Android消息机制源码分析
本篇主要介绍Android中的消息机制,即Looper、Handler是如何协同工作的;
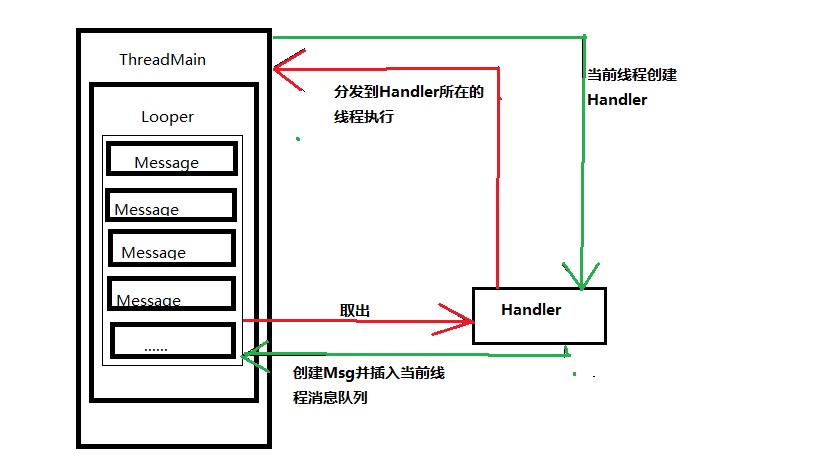
Looper:主要用来管理当前线程的消息队列,每个线程只能有一个Looper
Handler:用来将消息(Message)插入到当前线程的消息队列,并负责分发Looper中的消息,将消息发送到当前线程执行
具体关系图如下所示:
接下来我们来分析一下Looper和Handler的源码,了解一下其中的奥妙。
首先我们从一个程序运行的入口来分析,源码如下:
public static void main(String[] args){

    ......
    Looper.prepareMainLooper();//初始化Looper

    ......
    if(smainThreadHandler==null){
    smainThreadHandler=thread.getHandler();//初始化Handler
    }

    ......

    Looper.loop();//消息循环执行
    }
可以看出,程序在运行的时候首先会创建主线程的Looper对象,并通过Looper开启消息循环,不停的取出消息并执行;
接下来我们来研究Looper的源码;
第一部分:Looper源码
初始化
 1  private Looper(boolean quitAllowed) {
 2         mQueue = new MessageQueue(quitAllowed);
 3         mThread = Thread.currentThread();
 4     }
 5
 6     初始化Looper对象(该过程包含初始化消息队列和当前线程对象)
 7     private static void prepare(boolean quitAllowed) {
 8         if (sThreadLocal.get() != null) {
 9             throw new RuntimeException("Only one Looper may be created per thread");
10         }
11         sThreadLocal.set(new Looper(quitAllowed));
12     }
可以看出Looper在初始化的时候,首先会创建消息队列,并通过sThreadLocal保存在当前的线程本地变量中;
再来看一下程序入口Looper.prepareMainLooper();//初始化Looper究竟执行了什么
 1 //初始化主线程的Looper对象
 2      public static void prepareMainLooper() {
 3         prepare(false);
 4         synchronized (Looper.class) {
 5             if (sMainLooper != null) {
 6                 throw new IllegalStateException("The main Looper has already been prepared.");
 7             }
 8             sMainLooper = myLooper();
 9         }
10     }
这里有两行关键的代码:prepare(false);和sMainLooper = myLooper();
首先我们来看prepare(false);即上面讲到的 初始化Looper,可以看看上面的源码;
我们来看sMainLooper = myLooper();
1  public static @Nullable Looper myLooper() {
2         return sThreadLocal.get();
3     }
非常简单,我们上面提到在初始化Looper的时候会把Looper保存到当前线程的本地变量中,而这行代码的意思
就是从线程本地变量中将looper取出来
有了Looper,程序怎样才能运行?答案就在Looper.loop();//消息循环执行
 1  public static void loop() {
 2         final Looper me = myLooper();//得到当前线程的Looper对象
 3         if (me == null) {
 4             throw new RuntimeException("No Looper; Looper.prepare() wasn't called on this thread.");
 5         }
 6         final MessageQueue queue = me.mQueue;//得到消息队列
 7
 8       ......
 9
10       //执行消息循环
11         for (;;) {
12             Message msg = queue.next(); // might block
13             if (msg == null) {
14                 // No message indicates that the message queue is quitting.
15                 return;
16             }
17             msg.target.dispatchMessage(msg);
18             msg.recycleUnchecked();
19         }
20     }
显而易见,loop方法就是获取到当前线程的Looper对象,并从中循环取出消息,并执行,程序就这样跑起来了,具体是如何分发消息的
我们将会在下面讲解;
至此我们至少应该明白,当主线程在执行的时候
1、初始化Looper,并将Looper保存的线程变量中
2、Looper在初始化的时候会创建消息队列,并管理消息队列
2、取出Looper,并从消息队列中取出消息,循环执行
第二部分:Handler源码
我们知道Handler有两种使用方式,一种是使用handler.post(Runnable r);另一种是复写handleMessage(Message msg)方法
复写handleMessage(Message msg)方法非常简单,Handler在消息分发的时候,直接回调该方法即可,我们主要来研究第一种
1 public final boolean post(Runnable r)
2     {
3        return  sendMessageDelayed(getPostMessage(r), 0);
4     }
看到这个我们首先得明白getPostMessage(r)干了什么
1 private static Message getPostMessage(Runnable r) {
2         Message m = Message.obtain();
3         m.callback = r;
4         return m;
5     }
可以看出是将r封装成了一个消息,r作为该消息的回调;
我们接着看:
1 public final boolean sendMessageDelayed(Message msg, long delayMillis)
2     {
3         if (delayMillis < 0) {
4             delayMillis = 0;
5         }
6         return sendMessageAtTime(msg, SystemClock.uptimeMillis() + delayMillis);
7     }
关键代码在sendMessageAtTime(msg, SystemClock.uptimeMillis() + delayMillis);
继续:
 1 //得到消息队列
 2     public boolean sendMessageAtTime(Message msg, long uptimeMillis) {
 3         MessageQueue queue = mQueue;
 4         if (queue == null) {
 5             RuntimeException e = new RuntimeException(
 6                     this + " sendMessageAtTime() called with no mQueue");
 7             Log.w("Looper", e.getMessage(), e);
 8             return false;
 9         }
10         return enqueueMessage(queue, msg, uptimeMillis);
11     }
这段代码主要就是获取到消息队列,有了消息队列我们接着看enqueueMessage(queue, msg, uptimeMillis);
1 //handler和msg建立关联
2     private boolean enqueueMessage(MessageQueue queue, Message msg, long uptimeMillis) {
3         msg.target = this;
4         if (mAsynchronous) {
5             msg.setAsynchronous(true);
6         }
7         return queue.enqueueMessage(msg, uptimeMillis);
8     }
 msg.target = this;这里将msg的target指向自己,msg的target只能是this
最后相信大家也看出来了,接下来就是真正将msg插入到消息队列了
 1 //负责将msg插入到消息队列
 2      boolean enqueueMessage(Message msg, long when) {
 3         if (msg.target == null) {
 4             throw new IllegalArgumentException("Message must have a target.");
 5         }
 6
 7         synchronized (this) {
 8          //将msg插入到消息队列
 9
10             msg.when = when;
11             Message p = mMessages;
12             boolean needWake;
13             //消息队列为链式存储 如果消息队列中的消息为0,将msg插入到第一个,并新建一个message对象,将
14             //msg对象的next指向新建的message 等待新msg插入
15             if (p == null || when == 0 || when < p.when) {
16                 // New head, wake up the event queue if blocked.
17                 msg.next = p;
18                 mMessages = msg;
19                 needWake = mBlocked;
20             } else {
21             //将msg插入到队尾
22                 for (;;) {
23                     prev = p;
24                     p = p.next;
25                     if (p == null || when < p.when) {
26                         break;
27                     }
28                     if (needWake && p.isAsynchronous()) {
29                         needWake = false;
30                     }
31                 }
32                 msg.next = p; // invariant: p == prev.next
33                 prev.next = msg;
34             }
35
36
37         }
38         return true;
39     }
绕了这么大一圈,最后是通过Handler中的消息队列,将消息成功插入队尾,至此handler在post的时候实际上
是将r封装成了一个msg并插入到消息队列;
另外这里再提一下Handler第二种方式即复写handleMessage(Message msg)方法使用
handler.sendMessage(msg);
其源代码其实就是执行以上的
1 public final boolean sendMessageDelayed(Message msg, long delayMillis)
2     {
3         if (delayMillis < 0) {
4             delayMillis = 0;
5         }
6         return sendMessageAtTime(msg, SystemClock.uptimeMillis() + delayMillis);
7     }
重复以上一系列过程,将msg插入到消息队列;
最后我们来看一下比较关键的消息分发,消息分发是在以上Looper源码的loop方法中核心方法是:
msg.target.dispatchMessage(msg);
我们知道msg的target只能是Handler本身,因此消息分发是在Handler中来完成的;
 1   /**
 2      * Handle system messages here.
 3      */
 4     public void dispatchMessage(Message msg) {
 5         if (msg.callback != null) {
 6             handleCallback(msg);
 7         } else {
 8             if (mCallback != null) {
 9                 if (mCallback.handleMessage(msg)) {
10                     return;
11                 }
12             }
13             handleMessage(msg);
14         }
15     }
第一:if (msg.callback != null) 如果你传入了callback即Runnable,那么就执行 handleCallback(msg);
即调用r的run方法,通常是handler.post(r);类型的
第二:if (mCallback != null)这种方法允许让activity等来实现Handler.Callback接口,避免了自己编写handler重写handleMessage方法。
第三:handleMessage(msg); 即handler.sendMessage(msg);时调用的。直接回调Handler的handleMessage(msg);方法
至此,Android中的消息机制Looper和Handler相信你已经有了一定的了解;
最后我们再来总结一下
1、Looper 一个线程中只能有一个Looper,用来管理消息队列
2、Looper从消息队列里取出msg,交给Handler来进行分发,分发到Handler所在的线程执行,即创建Handler时的线程;
3、可以在当前线程中创建消息对象或直接复写Runnable的run方法,同过Handler将msg和r封装后的msg插入到消息队列

 浙公网安备 33010602011771号