
Spring注解驱动开发(二)-----生命周期、属性赋值
bean的生命周期
bean的生命周期:
bean创建---初始化----销毁的过程
容器管理bean的生命周期;
我们可以自定义初始化和销毁方法;容器在bean进行到当前生命周期的时候来调用我们自定义的初始化和销毁方法-----一共四种方式
构造(对象创建)
单实例:在容器启动的时候创建对象
多实例:在每次获取的时候创建对象

初始化:
对象创建完成,并赋值好,调用初始化方法。。。
销毁:
单实例:容器关闭的时候
多实例:容器不会管理这个bean;容器不会调用销毁方法;
指定方式
1、指定初始化和销毁方法;
通过@Bean指定init-method和destroy-method;
MainConfigOfLifeCycle:
package com.atguigu.config;

import org.springframework.context.ApplicationListener;
import org.springframework.context.annotation.Bean;
import org.springframework.context.annotation.ComponentScan;
import org.springframework.context.annotation.Configuration;
import org.springframework.context.annotation.Scope;

import com.atguigu.bean.Car;

@Configuration
public class MainConfigOfLifeCycle {

    @Bean(initMethod="init",destroyMethod="detory")
    public Car car(){
        return new Car();
    }

}
car:
package com.atguigu.bean;

import org.springframework.stereotype.Component;

@Component
public class Car {

    public Car(){
        System.out.println("car constructor...");
    }

    public void init(){
        System.out.println("car ... init...");
    }

    public void detory(){
        System.out.println("car ... detory...");
    }

}
2、通过让Bean实现InitializingBean(定义初始化逻辑),DisposableBean(定义销毁逻辑);
Cat:
package com.atguigu.bean;

import org.springframework.beans.factory.DisposableBean;
import org.springframework.beans.factory.InitializingBean;
import org.springframework.stereotype.Component;

@Component
public class Cat implements InitializingBean,DisposableBean {

    public Cat(){
        System.out.println("cat constructor...");
    }

    @Override
    public void destroy() throws Exception {
        // TODO Auto-generated method stub
        System.out.println("cat...destroy...");
    }

    @Override
    public void afterPropertiesSet() throws Exception {
        // TODO Auto-generated method stub
        System.out.println("cat...afterPropertiesSet...");
    }

}
MainConfigOfLifeCycle
@ComponentScan("com.atguigu.bean")
@Configuration
public class MainConfigOfLifeCycle {

}
3、可以使用JSR250;
@PostConstruct:在bean创建完成并且属性赋值完成;来执行初始化方法
@PreDestroy:在容器销毁bean之前通知我们进行清理工作
Dog:
package com.atguigu.bean;

import javax.annotation.PostConstruct;
import javax.annotation.PreDestroy;

import org.springframework.beans.BeansException;
import org.springframework.beans.factory.annotation.Autowired;
import org.springframework.context.ApplicationContext;
import org.springframework.context.ApplicationContextAware;
import org.springframework.stereotype.Component;

@Component
public class Dog {

    public Dog(){
        System.out.println("dog constructor...");
    }

    //对象创建并赋值之后调用
    @PostConstruct
    public void init(){
        System.out.println("Dog....@PostConstruct...");
    }

    //容器移除对象之前
    @PreDestroy
    public void detory(){
        System.out.println("Dog....@PreDestroy...");
    }
}
MainConfigOfLifeCycle:
@ComponentScan("com.atguigu.bean")
@Configuration
public class MainConfigOfLifeCycle {

}
4、BeanPostProcessor【interface】:bean的后置处理器;
在bean初始化前后进行一些处理工作;
postProcessBeforeInitialization:在初始化之前工作
postProcessAfterInitialization:在初始化之后工作
MyBeanPostProcessor:
package com.atguigu.bean;

import org.springframework.beans.BeansException;
import org.springframework.beans.factory.config.BeanPostProcessor;
import org.springframework.stereotype.Component;

/**
 * 后置处理器:初始化前后进行处理工作
 * 将后置处理器加入到容器中
 * @author lfy
 */
@Component
public class MyBeanPostProcessor implements BeanPostProcessor {

    @Override
    public Object postProcessBeforeInitialization(Object bean, String beanName) throws BeansException {
        // TODO Auto-generated method stub
        System.out.println("postProcessBeforeInitialization..."+beanName+"=>"+bean);
        return bean;
    }

    @Override
    public Object postProcessAfterInitialization(Object bean, String beanName) throws BeansException {
        // TODO Auto-generated method stub
        System.out.println("postProcessAfterInitialization..."+beanName+"=>"+bean);
        return bean;
    }

}
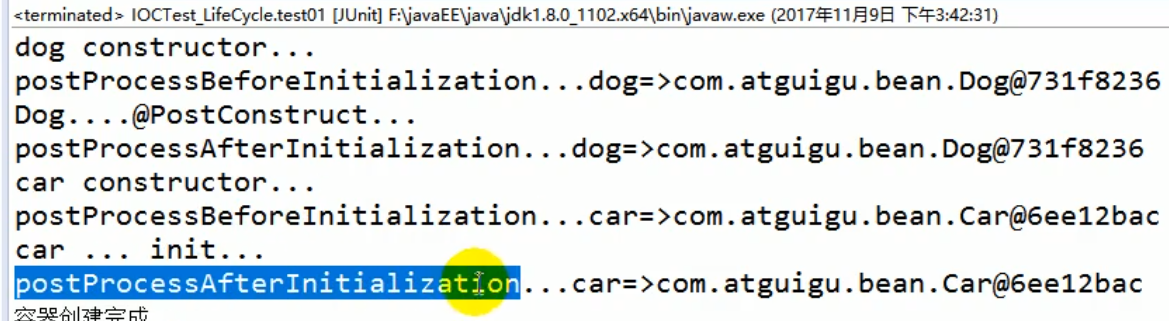
在bean初始化(调用构造方法)之后----->调用postProcessBeforeInitialization()----->@PostConstruct -----> InitializingBean -----> init-methodinit()方法----->postProcessAfterInitialization()
BeanPostProcessor原理
执行顺序
-----BeanPostProcessor.postProcessBeforeInitialization
|-----初始化:对象创建完成,并赋值好,调用初始化方法。。。
-----BeanPostProcessor.postProcessAfterInitialization
执行流程(BeanPostProcessor原理)
1、populateBean(beanName, mbd, instanceWrapper);-----给bean进行属性赋值
2、initializeBean
{
applyBeanPostProcessorsBeforeInitialization(wrappedBean, beanName);
invokeInitMethods(beanName, wrappedBean, mbd);-----执行自定义初始化
applyBeanPostProcessorsAfterInitialization(wrappedBean, beanName);
}
注:遍历得到容器中所有的BeanPostProcessor;挨个执行beforeInitialization,
一但返回null,跳出for循环,不会执行后面的BeanPostProcessor.postProcessorsBeforeInitialization
spring底层对BeanPostProcessor的使用
1、ApplicationContextAware-----实现ApplicationContextAware接口后,就可以将ApplicationContext对象通过setApplicationContext()注入。
package com.atguigu.bean;

import org.springframework.beans.BeansException;
import org.springframework.context.ApplicationContext;
import org.springframework.context.ApplicationContextAware;
import org.springframework.stereotype.Component;

@Component
public class Dog implements ApplicationContextAware {

    private ApplicationContext applicationContext;

    @Override
    public void setApplicationContext(ApplicationContext applicationContext) throws BeansException {
        this.applicationContext = applicationContext;
    }
}
属性赋值
@Value赋值
1、MainConfigOfPropertyValues
package com.atguigu.config;

import org.springframework.context.annotation.Bean;
import org.springframework.context.annotation.Configuration;
import org.springframework.context.annotation.PropertySource;

import com.atguigu.bean.Person;

//使用@PropertySource读取外部配置文件中的k/v保存到运行的环境变量中;加载完外部的配置文件以后使用${}取出配置文件的值
@PropertySource(value={"classpath:/person.properties"})
@Configuration
public class MainConfigOfPropertyValues {

    @Bean
    public Person person(){
        return new Person();
    }

}
2、Person
package com.atguigu.bean;

import org.springframework.beans.factory.annotation.Value;

public class Person {

    //使用@Value赋值;
    //1、基本数值
    //2、可以写SpEL; #{}
    //3、可以写${};取出配置文件【properties】中的值(在运行环境变量里面的值)

    @Value("张三")
    private String name;
    @Value("#{20-2}")
    private Integer age;

    @Value("${person.nickName}")
    private String nickName;

    public String getNickName() {
        return nickName;
    }
    public void setNickName(String nickName) {
        this.nickName = nickName;
    }
    public String getName() {
        return name;
    }
    public void setName(String name) {
        this.name = name;
    }
    public Integer getAge() {
        return age;
    }
    public void setAge(Integer age) {
        this.age = age;
    }

    public Person(String name, Integer age) {
        super();
        this.name = name;
        this.age = age;
    }
    public Person() {
        super();
    }
    @Override
    public String toString() {
        return "Person [name=" + name + ", age=" + age + ", nickName=" + nickName + "]";
    }
}
3、person.properties
person.nickName=李四
注:对于在classpath路径下的配置文件,也可以通过如下方式获取属性。配置文件的值都会加载到environment环境变量中,可以直接从环境变量中取值。


posted on 2019-06-28 22:50 阿里-马云的学习笔记 阅读(213) 评论(0) 收藏 举报

 浙公网安备 33010602011771号