
NIO原理解析
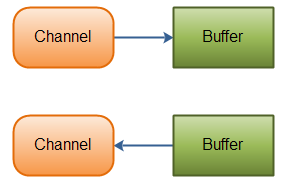
NIO中主要包括几大组件,selector、channel、buffer。selector后面介绍,channel则类似于BIO中的流,但是流的读取是单向的,例如只能读,或只能写,但是channel则是双向的。数据可以从channel读到buffer中,也可以从buffer中写入到channel中。
针对于客户端请求服务端的场景,NIO实现的结构图如下:
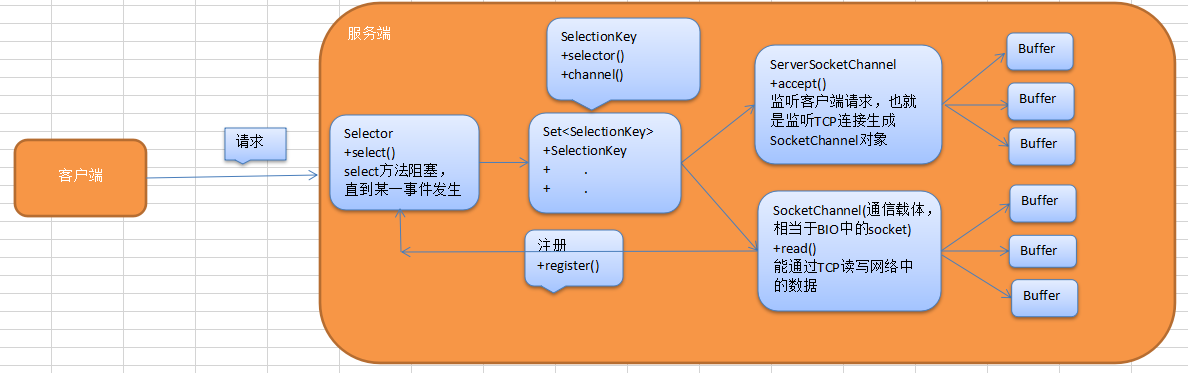
禁止盗图,画了好久。。。
一、channel
channel主要包括以下几类
- FileChannel-------------------------->从文件中读写数据
- DatagramChannel------------------>通过UDP读写网络中的数据
- SocketChannel----------------------->通过TCP读写网络中的数据
- ServerSocketChannel--------------->监听新进来的TCP连接,并生成一个SocketChannel对象
基本示例:
//创建能访问任意位置的file文件
RandomAccessFile aFile = new RandomAccessFile("data/nio-data.txt", "rw");
//获取fileChannel对象
FileChannel inChannel = aFile.getChannel();
//分配48字节大小的byteBuffer
ByteBuffer buf = ByteBuffer.allocate(48);
//读取channel中的数据到buffer中
int bytesRead = inChannel.read(buf);

while (bytesRead != -1) {
    System.out.println("Read " + bytesRead);
    //将buffer从写模式切换到读模式
    buf.flip();
    while(buf.hasRemaining()){
        System.out.print((char) buf.get());
    }
  //清空整个缓冲区
    buf.clear();
  //缓冲区已经全部读完,返回-1退出循环
    bytesRead = inChannel.read(buf);
}

aFile.close();
另外channel不仅可以读取数据到buffer中,当存在多个channel并且其中有一个channel为fileChannel时,channel之间可以互相传输数据
transferFrom() :可以将数据从源通道传输到FileChannel中
RandomAccessFile fromFile = new RandomAccessFile("fromFile.txt", "rw");
FileChannel fromChannel = fromFile.getChannel();
RandomAccessFile toFile = new RandomAccessFile("toFile.txt", "rw");
FileChannel toChannel = toFile.getChannel();
long position = 0;
long count = fromChannel.size();
toChannel.transferFrom(position, count, fromChannel);
transferTo()
RandomAccessFile fromFile = new RandomAccessFile("fromFile.txt", "rw");
FileChannel fromChannel = fromFile.getChannel();
RandomAccessFile toFile = new RandomAccessFile("toFile.txt", "rw");
FileChannel toChannel = toFile.getChannel();
long position = 0;
long count = fromChannel.size();
fromChannel.transferTo(position, count, toChannel);
二、Buffer
1、buffer主要包括如下几类:
- ByteBuffer
- CharBuffer
- DoubleBuffer
- FloatBuffer
- IntBuffer
- LongBuffer
- ShortBuffer
2、使用buffer的一般步骤:
- 写入数据到Buffer
- 调用
flip()方法 - 从Buffer中读取数据
- 调用
clear()方法或者compact()方法------------>clear()方法会清空整个缓冲区,compact()只会清除已经读过的数据
3、buffer中的概念
为了理解Buffer的工作原理,需要熟悉它的三个属性:
- capacity
- position
- limit
position和limit的含义取决于Buffer处在读模式还是写模式。不管Buffer处在什么模式,capacity的含义总是一样的。
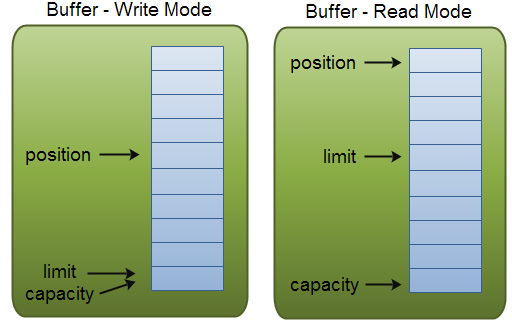
capacity
作为一个内存块,Buffer有一个固定的大小值,也叫“capacity”.你只能往里写capacity个byte、long,char等类型。一旦Buffer满了,需要将其清空(通过读数据或者清除数据)才能继续写数据往里写数据。
position
当你写数据到Buffer中时,position表示当前的位置。初始的position值为0.当一个byte、long等数据写到Buffer后, position会向前移动到下一个可插入数据的Buffer单元。position最大可为capacity – 1.
当读取数据时,也是从某个特定位置读。当将Buffer从写模式切换到读模式,position会被重置为0. 当从Buffer的position处读取数据时,position向前移动到下一个可读的位置。
limit
在写模式下,Buffer的limit表示你最多能往Buffer里写多少数据。 写模式下,limit等于Buffer的capacity。
当切换Buffer到读模式时, limit表示你最多能读到多少数据。因此,当切换Buffer到读模式时,limit会被设置成写模式下的position值。换句话说,你能读到之前写入的所有数据(limit被设置成已写数据的数量,这个值在写模式下就是position)
4、常用方法
a、分配大小
//分配48字节大小的byteBuffer
ByteBuffer buf = ByteBuffer.allocate(48);
//分配2014字符大小的charBuffer
CharBuffer buf = CharBuffer.allocate(1024);
b、写数据到buffer中
包括两种方式:一是从channel中读数据到buffer中,另外一种就是调用buffer的put()方法
//一、channel读取数据到buffer
int bytesRead = inChannel.read(buf);
//二、调用channel的put()方法
buf.put(127);
c、读取数据
同样包括两种方式:一是写入数据到channel中,另外一种就是调用buffer的get()方法
//一、将数据写入到channel中
int bytesWritten = inChannel.write(buf);
//二、调用buffer的get()方法读取数据
byte aByte = buf.get();
d、读写模式切换
buffer.flip()
e、清除buffer
一旦读完Buffer中的数据,需要让Buffer准备好再次被写入。可以通过clear()或compact()方法来完成。
如果调用的是clear()方法,position将被设回0,limit被设置成 capacity的值。换句话说,Buffer 被清空了。Buffer中的数据并未清除,只是这些标记告诉我们可以从哪里开始往Buffer里写数据。
如果Buffer中有一些未读的数据,调用clear()方法,数据将“被遗忘”,意味着不再有任何标记会告诉你哪些数据被读过,哪些还没有。
如果Buffer中仍有未读的数据,且后续还需要这些数据,但是此时想要先先写些数据,那么使用compact()方法。
compact()方法将所有未读的数据拷贝到Buffer起始处。然后将position设到最后一个未读元素正后面。limit属性依然像clear()方法一样,设置成capacity。现在Buffer准备好写数据了,但是不会覆盖未读的数据。
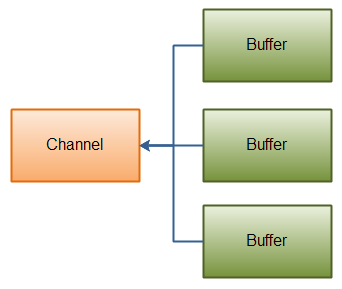
另外NIO支持scatter/gather,说白了,就是一个channel可以读取数据到多个buffer中去,或者多个buffer可以写入到channel中。当第一个buffer写满之后,会紧接着读取到第二个buffer中去,如下图:
channel-->buffer
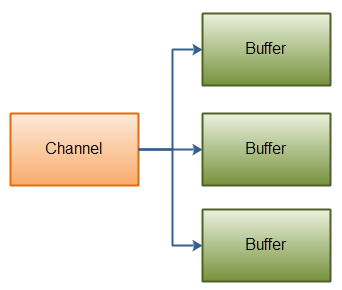
ByteBuffer header = ByteBuffer.allocate(128);
ByteBuffer body   = ByteBuffer.allocate(1024);
ByteBuffer[] bufferArray = { header, body };
channel.read(bufferArray);
buffer-->channel
ByteBuffer header = ByteBuffer.allocate(128);
ByteBuffer body   = ByteBuffer.allocate(1024);
ByteBuffer[] bufferArray = { header, body };
channel.write(bufferArray);
三、selector
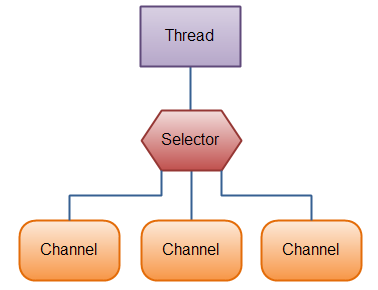
为啥使用selector?在传统的BIO当中,监听每个客户端的请求都需要一个线程去处理,线程数的上升会涉及到大量的上下文切换的操作,这也是非常浪费性能的。NIO中基于事件驱动的理念,使用selector监听各种事件的发生,可以实现只开启一个线程
就可以管理所有的请求,当然实际情况合理的增加线程数可以大大提高性能。
注意:与Selector一起使用时,Channel必须处于非阻塞模式下。这意味着不能将FileChannel与Selector一起使用,因为FileChannel不能切换到非阻塞模式。
1、注册channel到selector中
channel.configureBlocking(false);
SelectionKey key = channel.register(selector,Selectionkey.OP_READ);
selectionKey用来描述事件,包括事件类型,以及对应的selector与channel等等。
第二个入参为事件类型,主要包括四种:
- Connect
- Accept
- Read
- Write
分别用常量表示为:
- SelectionKey.OP_CONNECT
- SelectionKey.OP_ACCEPT
- SelectionKey.OP_READ
- SelectionKey.OP_WRITE
当然selector监听channel时,可以对多个事件感兴趣,写法如下:
int interestSet = SelectionKey.OP_READ | SelectionKey.OP_WRITE;
可能对selector、channel、事件三者的关系有点乱,用故事来总结一下:selector是父母,channel是孩子,父母监督孩子学习,孩子有很多同学,有些同学学习好,有些同学学习差,父母欢迎学习好的学生来家里玩,排斥成绩差的。那么特定的事件就可以理解
成那些成绩差的同学来家中,父母监听到了,开始行动,将他们赶走。
2、selectionKey
当channel注册到selector中时,会返回一个selectionKey对象,可以理解成事件的描述或是对注册的描述,主要包括这几个部分:
a、interest集合----------------------->感兴趣的事件集合。
int interestSet = selectionKey.interestOps();
//判断事件是否在集合中
boolean isInterestedInConnect = interestSet & SelectionKey.OP_CONNECT;
b、ready集合-------------------------->通道已经准备就绪的操作的集合
int readySet = selectionKey.readyOps();
//事件是否在已准备就绪的集合中,selectionKey提供了如下方法
selectionKey.isAcceptable();
selectionKey.isConnectable();
selectionKey.isReadable();
selectionKey.isWritable();
c、Channel
Channel channel = selectionKey.channel();
d、Selector
Selector selector = selectionKey.selector();
e、附加的对象(可选)
用户也可以将buffer等其他对象加到selectionKey上,方便后续操作
添加对象:
//添加对象到selectionKey有两种方式
selectionKey.attach(theObject);
SelectionKey key = channel.register(selector, SelectionKey.OP_READ, theObject);
//获取此附加对象
Object attachedObj = selectionKey.attachment();
3、select()
当把channel注册到selector中去之后,可以通过select()方法来监听对应channel的特定事件。主要有三种select方法:
- int select()-------------------------------------->阻塞到被监听的channel至少有一个事件发生。
- int select(long timeout)---------------------->在timeout(ms)的时间内阻塞,直到被监听的channel至少有一个事件发生。
- int selectNow()--------------------------------->非阻塞,不管有没有事件发生,都立马返回。
4、selectedKeys()
Set selectedKeys = selector.selectedKeys();
完整的示例:
Selector selector = Selector.open();
channel.configureBlocking(false);
SelectionKey key = channel.register(selector, SelectionKey.OP_READ);
while(true) {
    int readyChannels = selector.select();
    if(readyChannels == 0) continue;
    Set selectedKeys = selector.selectedKeys();
    Iterator keyIterator = selectedKeys.iterator();
    while(keyIterator.hasNext()) {
        SelectionKey key = keyIterator.next();
        if(key.isAcceptable()) {
            // a connection was accepted by a ServerSocketChannel.
        } else if (key.isConnectable()) {
            // a connection was established with a remote server.
        } else if (key.isReadable()) {
            // a channel is ready for reading
        } else if (key.isWritable()) {
            // a channel is ready for writing
    }
    keyIterator.remove();
  }
}
四、DatagramChannel
前面的示例都是基于TCP连接,现在讲述一下UDP的示例.
DatagramChannel是一个能收发UDP包的通道。因为UDP是无连接的网络协议,所以不能像其它通道那样读取和写入。它发送和接收的是数据包。
1、打开DatagramChannel
DatagramChannel channel = DatagramChannel.open();
channel.socket().bind(new InetSocketAddress(9999));
2、接收数据
ByteBuffer buf = ByteBuffer.allocate(48);
buf.clear();
channel.receive(buf);
3、发送数据
String newData = "New String to write to file..." + System.currentTimeMillis();
ByteBuffer buf = ByteBuffer.allocate(48);
buf.clear();
buf.put(newData.getBytes());
buf.flip();
int bytesSent = channel.send(buf, new InetSocketAddress("jenkov.com", 80));

posted on 2019-04-08 22:28 阿里-马云的学习笔记 阅读(902) 评论(0) 收藏 举报

 浙公网安备 33010602011771号