
nginx 的访问控制
ngx_http_access_module模块
可实现基于ip的访问控制功能
allow address | CIDR | unix: | all;
deny address | CIDR | unix: | all;
http, server, location, limit_except
自上而下检查,一旦匹配,将生效,条件严格的置前
示例:
location /about {
root /data/nginx/html/pc;
index index.html;
deny 192.168.1.1;
allow 192.168.1.0/24;
allow 10.1.1.0/16;
allow 2001:0db8::/32;
deny all; #先允许小部分,再拒绝大部分
}
ngx_http_auth_basic_module模块
实现基于用户的访问控制,使用basic机制进行用户认证
auth_basic string | off;
auth_basic_user_file file;
  location /admin/ {
    auth_basic "Admin Area";
    auth_basic_user_file /etc/nginx/.ngxpasswd;
}
auth_basic "Admin Area";弹出对话框提示
auth_basic_user_file /etc/nginx/.ngxpasswd; 密码存放的位置
用户口令文件:
1、明文文本:格式name:password:comment
2、加密文本:由htpasswd命令实现
httpd-tools所提供
实验:在nginx中启用basic验证,生成加密页面
1、生成htpasswd加密的密码
htpasswd -c /etc/nginx/conf.d/.nginx_passwd alex
New password:
Re-type new password:
Adding password for user alex
继续生成bob用户,密码centos
htpasswd -b /etc/nginx/conf.d/.nginx_passwd bob centos
Adding password for user bob
第一次创建加-c 第二次就不需要了,在加-c就覆盖了之前的创建的了,-b从命令行使用密码,而不是提示它。
2、修改自定义的nginx配置文件
vim /etc/nginx/conf.d/test.conf
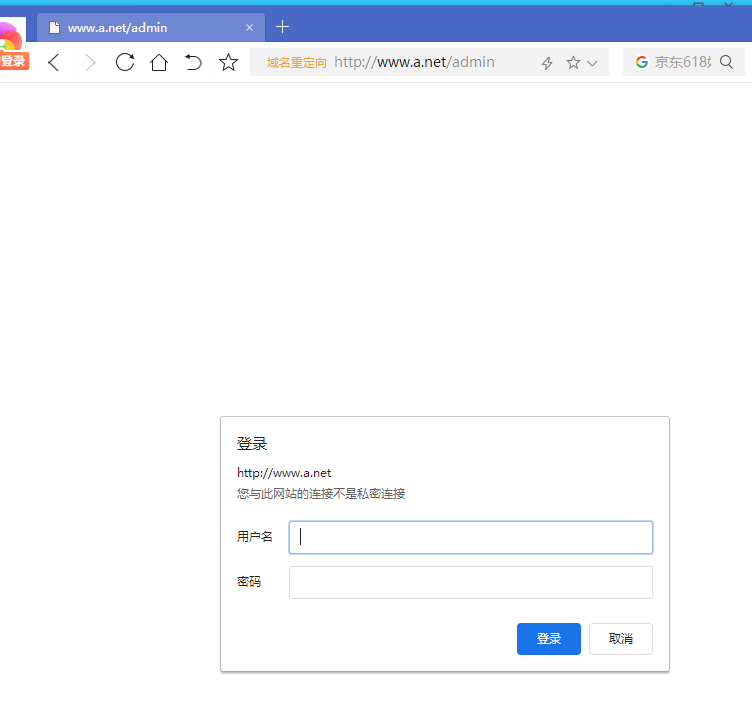
server {
        server_name www.a.net;
        root /data/site1;
        location / {
        }
        location /admin {
                root /data/;
                auth_basic "Admin Page";
                auth_basic_user_file /etc/nginx/conf.d/.nginx_passwd;
        }
}
3、新建测试页面
mkdir /data/admin
echo /data/admin/index.html > /data/admin/index.html
4、测试访问
5、配合访问控制,限制指定IP才能访问
server {
        server_name www.a.net;
        root /data/site1;
        location / {
        }
        location /admin {
                root /data/;
                allow 192.168.1.4;
                deny all;
                auth_basic "Admin Page";
                auth_basic_user_file /etc/nginx/conf.d/.nginx_passwd;
        }
}
-------------------------------------------------------------------------------------------------------------------------
------------------------------------------------------- 博客均为个人笔记,无所追求,仅供参考~~~ QQ--2382990774

 浙公网安备 33010602011771号