Ubuntu 20.1 (linux) 下软件安装教程(基本上都是使用命令行安装)
Ubuntu 20.1 (Linux) 下软件安装教程(基本上都是使用命令行安装)
一、Node
1. 安装教程
#  第二步,添加源后安装 需要什么版本直接替换后面的数字即可,如果需要21,直接将20替换为21就可以了
curl -sL https://deb.nodesource.com/setup_20.x | sudo -E bash -
# 开始进行安装
sudo apt install -y nodejs
# https://learnku.com/articles/42581


# 直接 apt 安装
apt install nodejs
2. 包管理
- n
npm install -g n # 安装n

   # https://segmentfault.com/a/1190000016956077
   # https://juejin.cn/post/7065534944101007391
3. 镜像源修改
将其修改为淘宝的镜像源
# 永久更换
npm config set registry https://registry.npmmirror.com

# 查看镜像源
npm config get registry
除了更换 npm 默认镜像源的方式,还可以使用 cnpm 来代替 npm,间接实现提高下载速度。cnpm 的安装和使用方式如下:
# 安装
npm install -g cnpm --registry=https://registry.npmmirror.com
#查询版本
cpnm -v
用 cnpm 替代 npm
#使用cpnm命令替代npm命令
cnpm install
二、 java 安装
1.jdk
https://developer.aliyun.com/article/704959
2.maven 配置环境变量
https://blog.csdn.net/idomyway/article/details/81974677
三、git 使用教程
1. 安装
    sudo apt install git-all
#https://git-scm.com/book/zh/v2/%E8%B5%B7%E6%AD%A5-%E5%AE%89%E8%A3%85-Git
2. 使用方法
- 生成密钥
ssh-keygen -t ed25519 -C "46887064+alex-oos@users.noreply.github.com"
#(https://docs.github.com/zh/authentication/connecting-to-github-with-ssh/generating-a-new-ssh-key-and-adding-it-to-the-ssh-agent)
3. 添加提交默认配置
安装完成之后第一次配置:
git config --global user.email  "46887064+alex-oos@users.noreply.github.com"  # 设置全局用户邮箱(为了防止隐私泄露,使用隐私邮箱)
git config --global user.name  "Alex"      # 设置全局用户名
git config --global init.defaultBranch main  # 设置默认分支为main分支
4.git 为每个项目单独设置用户名和邮箱
(如果使用令牌登录,那么就不在需要设置 git 提交信息了)
方法一 :
github 配置
git config --local user.name "Alex"
git config --local user.email "46887064+alex-oos@users.noreply.github.com"
#github 邮箱必须是这个,不然github显示用户名会有问题会影响统计,如果是码云也是一样的,需要邮箱与你绑定的一致

# 查看配置是否设置成功
git config --local -l
gitee 码云配置
git config --local user.name "快乐小王子"
git config --local user.email 4859564+alex-oos@user.noreply.gitee.com
#gitee 邮箱必须是这个,不然github显示用户名会有问题会影响统计,如果是码云也是一样的,需要邮箱与你绑定的一致

# 查看配置
git config --local -l
方法二:
直接在.git/config 配置文件中设置
[user]
    name = xxx
    email = xxx
5.Git 配置不同项目的不同账号
https://blog.csdn.net/u011291072/article/details/110958093
6. 关于隐私邮箱:
- github 是:46887064+alex-oos@users.noreply.github.com
- gitee 是 4859564+JadePanda@user.noreply.gitee.com
设置的时候需要注意一下
四、utools 安装方法
https://mdnice.com/writing/8eb9383bf8404cbeaf0dd140933b54cc
五、Python jdk 安装
https://linux.cn/article-15230-1.html
注意:
这里安装 python 最新版本的时候不要卸载原来的 python3.8,否则会造成 ubuntu-desktop 崩溃,从而不能进去 ubuntu 图形界面,解决方法如下:
https://blog.csdn.net/chehec2010/article/details/122632524
六、idea (linux 版本)输入法无法跟随光标解决
https://blog.csdn.net/nan123456789/article/details/129579124
七、postman 如何设置图标
https://blog.csdn.net/cx_sam/article/details/126223231
八、安装微信
一、docker-wechat (目前可用,微信版本 3.3.0)
-
具体步骤
- docker 拉取镜像
docker pull zixia/wechat- 启动服务,建议新建一个shell脚本,命名为wechat.sh,
docker run \ --name wechat \ --rm \ -i \ \ -v "$HOME/wechat/WeChatFiles/":'/home/user/WeChatFiles/' \ -v "$HOME/wechat/ApplcationData":'/home/user/.wine/drive_c/users/user/ApplicationData/' \ -v /tmp/.X11-unix:/tmp/.X11-unix \ \ -e DISPLAY \ \ -e XMODIFIERS=@im=fcitx \ -e GTK_IM_MODULE=fcitx \ -e QT_IM_MODULE=fcitx \ -e GID="$(id -g)" \ -e UID="$(id -u)" \ \ --ipc=host \ --privileged \ \ zixia/wechat- 给wechat目录权限最大权限,方便保存图片,如果不能保存重新执行一下即可
sudo chmod -R 777 ~/wechat/- 修改微信文件保存目录为 z:/home/user/WeChatFiles 今后在这个目录下就可以查看你下载的文件了
文件目录权限,十分重要,遇见问题直接给目录最大权限即可
二、docker-wechat (目前最火,版本最新,目前最新是 3.9.0) 目前存在的问题是,无法使用搜狗输入法
- 仓库地址:https://github.com/top-bettercode/docker-wechat
- 具体命令
- 拉取镜像
docker pull bestwu/wechat- 启动服务
docker run -d --name wechat --device /dev/snd --ipc="host"\ -v /tmp/.X11-unix:/tmp/.X11-unix \ -v $HOME/WeChatFiles:/WeChatFiles \ -e DISPLAY=$DISPLAY \ -e XMODIFIERS=@im=fcitx \ -e GTK_IM_MODULE=fcitx \ -e GTK_IM_MODULE=fcitx \ -e AUDIO_GID=`getent group audio | cut -d: -f3` \ -e GID=`id -g` \ -e UID=`id -u` \ bestwu/wechat - 教程地址:https://ugirc.blog.csdn.net/article/details/109487664
三、直接安装微信即可(目前我正在使用这种方式)
相关教程:https://blog.csdn.net/Jason_Yansir/article/details/138117714
四、安装麒麟版本的微信
- 点击链接:https://archive.ubuntukylin.com/ubuntukylin/pool/partner/weixin_2.1.4_amd64.deb 下载
- sudo dpkg -i +软件安装名的名称 (安装软件)
参考教程:https://www.luxiyue.com/personal/ubuntu安装微信的两种方法/
九、docker 安装
1. 安装
参考教程:https://docs.docker.com/engine/install/ubuntu
使用下面这种方式也是可以的
apt install docker.io
十、截图工具
https://blog.csdn.net/u013171226/article/details/107717009
下载完毕之后,设置一下快捷键,设置操作步骤如下,
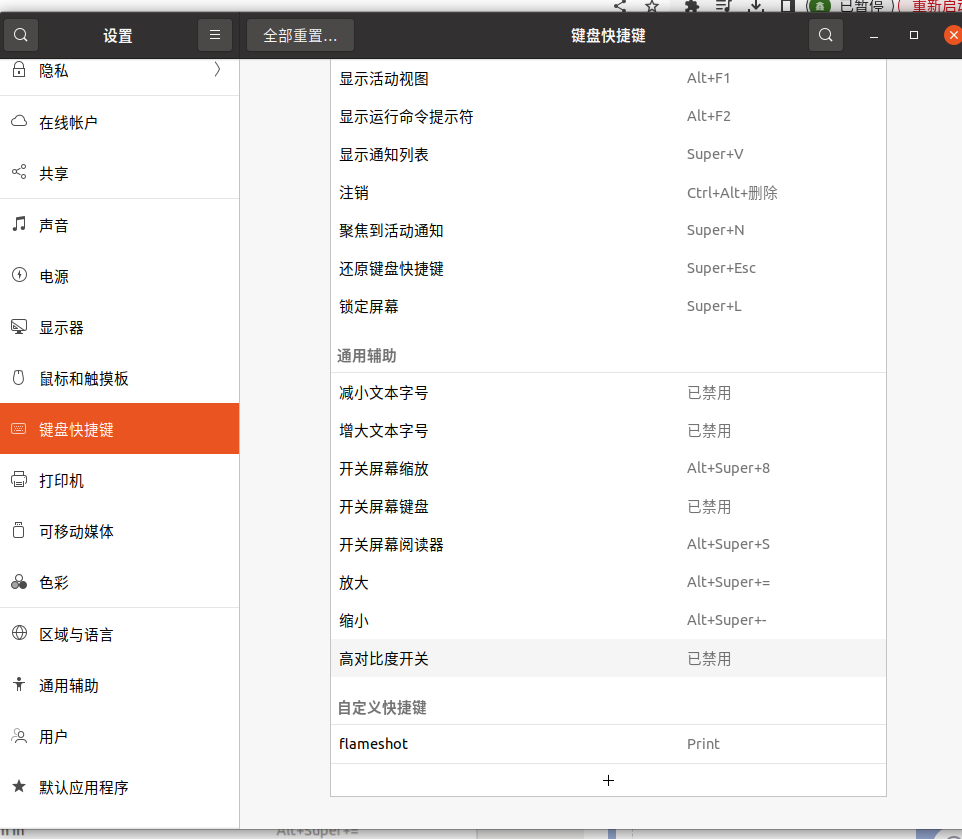
命令为:
/usr/bin/flameshot gui
十一、navicat
官网下载
如何设置图标:
图标地址为:https://www.navicat.com.cn/images/02.Product_00_AllProducts_Premium_large.png
gedit navicat.desktop
[Desktop Entry]
Type=Application
Name=Navicat
GenericName=Database Development Tool
Icon = 替换为你的navicat图标路径
Exec = 替换为你的navicat路径
Categories=Development;
Keywords=database;sql;
或者
[Desktop Entry]
Encoding=UTF-8
Name=Navicat Premium
Exec=/opt/navicat/navicat16-premium-cs.AppImage
Icon=/opt/navicat/navicat-icon.png
Categories=Application;Development
StartupWMClass=AppRun
Type=Application
移动到系统的应用文件夹下(最重要!!!)
sudo mv navicat.desktop /usr/share/applications
参考笔记: https://blog.csdn.net/qq_26235879/article/details/113087085
https://www.cnblogs.com/studywithallofyou/p/17294982.html
navicat 破解脚本
地址如下:
https://mrbe9bscgt.feishu.cn/drive/folder/B4YrfruWvlv71TdsQ7DcKEkunKo?from=from_copylink
linux 版本下破解脚本:
新建 navicat-reload.sh 脚本,里面输入下面即可
#!/bin/bash
set -x

BASE_CONFIG_PATH=$HOME/.config
NAVICAT_PREMIUM_PATH=$BASE_CONFIG_PATH/navicat/Premium
NAVICAT_SETTING_PATH=$BASE_CONFIG_PATH/navicat/Setting
DCONF_PATH=$BASE_CONFIG_PATH/dconf

# 删除Premium和Setting
if [ -d $BASE_CONFIG_PATH ];then
        if [ -d $NAVICAT_PREMIUM_PATH ];then
            rm -rf $NAVICAT_PREMIUM_PATH
        fi
        if [ -d $NAVICAT_SETTING_PATH ];then
            rm -rf $NAVICAT_SETTING_PATH
        fi
    else
        echo $BASE_CONFIG_PATH '目录不存在'
fi

# 删除dconf
if [ -d $DCONF_PATH ];then
        rm -rf $DCONF_PATH
    else
        echo $DCONF_PATH '目录不存在'
fi
window 下操作
新建一个 navicat-reload.bat
windows 下需要注意一下 注册表中 Registration 16XCS 是根据版本走的,如果是17版本,或者更新的,应该修改一下版本,否则删除无效
@echo off
set dn=Info
set dn2=ShellFolder
set rp=HKEY_CURRENT_USER\Software\Classes\CLSID
:: reg delete HKEY_CURRENT_USER\Software\PremiumSoft\NavicatPremium\Registration14XCS /f %针对<strong><font color="#FF0000">navicat</font></strong>15%
reg delete HKEY_CURRENT_USER\Software\PremiumSoft\NavicatPremium\Registration16XCS /f
reg delete HKEY_CURRENT_USER\Software\PremiumSoft\NavicatPremium\Update /f

echo finding.....
for /f "tokens=*" %%a in ('reg query "%rp%"') do (
 echo %%a
for /f "tokens=*" %%l in ('reg query "%%a" /f "%dn%" /s /e ^|findstr /i "%dn%"') do (
 echo deleteing: %%a
 reg delete %%a /f
)
for /f "tokens=*" %%l in ('reg query "%%a" /f "%dn2%" /s /e ^|findstr /i "%dn2%"') do (
 echo deleteing: %%a
 reg delete %%a /f
)
)
echo re trial done!
pause
exit
十一、安装搜狗输入法
https://zhuanlan.zhihu.com/p/676748003
乌班图 搜狗输入法鼠标一直闪烁不能使用
https://dhexx.cn/news/show-5310007.html?action=onClick
配置环境变量:
配置在 ~/.profile 目录下,这个不管是桌面启动还是服务启动都会加载
export QT_QPA_PLATFORM=xcb
https://blog.csdn.net/weixin_36296538/article/details/83044639
本文来自博客园,作者:快乐小王子帅气哥哥,转载请注明原文链接:https://www.cnblogs.com/alex-oos/p/17779345.html

 浙公网安备 33010602011771号