Blazor WebAssembly+IdentityServer4
本例子使用的是Blazor WebAssembly+IdentityServer4+Sql Server
IdentityServer4的基础知识可以访问官方网站学习:https://identityserver4.readthedocs.io/en/latest/
一.创建IdentityServer4
1.创建名为WebAppSample的空白解决方案。
2.通过命令安装IdentityServer4的模板,VS->工具->命令行->开发者命令提示,执行:dotnet new -i IdentityServer4.Templates,安装成功提示如下:
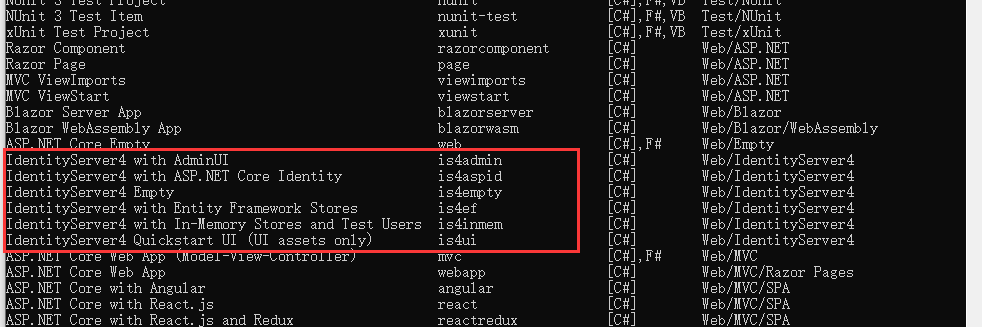
3.创建IdentityServer4项目,我这里使用的是IdentityServer4+Asp.Net Core Identity,以Asp.Net Core Identity作为IdentityServer4的用户支持。
- 在“开发者命令提示”中执行:dotnet new is4aspid -n WebApp.IdentityServer,其中WebApp.IdentityServer是项目名称。
- 以下提示选否。因为is4aspid模板默认使用的数据库不是Sql Server数据库,后面要修改。

- 项目已创建在解决方案的根目录,添加项目至解决方案。
4.把项目WebApp.IdentityServer的目标框架改为:.NET 5.0。
5.设置数据库上下文,这里我们使用的是SQL Server数据库。
- 给项目添加Microsoft.EntityFrameworkCore.SqlServer包。
- 打开appsettings.json文件设置连接字符串。
{
  "ConnectionStrings": {
    "DefaultConnection": "Server=127.0.0.1;Initial Catalog=WebAppIdentityServerDB;Persist Security Info=False;User id=sa;Password=sa123456;MultipleActiveResultSets=true"
  }
}
- 创建全局变量DbConnectionString用于保存数据库连接字符串。
public class Datas
    {
        public static string DbConnectionString { get; set; } = "Server=127.0.0.1;" +
            "Initial Catalog=WebAppIdentityServerDB;" +
            "Persist Security Info=False;" +
            "User id=sa;" +
            "Password=sa123456;" +
            "MultipleActiveResultSets=true";
    }
- 在Startup类的构造函数中给全局变量DbConnectionString赋值。
public Startup(IConfiguration configuration)
        {
            Configuration = configuration;

            Datas.DbConnectionString = Configuration.GetConnectionString("DefaultConnection");
        }
- 在Startup类的ConfigureServices方法中注册数据库上下文。
services.AddDbContext<ApplicationDbContext>(options =>
                options.UseSqlServer(Configuration.GetConnectionString("DefaultConnection")));
6.配置将客户端(Client)、资源(IdentityResource、ApiResource、ApiScope)、操作数据(codes、tokens、consents)保存至数据库。
- 添加IdentityServer4.EntityFramework包。
- 在Startup类的ConfigureServices方法添加以下代码。


            var builder = services.AddIdentityServer(options =>
            {
                options.Events.RaiseErrorEvents = true;
                options.Events.RaiseInformationEvents = true;
                options.Events.RaiseFailureEvents = true;
                options.Events.RaiseSuccessEvents = true;

                // see https://identityserver4.readthedocs.io/en/latest/topics/resources.html
                options.EmitStaticAudienceClaim = true;
            });

            #region 保存在内存中的身份资源、API资源、客户端资源
            //identityServerBuilder.AddInMemoryIdentityResources(Config.IdentityResources);
            //identityServerBuilder.AddInMemoryApiScopes(Config.ApiScopes);
            //identityServerBuilder.AddInMemoryClients(Config.Clients);
            #endregion

            #region 保存在数据库中的身份资源、API资源、客户端资源
            //配置数据(客户端、资源)至数据库:ConfigurationDbContext
            //typeof(SeedData).Assembly.FullName
            builder.AddConfigurationStore(options =>
            {
                options.ConfigureDbContext = builder =>
                {
                    builder.UseSqlServer(Datas.DbConnectionString, b => b.MigrationsAssembly("WebApp.IdentityServer"));
                };
            });

            //配置操作数据(codes、tokens、consents)至数据库:PersistedGrantDbContext
            builder.AddOperationalStore(options =>
            {
                options.ConfigureDbContext = builder =>
                {
                    builder.UseSqlServer(Datas.DbConnectionString, b => b.MigrationsAssembly("WebApp.IdentityServer"));
                };
                //启用自动令牌清理,这是可选的;清理时间默认是3600秒。
                options.EnableTokenCleanup = true;
                options.TokenCleanupInterval = 3600;
            });
7.配置IdentityServer使用Asp.Net Core Identity的用户作为用户支持。
- 在Startup类的ConfigureServices方法添加以下代码。
builder.AddAspNetIdentity<ApplicationUser>();
8.注册自定义用户声明工厂,用于添加自定义用户声明到用户标识,例如用户权限。
- 创建AdditionalUserClaimsPrincipalFactory类,如下:
public class AdditionalUserClaimsPrincipalFactory : UserClaimsPrincipalFactory<ApplicationUser, IdentityRole>
    {
        public AdditionalUserClaimsPrincipalFactory(UserManager<ApplicationUser> userManager, RoleManager<IdentityRole> roleManager, IOptions<IdentityOptions> optionsAccessor)
            : base(userManager, roleManager, optionsAccessor)
        {

        }

        public async override Task<ClaimsPrincipal> CreateAsync(ApplicationUser user)
        {
            var principal = await base.CreateAsync(user);
            var identity = (ClaimsIdentity)principal.Identity;
            var claims = new List<Claim>();

            claims.Add(new Claim(JwtClaimTypes.PreferredUserName, user.UserName));

            //你的代码:从数据库读取用户的权限声明


            identity.AddClaims(claims);

            return principal;
        }
    }
- 在Startup类的ConfigureServices方法中注册自定义用户声明工厂。
services.AddScoped<IUserClaimsPrincipalFactory<ApplicationUser>, AdditionalUserClaimsPrincipalFactory>();
9.初始化测试数据。
待续.....
二.创建Blazor WebAssembly
1.创建名称为WebApp的Blazor WebAssembly项目,身份验证类型选“个人账户”,是为了自动生成认证和授权的相关配置;勾选ASP.NET Core托管;具体如下:

2.配置OIDC认证。
- 在WebApp.Client项目的wwwroot文件夹下创建appsettings.json文件,用于配置OIDC信息。
{
  "OIDCSettings": {
    "Authority": "https://localhost:5001", //对应的是IdentityServer的URL
    "ClientId": "WebApp.Client", //对应IdentityServer里面配置的ClientId
    "ClientSecret": "WebApp.Client.Secret", //对应IdentityServer里面配置的ClientSecret 密钥
    "ResponseType": "code", //对应IdentityServer里面配置的GrantTypes:Code,授权码模式;password,资源拥有者密码模式;client_credentials,客户端模式,
    "DefaultScopes": [ "webapp.p" ],
    "RedirectUris": "https://localhost:6001/authentication/login-callback",
    "FrontChannelLogoutUri": "https://localhost:6001/authentication/signout-oidc",
    "PostLogoutRedirectUri": "https://localhost:6001/authentication/logout-callback/" //登出之后的跳转地址
  }
}
- 在WebApp.Client项目的Program类的Main方法里注册OIDC。
//01
            var services = builder.Services;

            //02.添加OIDC认证服务
            services.AddOidcAuthentication(options =>
            {
                //从wwwroot/appsettings.json里读取OIDC信息配置OIDC认证
                builder.Configuration.Bind("OIDCSettings", options.ProviderOptions);
                //初始化的时候从ClaimType=role的claims里面初始化角色信息,对应用户信息里的 Claim(JwtClaimTypes.Role,"Admin")
                options.UserOptions.RoleClaim = "role";
            })
                //03.把以Json数组形式存在的角色数据转换为Blazor认证组件能识别的Claim
                .AddAccountClaimsPrincipalFactory<CustomUserFactory>();
- 创建CustomUserFactory类,用于转换用户Cliam,因为从IdentityServer4服务器传回的同一类型Claim是用数组保存的,需要转换成单个Claim。
public class CustomUserFactory : AccountClaimsPrincipalFactory<RemoteUserAccount>
    {
        public CustomUserFactory(IAccessTokenProviderAccessor accessor) : base(accessor)
        {

        }

        public async override ValueTask<ClaimsPrincipal> CreateUserAsync(RemoteUserAccount account, RemoteAuthenticationUserOptions options)
        {
            var user = await base.CreateUserAsync(account, options);

            if (user.Identity.IsAuthenticated)
            {
                var identity = (ClaimsIdentity)user.Identity;
                //转换角色信息
                ParseArrayClaims(account, identity, identity.RoleClaimType, options.RoleClaim);
                //转换webapp.p的权限声明
                ParseArrayClaims(account, identity, "webapp.p", "webapp.p");
            }

            return user;
        }

        private void ParseArrayClaims(RemoteUserAccount account, ClaimsIdentity identity, string srcClaimType, string destClaimType)
        {
            var srcClaims = identity.FindAll(srcClaimType).ToList();

            if (srcClaims != null && srcClaims.Any())
            {
                foreach (var claim in srcClaims)
                {
                    identity.RemoveClaim(claim);
                }

                var srcEle = account.AdditionalProperties[srcClaimType];

                if (srcEle is JsonElement srcClaimValues)
                {
                    if (srcClaimValues.ValueKind == JsonValueKind.Array)
                    {
                        foreach (var value in srcClaimValues.EnumerateArray())
                        {
                            identity.AddClaim(new Claim(destClaimType, value.GetString()));
                        }
                    }
                    else
                    {
                        identity.AddClaim(new Claim(destClaimType, srcClaimValues.GetString()));
                    }
                }
            }
        }
    }
3.注册授权策略,由AuthorizeView组件调用授权策略实现UI权限控制。
- 在WebApp.Client项目的Program类的Main方法里注册权策略。
            //04.注册授权策略,UI通过AuthorizeView组件来实现权限控制
            services.AddAuthorizationCore(options =>
            {
                foreach (var p in Datas.WebAppPermissions)
                {
                    options.AddPolicy(p.Value, policy =>
                     {
                         policy.RequireClaim(Datas.WebAppPermissionName, new string[] { p.Value });
                     });
                }
            });
Datas.WebAppPermissions是我定义的静态变量(这里你们可以自定义),用于存储UI权限信息,通过foreach循环添加N个以p.Value的值命名的授权策略。例如p.Value=“/counter/access”时,将注册一个策略名为“/counter/access”的策略,该策略要求用户必须有类型为Datas.WebAppPermissionName且值为“/counter/access”的声明,有则true,否则false。
- 使用AuthorizeView组件实现UI权限控制。以下代码检查名为"/counter/access"的策略,当用户有"/counter/access"声明时显示AuthorizeView组件的内容,内容可以是按钮等。
AuthorizeView Policy="/counter/access">
            <li class="nav-item px-3">
                <NavLink class="nav-link" href="counter">
                    <span class="oi oi-plus" aria-hidden="true"></span> Counter
                </NavLink>
            </li>
        </AuthorizeView>
待续......

 浙公网安备 33010602011771号