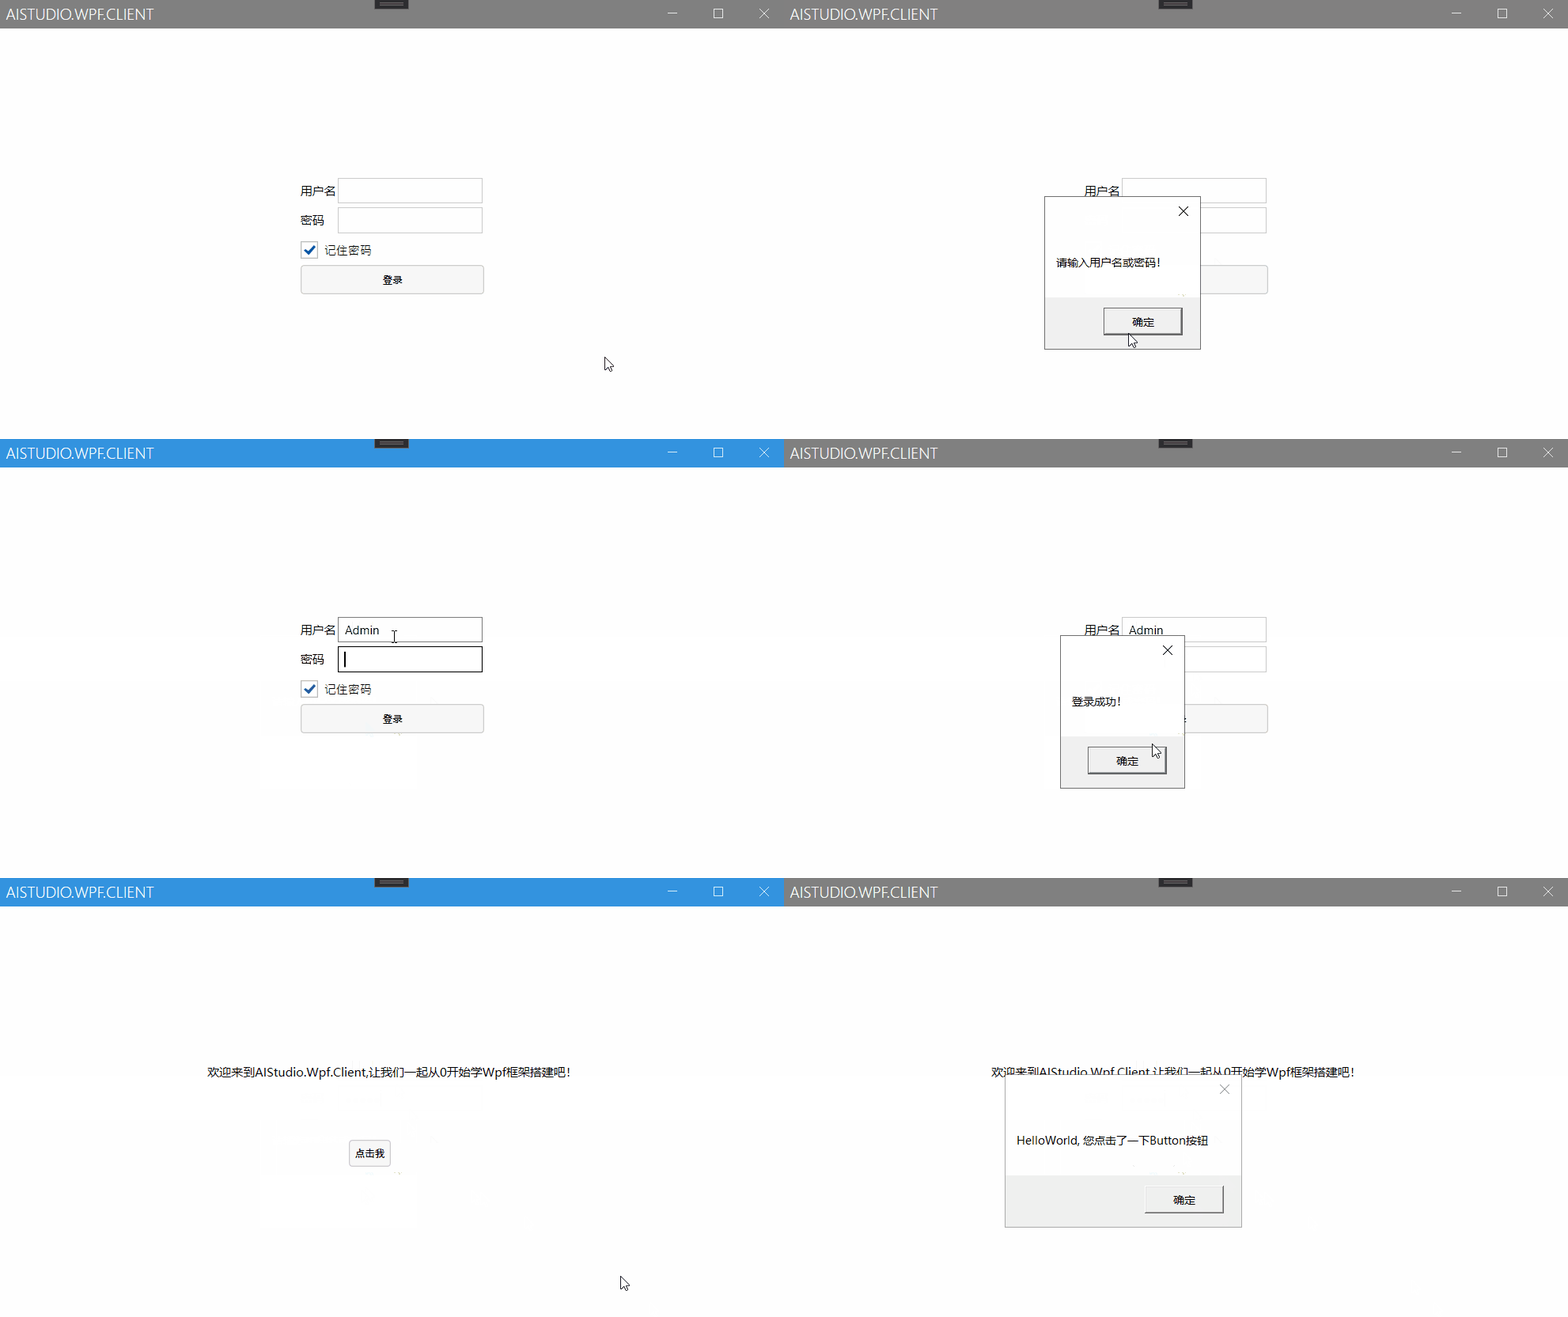
从零开始搭建Wpf初学篇3-界面模块化
AIStudio框架汇总及介绍
前言:将控件模块化,本章先不使用prism实现
第一步:在Views里面新建用户控件IntroduceView,将MainWindow里面的内容拷贝过去;在ViewModels里面新建类IntroduceViewModel,将MainWindowViewModel里面的内容拷贝过去,并将IntroduceViewModel关联到IntroduceView上。
<Grid>
    <TextBlock HorizontalAlignment="Center" Margin="0,160,0,0" Text="{Binding NoticeText}" TextWrapping="Wrap" VerticalAlignment="Top"/>
    <Button Content="点击我" HorizontalAlignment="Left" Margin="355,236,0,0" VerticalAlignment="Top" Command="{Binding ClickCommand}"/>
</Grid>
class IntroduceViewModel : BindableBase
{
    private string _noticeText = "欢迎来到AIStudio.Wpf.Client,让我们一起从0开始学Wpf框架搭建吧!";
    public string NoticeText
    {
        get { return _noticeText; }
        set
        {
            SetProperty(ref _noticeText, value);
        }
    }

    private ICommand _clickCommand;
    public ICommand ClickCommand
    {
        get
        {
            return this._clickCommand ?? (this._clickCommand = new DelegateCommand(() => this.Click()));
        }
    }

    private void Click()
    {
        MessageBox.Show("HelloWorld, 您点击了一下Button按钮");
    }
}

this.DataContext = new IntroduceViewModel();
第二步:MainWindow内容替换成如下:
<mah:MetroWindow  x:Class="AIStudio.Wpf.Client.MainWindow"
        xmlns="http://schemas.microsoft.com/winfx/2006/xaml/presentation"
        xmlns:x="http://schemas.microsoft.com/winfx/2006/xaml"
        xmlns:d="http://schemas.microsoft.com/expression/blend/2008"
        xmlns:mc="http://schemas.openxmlformats.org/markup-compatibility/2006"
        xmlns:local="clr-namespace:AIStudio.Wpf.Client"
        xmlns:view="clr-namespace:AIStudio.Wpf.Client.Views"
        xmlns:mah="http://metro.mahapps.com/winfx/xaml/controls"
        mc:Ignorable="d"
        Title="AIStudio.Wpf.Client" Height="450" Width="800">

    <Grid>
        <view:IntroduceView/>
    </Grid>
</mah:MetroWindow>
运行,将和之前的效果一样。
第三步:添加登录窗口,启动的时候显示登录窗口,点击登录后切换到IntroduceView。
在Views里添加用户控件LoginView,在ViewModels里添加LoginViewModel
<Grid x:Name="LoginGrid" HorizontalAlignment="Center" VerticalAlignment="Center">
    <Grid.RowDefinitions>
        <RowDefinition Height="30"/>
        <RowDefinition Height="30"/>
        <RowDefinition Height="30"/>
        <RowDefinition Height="30"/>
    </Grid.RowDefinitions>
    <Grid.ColumnDefinitions>
        <ColumnDefinition Width="Auto"></ColumnDefinition>
        <ColumnDefinition Width="150"></ColumnDefinition>
    </Grid.ColumnDefinitions>

    <TextBlock Grid.Row="0" Grid.Column="0" Text="用户名" VerticalAlignment="Center"/>

    <TextBox Grid.Row="0" Grid.Column="1" Margin="2" Text="{Binding UserName}"/>

    <TextBlock Grid.Row="1" Grid.Column="0" Text="密码" VerticalAlignment="Center"/>
    <PasswordBox Grid.Row="1" Grid.Column="1" Margin="2"  core:PasswordBoxHelper.Password="{Binding Password,Mode=TwoWay}" />
    <CheckBox Grid.Row="2" Grid.ColumnSpan="2" Content="记住密码" VerticalAlignment="Center" IsChecked="{Binding IsRmembered}" />
    <Button Grid.Row="3" Grid.ColumnSpan="2" Content="登录" Command="{Binding LoginCommand}" IsDefault="True" />
</Grid>
注:PasswordBox的绑定需要使用附加属性来辅助,附加属性的实现请看我的源码,或者百度一下。
public class LoginViewModel : BindableBase
{
    private string _userName;
    public string UserName
    {
        get { return _userName; }
        set
        {
            SetProperty(ref _userName, value);
        }
    }

    private string _password;
    public string Password
    {
        get { return _password; }
        set
        {
            SetProperty(ref _password, value);

        }
    }

    private bool _isRmembered = true;
    public bool IsRmembered
    {
        get { return _isRmembered; }
        set
        {
            SetProperty(ref _isRmembered, value);
        }
    }

    private ICommand _loginCommand;
    public ICommand LoginCommand
    {
        get
        {
            return this._loginCommand ?? (this._loginCommand = new DelegateCommand(() => this.Login()));
        }
    }

    public Action LoginSuccess;

    private void Login()
    {
        if (!string.IsNullOrEmpty(UserName)  && !string.IsNullOrEmpty(Password))
        {
            MessageBox.Show("登录成功!");
            if (LoginSuccess != null)
            {
                LoginSuccess();
            }
        }
        else
        {
            MessageBox.Show("请输入用户名或密码!");
        }
    }

}
可以看到里面还添加了一个LoginSuccess,用来通知MainWindowViewModel改变系统状态。
第四步:主窗口MainWindow的控件改成ContentControl,以便可以加载不同的控件。
<Window.Resources>
    <ControlTemplate x:Key="LoginStyle" TargetType="{x:Type ContentControl}">
        <view:LoginView DataContext="{Binding LoginViewModel}"/>
    </ControlTemplate>

    <ControlTemplate x:Key="IntroduceStyle" TargetType="{x:Type ContentControl}">
        <view:IntroduceView/>
    </ControlTemplate>

    <Style x:Key="MainContentStyle" TargetType="{x:Type ContentControl}">
        <Setter Property="Template" Value="{StaticResource LoginStyle}" />
        <Style.Triggers>
            <DataTrigger Binding="{Binding Status}" Value="Introduce">
                <Setter Property="Template" Value="{StaticResource IntroduceStyle}" />
            </DataTrigger>
        </Style.Triggers>
    </Style>
</Window.Resources>
<Grid>
    <ContentControl  Style="{StaticResource MainContentStyle}"/>
</Grid>
注意1:可以看到Template中用DataTrigger触发器,根据系统状态Status,使用不同的内容模板。 注意2: <view:LoginView DataContext="{Binding LoginViewModel}"/>这里DataContext没有使用之前的绑定方法,而是在MainWindowViewModel中new一个LoginViewModel,然后在界面上把LoginView与LoginViewModel关联上。
第五步:MainViewModel的代码改成如下:
class MainWindowViewModel: BindableBase
{
    private string _status = "Login";
    public string Status
    {
        get { return _status; }
        set
        {
            SetProperty(ref _status, value);
        }
    }

    public LoginViewModel LoginViewModel { get; set; }

    public MainWindowViewModel()
    {
        LoginViewModel = new LoginViewModel();
        LoginViewModel.LoginSuccess += LoginSuccess;
    }

    private void LoginSuccess()
    {
        Status = "Introduce";
    }
}
可以看到MainWindowViewModel的子类LoginViewModel之间通信是使用LoginSuccess这个Action方法。(缺点就是不同ViewModel之间通信还很麻烦,Prism的EventAggregator很方便,后续将介绍)
源码地址:https://gitee.com/akwkevin/aistudio.-wpf.-client.-stepby-step
另外推荐一下我的Wpf客户端框架:https://gitee.com/akwkevin/aistudio.-wpf.-aclient


 浙公网安备 33010602011771号