
mock测试1
一、Mock测试
1. Mock定义
Mock 是指使用各种技术手段模拟出各种需要的资源以供测试使用。 被 Mock 的资源通常有以下特征:
- 被测目标依赖该资源。
- 该资源可能因为各种原因不稳定、返回结果不断变化或者并不总是能够获取到。
- 该资源跟被测目标本身质量无关。
- 这些资源可能是一个外部或底层接口、一个系统、一组数据对象或者是一整套目标软件的工作环境等。通过 Mock 避免对外部真实资源的依赖实现对被测目标的孤立测试,从而大大降低测试的难度,节约测试成本。
- 需要注意的是利用 Mock 通过的测试与使用真实环境通过的测试毕竟还是有一定差别的。有些时候我们就是需要所测试的系统能够处理依赖所产生的各种情况,包括正常情况和异常情况,我们同样不能保证我们的 Mock 可以模拟到每种这样的情况。因此只在确实有必要的情况下才运用 Mock 。
在具体的测试过程中,我们经常会碰到需要模拟数据或者接口的情况,因为环境问题或者系统复杂度的问题,我们需要使用 Mock 方式进行数据的模拟。
mock 测试就是在测试过程中,创建一个假的对象,避免你为了测试一个方法,却要自行构建整个 bean 的依赖链。
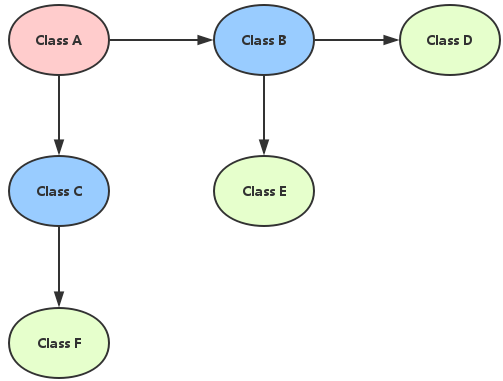
像是以下这张图,类 A 需要调用类 B 和类 C,而类 B 和类 C 又需要调用其他类如 D、E、F 等,假设类 D 是一个外部服务,那就会很难测,因为你的返回结果会直接的受外部服务影响,导致你的单元测试可能今天会过、但明天就过不了了
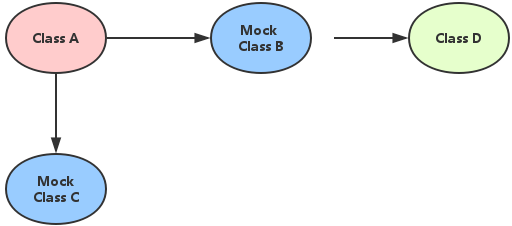
而当我们引入 mock 测试时,就可以创建一个假的对象,替换掉真实的 bean B 和 C,这样在调用B、C的方法时,实际上就会去调用这个假的 mock 对象的方法,而我们就可以自己设定这个 mock 对象的参数和期望结果,让我们可以专注在测试当前的类 A,而不会受到其他的外部服务影响,这样测试效率就能提高很多
2. Mock分类
目前主要应用两大类 Mock 的场景。
- 一种是 Mock 一个对象,写入一些预期的值,通过它进行自己想要的测试。主要适用于单元测试,哪种语言开发的程序必须用基于哪种语言的 Mock 方案去实现。
例如:Mockito 只能针对 Java ,适用范围:单测
- 另外一种就是 Mock 一个 Server ,构造一个假的服务返回预期的结果,也是为了进行自己的测试。主要适用于接口&性能测试,Mock 方案和程序使用的语言无关,可以用 Java 实现,也可以用 Python 实现等。
例如:搭建一个 Mock Server,适用范围:无限制
这两个场景构造了大部分的 Mock 使用范围。
二、Mock 一个对象
此处使用Mockito示例
1. mockito简介
Mockito 是一种 Java mock 框架,用于创建和配置 mock 对象,主要是用来做 mock 测试的,它可以模拟任何 Spring 管理的 bean、模拟方法的返回值、模拟抛出异常...等,它同时也会记录调用这些模拟方法的参数、调用顺序,从而可以校验出这个 mock 对象是否有被正确的顺序调用,以及按照期望的参数被调用。
像是 Mockito 可以在单元测试中模拟一个 service 返回的数据,而不会真正去调用该 service,这就是上面提到的 mock 测试精神,也就是通过模拟一个假的 service 对象,来快速的测试当前我想要测试的类
目前在 Java 中主流的 mock 测试工具有 Mockito、JMock、EasyMock..等,而 SpringBoot 目前内建的是 Mockito 框架。
Mockito 是 GitHub 上使用最广泛的 Mock 框架,并与 JUnit 结合使用。使用 Mockito 简化了具有外部依赖的类的测试开发。
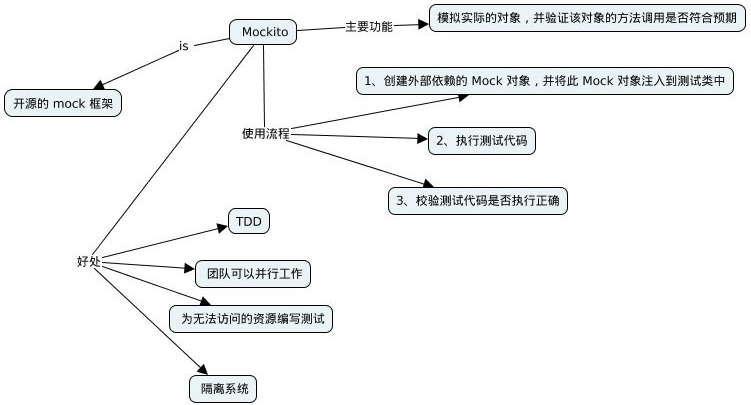
2. 一般使用 Mockito 的步骤:
-
模拟任何外部依赖并将这些模拟对象插入测试代码中
-
执行测试中的代码
-
验证代码是否按照预期执行
3. 简单应用
引入POM
<dependency>
    <groupId>org.mockito</groupId>
    <artifactId>mockito-all</artifactId>
    <version>1.10.19</version>
</dependency>
<dependency>
    <groupId>org.testng</groupId>
    <artifactId>testng</artifactId>
    <version>6.14.3</version>
</dependency>
public class SimpleTest {
    @Test
    public void test() {
        // 创建Mock对象,参数可以是类或者接口
        List<String> list = mock(List.class);

        // 设置方法的预见期返回值
        when(list.get(0)).thenReturn("zuozewei");
        when(list.get(1)).thenThrow(new RuntimeException("test exception"));
        String result = list.get(0);

        // 验证方法调用
        verify(list).get(0);

        // 断言,list的第一个元素是否是"zuozewei"
        Assert.assertEquals(result, "zuozewei");
    }
}
新建测试类,构造了 list 这样的对象,并且给一个元素赋值 zuozewei。在最后断言的时候,也可以断言这个 list 里面确实有这个值。所以,通过这种方式,我们可以进行对象构造。可以是类,也可以是接口。除了构造对象,当然也可以对方法设定的返回值指定异常。上述代码的意思就是当调用 list 的第二个元素的时候,抛出一个运行异常。
上面列举了 Mockito 的简单用法。
4. 复杂应用:在 SpringBoot 单元测试中使用 Mockito
对于比较复杂的用法,可以通过官网深入学习。因为 Mockito 主要用于单元测试,开发人员用的比较多。
a. 首先在 pom.xml 下新增 spring-boot-starter-test 依赖,该依赖内就有包含了 JUnit、Mockito
<dependency>
    <groupId>org.springframework.boot</groupId>
    <artifactId>spring-boot-starter-test</artifactId>
    <scope>test</scope>
</dependency>
b. 先写好一个 UserService,它里面有两个方法 getUserById() 和 insertUser(),而它们会分别再去调用 UserDao 这个 bean的 getUserById() 和 insertUser() 方法
@Component
public class UserService {

    @Autowired
    private UserDao userDao;

    public User getUserById(Integer id) {
        return userDao.getUserById(id);
    }

    public Integer insertUser(User user) {
        return userDao.insertUser(user);
    }
}
c. User model 的定义如下
public class User {
    private Integer id;
    private String name;
    //省略 getter/setter
}
d. 如果这时候我们先不使用 Mockito 模拟一个假的 userDao bean,而是真的去调用一个正常的 Spring bean 的 userDao 的话,测试类写法如下。其实就是很普通的注入 userService bean,然后去调用它的方法,而它会再去调用 userDao 取得数据库的数据,然后我们再对返回结果做 assert 断言检查
@RunWith(SpringRunner.class)
@SpringBootTest
public class UserServiceTest {

    //先普通的注入一个userService bean
    @Autowired
    private UserService userService;

    @Test
    public void getUserById() throws Exception {
        //普通的使用userService,他里面会再去调用userDao取得数据库的数据
        User user = userService.getUserById(1);

        //检查结果
        Assert.assertNotNull(user);
        Assert.assertEquals(user.getId(), new Integer(1));
        Assert.assertEquals(user.getName(), "John");
    }
}
e. 但是如果 userDao 还没写好,又想先测 userService 的话,就需要使用 Mockito 去模拟一个假的 userDao 出来
使用方法是在 userDao 上加上一个 @MockBean 注解,当 userDao 被加上这个注解之后,表示 Mockito 会帮我们创建一个假的 mock 对象,替换掉 Spring 中已存在的那个真实的 userDao bean,也就是说,注入进 userService 的 userDao bean,已经被我们替换成假的 mock 对象了,所以当我们再次调用 userService 的方法时,会去调用的实际上是 mock userDao bean 的方法,而不是真实的 userDao bean
Mockito库中创建模拟对象的三种方式:mock()方法、@Mock注解和@MockBean注解。
Mockito.mock()方法:允许我们在测试中指定方法行为并验证调用。
@Mock注解:用于模拟不属于Spring上下文的对象。实际上是Mockito.mock()方法的缩写,简化了mock对象的创建,但需配合MockitoJUnitRunner或手动初始化。
@MockBean:用于模拟属于Spring Boot应用程序中的Spring上下文的对象,将@Service、@Reporitory、@Component注释的实际beans替换为mock对象。与Spring集成测试,它可以将模拟对象注入到Spring上下文中,替代或新增实际bean。
@Mock和@InjectMocks的区别:
    @Mock:创建一个模拟对象
    @InjectMocks:创建一个该类的实例,并将使用@Mock注解创建的模拟对象注入到该实例中。@RunWith(MockitoJUnitRunner.class)
注意:必须使用@RunWith(MockitoJUnitRunner.class)或MockitoAnnotations.initMocks(this)进行mocks的初始化和注入。
当我们创建了一个假的 userDao 后,我们需要为这个 mock userDao 自定义方法的返回值,这里有一个公式用法,下面这段代码的意思为:当调用了某个 mock 对象的方法时,就回传给我们一个自定义结果。
Mockito.when( mock对象.方法名() ).thenReturn( 自定义结果 )
f. 使用 Mockito 模拟 bean 的单元测试具体实例如下
@RunWith(SpringRunner.class)
@SpringBootTest
public class UserServiceTest {

    @Autowired
    private UserService userService;

    @MockBean   //创建mock对象
    private UserDao userDao;

    @Test
    public void getUserById() throws Exception {
        // 定义当调用mock userDao的getUserById()方法,并且参数为3时,就返回id为200、name为I'm mock3的user对象
        Mockito.when(userDao.getUserById(3)).thenReturn(new User(200, "I'm mock 3"));

        // 返回的会是名字为I'm mock 3的user对象,若此处入参传2,则返回的user为null
        User user = userService.getUserById(3);

        Assert.assertNotNull(user);
        Assert.assertEquals(user.getId(), new Integer(200));
        Assert.assertEquals(user.getName(), "I'm mock 3");
    }
}
g. thenReturn 系列方法
当使用任何整数值调用 userDao 的 getUserById() 方法时,就回传一个名字为 I'm mock3 的 user 对象:
Mockito.when(userDao.getUserById(Mockito.anyInt())).thenReturn(new User(3, "I'm mock"));
User user1 = userService.getUserById(3); // 回传的user的名字为I'm mock
User user2 = userService.getUserById(200); // 回传的user的名字也为I'm mock
限制只有当参数的数字是 3 时,才会回传名字为 I'm mock 3 的 user 对象:
Mockito.when(userDao.getUserById(3)).thenReturn(new User(3, "I'm mock"));
User user1 = userService.getUserById(3); // 回传的user的名字为I'm mock
User user2 = userService.getUserById(200); // 回传的user为null
当调用 userDao 的 insertUser() 方法时,不管传进来的 user 是什么,都回传 100:
Mockito.when(userDao.insertUser(Mockito.any(User.class))).thenReturn(100);
Integer i = userService.insertUser(new User()); //会返回100
h. thenThrow 系列方法
当调用 userDao 的 getUserById() 时的参数是 9 时,抛出一个 RuntimeException:
Mockito.when(userDao.getUserById(9)).thenThrow(new RuntimeException("mock throw exception"));
User user = userService.getUserById(9); //会抛出一个RuntimeException
如果方法没有返回值的话(即是方法定义为public void myMethod() {...}),要改用 doThrow() 抛出 Exception:
Mockito.doThrow(new RuntimeException("mock throw exception")).when(userDao).print();
userService.print(); //会抛出一个RuntimeException
j. verify 系列方法
验证方法调用:
Mockito.verify(userDao).getUserById(Mockito.eq(3)) ;
Mockito.verify(userDao).getUserById(3);
验证调用次数,下文表示检查调用 userDao 的 getUserById()、且参数为3的次数是否为1次:
Mockito.verify(userDao, Mockito.times(1)).getUserById(Mockito.eq(3)) ;
验证调用顺序,验证 userDao 是否先调用 getUserById() 两次,并且第一次的参数是 3、第二次的参数是 5,然后才调用insertUser() 方法:
InOrder inOrder = Mockito.inOrder(userDao);
inOrder.verify(userDao).getUserById(3);
inOrder.verify(userDao).getUserById(5);
inOrder.verify(userDao).insertUser(Mockito.any(User.class));
4. Mockito常用参数匹配器:
any(),anyInt(),anyString()- 匹配任意值eq()- 严格匹配isNull(),isNotNull()- 空值检查contains(),endsWith()- 字符串匹配argThat()- 自定义匹配逻辑
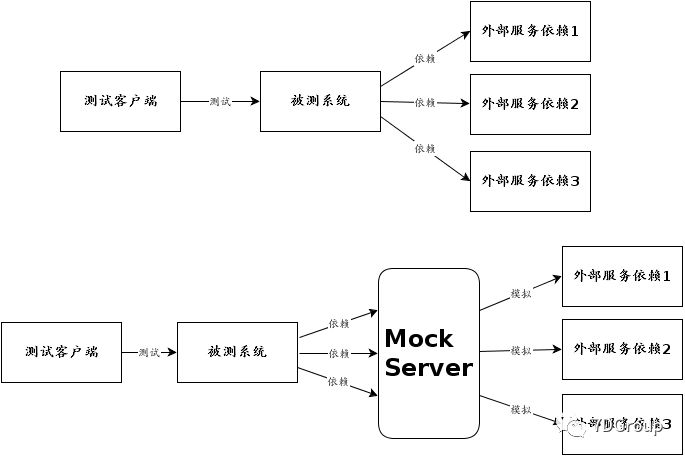
三、Mock一个Server
1. Mocker Server位置和作用
2. 常见的Mock Server
- WireMock,支持HTTP协议,参考:http://wiremock.org/
- SoapUI MockService 支持 WebService,参考:https://www.soapui.org/
- Dubbo,需要自己实现
- 使用Web框架自己开发Mock Server系统,参考:http://www.testclass.net/interface/flask_mock/
- 在线 Mock Server 系统,参考:http://easy-mock.com/login
- 使用现成的 Mock Server 库创建系统,参考:
MockServer:https://github.com/jamesdbloom/mockserver
Moco:https://github.com/dreamhead/moco
两个项目都不错,有Mock Server库,GitHub上面的 Star 也差不多。
四、Mock Server Moco
1. 简介
简单来说 Moco 就是类似一个 Mock 的工具框架,一个简单搭建模拟服务器的程序库 / 工具,下载就是一个JAR包。
集成,特别是基于 HTTP 协议的集成,例如 web 服务、REST 等,在我们的大多数开发中都被广泛使用。在过去,我们只是将另一场 WAR 包部署到应用服务器上,例如 Jetty 或Tomcat 等。众所周知,开发一个 WAR 包并将其部署到任何应用服务器上是非常枯燥的,即使我们使用的是嵌入式服务器。WAR包也需要被重新打包即使我们只是想稍微改变一下。

简单来说,Moco 就是解决了开发前端时没有后端支持,开发接口时依赖没有到位的尴尬场景。当然 Moco 的灵活性,让其有越来越多的应用场景,比如我们在开发接口测试的时候。
2. 特点:
- 只需要简单的配置 request、response 等即可满足要求,支持 http、https、socket 。可以说是非常的灵活性。
- 支持在 request 中设置 Headers , Cookies , StatusCode 等。
- 对 GET、POST、PUT、DELETE 等请求方式均支持,很适合 web 开发。
- 无需环境配置,有 Java 环境即可。
- 修改配置后,立刻生效。只需要维护接口,也就是契约即可。
- 对可能用到的数据格式都支持,如 Json、text、xml、file 等。
- 还能与其他工具集成,如 Junit、Maven、Gradle 等。
3. 原理
Moco 本身支持 API 和独立运行两种方式。通过 API ,开发人员可以在Junit、TestNg 等测试框架里使用 Moco,这样极大地降低了接口测试的复杂度。Moco 根据一些配置,启动一个真正的 HTTP 服务(监听本地指定端口)。当发起的请求满足一个条件时,就会收到一个 response 。Moco 底层并没有依赖于像 Servlet 这样的重型框架,而是基于 Netty 的网络应用框架编写的,这样就绕过了复杂的应用服务器,所以它的速度是极快的。
4. 加载配置启动 Moco HTTP Server
java -jar <moco-runner-path> http -p <port> -c <configfile-path>
java -jar moco-runner-0.11.0-standalone.jar http -p 12306 -c ./src/main/resources/startupURI.json
启动命令参数含义:
-
- moco-runner-path :
moco-runner-0.11.0-standalone.jar包路径,https://github.com/dreamhead/moco/tree/v0.11.0?tab=readme-ov-file 下载jar包 - port :HTTP 服务监听端口
- configfile-path :配置文件路径
- moco-runner-path :
5. 使用
下面介绍不同的 HTTP 服务,以及如何设置 JSON 文件的参数。
在本地启动一个 http 服务器,其中监听端口是 12306,配置文件是 JSON 文件。只需要本机发起一个request,如:http://localhost:12306。
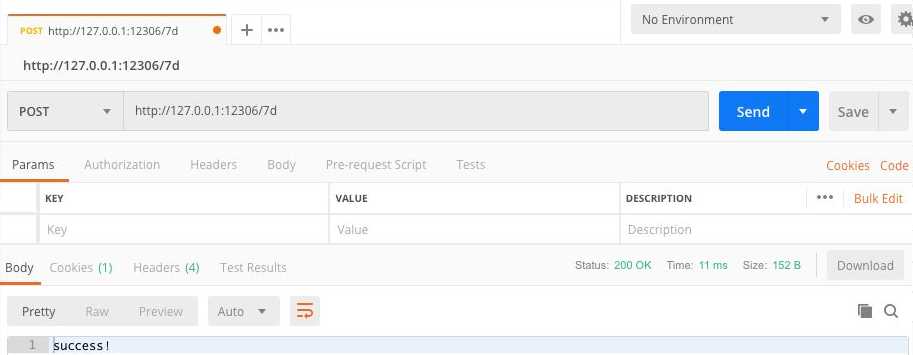
a. 约定请求 URI
[
  {
    "description":"这是一个请求URI",
    "request":{
      "uri":"/7d"
    },
    "response":{
      "text":"success!"
    }
  }
]
启动命令:
java -jar moco-runner-0.11.0-standalone.jar http -p 12306 -c ./src/main/resources/startupURI.json
通过 Postman 验证服务,测试 Get 请求:
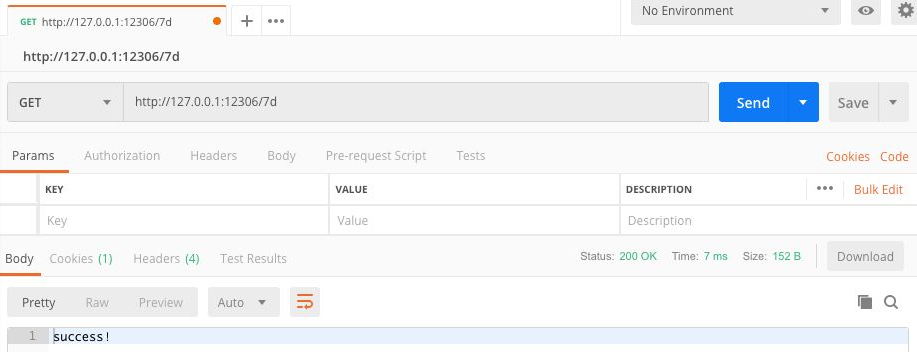
Moco 服务日志 :
09 十二月 2018 11:06:50 [nioEventLoopGroup-3-2] INFO  Request received:

GET /7d HTTP/1.1
Host: 127.0.0.1:12306
User-Agent: PostmanRuntime/7.4.0
Accept: */*
Accept-Encoding: gzip, deflate
Cache-Control: no-cache
Postman-Token: 7b5a1a47-a287-4674-b94e-c455fc5c645a
X-Lantern-Version: 5.1.0
Content-Length: 0

09 十二月 2018 11:06:50 [nioEventLoopGroup-3-2] INFO  Response return:

HTTP/1.1 200
Content-Length: 10
Content-Type: text/plain; charset=utf-8

success!
b. 约定请求 Queries
JSON 脚本
[
  {
    "description":"这是一个请求queries",
    "request":{
      "uri":"/7d",
      "queries":{
        "name":"zuozewei"
      }
    },
    "response":{
      "text":"success!"
    }
  }
]
启动mock http server,通过 Postman 验证服务,测试 Get 请求:
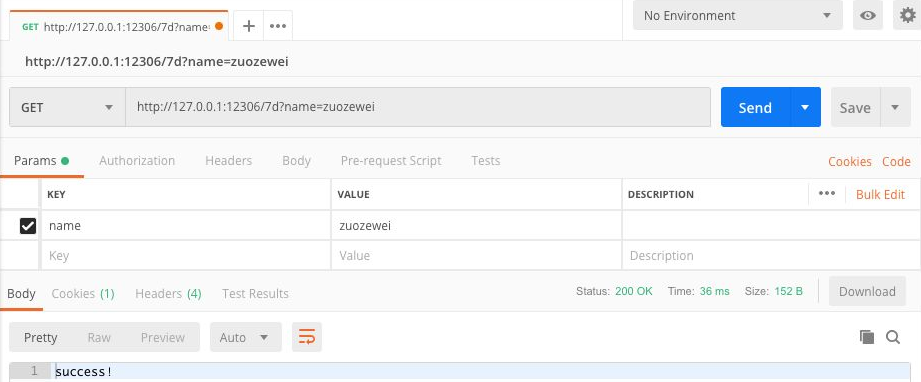
Moco 服务日志:
09 十二月 2018 11:21:04 [nioEventLoopGroup-3-2] INFO  Request received:

GET /7d HTTP/1.1
Host: 127.0.0.1:12306
User-Agent: PostmanRuntime/7.4.0
Accept: */*
Accept-Encoding: gzip, deflate
Cache-Control: no-cache
Postman-Token: 2d36e386-e022-4478-8acd-258eff4ff684
X-Lantern-Version: 5.1.0
Content-Length: 0

09 十二月 2018 11:21:04 [nioEventLoopGroup-3-2] INFO  Response return:

HTTP/1.1 200
Content-Length: 10
Content-Type: text/plain; charset=utf-8

success!
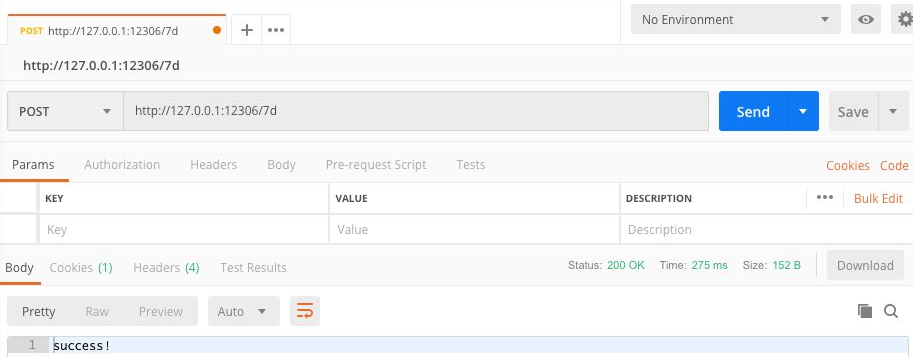
c. 约定请求 Get 方法
JSON脚本:
[
  {
    "description":"这是一个get请求",
    "request":{
      "uri":"/7d",
      "method":"get"
    },
    "response":{
      "text":"success!"
    }
  }
]
通过 Postman 验证服务,测试 Get 请求:

Moco 服务日志:
09 十二月 2018 11:26:42 [nioEventLoopGroup-3-2] INFO  Request received:

GET /7d HTTP/1.1
Host: 127.0.0.1:12306
User-Agent: PostmanRuntime/7.4.0
Accept: */*
Accept-Encoding: gzip, deflate
Cache-Control: no-cache
Postman-Token: ae3250b6-0ec0-4875-8970-d37e5b840820
X-Lantern-Version: 5.1.0
Content-Length: 0

09 十二月 2018 11:26:42 [nioEventLoopGroup-3-2] INFO  Response return:

HTTP/1.1 200
Content-Length: 10
Content-Type: text/plain; charset=utf-8

success!
d. 约定请求 Post 方法
JSON 脚本:
[
  {
    "description":"这是一个post请求",
    "request":{
      "uri":"/7d",
      "method":"post"
    },
    "response":{
      "text":"success!"
    }
  }
]
通过 Postman 验证服务,测试 Post 请求:
Moco 服务日志:
09 十二月 2018 11:29:30 [nioEventLoopGroup-3-2] INFO  Request received:

POST /7d HTTP/1.1
Host: 127.0.0.1:12306
User-Agent: PostmanRuntime/7.4.0
Content-Length: 0
Accept: */*
Accept-Encoding: gzip, deflate
Cache-Control: no-cache
Postman-Token: 73f38af1-4efb-473a-b9d2-de0392c65bbe
X-Lantern-Version: 5.1.0

09 十二月 2018 11:29:30 [nioEventLoopGroup-3-2] INFO  Response return:

HTTP/1.1 200
Content-Length: 10
Content-Type: text/plain; charset=utf-8

success!
e. 约定请求 Headers
JSON 脚本:
[
  {
    "description":"这是一个带headers的post请求",
    "request":{
      "uri":"/7d",
      "method":"post",
      "headers":{
        "content-type":"application/json"
      }
    },
    "response":{
      "text":"success!"
      }
    }
]
通过 Postman 验证服务,测试 Post 请求:
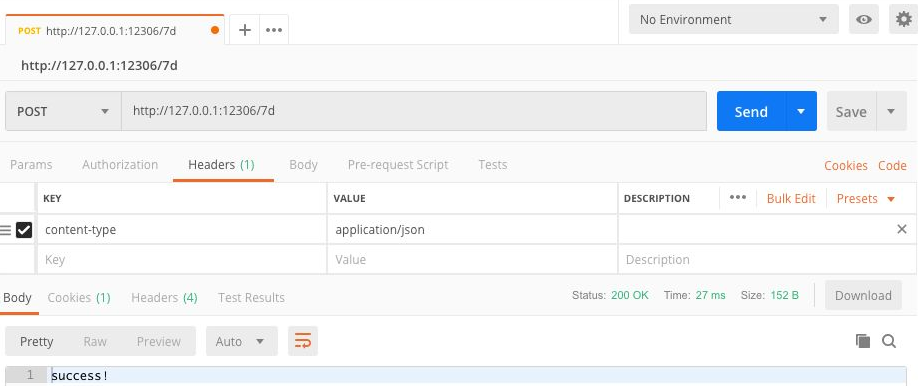
Moco 服务日志:
09 十二月 2018 11:34:43 [nioEventLoopGroup-3-2] INFO  Request received:

POST /7d HTTP/1.1
Host: 127.0.0.1:12306
User-Agent: PostmanRuntime/7.4.0
Content-Length: 0
Accept: */*
Accept-Encoding: gzip, deflate
Cache-Control: no-cache
Content-Type: application/json
Postman-Token: 0a82d74b-303f-42a3-9da0-32fd6c604166
X-Lantern-Version: 5.1.0

09 十二月 2018 11:34:43 [nioEventLoopGroup-3-2] INFO  Response return:

HTTP/1.1 200
Content-Length: 10
Content-Type: text/plain; charset=utf-8

success!
JSON 脚本:
[
  {
    "description":"这是一个带cookies的post请求",
    "request":{
      "uri":"/7d",
      "method":"post",
      "cookies":{
        "login":"7dgroup"
      }
    },
    "response":{
      "text":"success!"
      }
    }
]
通过 Postman 验证服务,测试 Post 请求:
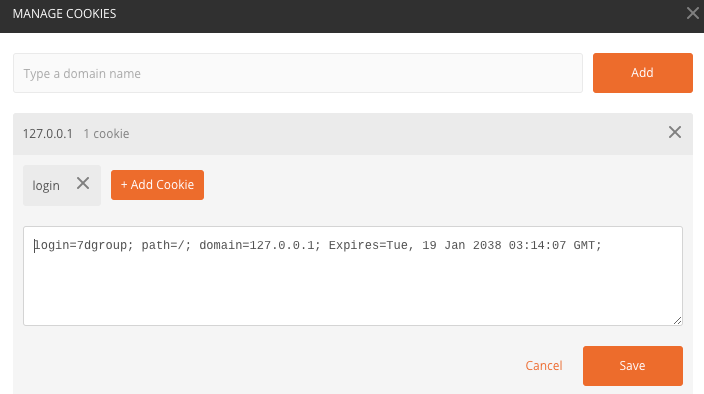
Moco 服务日志:
09 十二月 2018 12:26:46 [nioEventLoopGroup-3-3] INFO  Request received:

POST /7d HTTP/1.1
Host: 127.0.0.1:12306
User-Agent: PostmanRuntime/7.4.0
Content-Length: 0
Accept: */*
Accept-Encoding: gzip, deflate
Cache-Control: no-cache
Cookie: login=7dgroup
Postman-Token: 36a12412-6eb1-44a4-a2d8-ea222eba8968
X-Lantern-Version: 5.1.0

09 十二月 2018 12:26:46 [nioEventLoopGroup-3-3] INFO  Response return:

HTTP/1.1 200
Content-Length: 10
Content-Type: text/plain; charset=utf-8

success!
g. 约定请求 Forms
JSON 脚本:
[
  {
    "description":"这是一个带forms参数的post请求",
    "request":{
      "uri":"/7d",
      "method":"post",
      "forms":{
        "name":"zuozewei"
      }
    },
    "response":{
      "text":"success!"
      }
    }
]
通过 Postman 验证服务,测试 Post 请求:
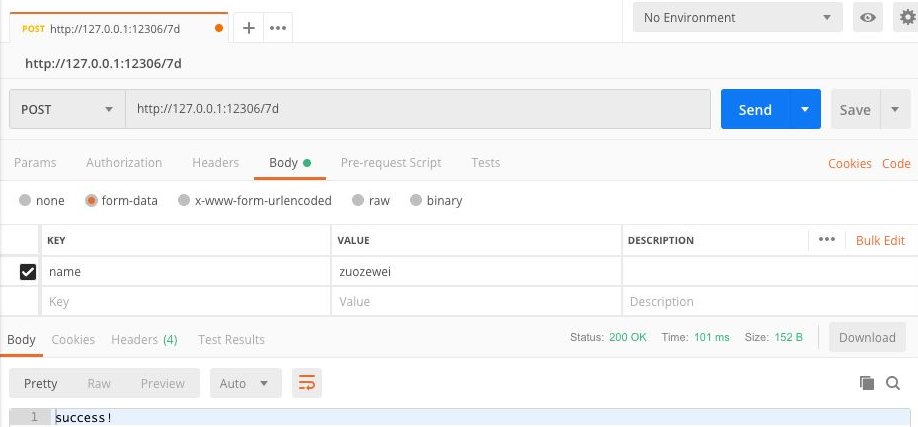
Moco 服务日志:
09 十二月 2018 12:50:47 [nioEventLoopGroup-3-3] INFO  Request received:

POST /7d HTTP/1.1
Host: 127.0.0.1:12306
User-Agent: PostmanRuntime/7.4.0
Content-Length: 167
Accept: */*
Accept-Encoding: gzip, deflate
Cache-Control: no-cache
Content-Type: multipart/form-data; boundary=--------------------------977669308391204172275520
Postman-Token: 308d06bf-c110-4736-9ac4-ee2fe8a4a036
X-Lantern-Version: 5.1.0

<content is binary>

09 十二月 2018 12:50:47 [nioEventLoopGroup-3-3] INFO  Response return:

HTTP/1.1 200
Content-Length: 10
Content-Type: text/plain; charset=utf-8

success!
h. 约定请求 URI(Match)
对于 Restful 风格的 url ,支持正则匹配。
JSON 脚本:
[
  {
    "description":"这是一个请求Match URI",
    "request":{
      "uri":
          {
            "match":"/\\w*/7d"
          }
    },
    "response":{
      "text":"success!"
    }
  }
]
通过 Postman 验证服务,测试 Post 请求:
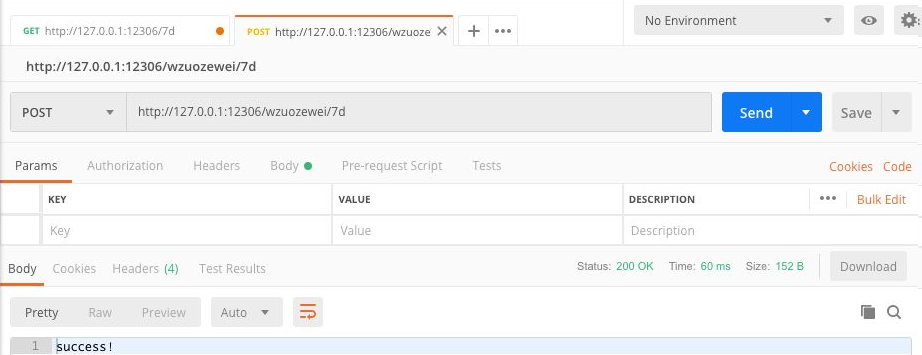
Moco 服务日志:
09 十二月 2018 13:05:48 [nioEventLoopGroup-7-2] INFO  Request received:

POST /wzuozewei/7d HTTP/1.1
Host: 127.0.0.1:12306
User-Agent: PostmanRuntime/7.4.0
Content-Length: 0
Accept: */*
Accept-Encoding: gzip, deflate
Cache-Control: no-cache
Content-Type: multipart/form-data; boundary=--------------------------767805110351846142172059
Postman-Token: 5d7b5c65-1f8b-46ae-8868-62def1a5de31
X-Lantern-Version: 5.1.0

09 十二月 2018 13:05:48 [nioEventLoopGroup-7-2] INFO  Response return:

HTTP/1.1 200
Content-Length: 10
Content-Type: text/plain; charset=utf-8

success!
i. 约定请求 URI(StartsWith)
JSON 脚本:
[
  {
    "description":"这是一个请求StartsWith URI",
    "request":{
      "uri":
          {
            "startsWith":"/7d"
          }
    },
    "response":{
      "text":"success!"
    }
  }
]
通过 Postman 验证服务,测试 Get 请求:
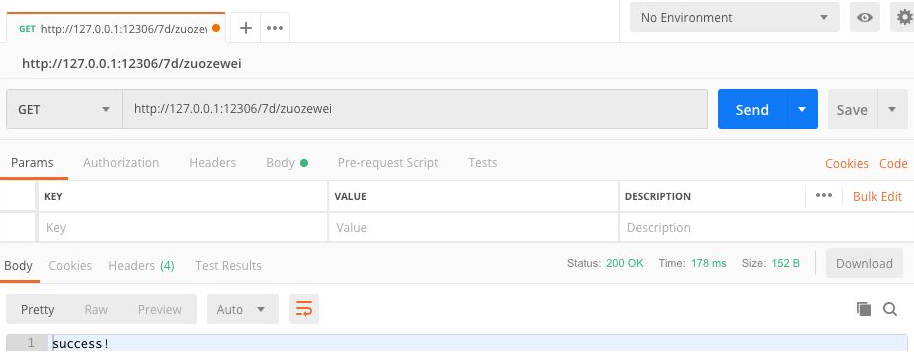
Moco 服务日志:
09 十二月 2018 13:12:43 [nioEventLoopGroup-3-2] INFO  Request received:

GET /7d/zuozewei HTTP/1.1
Host: 127.0.0.1:12306
User-Agent: PostmanRuntime/7.4.0
Accept: */*
Accept-Encoding: gzip, deflate
Cache-Control: no-cache
Content-Type: multipart/form-data; boundary=--------------------------445269276531904972620891
Postman-Token: f9deca3a-9b59-426c-ad48-00ebb4800321
X-Lantern-Version: 5.1.0
Content-Length: 0

09 十二月 2018 13:12:43 [nioEventLoopGroup-3-2] INFO  Response return:

HTTP/1.1 200
Content-Length: 10
Content-Type: text/plain; charset=utf-8

success!
j. 约定请求 URI(endsWith)
JSON 脚本:
[
  {
    "description":"这是一个请求endsWith URI",
    "request":{
      "uri":
          {
            "endsWith":"/7d"
          }
    },
    "response":{
      "text":"success!"
    }
  }
]
通过 Postman 验证服务,测试 Get 请求:
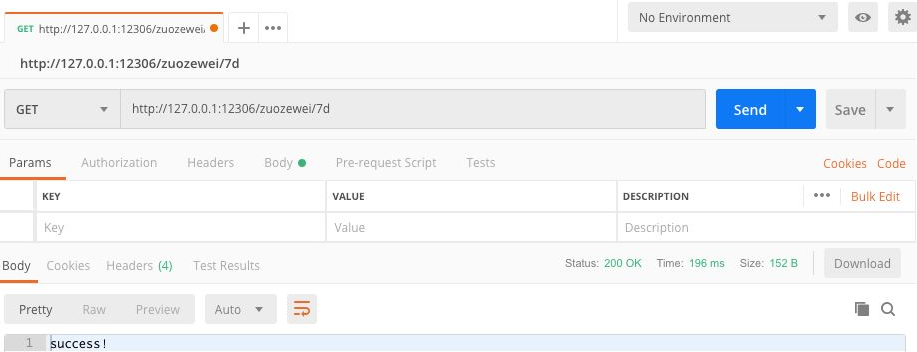
Moco 服务日志:
09 十二月 2018 13:16:48 [nioEventLoopGroup-3-2] INFO  Request received:

GET /zuozewei/7d HTTP/1.1
Host: 127.0.0.1:12306
User-Agent: PostmanRuntime/7.4.0
Accept: */*
Accept-Encoding: gzip, deflate
Cache-Control: no-cache
Content-Type: multipart/form-data; boundary=--------------------------516453569550782372688423
Postman-Token: 774378a6-5e57-4cc2-a015-f4b3bd2cb84d
X-Lantern-Version: 5.1.0
Content-Length: 0

09 十二月 2018 13:16:48 [nioEventLoopGroup-3-2] INFO  Response return:

HTTP/1.1 200
Content-Length: 10
Content-Type: text/plain; charset=utf-8

success!
k. 约定请求 URI(Contain)
JSON 脚本:
[
  {
    "description":"这是一个请求Contain URI",
    "request":{
      "uri":
          {
            "contain":"/7d"
          }
    },
    "response":{
      "text":"success!"
    }
  }
]
通过 Postman 验证服务,测试 Get 请求:
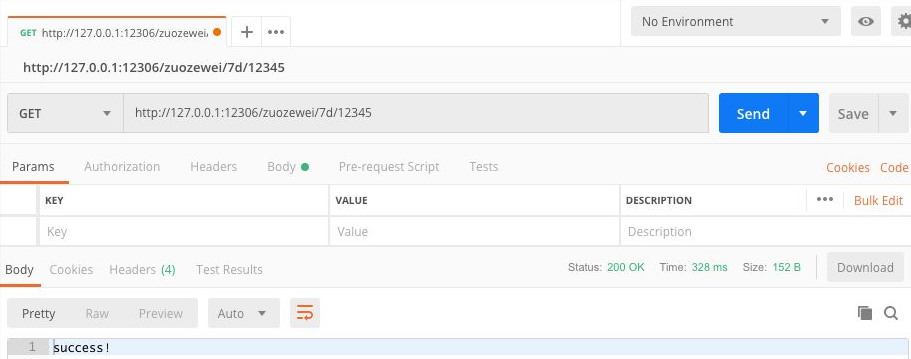
Moco 服务日志:
09 十二月 2018 13:20:28 [nioEventLoopGroup-3-2] INFO  Request received:

GET /zuozewei/7d/12345 HTTP/1.1
Host: 127.0.0.1:12306
User-Agent: PostmanRuntime/7.4.0
Accept: */*
Accept-Encoding: gzip, deflate
Cache-Control: no-cache
Content-Type: multipart/form-data; boundary=--------------------------030965700716204296542028
Postman-Token: 7615db1b-77e1-40f7-bdc3-e464c4e7269a
X-Lantern-Version: 5.1.0
Content-Length: 0

09 十二月 2018 13:20:28 [nioEventLoopGroup-3-2] INFO  Response return:

HTTP/1.1 200
Content-Length: 10
Content-Type: text/plain; charset=utf-8

success!
l. 约定指定 Json 响应
JSON 脚本:
[
  {
    "description":"这是一个指定Json响应的post请求",
    "request":{
      "uri":"/7d",
      "method":"post"
    },
    "response":{
      "json":{
        "name":"success",
        "code":"1"
      }
    }
  }
]
通过 Postman 验证服务,测试 Post 请求:
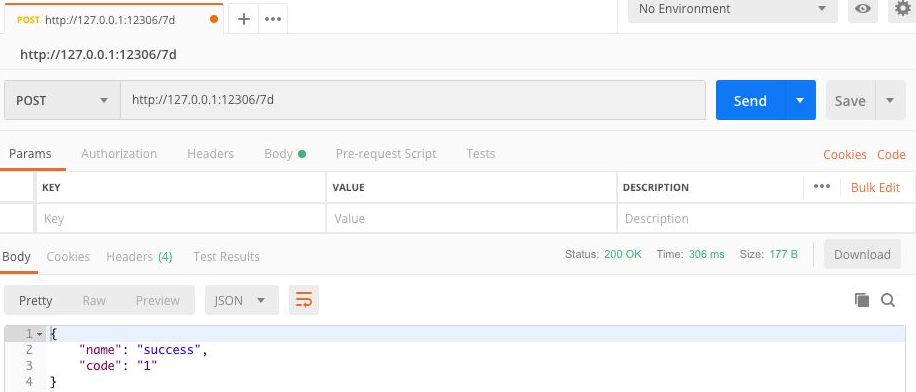
Moco 服务日志:
09 十二月 2018 13:25:19 [nioEventLoopGroup-3-2] INFO  Request received:

POST /7d HTTP/1.1
Host: 127.0.0.1:12306
User-Agent: PostmanRuntime/7.4.0
Content-Length: 0
Accept: */*
Accept-Encoding: gzip, deflate
Cache-Control: no-cache
Content-Type: multipart/form-data; boundary=--------------------------703341725381001692596870
Postman-Token: e5686919-85b9-44d0-8a73-61bf804b6377
X-Lantern-Version: 5.1.0

09 十二月 2018 13:25:19 [nioEventLoopGroup-3-2] INFO  Response return:

HTTP/1.1 200
Content-Length: 29
Content-Type: application/json; charset=utf-8

{"name":"success","code":"1"}
m. 约定响应 Status
JSON 脚本:
[
  {
    "description":"这是指定响应status的get请求",
    "request":{
      "uri":"/7d",
      "method":"get"
    },
    "response":{
      "status":200
    }
  }
]
通过 Postman 验证服务,测试 Get 请求:
Moco 服务日志:
09 十二月 2018 13:29:07 [nioEventLoopGroup-3-2] INFO  Request received:

GET /7d HTTP/1.1
Host: 127.0.0.1:12306
User-Agent: PostmanRuntime/7.4.0
Accept: */*
Accept-Encoding: gzip, deflate
Cache-Control: no-cache
Content-Type: multipart/form-data; boundary=--------------------------465777039297587100709267
Postman-Token: 791fa21c-386f-4389-aaa9-ba06d9e53aff
X-Lantern-Version: 5.1.0
Content-Length: 0

09 十二月 2018 13:29:07 [nioEventLoopGroup-3-2] INFO  Response return:

HTTP/1.1 200
n. 约定响应 Headers
JSON 脚本:
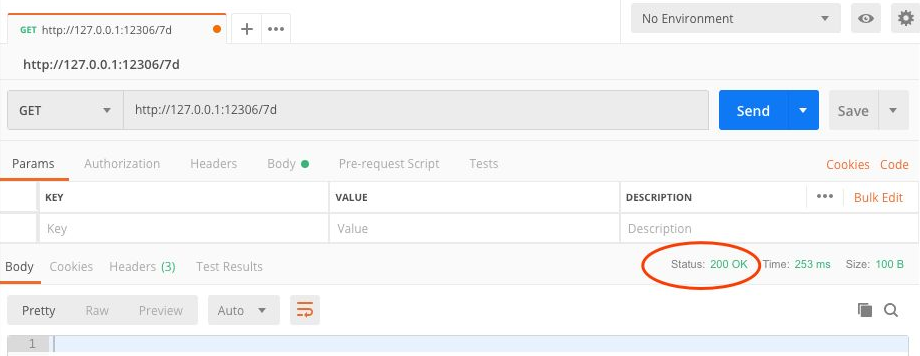
[
  {
    "description":"这是一个get请求",
    "request":{
      "uri":"/7d",
      "method":"get"
    },
    "response":{
      "headers":{
        "content-type":"application/json"
      }
    }
  }
]
通过 Postman 验证服务,测试 Get 请求:
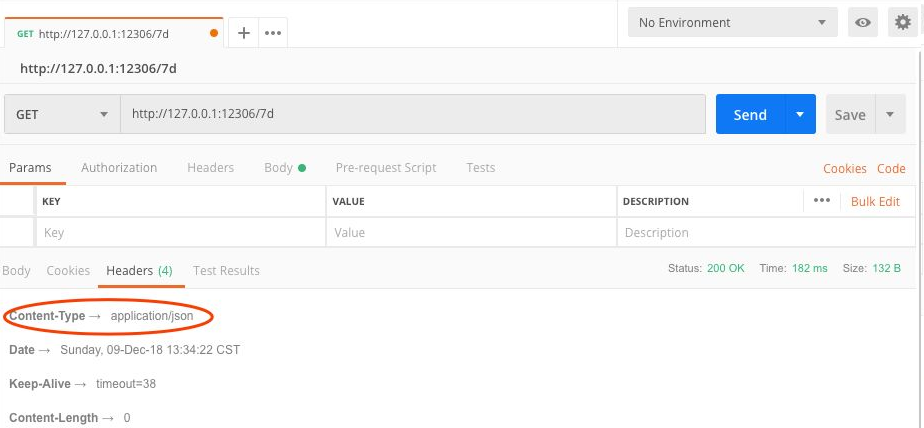
Moco 服务日志:
09 十二月 2018 13:34:22 [nioEventLoopGroup-3-2] INFO  Request received:

GET /7d HTTP/1.1
Host: 127.0.0.1:12306
User-Agent: PostmanRuntime/7.4.0
Accept: */*
Accept-Encoding: gzip, deflate
Cache-Control: no-cache
Content-Type: multipart/form-data; boundary=--------------------------774041889819140984857561
Postman-Token: 0a51f958-0338-4afa-8ff6-af45d61e12a7
X-Lantern-Version: 5.1.0
Content-Length: 0

09 十二月 2018 13:34:22 [nioEventLoopGroup-3-2] INFO  Response return:

HTTP/1.1 200
content-type: application/json
o. 约定响应 Cookies
JSON 脚本:
[
  {
    "description":"这是一个响应Cookies的get请求",
    "request":{
      "uri":"/7d",
      "method":"get"
    },
    "response":{
      "cookies":{
        "login":"7dgroup"
      }
    }
  }
]
通过 Postman 验证服务,测试 Get 请求:

Moco 服务日志:
09 十二月 2018 13:39:00 [nioEventLoopGroup-3-2] INFO  Request received:

GET /7d HTTP/1.1
Host: 127.0.0.1:12306
User-Agent: PostmanRuntime/7.4.0
Accept: */*
Accept-Encoding: gzip, deflate
Cache-Control: no-cache
Content-Type: multipart/form-data; boundary=--------------------------315176206881627055625168
Postman-Token: f6d1ae6b-c1c2-474a-827c-f02ed3f23482
X-Lantern-Version: 5.1.0
Content-Length: 0

09 十二月 2018 13:39:00 [nioEventLoopGroup-3-2] INFO  Response return:

HTTP/1.1 200
Set-Cookie: login=7dgroup; Path=/
p. 约定重定向 RedirectTo
JSON 脚本:
[
  {
    "description":"这是一个重定向的get请求",
    "request":{
      "uri":"/7d",
      "method":"get"
    },
    "redirectTo":"https://www.baidu.com"
  }
]
通过浏览器验证服务,测试 Get 请求 http://127.0.0.1:12306/7d,请求会自动重定向到 https://www.baidu.com
Moco 服务日志:
09 十二月 2018 13:43:58 [nioEventLoopGroup-4-2] INFO  Request received:

GET /7d HTTP/1.1
Host: 127.0.0.1:12306
User-Agent: PostmanRuntime/7.4.0
Accept: */*
Accept-Encoding: gzip, deflate
Cache-Control: no-cache
Content-Type: multipart/form-data; boundary=--------------------------167408129884853494096695
Cookie: login=7dgroup
Postman-Token: f83696d4-37ba-45b6-aff6-6f20982673ac
X-Lantern-Version: 5.1.0
Content-Length: 0

09 十二月 2018 13:43:58 [nioEventLoopGroup-4-2] INFO  Response return:

HTTP/1.1 302
Location: http://www.baidu.com
5. 小结
Moco 的使用很简单,配置也很方便,目前更是提供了 http、rest、socket 服务。但是也仅仅是能 stub 接口,模拟出简单的场景。如果接收到请求后需要做一些处理,如需查询数据库、进行运算、或者一些复杂的操作,就无能为力了。所以是否选用 Moco,就取决于测试人员是否只是需要一个简单的模拟 Server
五、 WireMock
1. 简介
WireMock 是一个HTTP模拟服务,其核心也是一个WEB服务,WireMock主要是为特定请求提供固定的返回值。
WireMock可以作为单独进程启动,模拟一个WEB服务器,提供一些API访问,并返回特定的返回值。也可以作为第三方库在项目中使用。
2. WireMock搭建
a. 先下载WireMock的Jar包, 本文使用下载地址如下:https://repo1.maven.org/maven2/com/github/tomakehurst/wiremock-jre8-standalone/2.33.2/wiremock-jre8-standalone-2.33.2.jar
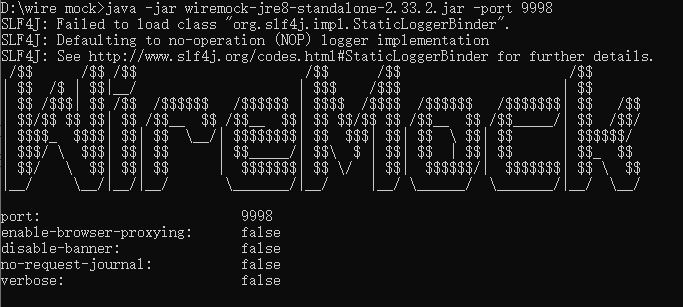
b. 到指定目录启动Jar,同时也可以加一些启动参数。下面的命令表示用9998端口启动这个模拟服务器
java -jar wiremock-jre8-standalone-2.33.2.jar -port 9998
启动界面如下:
3. WireMock使用
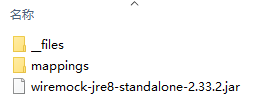
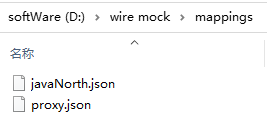
WireMock启动时候,会生成 _files 和 mappings 两个文件夹, _files文件夹中可以放一些返回数据文件。mappings文件夹中存放映射关系,使用json格式的文件。
如下图,新建json文件,启动WireMock时会加载这些文件,更新之后只需要重启WireMock即可。
a. 简单API映射
json文件:
{
 "mappings": [
  {
   "request": {
    "method": "GET",
    "url": "/api/hello"
   },
   "response": {
    "body": "Hello world!",
    "headers": {
     "Content-Type": "text/plain"
    },
    "status": 200
   }
  }
 ]
}
启动后访问:

b. 返回response中添加header
{
    "request": {
        "method": "GET",
        "url": "/whatever"
    },
    "response": {
        "status": 200,
        "headers": {
            "Content-Type": "text/plain",
            "Set-Cookie": ["session_id=91837492837", "split_test_group=B"],
            "Cache-Control": "no-cache"
        }
    }
}
c. 返回数组
{
    "response": {
        "status": 200,
        "jsonBody": {
          "arbitrary_json": [1, 2, 3]
        }
    }
}
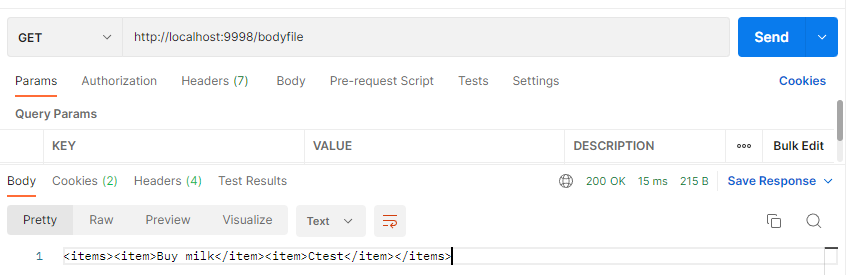
d. 返回指定文件数据 写在_file文件夹里面
json脚本:
{
    "request": {
        "method": "GET",
        "url": "/bodyfile"
    },
    "response": {
        "status": 200,
        "bodyFileName": "/myfile.xml"
    }
}
_file文件夹下面新建myfile.xml文件:
<items>
    <item>buy milk</item>
    <item>Ctest</item>
</items>
访问接口则可以直接返回文件中的数据:
e. URL映射
WireMock也支持映射正则表达式:
{
  "request": {
    "method": "GET",
    "urlPattern": "/your/([a-z]*)?and=query"
  },
  "response":{
    "body":"hello",
    "status":200
  }
}
访问:

f. 指定请求头
{
  "request": {
    ...
    "headers": {
      "Content-Type": {
        "equalTo": "application/json",
        "caseInsensitive": true
      }
    }
    ...
  },
  ...
}
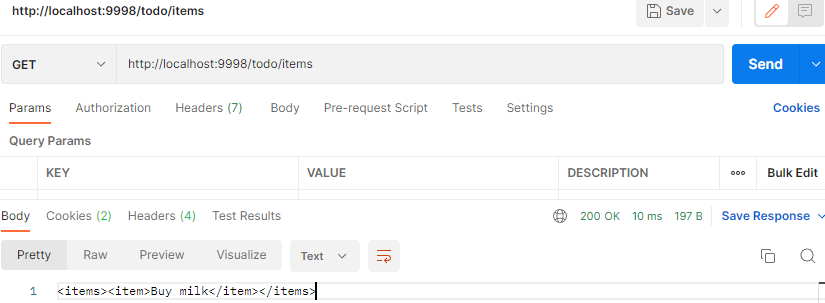
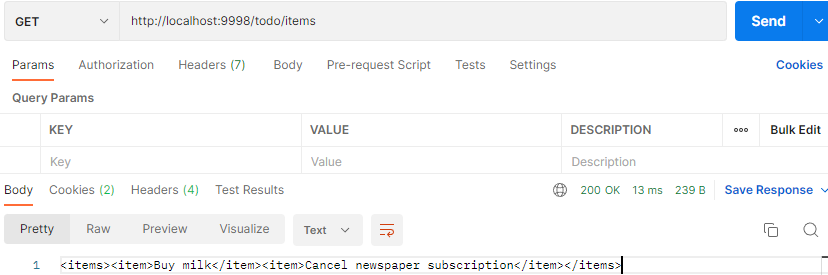
g. 可变状态请求
requiredScenarioState/newScenarioState 可以记录当前API映射所处的状态以及新的状态,可以通过改变其状态,从而可以使同一个API返回不同的结果。如下面的请求则可以改变状态,返回不同的结果。
{
    "mappings": [
        {
            "scenarioName": "To do list",
            "requiredScenarioState": "Started",
            "request": {
                "method": "GET",
                "url": "/todo/items"
            },
            "response": {
                "status": 200,
                "body": "< items >< item >Buy milk< /item >< /items >"
            }
        },
        {
            "scenarioName": "To do list",
            "requiredScenarioState": "Started",
            "newScenarioState": "Cancel newspaper item added",
            "request": {
                "method": "POST",
                "url": "/todo/items",
                "bodyPatterns": [
                    {
                        "contains": "Cancel newspaper subscription"
                    }
                ]
            },
            "response": {
                "status": 201
            }
        },
        {
            "scenarioName": "To do list",
            "requiredScenarioState": "Cancel newspaper item added",
            "request": {
                "method": "GET",
                "url": "/todo/items"
            },
            "response": {
                "status": 200,
                "body": "< items >< item >Buy milk< /item >< item >Cancel newspaper subscription< /item >< /items >"
            }
        }
    ]
}
第一次访问时,Started状态:
访问第二个post接口,改变其状态;
再次访问API,会返回新的数据:
h. API故障模拟
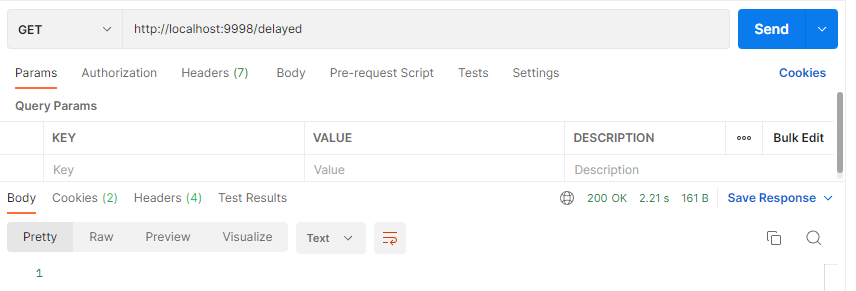
设置延时返回,如下可以设置定时延迟2秒:
{
  "request": {
   "method": "GET",
   "url": "/delayed"
  },
  "response": {
   "status": 200,
   "fixedDelayMilliseconds": 2000
  }
 }
如下是延迟2秒的返回结果:
同时也可以设置随机的延迟时间:
{
    "request": {
        "method": "GET",
        "url": "/random/delayed"
    },
    "response": {
        "status": 200,
        "delayDistribution": {
            "type": "lognormal",
            "median": 50,
            "sigma": 0.4
    }
    }
}
4. 总结
WireMock可以快速搭建Web服务,可以模拟开发测试需要的各种请求,使用十分方便。对于维护测试环境稳定以及提高开发效率方面都有不错的效果。
userDao

 浙公网安备 33010602011771号