


十次方社交项目-消息通知系统改进6
1. 获取新消息通知的两种模式
用户获取新的消息通知有两种模式
- 上线登录后向系统主动索取
- 在线时系统向接收者主动推送新消息
新消息提醒功能需要定时轮询接口的方式太低效,改进点如下
-
将新消息提醒数据由tb_notice_fresh表转移到rabbitmq中,减轻数据库访问压力
-
将轮询接口的伪推送改进为真正的使用全双工长连接进行的推送
2.1 消息通知微服务加入netty框架,为页面中的websocket连接提供接入服务
2.2 netty框架与rabbitmq对接,接收并下发新消息提醒数据
2.2 将页面中的定时轮询接口代码替换为websocket连接和事件处理
2. 上线登录后向系统索取
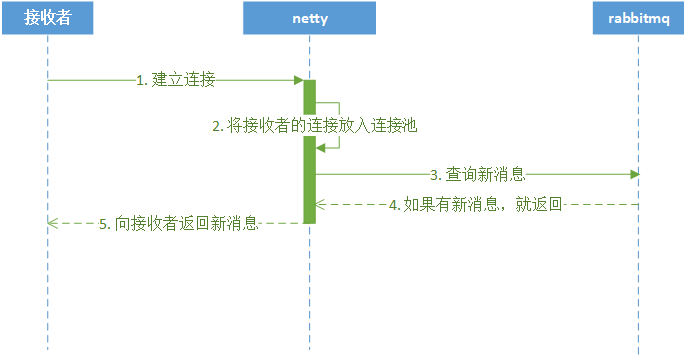
此模式是接受者请求系统,系统将新的消息通知返回给接收者的模式,流程如下:
1)接收者向服务端netty请求WebSocket连接
2)Netty服务把连接放到自己的连接池中
3)Netty根据接受者信息向RabbitMQ查询消息
4)如果有新消息,返回新消息通知
5)使用WebSocket连接向接收者返回新消息的数量
3. 在线时系统向接收者主动推送
此模式是系统将新的消息通知返回给接收者的模式,流程如下:
1)RabbitMQ将新消息数据推送给Netty
2)Netty从连接池中取出接收者的WebSocket连接
3)Netty通过接收者的WebSocket连接返回新消息的数量
二、文章订阅群发消息改进
文章订阅群发消息的改进步骤:
1)准备RabbitMQ消息中间件
2)改进文章订阅功能,创建RabbitMQ队列存放新消息通知
3)改进发布文章后群发消息通知功能
4)整合Netty和WebSocket实现双向通信
在虚拟机中启动RabbitMQ
docker run -id --name=tensquare_rabbit -p 5671:5671 -p 5672:5672 -p 4369:4369 -p 15672:15672 -p 25672:25672 rabbitmq:management
访问地址:http://192.168.240.134:15672 登录账号: guest 登录密码: guest
1. 文章订阅功能改进
1.1 修改文章微服务配置文件
因为文章订阅功能需要增加Rabbitmq的交换机和队列的绑定、解绑等相关操作,所以需要让tensquare_article微服务具备操作Rabbitmq的能力。
修改tensquare_article微服务的application.yml配置文件,在该文件中添加Rabbitmq相关的配置
然后修改tensquare_article微服务的pom.xml项目配置文件,添加spring-boot-starter-amqp依赖
1.2 修改文章订阅功能代码
在ArticleService中原有的subscribe方法中,增加了几个业务逻辑
-
- 定义Rabbitmq的direct类型的交换机
- 定义用户的Rabbitmq队列
- 将队列通过路由键绑定或解绑direct交换机
改进后完整的subscribe方法如下
    @Autowired
    private RabbitTemplate rabbitTemplate;

    public Boolean subscribe(String userId, String articleId) {
        //根据文章id查询文章作者id
        String authorId = articleDao.selectById(articleId).getUserid();

        //创建Rabbit管理器
        RabbitAdmin rabbitAdmin = new RabbitAdmin(rabbitTemplate.getConnectionFactory());
        //声明exchange,处理新增文章消息
        DirectExchange exchange = new DirectExchange("article_subscribe");
        rabbitAdmin.declareExchange(exchange);
        //创建queue,每个用户都有自己的队列,通过用户id进行区分
        Queue queue = new Queue("article_subscribe_"+userId, true);
        //声明exchange和queue的绑定关系,设置路由键为作者id,队列只收到对应作者的新增文章消息
        Binding binding = BindingBuilder.bind(queue).to(exchange).with(authorId);

        //存放用户订阅信息的集合key,里面存放作者id
        String userKey = "article_subscribe_"+userId;
        //存放作者订阅者信息的集合key,里面存放订阅者id
        String authorKey = "article_author_"+authorId;

        //查询该用户是否已经订阅作者
        //使用userKey查询redis查询不到是因为userkey存储的是编码后的\xac\xed\x00\x05t\x00\x10article_author_2
        Boolean flag = redisTemplate.boundSetOps(userKey).isMember(authorId);
        if(flag){
            //已经订阅,则取消订阅
            redisTemplate.boundSetOps(userKey).remove(authorId);
            redisTemplate.boundSetOps(authorKey).remove(userId);

            //删除队列绑定关系
            rabbitAdmin.removeBinding(binding);
            return false;
        }else {
            //没有订阅,则进行订阅
            redisTemplate.boundSetOps(userKey).add(authorId);
            redisTemplate.boundSetOps(authorKey).add(userId);

            //声明队列和绑定队列
            rabbitAdmin.declareQueue(queue);
            rabbitAdmin.declareBinding(binding);
            return true;
        }
    }
2. 发布文章触发群发消息
在原有的处理逻辑中,增加向交换机发送Rabbitmq消息的业务逻辑。
修改ArticleService中的 save方法,在新增方法的最后面添加下面的代码:
        //入库成功后后,发送mq消息,内容是消息通知id
        //第一个参数是交换机名,使用之前完成的订阅功能的交换机
        //第二个参数是路由键,使用文章作者的id作为路由键
        //第三个参数是消息内容,这里只完成新消息提醒,内容是文章id
        rabbitTemplate.convertAndSend("article_subscribe",authorId,id);
删除消息通知微服务中的 新的通知提醒消息入库 逻辑,因为现在新通知由RabbitMQ发送。修改tensquare_notice微服务的NoticeService方法:
    public void save(Notice notice) {
        //初始化数据
        notice.setState("0");
        notice.setCreatetime(new Date());
        String id = idWorker.nextId()+"";
        notice.setId(id);
        //通知消息入库
        noticeDao.insert(notice);

        //删除消息通知微服务中的新的通知提醒消息入库逻辑,现在新通知由RabbitMQ发送
        //待推送消息入库,新的通知提醒消息
//        NoticeFresh noticeFresh = new NoticeFresh();
//        noticeFresh.setNoticeId(id);
//        noticeFresh.setUserId(notice.getReceiverId());
//        noticeFreshDao.insert(noticeFresh);
    }
三、IO编程
在开始了解Netty之前,先来实现一个客户端与服务端通信的程序,使用传统的IO编程和使用NIO编程有什么不一样。
1. 传统IO编程
每个客户端连接过来后,服务端都会启动一个线程去处理该客户端的请求。阻塞I/O的通信模型示意图如下:
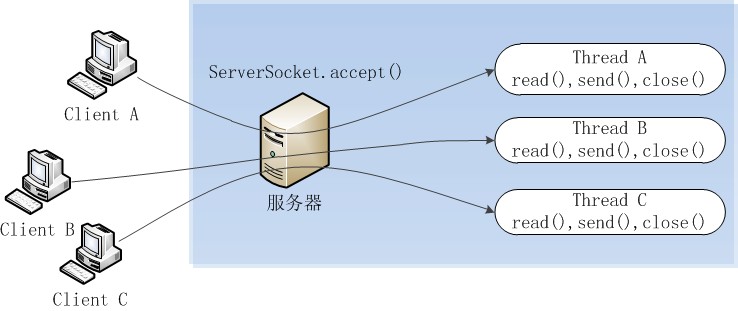
业务场景:客户端每隔两秒发送字符串给服务端,服务端收到之后打印到控制台。
1.1 服务端实现:
package com.itheima.io;

import java.io.InputStream;
import java.net.ServerSocket;
import java.net.Socket;

//传统IO编程,服务端
public class IOServer {

    public static void main(String[] args) throws Exception {
        ServerSocket serverSocket = new ServerSocket(8000);//端口不建议使用1024以下的端口
        while (true){
            //1. 使用阻塞的方式获取新的连接
            Socket socket = serverSocket.accept();

            //每个客户端连接的时候,创建新线程
            new Thread(){
                @Override
                public void run(){
                    String name = Thread.currentThread().getName();
                    try{
                        //2. 每一个新的连接都创建一个线程,负责读取数据
                        byte[] data = new byte[1024];
                        InputStream inputStream = socket.getInputStream();
                        while(true){
                            int len;
                            //3. 按字节流方式读取数据
                            while ((len=inputStream.read(data)) != -1){
                                System.out.println("线程"+name+":"+new String(data,0,len));
                            }
                        }
                    }catch (Exception e){
                    }
                }
            }.start();
        }
    }
}
1.2 客户端实现:
package com.itheima.io;

import java.net.Socket;

//IO编程的客户端
public class MyClient {
    public static void main(String[] args) {
        //测试使用不同的线程数进行访问,5个线程
        for (int i = 0; i < 5; i++) {
            new ClientDemo().start();
        }
    }

    static class ClientDemo extends Thread{
        @Override
        public void run() {
            try{
                Socket socket = new Socket("127.0.0.1",8000);
                while (true){
                    socket.getOutputStream().write("测试数据".getBytes());
                    socket.getOutputStream().flush();
                    Thread.sleep(2000);
                }
            }catch (Exception e){
            }
        }
    }
}
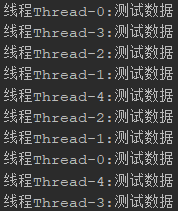
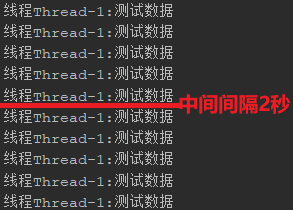
先执行服务端,再执行客户端,可以发现每隔2秒打印一次,每次打印5个线程信息
1.3 这样做存在的问题
从服务端代码中我们可以看到,在传统的IO模型中,每个连接创建成功之后都需要一个线程来维护,每个线程包含一个while死循环。
如果在用户数量较少的情况下运行是没有问题的,但是对于用户数量比较多的业务来说,服务端可能需要支撑成千上万的连接,IO模型可能就不太合适了。
如果有1万个连接就对应1万个线程,继而1万个while死循环,这种模型存在以下问题:
-
- 当客户端越多,就会创建越多的处理线程。线程是操作系统中非常宝贵的资源,同一时刻有大量的线程处于阻塞状态是非常严重的资源浪费。并且如果务器遭遇洪峰流量冲击,例如双十一活动,线程池会瞬间被耗尽,导致服务器瘫痪。
- 因为是阻塞式通信,线程爆炸之后操作系统频繁进行线程切换,应用性能急剧下降。
- IO编程中数据读写是以字节流为单位,效率不高。
2. NIO编程
NIO,也叫做new-IO或者non-blocking-IO,可理解为非阻塞IO。
2.1 NIO编程模型中,新来一个连接不再创建一个新的线程,而是可以把这条连接直接绑定到某个固定的线程,然后这条连接所有的读写都由这个线程来负责,我们用一幅图来对比一下IO与NIO:
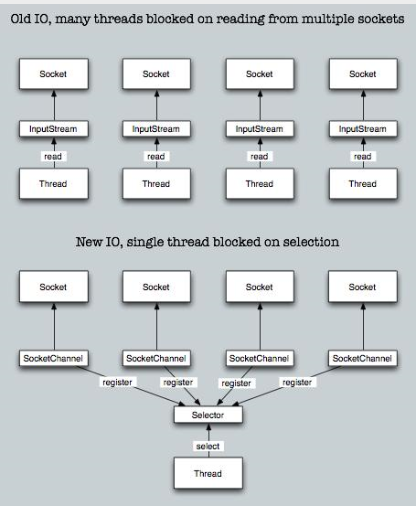
如上图所示,IO模型中,一个连接都会创建一个线程,对应一个while死循环,死循环的目的就是不断监测这条连接上是否有数据可以读。但是在大多数情况下,1万个连接里面同一时刻只有少量的连接有数据可读,因此,很多个while死循环都白白浪费掉了,因为没有数据。
而在NIO模型中,可以把这么多的while死循环变成一个死循环,这个死循环由一个线程控制。这就是NIO模型中选择器(Selector)的作用,一条连接来了之后,现在不创建一个while死循环去监听是否有数据可读了,而是直接把这条连接注册到选择器上,通过检查这个选择器,就可以批量监测出有数据可读的连接,进而读取数据。
举个栗子,在一家餐厅里,客人有点菜的需求,一共有100桌客人,有两种方案可以解决客人点菜的问题:
-
-
方案一:每桌客人配一个服务生,每个服务生就在餐桌旁给客人提供服务。如果客人要点菜,服务生就可以立刻提供点菜的服务。那么100桌客人就需要100个服务生提供服务,这就是IO模型,一个连接对应一个线程。
-
方案二:一个餐厅只有一个服务生(假设服务生可以忙的过来)。这个服务生隔段时间就询问所有的客人是否需要点菜,然后每一时刻处理所有客人的点菜要求。这就是NIO模型,所有客人都注册到同一个服务生,对应的就是所有的连接都注册到一个线程,然后批量轮询。
-
这就是NIO模型解决线程资源受限的方案,实际开发过程中,我们会开多个线程,每个线程都管理着一批连接,相对于IO模型中一个线程管理一条连接,消耗的线程资源大幅减少。
2.2 NIO的三大核心组件:通道(Channel)、缓冲(Buffer)、选择器(Selector)
-
通道(Channel)
是传统IO中的Stream(流)的升级版。Stream是单向的、读写分离(inputstream和outputstream),Channel是双向的,既可以进行读操作,又可以进行写操作。
-
缓冲(Buffer)
Buffer可以理解为一块内存区域,可以写入数据,并且在之后读取它。
-
选择器(Selector)
选择器(Selector)可以实现一个单独的线程来监控多个注册在她上面的信道(Channel),通过一定的选择机制,实现多路复用的效果。
2.3 NIO相对于IO的优势:
- IO是面向流的,每次都是从操作系统底层一个字节一个字节地读取数据,并且数据只能从一端读取到另一端,不能前后移动流中的数据。NIO则是面向缓冲区的,每次可以从这个缓冲区里面读取一块的数据,并且可以在需要时在缓冲区中前后移动。
- IO是阻塞的,这意味着,当一个线程读取数据或写数据时,该线程被阻塞,直到有一些数据被读取,或数据完全写入,在此期间该线程不能干其他任何事情。而NIO是非阻塞的,不需要一直等待操作完成才能干其他事情,而是在等待的过程中可以同时去做别的事情,所以能最大限度地使用服务器的资源。
- NIO引入了IO多路复用器selector。selector是一个提供channel注册服务的线程,可以同时对接多个channel,并在线程池中为channel适配、选择合适的线程来处理channel。由于NIO模型中线程数量大大降低,线程切换效率因此也大幅度提高。
2.4 和前面一样的场景,使用NIO实现(复制代码演示效果即可):
package com.itheima.io;

import java.io.IOException;
import java.net.InetSocketAddress;
import java.nio.ByteBuffer;
import java.nio.channels.SelectionKey;
import java.nio.channels.Selector;
import java.nio.channels.ServerSocketChannel;
import java.nio.channels.SocketChannel;
import java.nio.charset.Charset;
import java.util.Iterator;
import java.util.Set;

public class NIOServer {
    public static void main(String[] args) throws Exception {
        //负责轮询是否有新的连接
        Selector serverSelector = Selector.open();
        //负责轮询处理连接中的数据
        Selector clientSelector = Selector.open();

        new Thread(){
            @Override
            public void run() {
                //对应IO编程中服务端启动
                ServerSocketChannel listenerChannel = null;
                try {
                    listenerChannel = ServerSocketChannel.open();
                    listenerChannel.socket().bind(new InetSocketAddress(8000));
                    listenerChannel.configureBlocking(false);
                    //OP_ACCEPT表示服务器监听到了客户端连接,服务器可以接收这个连接了。channel注册到selector
                    listenerChannel.register(serverSelector, SelectionKey.OP_ACCEPT);
                    while (true){
                        //监测是否有新的连接,这里的1指的是阻塞的时间为1ms
                        if(serverSelector.select(1)>0){
                            Set<SelectionKey> set = serverSelector.selectedKeys();
                            Iterator<SelectionKey> keyIterator = set.iterator();
                            while (keyIterator.hasNext()){
                                SelectionKey key = keyIterator.next();
                                if(key.isAcceptable()){
                                    try{
                                        //1. 每来一个新连接,不需要创建一个线程,而是直接注册到clientSelector
                                        SocketChannel clientChannel = ((ServerSocketChannel) key.channel()).accept();
                                        clientChannel.configureBlocking(false);
                                        //OP_READ表示通道中已经有了可读的数据,可以执行读操作了(通道目前有数据,可以进行读操作了)
                                        clientChannel.register(clientSelector,SelectionKey.OP_READ);
                                    }finally {
                                        keyIterator.remove();
                                    }
                                }
                            }
                        }
                    }
                } catch (IOException e) {
                    e.printStackTrace();
                }
            }
        }.start();

        new Thread(){
            @Override
            public void run() {
                String name = Thread.currentThread().getName();
                try{
                    while (true){
                        //2. 批量轮询是否有哪些连接有数据可读,这里的1指的是阻塞的时间为1ms
                        if(clientSelector.select(1)>0){
                            Set<SelectionKey> set = clientSelector.selectedKeys();
                            Iterator<SelectionKey> keyIterator = set.iterator();
                            while (keyIterator.hasNext()) {
                                SelectionKey key = keyIterator.next();
                                if(key.isReadable()){
                                    try{
                                        SocketChannel clientChannel = (SocketChannel) key.channel();
                                        ByteBuffer byteBuffer = ByteBuffer.allocate(1024);
                                        //3. 读取数据以块为单位批量读取
                                        clientChannel.read(byteBuffer);
                                        byteBuffer.flip();
                                        //每隔2秒输出5条数据:线程Thread-1:测试数据
                                        System.out.println("线程"+name+":"+ Charset.defaultCharset().newDecoder().decode(byteBuffer).toString());
                                    }finally {
                                        keyIterator.remove();
                                        key.interestOps(SelectionKey.OP_READ);
                                    }
                                }
                            }
                        }
                    }
                }catch (IOException ignored){
                }
            }
        }.start();
    }
}
先执行NIOServer,再执行IO中的MyClient,查看结果:每隔2秒打印5条数据,且只有一个线程
五、Netty
1. 为什么使用Netty
我们已经有了NIO能够提高程序效率了,为什么还要使用Netty?
简单的说:Netty封装了JDK的NIO,让你用得更爽,你不用再写一大堆复杂的代码了。
官方术语:Netty是一个异步事件驱动的网络应用框架,用于快速开发可维护的高性能服务器和客户端。
下面是使用Netty不使用JDK原生NIO的一些原因:
- 使用JDK自带的NIO需要了解太多的概念,编程复杂
- Netty底层IO模型随意切换,而这一切只需要做微小的改动,就可以直接从NIO模型变身为IO模型
- Netty自带的拆包解包,异常检测等机制,可以从NIO的繁重细节中脱离出来,只需要关心业务逻辑
- Netty解决了JDK的很多包括空轮询在内的bug
- Netty底层对线程,selector做了很多细小的优化,精心设计的线程模型做到非常高效的并发处理
- 自带各种协议栈让你处理任何一种通用协议都几乎不用亲自动手
- Netty社区活跃,遇到问题随时邮件列表或者issue
- Netty已经历各大rpc框架,消息中间件,分布式通信中间件线上的广泛验证,健壮性无比强大
和IO编程一样的案例:
添加Netty依赖
<dependency>
    <groupId>io.netty</groupId>
    <artifactId>netty-all</artifactId>
    <version>4.1.5.Final</version>
</dependency>
服务端:
package com.itheima.netty;

import io.netty.bootstrap.ServerBootstrap;
import io.netty.channel.ChannelHandlerContext;
import io.netty.channel.ChannelInitializer;
import io.netty.channel.ChannelPipeline;
import io.netty.channel.SimpleChannelInboundHandler;
import io.netty.channel.nio.NioEventLoopGroup;
import io.netty.channel.socket.nio.NioServerSocketChannel;
import io.netty.channel.socket.nio.NioSocketChannel;
import io.netty.handler.codec.string.StringDecoder;

public class NettyServer {
    public static void main(String[] args) {
        //用于接收客户端的连接以及为已接收的连接创建子通道,一般用于服务端。
        ServerBootstrap serverBootstrap = new ServerBootstrap();
        // EventLoopGroup包含有多个EventLoop的实例,用来管理event Loop的组件,可以理解为一个线程池,内部维护了一组线程。
        // 接收新连接线程,处理新的连接
        NioEventLoopGroup boos = new NioEventLoopGroup();
        // 读取数据的线程,处理数据
        NioEventLoopGroup worker = new NioEventLoopGroup();

     //服务端执行
        serverBootstrap
                .group(boos, worker)
                // Channel对网络套接字的I/O操作,例如读、写、连接、绑定等操作进行适配和封装的组件。
                .channel(NioServerSocketChannel.class)
                // ChannelInitializer用于对刚创建的channel进行初始化,将ChannelHandler添加到channel的ChannelPipeline处理链路中。
                .childHandler(new ChannelInitializer<NioSocketChannel>() {

                    //初始化channel的方法
                    protected void initChannel(NioSocketChannel ch) {
                        // 组件从流水线头部进入,流水线上的工人按顺序对组件进行加工,到达流水线尾部时商品组装完成。
                        // 流水线相当于ChannelPipeline
                        // 流水线工人相当于ChannelHandler
                        ChannelPipeline pipeline = ch.pipeline();
                        pipeline.addLast(new StringDecoder());
                        pipeline.addLast(new SimpleChannelInboundHandler<String>() {
                            //自己指定流水线工人可以干什么事
                            @Override
                            protected void channelRead0(ChannelHandlerContext ctx, String msg) {
                                System.out.println(msg);
                            }
                        });
                    }
                })
                .bind(8000);
    }
}
客户端:
package com.itheima.netty;

import io.netty.bootstrap.Bootstrap;
import io.netty.channel.Channel;
import io.netty.channel.ChannelFuture;
import io.netty.channel.ChannelInitializer;
import io.netty.channel.nio.NioEventLoopGroup;
import io.netty.channel.socket.nio.NioSocketChannel;
import io.netty.handler.codec.string.StringEncoder;

public class NettyClient {
    public static void main(String[] args) throws InterruptedException {
        // 不接受新的连接,并且是在父通道类完成一些操作,一般用于客户端的。
        Bootstrap bootstrap = new Bootstrap();
        // EventLoopGroup包含有多个EventLoop的实例,用来管理event Loop的组件
        NioEventLoopGroup group = new NioEventLoopGroup();
        //客户端执行
        bootstrap.group(group)
                // Channel对网络套接字的I/O操作,
                // 例如读、写、连接、绑定等操作进行适配和封装的组件。
                .channel(NioSocketChannel.class)
                // 用于对刚创建的channel进行初始化,
                // 将ChannelHandler添加到channel的ChannelPipeline处理链路中。
                .handler(new ChannelInitializer<Channel>() {
                    @Override
                    protected void initChannel(Channel ch) {
                        // 组件从流水线头部进入,流水线上的工人按顺序对组件进行加工
                        // 流水线相当于ChannelPipeline
                        // 流水线工人相当于ChannelHandler
                        ch.pipeline().addLast(new StringEncoder());
                    }
                });
        //客户端连接服务端
        Channel channel = bootstrap.connect("127.0.0.1", 8000).channel();

        while (true) {
            // 客户端使用writeAndFlush方法向服务端发送数据,返回的是ChannelFuture
            // 与jdk中线程的Future接口类似,即实现并行处理的效果
            // 可以在操作执行成功或失败时自动触发监听器中的事件处理方法。
            ChannelFuture channelFuture = channel.writeAndFlush("测试数据");
            Thread.sleep(2000);
        }
    }
}
先执行NettyServer再执行NettyClient,查看结果:NettyServer控制台每隔2秒打印一条数据

2. Netty的事件驱动
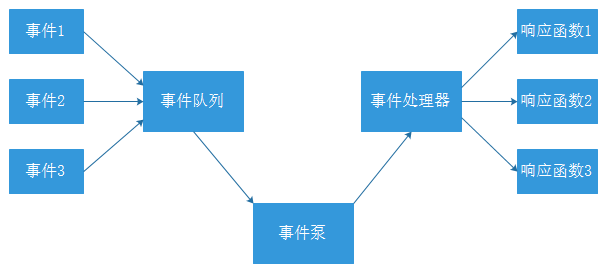
例如很多系统都会提供 onClick() 事件,这个事件就代表鼠标按下事件。事件驱动模型的大体思路如下:
- 有一个事件队列;
- 鼠标按下时,往事件队列中增加一个点击事件;
- 有个事件泵,不断循环从队列取出事件,根据不同的事件,调用不同的函数;
- 事件一般都各自保存各自的处理方法的引用。这样,每个事件都能找到对应的处理方法;
为什么使用事件驱动?
-
程序中的任务可以并行执行
-
任务之间高度独立,彼此之间不需要互相等待
-
在等待的事件到来之前,任务不会阻塞
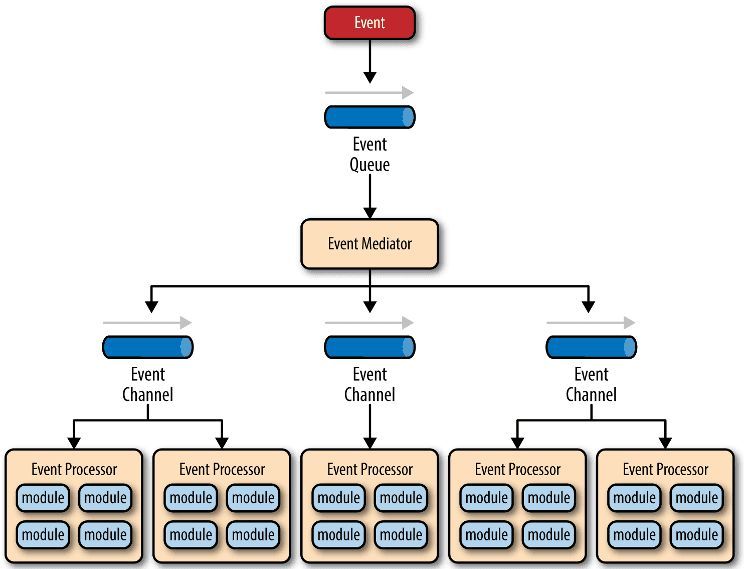
Netty使用事件驱动的方式作为底层架构,包括:
- 事件队列(event queue):接收事件的入口。
- 分发器(event mediator):将不同的事件分发到不同的业务逻辑单元。
- 事件通道(event channel):分发器与处理器之间的联系渠道。
- 事件处理器(event processor):实现业务逻辑,处理完成后会发出事件,触发下一步操作。
3. 核心组件
Netty 的功能特性图:
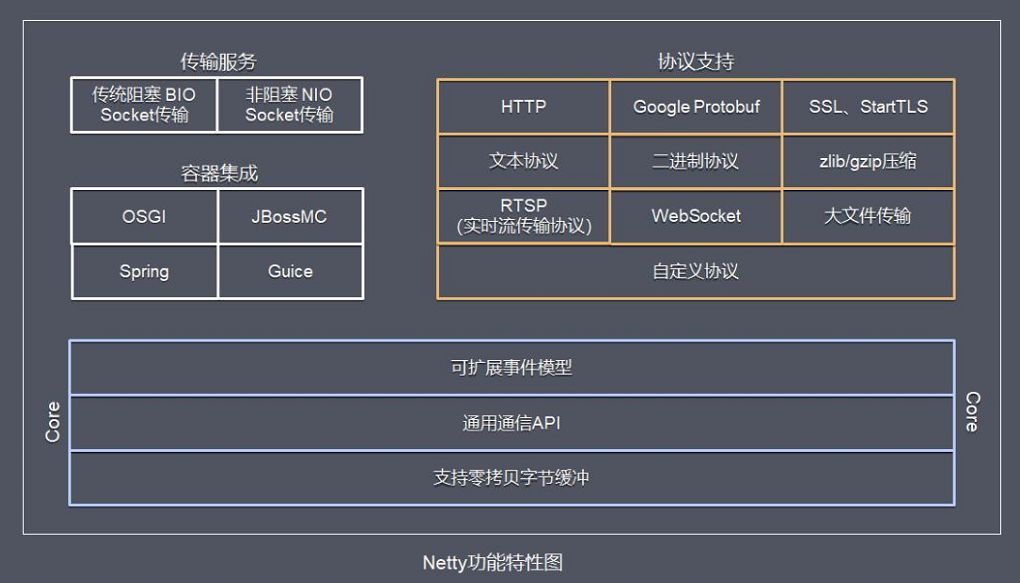
Netty 功能特性:
- 传输服务,支持 BIO 和 NIO。
- 容器集成:支持 OSGI、JBossMC、Spring、Guice 容器。
- 协议支持:HTTP、Protobuf、二进制、文本、WebSocket 等,支持自定义协议。
BIO和NIO的区别:

Netty框架包含如下的组件:
- ServerBootstrap :用于接受客户端的连接以及为已接受的连接创建子通道,一般用于服务端。
- Bootstrap:不接受新的连接,并且是在父通道类完成一些操作,一般用于客户端的。
- Channel:对网络套接字的I/O操作,例如读、写、连接、绑定等操作进行适配和封装的组件。
- EventLoop:处理所有注册其上的channel的I/O操作。通常情况一个EventLoop可为多个channel提供服务。
- EventLoopGroup:包含有多个EventLoop的实例,用来管理 event Loop 的组件,可以理解为一个线程池,内部维护了一组线程。
- ChannelHandler和ChannelPipeline:例如一个流水线车间,当组件从流水线头部进入,穿越流水线,流水线上的工人按顺序对组件进行加工,到达流水线尾部时商品组装完成。流水线相当于ChannelPipeline,流水线工人相当于ChannelHandler,源头的组件当做event。
- ChannelInitializer:用于对刚创建的channel进行初始化,将ChannelHandler添加到channel的ChannelPipeline处理链路中。
- ChannelFuture:与jdk中线程的Future接口类似,即实现并行处理的效果。可以在操作执行成功或失败时自动触发监听器中的事件处理方法。
六、整合Netty和WebSocket
我们需要使用netty对接websocket连接,实现双向通信,这一步需要有服务端的netty程序,用来处理客户端的websocket连接操作,例如建立连接,断开连接,收发数据等。
1. 修改配置
1.1 修改消息通知微服务模块tensquare_notice的pom文件,添加下面的dependency依赖
<dependency>
    <groupId>org.springframework.boot</groupId>
    <artifactId>spring-boot-starter-amqp</artifactId>
</dependency>
<dependency>
    <groupId>io.netty</groupId>
    <artifactId>netty-all</artifactId>
    <version>4.1.5.Final</version>
</dependency>
1.2 修改application.yml文件,添加下面的配置
spring:
  rabbitmq:
    host: 192.168.240.134
这样消息通知微服务就引入了netty框架,并且具有了和Rabbitmq交互的能力
2. 实现Netty的整合
2.1 整合分析
现在的通讯模式如下:

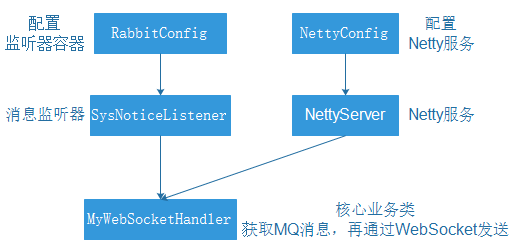
因为使用到了WebSocket和Netty,整合方式和以前有所不同,整合步骤:
- 编写
NettyServer,启动Netty服务。 - 使用配置Bean创建Netty服务。编写
NettyConfig。 - 编写和WebSocket进行通讯处理类
MyWebSocketHandler,进行MQ和WebSocket的消息处理。 - 使用配置Bean创建Rabbit监听器容器,使用监听器。编写
RabbitConfig。 - 编写Rabbit监听器
SysNoticeListener,用来获取MQ消息并进行处理。
五个类的关系如下图:
2.2 实现整合
1) 在com.tensquare.notice.config包下创建ApplicationContextProvider类
这个类是工具类,作用是获取Spring容器中的实例


package com.tensquare.notice.config;

import org.springframework.beans.BeansException;
import org.springframework.context.ApplicationContext;
import org.springframework.context.ApplicationContextAware;
import org.springframework.stereotype.Component;

@Component
public class ApplicationContextProvider implements ApplicationContextAware {
    /**
     * 上下文对象实例
     */
    private static ApplicationContext applicationContext;

    @Override
    public void setApplicationContext(ApplicationContext applicationContext) throws BeansException {
        this.applicationContext = applicationContext;
    }

    /**
     * 获取applicationContext
     *
     * @return
     */
    public static ApplicationContext getApplicationContext() {
        return applicationContext;
    }

    /**
     * 通过name获取 Bean.
     *
     * @param name
     * @return
     */
    public Object getBean(String name) {
        return getApplicationContext().getBean(name);
    }

    /**
     * 通过class获取Bean.
     *
     * @param clazz
     * @param <T>
     * @return
     */
    public <T> T getBean(Class<T> clazz) {
        return getApplicationContext().getBean(clazz);
    }

    /**
     * 通过name,以及Clazz返回指定的Bean
     *
     * @param name
     * @param clazz
     * @param <T>
     * @return
     */
    public <T> T getBean(String name, Class<T> clazz) {
        return getApplicationContext().getBean(name, clazz);
    }
}
2) 编写NettyServer
创建com.tensquare.notice.netty包,包下创建NettyServer类
package com.tensquare.notice.netty;

import io.netty.bootstrap.ServerBootstrap;
import io.netty.channel.Channel;
import io.netty.channel.ChannelInitializer;
import io.netty.channel.EventLoopGroup;
import io.netty.channel.nio.NioEventLoopGroup;
import io.netty.channel.socket.nio.NioServerSocketChannel;
import io.netty.handler.codec.http.HttpObjectAggregator;
import io.netty.handler.codec.http.HttpServerCodec;
import io.netty.handler.codec.http.websocketx.WebSocketServerProtocolHandler;

public class NettyServer {

    public void start(int port) {
        System.out.println("准备启动Netty。。。");
        ServerBootstrap serverBootstrap = new ServerBootstrap();

        //用来处理新连接的
        EventLoopGroup boos = new NioEventLoopGroup();
        //用来处理业务逻辑的,读写。。。
        EventLoopGroup worker = new NioEventLoopGroup();

        serverBootstrap.group(boos, worker)
                .channel(NioServerSocketChannel.class)
                .childHandler(new ChannelInitializer() {
                    @Override
                    protected void initChannel(Channel ch) throws Exception {
                        //请求消息解码器
                        ch.pipeline().addLast(new HttpServerCodec());
                        // 将多个消息转换为单一的request或者response对象
                        ch.pipeline().addLast(new HttpObjectAggregator(65536));
                        //处理WebSocket的消息事件
                        ch.pipeline().addLast(new WebSocketServerProtocolHandler("/ws"));

                        //创建自己的webSocket处理器,就是用来编写业务逻辑的
                        MyWebSocketHandler myWebSocketHandler = new MyWebSocketHandler();
                        ch.pipeline().addLast(myWebSocketHandler);
                    }
                }).bind(port);
    }
}
3) 编写NettyConfig
在com.tensquare.notice.config中编写
package com.tensquare.notice.config;

import com.tensquare.notice.netty.NettyServer;
import org.springframework.context.annotation.Bean;
import org.springframework.context.annotation.Configuration;

@Configuration
public class NettyConfig {

    @Bean
    public NettyServer createNettyServer() {
        NettyServer nettyServer = new NettyServer();

        //启动Netty服务,使用新的线程启动
        new Thread() {
            @Override
            public void run() {
                nettyServer.start(1234);//1024以上的端口
            }
        }.start();
        return nettyServer;
    }
}
4) 编写MyWebSocketHandler
com.tensquare.notice.netty包下编写
package com.tensquare.notice.netty;

import com.fasterxml.jackson.databind.ObjectMapper;
import com.tensquare.entity.Result;
import com.tensquare.entity.StatusCode;
import com.tensquare.notice.config.ApplicationContextProvider;
import io.netty.channel.Channel;
import io.netty.channel.ChannelHandlerContext;
import io.netty.channel.SimpleChannelInboundHandler;
import io.netty.handler.codec.http.websocketx.TextWebSocketFrame;
import org.springframework.amqp.rabbit.core.RabbitAdmin;
import org.springframework.amqp.rabbit.core.RabbitTemplate;
import org.springframework.amqp.rabbit.listener.SimpleMessageListenerContainer;
import java.util.HashMap;
import java.util.Properties;
import java.util.concurrent.ConcurrentHashMap;

public class MyWebSocketHandler extends SimpleChannelInboundHandler<TextWebSocketFrame> {

    private static ObjectMapper MAPPER = new ObjectMapper();

    //从Spring容器中获取消息监听器容器,处理订阅消息sysNotice
    SimpleMessageListenerContainer sysNoticeContainer = (SimpleMessageListenerContainer) ApplicationContextProvider.getApplicationContext()
            .getBean("sysNoticeContainer");
    SimpleMessageListenerContainer userNoticeContainer = (SimpleMessageListenerContainer) ApplicationContextProvider.getApplicationContext()
            .getBean("userNoticeContainer");


    //从Spring容器中获取RabbitTemplate
    RabbitTemplate rabbitTemplate = ApplicationContextProvider.getApplicationContext().getBean(RabbitTemplate.class);

    //存放WebSocket连接Map,根据用户id存放
    public static ConcurrentHashMap<String, Channel> userChannelMap = new ConcurrentHashMap();

    //用户请求WebSocket服务端,执行的方法
    //第一次请求的时候,需要建立WebSocket连接
    @Override
    protected void channelRead0(ChannelHandlerContext ctx, TextWebSocketFrame msg) throws Exception {
        //约定用户第一次请求携带的数据:{"userId":"1"}
        //获取用户请求数据并解析
        String json = msg.text();
        //解析json数据,获取用户id
        String userId = MAPPER.readTree(json).get("userId").asText();

        //第一次请求的时候,需要建立WebSocket连接
        Channel channel = userChannelMap.get(userId);
        if (channel == null) {
            //获取WebSocket的连接
            channel = ctx.channel();

            //把连接放到容器中
            userChannelMap.put(userId, channel);
        }

        //只用完成新消息的提醒即可,只需要获取消息的数量
        //获取RabbitMQ的消息内容,并发送给用户
        RabbitAdmin rabbitAdmin = new RabbitAdmin(rabbitTemplate);
        //获取订阅类消息
        //拼接获取队列名称
        String queueName = "article_subscribe_" + userId;
        //获取Rabbit的Properties容器
        Properties queueProperties = rabbitAdmin.getQueueProperties(queueName);

        //获取消息数量
        int noticeCount = 0;
        //判断Properties是否不为空
        if (queueProperties != null) {
            // 如果不为空,获取消息的数量
            noticeCount = (int) queueProperties.get("QUEUE_MESSAGE_COUNT");
        }
        //获取点赞类消息
        String userQueueName = "article_thumbup_"+userId;
        Properties userQueueProperties = rabbitAdmin.getQueueProperties(userQueueName);
        int userNoticeCount = 0;
        if(userQueueProperties != null){
            userNoticeCount = (int) userQueueProperties.get("QUEUE_MESSAGE_COUNT");
        }

        //封装返回的数据
        HashMap countMap = new HashMap();
        //订阅类消息数量
        countMap.put("sysNoticeCount", noticeCount);
        //点赞类消息数量
        countMap.put("userNoticeCount",userNoticeCount);
        Result result = new Result(true, StatusCode.OK, "查询成功", countMap);

        //把数据发送给用户
        channel.writeAndFlush(new TextWebSocketFrame(MAPPER.writeValueAsString(result)));

        //把消息从队列里面清空,否则MQ消息监听器会再次消费一次
        if (noticeCount > 0) {
            rabbitAdmin.purgeQueue(queueName, true);
        }
        if(userNoticeCount > 0){
            rabbitAdmin.purgeQueue(userQueueName,true);
        }

        //为用户的消息通知队列注册监听器,便于用户在线的时候,
        //一旦有消息,可以主动推送给用户,不需要用户请求服务器获取数据
        sysNoticeContainer.addQueueNames(queueName); //运行时添加监听队列
        userNoticeContainer.addQueueNames(userQueueName);
    }
}
5) 编写RabbitConfig
在com.tensquare.notice.config中编写
package com.tensquare.notice.config;

import com.tensquare.notice.listener.SysNoticeListener;
import com.tensquare.notice.listener.UserNoticeListener;
import org.springframework.amqp.rabbit.connection.ConnectionFactory;
import org.springframework.amqp.rabbit.listener.SimpleMessageListenerContainer;
import org.springframework.context.annotation.Bean;
import org.springframework.context.annotation.Configuration;

@Configuration
public class RabbitConfig {

    @Bean("sysNoticeContainer")
    public SimpleMessageListenerContainer createSys(ConnectionFactory connectionFactory) {
        SimpleMessageListenerContainer container = new SimpleMessageListenerContainer(connectionFactory);
        //使用Channel监听,接收消息和发送消息用同一个channel。false,发消息时是用一个新的channel。
        container.setExposeListenerChannel(true);
        //设置自己编写的监听器
        container.setMessageListener(new SysNoticeListener());

        return container;
    }

    @Bean("userNoticeContainer")
    public SimpleMessageListenerContainer createUser(ConnectionFactory connectionFactory) {
        SimpleMessageListenerContainer container = new SimpleMessageListenerContainer(connectionFactory);
        //使用Channel监听
        container.setExposeListenerChannel(true);
        //设置自己编写的监听器
        container.setMessageListener(new UserNoticeListener());

        return container;
    }
}
6) 编写SysNoticeListener、UserNoticeListener
在com.tensquare.notice.listener中编写:
package com.tensquare.notice.listener;

import com.fasterxml.jackson.databind.ObjectMapper;
import com.rabbitmq.client.Channel;
import com.tensquare.entity.Result;
import com.tensquare.entity.StatusCode;
import com.tensquare.notice.netty.MyWebSocketHandler;
import io.netty.handler.codec.http.websocketx.TextWebSocketFrame;
import org.springframework.amqp.core.Message;
import org.springframework.amqp.rabbit.listener.api.ChannelAwareMessageListener;
import java.util.HashMap;

public class SysNoticeListener implements ChannelAwareMessageListener {

    private static ObjectMapper MAPPER = new ObjectMapper();

    @Override
    public void onMessage(Message message, Channel channel) throws Exception {
        //获取用户id,可以通过队列名称获取
        String queueName = message.getMessageProperties().getConsumerQueue();
        String userId = queueName.substring(queueName.lastIndexOf("_") + 1);

        io.netty.channel.Channel wsChannel = MyWebSocketHandler.userChannelMap.get(userId);

        //判断用户是否在线
        if (wsChannel != null) {
            //如果连接不为空,表示用户在线
            //封装返回数据
            HashMap countMap = new HashMap();
            countMap.put("sysNoticeCount", 1);
            Result result = new Result(true, StatusCode.OK, "查询成功", countMap);

            // 把数据通过WebSocket连接主动推送用户
            wsChannel.writeAndFlush(new TextWebSocketFrame(MAPPER.writeValueAsString(result)));
        }
    }
}
package com.tensquare.notice.listener;

import com.fasterxml.jackson.databind.ObjectMapper;
import com.rabbitmq.client.Channel;
import com.tensquare.entity.Result;
import com.tensquare.entity.StatusCode;
import com.tensquare.notice.netty.MyWebSocketHandler;
import io.netty.handler.codec.http.websocketx.TextWebSocketFrame;
import org.springframework.amqp.core.Message;
import org.springframework.amqp.rabbit.listener.api.ChannelAwareMessageListener;
import java.util.HashMap;

public class UserNoticeListener implements ChannelAwareMessageListener {

    private static ObjectMapper MAPPER = new ObjectMapper();

    @Override
    public void onMessage(Message message, Channel channel) throws Exception {
        //获取用户id,可以通过队列名称获取
        String queueName = message.getMessageProperties().getConsumerQueue();
        String userId = queueName.substring(queueName.lastIndexOf("_") + 1);

        io.netty.channel.Channel wsChannel = MyWebSocketHandler.userChannelMap.get(userId);

        //判断用户是否在线
        if (wsChannel != null) {
            //如果连接不为空,表示用户在线
            //封装返回数据
            HashMap countMap = new HashMap();
            countMap.put("userNoticeCount", 1);
            Result result = new Result(true, StatusCode.OK, "查询成功", countMap);

            // 把数据通过WebSocket连接主动推送用户
            wsChannel.writeAndFlush(new TextWebSocketFrame(MAPPER.writeValueAsString(result)));
        }
    }
}
7)修改启动类,添加Netty服务的启动
public static void main(String[] args) {
SpringApplication.run(NoticeApplication.class, args);
NettyServer server = ApplicationContextProvider.getApplicationContext().getBean(NettyServer.class);
try {
server.start(12345);
} catch (Exception e) {
e.printStackTrace();
}
}
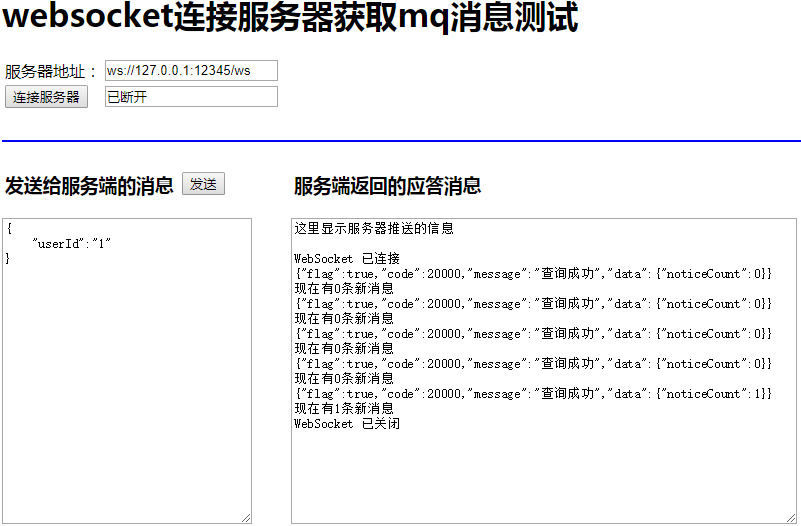
8)在resources目录下创建index.html,这个html是测试页面
<!DOCTYPE html PUBLIC "-//W3C//DTD XHTML 1.0 Transitional//EN" "http://www.w3.org/TR/xhtml1/DTD/xhtml1transitional.dtd">
<html xmlns="http://www.w3.org/1999/xhtml">
<head>
    <meta http-equiv="Content-Type" content="text/html; charset=utf-8" />
    <title>测试 notice 微服务与页面 websocket 交互</title>
</head>
<body>
<h1>
    websocket连接服务器获取mq消息测试
</h1>
<form onSubmit="return false;">
    <table><tr>
        <td><span>服务器地址:</span></td>
        <td><input type="text" id="serverUrl" value="ws://127.0.0.1:1234/ws" /></td>
      </tr>
      <tr>
        <td><input type="button" id="action" value="连接服务器" onClick="connect()" /></td>
        <td><input type="text" id="connStatus" value="未连接 ......" /></td>
    </tr></table>
    <br />
    <hr color="blue" />
    <div>
        <div style="width: 50%;float:left;">
            <div>
                <table><tr>
                    <td><h3>发送给服务端的消息</h3></td>
                    <td><input type="button" value="发送" onClick="send(this.form.message.value)" /></td>
                </tr></table>
            </div>
            <div><textarea type="text" name="message" style="width:500px;height:300px;">
{
    "userId":"1"
}
                </textarea></div>
        </div>
        <div style="width: 50%;float:left;">
            <div><table>
                <tr>
                    <td><h3>服务端返回的应答消息</h3></td>
                </tr>
            </table></div>
            <div><textarea id="responseText" name="responseText" style="width: 500px;height: 300px;" onfocus="this.scrollTop = this.scrollHeight ">
这里显示服务器推送的信息
            </textarea></div>
        </div>
    </div>

</form>

<script type="text/javascript">
    var socket;
    var connStatus = document.getElementById('connStatus');;
    var respText = document.getElementById('responseText');
    var actionBtn = document.getElementById('action');
    var sysCount = 0;
    var userCount = 0;

    function connect() {
        connStatus.value = "正在连接 ......";

        if(!window.WebSocket){
            window.WebSocket = window.MozWebSocket;
        }
        if(window.WebSocket){

            socket = new WebSocket("ws://127.0.0.1:1234/ws");

            socket.onmessage = function(event){
                respText.scrollTop = respText.scrollHeight;
                respText.value += "\r\n" + event.data;
                var sysData = JSON.parse(event.data).data.sysNoticeCount;
                if(sysData){
                    sysCount = sysCount + parseInt(sysData)
                }
                var userData = JSON.parse(event.data).data.userNoticeCount;
                if(userData){
                    userCount = userCount + parseInt(userData)
                }
                respText.value += "\r\n现在有" + sysCount + "条订阅新消息";
                respText.value += "\r\n现在有" + userCount + "条点赞新消息";
                respText.scrollTop = respText.scrollHeight;
            };
            socket.onopen = function(event){
                respText.value += "\r\nWebSocket 已连接";
                respText.scrollTop = respText.scrollHeight;

                connStatus.value = "已连接 O(∩_∩)O";

                actionBtn.value = "断开服务器";
                actionBtn.onclick =function(){
                    disconnect();
                };

            };
            socket.onclose = function(event){
                respText.value += "\r\n" + "WebSocket 已关闭";
                respText.scrollTop = respText.scrollHeight;

                connStatus.value = "已断开";

                actionBtn.value = "连接服务器";
                actionBtn.onclick = function() {
                    connect();
                };
            };

        } else {
            //alert("您的浏览器不支持WebSocket协议!");
            connStatus.value = "您的浏览器不支持WebSocket协议!";
        }
    }

    function disconnect() {
        socket.close();
    }

    function send(message){
        if(!window.WebSocket){return;}
        if(socket.readyState == WebSocket.OPEN){
            socket.send(message);
        }else{
            alert("WebSocket 连接没有建立成功!");
        }
    }
</script>
</body>
</html>
9)启动tensquare-eureka,tensquare-user,tensquare-article,tensquare-notice四个微服务进行测试
当新增一个文章数据的时候,就会发消息,最终页面显示的效果:
七、文章点赞点对点消息改进
1. 文章点赞功能改进
在ArticleService中原有的thumbup方法中,增加向用户的点对点消息队列发送消息 的功能
改进后完整的代码如下
    public void thumbup(String articleId,String userId) {
        //文章点赞
        Article article = articleDao.selectById(articleId);
        article.setThumbup(article.getThumbup()+1);
        articleDao.updateById(article);

        //消息通知
        Notice notice = new Notice();
        notice.setReceiverId(article.getUserid());
        notice.setOperatorId(userId);
        notice.setAction("thumbup");
        notice.setTargetType("article");
        notice.setTargetId(articleId);
        notice.setCreatetime(new Date());
        notice.setType("user");
        notice.setState("0");
        noticeClient.save(notice);

        //点赞成功后,需要发送消息给文章作者(点对点消息)
        //1. 创建Rabbit管理器
        RabbitAdmin rabbitAdmin = new RabbitAdmin(rabbitTemplate.getConnectionFactory());
        //2. 创建队列,每个作者都有自己的队列,通过作者id进行区分
        Queue queue = new Queue("article_thumbup_" + article.getUserid(), true);
        rabbitAdmin.declareQueue(queue);
        //3. 发送消息到队列中
        rabbitTemplate.convertAndSend("article_thumbup_"+article.getUserid(),articleId);
    }
2. 消息通知改进
1) 在com.tensquare.notice.listeners包下新建 UserNoticeListener类,添加代码
2)RabbitConfig改造
package com.tensquare.notice.config;

import com.tensquare.notice.listener.SysNoticeListener;
import com.tensquare.notice.listener.UserNoticeListener;
import org.springframework.amqp.rabbit.connection.ConnectionFactory;
import org.springframework.amqp.rabbit.listener.SimpleMessageListenerContainer;
import org.springframework.context.annotation.Bean;
import org.springframework.context.annotation.Configuration;

@Configuration
public class RabbitConfig {

    @Bean("sysNoticeContainer")
    public SimpleMessageListenerContainer createSys(ConnectionFactory connectionFactory) {
        SimpleMessageListenerContainer container = new SimpleMessageListenerContainer(connectionFactory);
        //使用Channel监听,接收消息和发送消息用同一个channel。false,发消息时是用一个新的channel。
        container.setExposeListenerChannel(true);
        //设置自己编写的监听器
        container.setMessageListener(new SysNoticeListener());

        return container;
    }

    @Bean("userNoticeContainer")
    public SimpleMessageListenerContainer createUser(ConnectionFactory connectionFactory) {
        SimpleMessageListenerContainer container = new SimpleMessageListenerContainer(connectionFactory);
        //使用Channel监听
        container.setExposeListenerChannel(true);
        //设置自己编写的监听器
        container.setMessageListener(new UserNoticeListener());

        return container;
    }
}
3) MyWebSocketHandler改造
package com.tensquare.notice.netty;

import com.fasterxml.jackson.databind.ObjectMapper;
import com.tensquare.entity.Result;
import com.tensquare.entity.StatusCode;
import com.tensquare.notice.config.ApplicationContextProvider;
import io.netty.channel.Channel;
import io.netty.channel.ChannelHandlerContext;
import io.netty.channel.SimpleChannelInboundHandler;
import io.netty.handler.codec.http.websocketx.TextWebSocketFrame;
import org.springframework.amqp.rabbit.core.RabbitAdmin;
import org.springframework.amqp.rabbit.core.RabbitTemplate;
import org.springframework.amqp.rabbit.listener.SimpleMessageListenerContainer;
import java.util.HashMap;
import java.util.Properties;
import java.util.concurrent.ConcurrentHashMap;

public class MyWebSocketHandler extends SimpleChannelInboundHandler<TextWebSocketFrame> {

    private static ObjectMapper MAPPER = new ObjectMapper();

    //从Spring容器中获取消息监听器容器,处理订阅消息sysNotice
    SimpleMessageListenerContainer sysNoticeContainer = (SimpleMessageListenerContainer) ApplicationContextProvider.getApplicationContext()
            .getBean("sysNoticeContainer");
    SimpleMessageListenerContainer userNoticeContainer = (SimpleMessageListenerContainer) ApplicationContextProvider.getApplicationContext()
            .getBean("userNoticeContainer");


    //从Spring容器中获取RabbitTemplate
    RabbitTemplate rabbitTemplate = ApplicationContextProvider.getApplicationContext().getBean(RabbitTemplate.class);

    //存放WebSocket连接Map,根据用户id存放
    public static ConcurrentHashMap<String, Channel> userChannelMap = new ConcurrentHashMap();

    //用户请求WebSocket服务端,执行的方法
    //第一次请求的时候,需要建立WebSocket连接
    @Override
    protected void channelRead0(ChannelHandlerContext ctx, TextWebSocketFrame msg) throws Exception {
        //约定用户第一次请求携带的数据:{"userId":"1"}
        //获取用户请求数据并解析
        String json = msg.text();
        //解析json数据,获取用户id
        String userId = MAPPER.readTree(json).get("userId").asText();

        //第一次请求的时候,需要建立WebSocket连接
        Channel channel = userChannelMap.get(userId);
        if (channel == null) {
            //获取WebSocket的连接
            channel = ctx.channel();

            //把连接放到容器中
            userChannelMap.put(userId, channel);
        }

        //只用完成新消息的提醒即可,只需要获取消息的数量
        //获取RabbitMQ的消息内容,并发送给用户
        RabbitAdmin rabbitAdmin = new RabbitAdmin(rabbitTemplate);
        //获取订阅类消息
        //拼接获取队列名称
        String queueName = "article_subscribe_" + userId;
        //获取Rabbit的Properties容器
        Properties queueProperties = rabbitAdmin.getQueueProperties(queueName);

        //获取消息数量
        int noticeCount = 0;
        //判断Properties是否不为空
        if (queueProperties != null) {
            // 如果不为空,获取消息的数量
            noticeCount = (int) queueProperties.get("QUEUE_MESSAGE_COUNT");
        }
        //获取点赞类消息
        String userQueueName = "article_thumbup_"+userId;
        Properties userQueueProperties = rabbitAdmin.getQueueProperties(userQueueName);
        int userNoticeCount = 0;
        if(userQueueProperties != null){
            userNoticeCount = (int) userQueueProperties.get("QUEUE_MESSAGE_COUNT");
        }

        //封装返回的数据
        HashMap countMap = new HashMap();
        //订阅类消息数量
        countMap.put("sysNoticeCount", noticeCount);
        //点赞类消息数量
        countMap.put("userNoticeCount",userNoticeCount);
        Result result = new Result(true, StatusCode.OK, "查询成功", countMap);

        //把数据发送给用户
        channel.writeAndFlush(new TextWebSocketFrame(MAPPER.writeValueAsString(result)));

        //把消息从队列里面清空,否则MQ消息监听器会再次消费一次
        if (noticeCount > 0) {
            rabbitAdmin.purgeQueue(queueName, true);
        }
        if(userNoticeCount > 0){
            rabbitAdmin.purgeQueue(userQueueName,true);
        }

        //为用户的消息通知队列注册监听器,便于用户在线的时候,
        //一旦有消息,可以主动推送给用户,不需要用户请求服务器获取数据
        sysNoticeContainer.addQueueNames(queueName); //运行时添加监听队列
        userNoticeContainer.addQueueNames(userQueueName);
    }
}
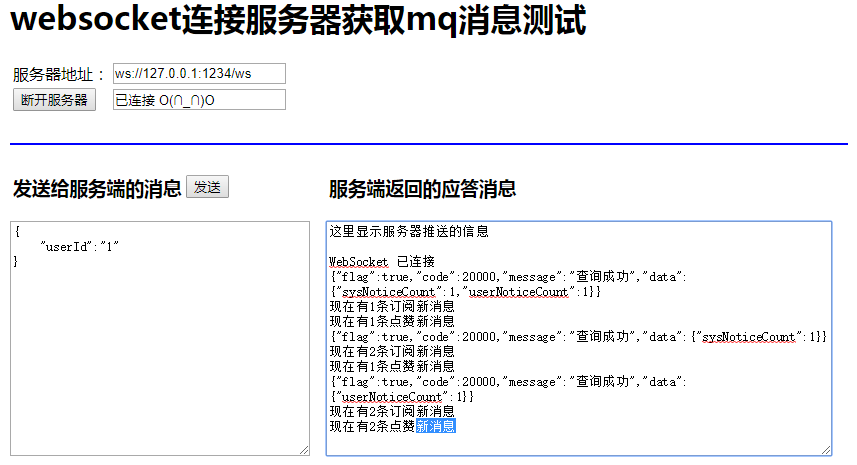
3. 测试点对点消息
1) 启动tensquare-eureka,tensquare-user,tensquare-article,tensquare-notice四个微服务进行测试
当作者的文章被点赞时,会收到点赞的新消息提示,最终页面显示的效果:

 浙公网安备 33010602011771号