


十次方社交项目-消息通知5
一、消息通知的业务场景
消息通知微服务的定位是“平台内”的“消息”功能,分为全员消息,订阅类消息,点 对点消息。例如系统通知,私信,@类消息
-
全员消息
系统通知,活动通知,管理员公告等全部用户都会收到的消息
-
订阅类消息
关注某一类数据的用户,该类数据有更新时向用户发送的消息。例如关注某位大v的微博,公众号,订阅某位知名作家的专栏
-
点对点消息
某位用户对另外一位用户进行操作后,系统向被操作的用户发送的消息。例如点赞,发红包
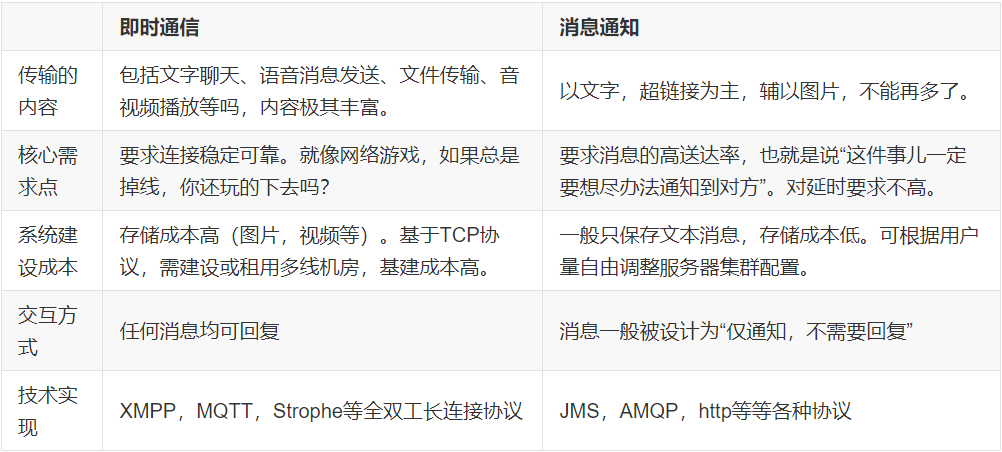
二、消息通知与即时通讯的区别
三、搭建消息通知微服务
1. 业务分析
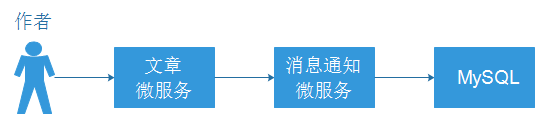
用户可以对文章作者进行订阅,当被订阅的用户发布新的文章时,可以通过消息通知系统发送消息给订阅者。
流程如下:

2. 表结构分析
十次方消息通知微服务总共需要两张数据库表,tb_notice 和 tb_notice_fresh。
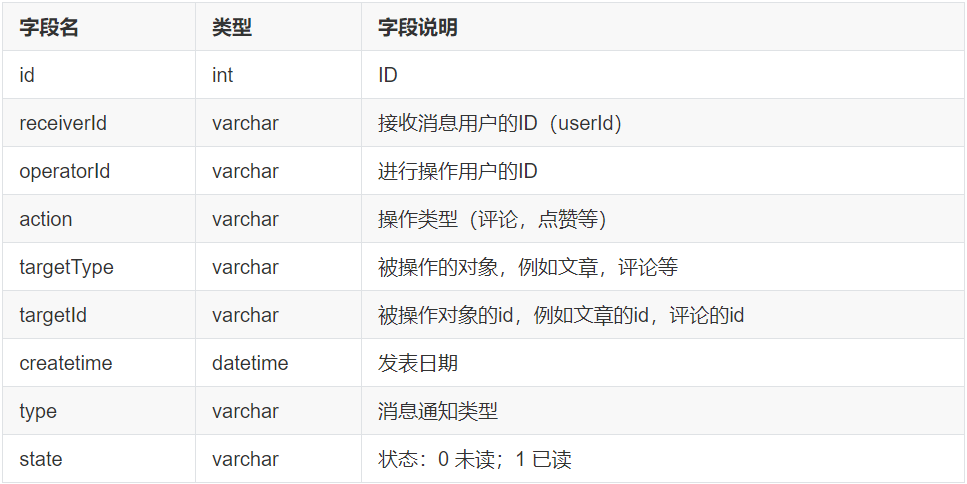
2.1 消息通知表 tb_notice
保存用户的消息通知
2.2 待推送消息表 tb_notice_fresh
保存准备推送给用户的消息通知

3. 搭建消息通知微服务
3.1 在tensquare_parent父工程下创建tensquare_notice子模块
3.2 修改pom.xml文件,添加下面的配置


<?xml version="1.0" encoding="UTF-8"?>
<project xmlns="http://maven.apache.org/POM/4.0.0"
         xmlns:xsi="http://www.w3.org/2001/XMLSchema-instance"
         xsi:schemaLocation="http://maven.apache.org/POM/4.0.0 http://maven.apache.org/xsd/maven-4.0.0.xsd">
    <parent>
        <artifactId>tensquare_parent</artifactId>
        <groupId>com.tensquare</groupId>
        <version>1.0-SNAPSHOT</version>
    </parent>
    <modelVersion>4.0.0</modelVersion>

    <artifactId>tensquare_notice</artifactId>

    <dependencies>
        <dependency>
            <groupId>com.baomidou</groupId>
            <artifactId>mybatisplus-spring-boot-starter</artifactId>
            <version>${mybatisplus-spring-boot-starter.version}</version>
        </dependency>
        <dependency>
            <groupId>com.baomidou</groupId>
            <artifactId>mybatis-plus</artifactId>
            <version>${mybatisplus.version}</version>
        </dependency>
        <dependency>
            <groupId>com.alibaba</groupId>
            <artifactId>druid-spring-boot-starter</artifactId>
            <version>1.1.9</version>
        </dependency>
        <dependency>
            <groupId>mysql</groupId>
            <artifactId>mysql-connector-java</artifactId>
        </dependency>
        <dependency>
            <groupId>com.tensquare</groupId>
            <artifactId>tensquare_common</artifactId>
            <version>1.0-SNAPSHOT</version>
        </dependency>
        <dependency>
            <groupId>org.springframework.boot</groupId>
            <artifactId>spring-boot-starter-data-redis</artifactId>
        </dependency>
        <dependency>
            <groupId>org.springframework.cloud</groupId>
            <artifactId>spring-cloud-starter-netflix-eureka-client</artifactId>
            <version>2.1.1.RELEASE</version>
        </dependency>
        <dependency>
            <groupId>org.springframework.cloud</groupId>
            <artifactId>spring-cloud-starter-openfeign</artifactId>
            <version>2.1.1.RELEASE</version>
        </dependency>
        <dependency>
            <groupId>org.projectlombok</groupId>
            <artifactId>lombok</artifactId>
        </dependency>
        <dependency>
            <groupId>org.springframework.boot</groupId>
            <artifactId>spring-boot-starter-amqp</artifactId>
        </dependency>
        <dependency>
            <groupId>io.netty</groupId>
            <artifactId>netty-all</artifactId>
            <version>4.1.5.Final</version>
        </dependency>
    </dependencies>
</project>
3.3 在resources文件夹下添加application.yml文件,并添加下面的配置
server:
  port: 9014
spring:
  application:
    name: tensquare-notice
  datasource:
    driver-class-name: com.mysql.jdbc.Driver
    url: jdbc:mysql://192.168.240.134:3306/tensquare_notice?characterEncoding=utf-8
    username: root
    password: root
  redis:
    host: 192.168.240.134
  rabbitmq:
    host: 192.168.240.134
mybatis-plus:
  type-aliases-package: com.tensquare.notice.pojo
  global-config:
    id-type: 1
    db-column-underline: false
    refresh-mapper: true
    configuration:
      map-underscore-to-camel-case: true
      cache-enabled: true
      lazyLoadingEnabled: true
      multipleResultSetsEnabled: true
      log-impl: org.apache.ibatis.logging.stdout.StdOutImpl
eureka:
  client:
    service-url:
      defaultZone: http://127.0.0.1:6868/eureka/
  instance:
    prefer-ip-address: true
3.4 创建启动类
新建com.tensquare.notice包,并在该包下新建NoticeApplication,添加如下代码
package com.tensquare.notice;

import com.tensquare.util.IdWorker;
import org.mybatis.spring.annotation.MapperScan;
import org.springframework.boot.SpringApplication;
import org.springframework.boot.autoconfigure.SpringBootApplication;
import org.springframework.cloud.netflix.eureka.EnableEurekaClient;
import org.springframework.cloud.openfeign.EnableFeignClients;
import org.springframework.context.annotation.Bean;

@SpringBootApplication
@EnableEurekaClient
@EnableFeignClients
@MapperScan("com.tensquare.notice.dao")
public class NoticeApplication {
    public static void main(String[] args) {
        SpringApplication.run(NoticeApplication.class,args);
    }

    @Bean
    public IdWorker idWorker(){
        return new IdWorker(1,1);
    }
}
3.5 编写pojo
package com.tensquare.notice.pojo;

import com.baomidou.mybatisplus.annotations.TableField;
import com.baomidou.mybatisplus.annotations.TableId;
import com.baomidou.mybatisplus.annotations.TableName;
import com.baomidou.mybatisplus.enums.IdType;
import lombok.Data;
import java.io.Serializable;
import java.util.Date;

@TableName("tb_notice")
@Data
public class Notice implements Serializable {

    @TableId(type = IdType.INPUT)
    private String id;
    private String receiverId;
    private String operatorId;
    @TableField(exist = false)
    private String operatorName;//用户昵名
    private String action;  //操作类型(评论、点赞等)
    private String targetType;//对象类型(文章、评论等)
    @TableField(exist = false)
    private String targetName;//对象名称(文章title)
    private String targetId;
    private Date createtime;
    private String type;    //消息类型
    private String state;   //消息状态 0未读1已读
}
package com.tensquare.notice.pojo;

import com.baomidou.mybatisplus.annotations.TableName;
import lombok.Data;

@TableName("tb_notice_fresh")
@Data
public class NoticeFresh {

    private String userId;
    private String noticeId;
}
3.6 编写dao
package com.tensquare.notice.dao;

import com.baomidou.mybatisplus.mapper.BaseMapper;
import com.tensquare.notice.pojo.Notice;

public interface NoticeDao extends BaseMapper<Notice> {
}
package com.tensquare.notice.dao;

import com.baomidou.mybatisplus.mapper.BaseMapper;
import com.tensquare.notice.pojo.NoticeFresh;

public interface NoticeFreshDao extends BaseMapper<NoticeFresh> {
}
3.7 com.tensquare.notice.config添加配置
package com.tensquare.notice.config;

import com.baomidou.mybatisplus.plugins.PaginationInterceptor;
import org.springframework.context.annotation.Bean;
import org.springframework.context.annotation.Configuration;

@Configuration
public class MybatisPlusConfig {

    @Bean
    public PaginationInterceptor createPaginationInterceptor(){
        return new PaginationInterceptor();
    }
}
4. 实现基本增删改查功能
需要实现功能:
1)根据id查询消息通知
2)根据条件分页查询消息通知
3)新增通知
4)修改通知
5)根据用户id查询该用户的待推送消息(新消息)
6)删除待推送消息(新消息)
编写Controller
package com.tensquare.notice.controller;

import com.baomidou.mybatisplus.plugins.Page;
import com.tensquare.entity.PageResult;
import com.tensquare.entity.Result;
import com.tensquare.entity.StatusCode;
import com.tensquare.notice.pojo.Notice;
import com.tensquare.notice.pojo.NoticeFresh;
import com.tensquare.notice.service.NoticeService;
import org.springframework.beans.factory.annotation.Autowired;
import org.springframework.web.bind.annotation.*;

@RestController
@RequestMapping("notice")
@CrossOrigin
public class NoticeController {

    @Autowired
    private NoticeService noticeService;

    //1. 根据id查询消息通知
    //http://127.0.0.1:9014/notice/{id}    GET
    @RequestMapping(value = "{id}",method = RequestMethod.GET)
    public Result selectById(@PathVariable String id){
        Notice notice = noticeService.selectById(id);
        return new Result(true, StatusCode.OK,"查询成功",notice);
    }

    //2. 根据条件分页查询消息通知
    //http://127.0.0.1:9014/notice/search/{page}/{size} POST
    @RequestMapping(value = "search/{page}/{size}",method = RequestMethod.POST)
    public Result selectByList(@RequestBody Notice notice,@PathVariable Integer page,@PathVariable Integer size){
        Page<Notice> pageData = noticeService.selectByPage(notice,page,size);
        PageResult<Notice> pageResult = new PageResult<>(pageData.getTotal(),pageData.getRecords());
        return new Result(true,StatusCode.OK,"查询成功",pageResult);
    }

    //3. 新增通知
    //http://127.0.0.1:9014/notice POST
    @RequestMapping(method = RequestMethod.POST)
    public Result save(@RequestBody Notice notice){
        noticeService.save(notice);
        return new Result(true,StatusCode.OK,"新增成功");
    }

    //4. 修改通知
    //http://127.0.0.1:9014/notice PUT
    @RequestMapping(method = RequestMethod.PUT)
    public Result updateById(@RequestBody Notice notice){
        noticeService.updateById(notice);
        return new Result(true,StatusCode.OK,"修改成功");
    }

    //5. 根据用户id查询该用户的待推送消息
    //http://127.0.0.1:9014/notice/fresh/{userId}/{page}/{size} GET
    @RequestMapping(value = "fresh/{userId}/{page}/{size}",method = RequestMethod.GET)
    public Result freshPage(@PathVariable String userId,@PathVariable Integer page,@PathVariable Integer size){
        Page<NoticeFresh> pageData = noticeService.freshPage(userId,page,size);
        PageResult<NoticeFresh> pageResult = new PageResult<>(pageData.getTotal(),pageData.getRecords());
        return new Result(true,StatusCode.OK,"查询成功",pageResult);
    }

    //6. 删除待推送消息
    //http://127.0.0.1:9014/notice/fresh DELETE
    @RequestMapping(value = "fresh",method = RequestMethod.DELETE)
    public Result freshDelete(@RequestBody NoticeFresh noticeFresh){
        noticeService.freshDelete(noticeFresh);
        return new Result(true,StatusCode.OK,"删除成功");
    }
}
编写Service
package com.tensquare.notice.service;

import com.baomidou.mybatisplus.mapper.EntityWrapper;
import com.baomidou.mybatisplus.plugins.Page;
import com.tensquare.entity.Result;
import com.tensquare.notice.client.ArticleClient;
import com.tensquare.notice.client.UserClient;
import com.tensquare.notice.dao.NoticeDao;
import com.tensquare.notice.dao.NoticeFreshDao;
import com.tensquare.notice.pojo.Notice;
import com.tensquare.notice.pojo.NoticeFresh;
import com.tensquare.util.IdWorker;
import org.springframework.beans.factory.annotation.Autowired;
import org.springframework.stereotype.Service;
import java.util.Date;
import java.util.HashMap;
import java.util.List;

@Service
public class NoticeService {

    @Autowired
    private NoticeDao noticeDao;

    @Autowired
    private NoticeFreshDao noticeFreshDao;

    @Autowired
    private IdWorker idWorker;

    @Autowired
    private ArticleClient articleClient;

    @Autowired
    private UserClient userClient;

    //完善消息内容
    private void getNoticeInfo(Notice notice){
        //查询用户昵称
        Result userResult = userClient.selectById(notice.getOperatorId());
        HashMap userMap = (HashMap) userResult.getData();
        System.out.println(userMap);
        if(null != userMap && userMap.get("nickname") != null){
            notice.setOperatorName(userMap.get("nickname").toString());
        }

        //查询文章名称
        if("article".equals(notice.getTargetType())){
            Result articleResult = articleClient.findById(notice.getTargetId());
            HashMap articleMap = (HashMap) articleResult.getData();
            System.out.println(articleMap);
            if(null != articleMap && articleMap.get("title") != null){
                notice.setTargetName(articleMap.get("title").toString());
            }
        }
    }

    //根据id查询实体
    public Notice selectById(String id) {
        Notice notice = noticeDao.selectById(id);
        getNoticeInfo(notice);
        return notice;
    }

    //条件查询
    public Page<Notice> selectByPage(Notice notice, Integer page, Integer size) {
        Page<Notice> pageData = new Page<>(page,size);
        List<Notice> noticeList = noticeDao.selectPage(pageData,new EntityWrapper<>(notice));
        for (Notice n : noticeList) {
            getNoticeInfo(n);
        }
        pageData.setRecords(noticeList);
        return pageData;
    }

    public void save(Notice notice) {
        //初始化数据
     //设置状态:0表示未读,1表示已读
        notice.setState("0");
        notice.setCreatetime(new Date());
        String id = idWorker.nextId()+"";
        notice.setId(id);
        //通知消息入库
        noticeDao.insert(notice);

        //后期需要删除消息通知微服务中的新的通知提醒消息入库逻辑,改为新通知由RabbitMQ发送
        //待推送消息入库,新的通知提醒消息
        NoticeFresh noticeFresh = new NoticeFresh();
        noticeFresh.setNoticeId(id);
        noticeFresh.setUserId(notice.getReceiverId());
        noticeFreshDao.insert(noticeFresh);
    }

    public void updateById(Notice notice) {
        noticeDao.updateById(notice);
    }

    public Page<NoticeFresh> freshPage(String userId, Integer page, Integer size) {
        NoticeFresh noticeFresh = new NoticeFresh();
        noticeFresh.setUserId(userId);
        Page<NoticeFresh> pageData = new Page<>(page,size);
        List<NoticeFresh> list = noticeFreshDao.selectPage(pageData,new EntityWrapper<>(noticeFresh));
        pageData.setRecords(list);
        return pageData;
    }

    public void freshDelete(NoticeFresh noticeFresh) {
        noticeFreshDao.delete(new EntityWrapper<>(noticeFresh));
    }
}
5. 完善返回的消息内容
数据库表设计的时候,为了提高性能,并没有保存用户昵称,文章标题等信息,只保存了主键id。但用户在查看消息的时候,只有id是很难阅读的,所以需要根据id,把用户昵称,文章标题等信息查询,并在返回消息之前设置到消息中。
由于消息通知微服务需要调用其他微服务获取字段信息,所以需要做 feign client 调用。
1) com.tensquare.notice.client包下添加ArticleClient和UserClient
package com.tensquare.notice.client;

import com.tensquare.entity.Result;
import org.springframework.cloud.openfeign.FeignClient;
import org.springframework.web.bind.annotation.PathVariable;
import org.springframework.web.bind.annotation.RequestMapping;
import org.springframework.web.bind.annotation.RequestMethod;

@FeignClient(value = "tensquare-article")
public interface ArticleClient {

    //根据id查询文章
    @RequestMapping(value = "/article/{articleId}",method = RequestMethod.GET)
    public Result findById(@PathVariable("articleId") String articleId);
}
package com.tensquare.notice.client;

import com.tensquare.entity.Result;
import org.springframework.cloud.openfeign.FeignClient;
import org.springframework.web.bind.annotation.PathVariable;
import org.springframework.web.bind.annotation.RequestMapping;
import org.springframework.web.bind.annotation.RequestMethod;

@FeignClient(value="tensquare-user")
public interface UserClient {

    //根据id查询用户
    @RequestMapping(value = "/user/{userId}",method = RequestMethod.GET)
    public Result selectById(@PathVariable("userId") String userId);
}
2) 修改用户微服务,添加根据id查询用户
编写Controller,添加以下逻辑
package com.tensquare.user.controller;

import com.tensquare.entity.Result;
import com.tensquare.entity.StatusCode;
import com.tensquare.user.pojo.User;
import com.tensquare.user.service.UserService;
import org.springframework.beans.factory.annotation.Autowired;
import org.springframework.web.bind.annotation.*;

@RestController
@RequestMapping("user")
@CrossOrigin
public class UserController {

    @Autowired
    private UserService userService;

    //根据用户id查询用户
    //http://127.0.0.1:9008/user/{userId}   GET
    @RequestMapping(value = "{userId}",method = RequestMethod.GET)
    public Result selectById(@PathVariable String userId){
        User result = userService.selectById(userId);
        if(result != null){
            return  new Result(true, StatusCode.OK,"查询成功",result);
        }
        return  new Result(false, StatusCode.ERROR,"查询失败");

    }
}
编写Service,添加以下逻辑
package com.tensquare.user.service;

import com.tensquare.user.dao.UserDao;
import com.tensquare.user.pojo.User;
import org.springframework.beans.factory.annotation.Autowired;
import org.springframework.stereotype.Service;

@Service
public class UserService {

    @Autowired
    private UserDao userDao;

    public User selectById(String userId){
        return userDao.selectById(userId);
    }

}
编写Dao
package com.tensquare.user.dao;

import com.baomidou.mybatisplus.mapper.BaseMapper;
import com.tensquare.user.pojo.User;

public interface UserDao extends BaseMapper<User> {
}
3)测试功能
需要开启tensquare-eureka,tensquare-user,tensquare-article,tensquare-notice四个微服务进行测试
四、文章订阅 - 实现群发消息功能
1. 订阅文章作者
用户在登录十次方以后,可以查看文章。如果觉得文章好,可以订阅文章作者,从而可以收到这个作者发布的新文章的消息。所以需要完成根据文章id,订阅文章作者。
1) 功能分析
- 用户之间的文章订阅关系的数据存放在redis中。
- 用户订阅文章作者,则系统将作者的id放入用户自己的订阅集合(set类型),同时系统将用户的id放入文章作者的订阅者集合中。
- 由于redis的set集合,其中的数据是不重复的,所以不用担心重复数据的问题。
2) 代码实现
需要在tensquare_article微服务中添加根据文章id订阅文章作者的功能,在ArticleController中添加以下代码:
    //订阅或者取消订阅文章作者
    //根据文章id和用户id(订阅者),建立订阅关系,保存的是文章作者id和用户id的关系
    //http://127.0.0.1:9004/article/subscribe   POST
    @RequestMapping(value = "/subscribe",method = RequestMethod.POST)
    private Result subscribe(@RequestBody Map map){
        //返回状态,返回true就是订阅该文章作者,返回false就是取消订阅文章作者
        Boolean flag = articleService.subscribe(map.get("userId").toString(),map.get("articleId").toString());
        if(flag){
            return new Result(true,StatusCode.OK,"订阅成功");
        }else {
            return new Result(true,StatusCode.OK,"订阅取消");
        }
    }
编写ArticleService
    public Boolean subscribe(String userId, String articleId) {
        //根据文章id查询文章作者id
        String authorId = articleDao.selectById(articleId).getUserid();

        //存放用户订阅信息的集合key,里面存放作者id
        String userKey = "article_subscribe_"+userId;
        //存放作者订阅者信息的集合key,里面存放订阅者id
        String authorKey = "article_author_"+authorId;

        //查询该用户是否已经订阅作者
        //使用userKey查询redis查询不到是因为userkey存储的是编码后的\xac\xed\x00\x05t\x00\x10article_author_2
//        redisTemplate.setKeySerializer(new StringRedisSerializer());//不配置RedisConfig就这样设置
        Boolean flag = redisTemplate.boundSetOps(userKey).isMember(authorId);
        if(flag){
            //已经订阅,则取消订阅
            redisTemplate.boundSetOps(userKey).remove(authorId);
            redisTemplate.boundSetOps(authorKey).remove(userId);
            return false;
        }else {
            //没有订阅,则进行订阅
            redisTemplate.boundSetOps(userKey).add(authorId);
            redisTemplate.boundSetOps(authorKey).add(userId);
       return true;
        }
    }
3) 启动微服务测试功能
需要开启tensquare-eureka,tensquare-article
2. 新增文章群发消息
新增文章后,需要通知订阅的用户,文章微服务需要调用消息通知微服务,创建消息。
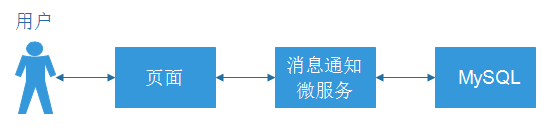
用户登录十次方后,访问的前端页面,页面需要定时轮询通知接口,获取消息。(接口已完成)
1) 新增NoticeClient,调用消息通知微服务
package com.tensquare.article.client;

import com.tensquare.article.pojo.Notice;
import com.tensquare.entity.Result;
import org.springframework.cloud.openfeign.FeignClient;
import org.springframework.web.bind.annotation.RequestBody;
import org.springframework.web.bind.annotation.RequestMapping;
import org.springframework.web.bind.annotation.RequestMethod;

@FeignClient("tensquare-notice")
public interface NoticeClient {

    //添加消息
    @RequestMapping(value = "notice",method = RequestMethod.POST)
    public Result save(@RequestBody Notice notice);
}
2) 修改ArticleService的save方法,进行消息通知
    //新增文章后需要通知订阅的用户
    public void save(Article article) {
        String id = idWorker.nextId()+"";
        article.setId(id);
        article.setVisits(0);
        article.setThumbup(0);
        article.setComment(0);
        articleDao.insert(article);

        //新增文章后,创建消息,通知给订阅者
        //TODO:使用jwt获取当前用户的userid,也就是文章作者id
        String authorId = article.getUserid();

        //获取订阅者信息
        //存放作者订阅者信息的集合key,里面存放订阅者id
        String authorKey = "article_author_"+authorId;
        Set<String> set = redisTemplate.boundSetOps(authorKey).members();

        for (String uid : set) {
            //消息通知
            Notice notice = new Notice();
            notice.setReceiverId(uid);
            notice.setOperatorId(authorId);
            notice.setAction("publish");
            notice.setTargetType("article");
            notice.setTargetId(id);
            notice.setCreatetime(new Date());
            notice.setType("sys");
            notice.setState("0");
            noticeClient.save(notice);
        }
    }
五、文章点赞 - 实现点对点消息功能
1. 实现文章点赞
编写ArticleController添加点赞方法:
    //文章点赞
    @RequestMapping(value = "thumbup/{articleId}",method = RequestMethod.PUT)
    public Result thumbup(@PathVariable String articleId){
        //模拟用户id-谁操作的点赞
        String userId = "3";
        String key = "thumbup_article_"+userId+"_"+articleId;
        //查询用户点赞信息,根据用户id和文章id
        //key没做序列化存储会导致存进去的key多几个字符,redis客户端去查下的时候查询key查不到数据
       Object flag = redisTemplate.opsForValue().get(key);
        System.out.println("+++++++----------"+flag);

        if(flag == null){
            //表示用户没有点赞过,可以点赞
            articleService.thumbup(articleId, userId);
            //点赞成功,保存点赞信息
            redisTemplate.opsForValue().set(key,"1");
            return  new Result(true,StatusCode.OK,"点赞成功");
        }else{
            //表示用户点赞过,不可以重复点赞
            return new Result(false,StatusCode.REPERROR,"不能重复点赞");
        }
    }
编写ArticleService:
    public void thumbup(String articleId,String userId) {
        //文章点赞
        Article article = articleDao.selectById(articleId);
        article.setThumbup(article.getThumbup()+1);
        articleDao.updateById(article);
    }
2. 实现点赞消息通知
修改ArticleService的点赞方法,增加消息通知:
    public void thumbup(String articleId,String userId) {
        //文章点赞
        Article article = articleDao.selectById(articleId);
        article.setThumbup(article.getThumbup()+1);
        articleDao.updateById(article);

        //消息通知
        Notice notice = new Notice();
        notice.setReceiverId(article.getUserid());
        notice.setOperatorId(userId);
        notice.setAction("thumbup");
        notice.setTargetType("article");
        notice.setTargetId(articleId);
        notice.setCreatetime(new Date());
        notice.setType("user");
        notice.setState("0");
        noticeClient.save(notice);
    }
六、基于db实现的通知系统存在的问题
1. 消息通知系统的构成
一个消息通知系统,其主要的构成有消息发送者,消息存储,消息接收者,新消息提醒机制
1.1 消息发送者
消息是由系统的操作者发出的吗?不一定。
消息发送的常规流程:
-
系统的开发者设置了某种消息发送的规则,规则中包含一些条件
-
规则中的条件都满足后,触发系统生成消息数据
-
系统将消息数据保存并推送给接收者
以前面文章订阅群发消息作来举例的话
-
规则:
1.1 用户订阅文章作者
1.2 文章作者发布了新文章
-
上面规则中的两个条件都满足后,系统就生成消息通知并推送给接收者,告诉接收者有新的文章
在这个例子中,消息真正的发送者是消息通知系统,而非操作者。
用户提前为系统设定好规则,系统按照规则发送消息。
1.2 消息存储
消息通知的存储包含消息通知实体数据的存储和新消息提醒数据的存储。
- 消息通知实体数据保存在tb_notice表中的数据
- 新消息提醒数据保存在tb_notice_fresh表中的数据
1.3 消息接收者
也就是消息的阅读者,是一条消息通知的最终目的地。
1.4 新消息提醒机制
系统产生新的消息通知后,必须有一个合理的机制或者方法来告知接收者有新的消息。否则接收者会郁闷且痛苦地在茫茫的数据海洋中手动去查找新消息。可以使用以下两种方式提醒新消息:
1. 提醒新消息的数量
2. 消息通知列表中新消息置顶并标记
2. 现在消息通知存在的问题
2.1 数据库访问压力大
用户的通知消息和新通知提醒数据都放在数据库中,数据库的读写操作频繁,尤其是tb_notice_refresh表,访问压力大。
2.2 服务器性能压力大
采用页面轮询调接口的方式实现服务器向用户推送消息通知,服务器的接口访问压力大。
2.3 改进的方法
1) 使用 rabbitmq 实现新消息提醒数据的缓存功能,替代tb_notice_refresh表
2) 使用全双工长连接的方式实现服务器向用户推送最新的消息通知,替换轮询
-
- 页面使用websocket
- 微服务端使用异步高性能框架netty

 浙公网安备 33010602011771号