

十次方社交项目-文章微服务-文章管理2
一、模块搭建
1. 在tensquare_parent项目下创建tensquare_article模块,创建过程参考第4.2节公共子模块的创建过程
2. 修改tensquare_article模块的pom.xml文件,添加以下依赖


<?xml version="1.0" encoding="UTF-8"?>
<project xmlns="http://maven.apache.org/POM/4.0.0"
         xmlns:xsi="http://www.w3.org/2001/XMLSchema-instance"
         xsi:schemaLocation="http://maven.apache.org/POM/4.0.0 http://maven.apache.org/xsd/maven-4.0.0.xsd">
    <parent>
        <artifactId>tensquare_parent</artifactId>
        <groupId>com.tensquare</groupId>
        <version>1.0-SNAPSHOT</version>
    </parent>
    <modelVersion>4.0.0</modelVersion>

    <artifactId>tensquare_article</artifactId>

    <dependencies>
        <dependency>
            <groupId>org.springframework.cloud</groupId>
            <artifactId>spring-cloud-starter-netflix-eureka-client</artifactId>
            <version>2.1.1.RELEASE</version>
        </dependency>
        <dependency>
            <groupId>org.springframework.boot</groupId>
            <artifactId>spring-boot-starter-data-redis</artifactId>
        </dependency>
        <dependency>
            <groupId>org.springframework.boot</groupId>
            <artifactId>spring-boot-starter-data-mongodb</artifactId>
        </dependency>
        <dependency>
            <groupId>mysql</groupId>
            <artifactId>mysql-connector-java</artifactId>
        </dependency>
        <dependency>
            <groupId>com.tensquare</groupId>
            <artifactId>tensquare_common</artifactId>
            <version>1.0-SNAPSHOT</version>
        </dependency>
        <dependency>
            <groupId>com.baomidou</groupId>
            <artifactId>mybatisplus-spring-boot-starter</artifactId>
            <version>${mybatisplus-spring-boot-starter.version}</version>
        </dependency>
        <dependency>
            <groupId>com.baomidou</groupId>
            <artifactId>mybatis-plus</artifactId>
            <version>${mybatisplus.version}</version>
        </dependency>
        <dependency>
            <groupId>org.projectlombok</groupId>
            <artifactId>lombok</artifactId>
            <version>1.18.8</version>
        </dependency>
        <dependency>
            <groupId>org.springframework.cloud</groupId>
            <artifactId>spring-cloud-starter-openfeign</artifactId>
            <version>2.1.1.RELEASE</version>
        </dependency>
        <dependency>
            <groupId>org.springframework.boot</groupId>
            <artifactId>spring-boot-starter-amqp</artifactId>
        </dependency>
    </dependencies>

</project>
3. 创建com.tensquare.article包,并创建ArticleApplication启动类
package com.tensquare.article;

import org.mybatis.spring.annotation.MapperScan;
import org.springframework.boot.SpringApplication;
import org.springframework.boot.autoconfigure.SpringBootApplication;
import org.springframework.cloud.netflix.eureka.EnableEurekaClient;
import org.springframework.cloud.openfeign.EnableFeignClients;

@SpringBootApplication
@MapperScan("com.tensquare.article.dao")
@EnableEurekaClient
@EnableFeignClients
public class ArticleApplication {

    public static void main(String[] args) {
        SpringApplication.run(ArticleApplication.class, args);
    }
}
4. 创建com.tensquare.article.config包,包下创建IdWorkerConfig类
package com.tensquare.article.config;

import com.tensquare.util.IdWorker;
import org.springframework.context.annotation.Bean;
import org.springframework.context.annotation.Configuration;

@Configuration
public class IdWorkerConfig {

    @Bean
    public IdWorker idWorker(){
        return new IdWorker(1,1);
    }
}
5. 在resources文件夹下创建application.yml,并添加以下内容
server:
  port: 9004  #服务访问端口号
spring:
  application:
    name: tensquare-article #指定服务名
  datasource: #数据库连接四大属性
    driver-class-name: com.mysql.jdbc.Driver
    url: jdbc:mysql://192.168.240.134:3306/tensquare_article?characterEncoding=utf-8
    password: root
    username: root
  data:
    mongodb:
      database: commentdb
      host: 192.168.240.134
      port: 27017
  redis:
    host: 192.168.240.134
    port: 6379
  rabbitmq:
    host: 192.168.240.134
mybatis-plus:
  #mapper-locations: classpath:/mapper/*Mapper.xml
  type-aliases-package: com.tensquare.article.pojo  #实体扫描,多个package用逗号或者分号分隔
  global-config:
    id-type: 1  #0:数据库ID自增  1:用户输入id
    db-column-underline: false   #映射数据库下划线字段名到数据库实体类的驼峰命名映射
    refresh-mapper: true
    configuration:
      map-underscore-to-camel-case: true #开启驼峰功能,把数据库字段user_name转换为Java对象userName
      cache-enabled: true              #配置的缓存的全局开关
      lazyLoadingEnable: true           #延时加载的开关
      multipleResultSetsEnabled: true  #开启延时加载,否则按需加载属性
      log-impl: org.apache.ibatis.logging.stdout.StdOutImpl  #打印sql语句,调试用
eureka:
  client:
    service-url:
      defaultZone: http://127.0.0.1:6868/eureka/
  instance:
    prefer-ip-address: true
6. 在com.tensquare.article.config包下创建RedisConfig类
package com.tensquare.article.config;

import org.springframework.context.annotation.Bean;
import org.springframework.context.annotation.Configuration;
import org.springframework.data.redis.connection.RedisConnectionFactory;
import org.springframework.data.redis.core.RedisTemplate;
import org.springframework.data.redis.serializer.StringRedisSerializer;

@Configuration
public class RedisConfig {

    @Bean
    public RedisTemplate<String,Object> redisTemplate(RedisConnectionFactory factory){
        RedisTemplate<String,Object> template = new RedisTemplate<>();
        template.setConnectionFactory(factory);
//        RedisTemplate使用的是 JdkSerializationRedisSerializer 序列化对象。可以用来存储对象,但是要实现Serializable接口。以二进制数组方式存储,内容没有可读性。
//        StringRedisTemplate使用的是 StringRedisSerializer 序列化String。主要用来存储字符串
        StringRedisSerializer stringRedisSerializer = new StringRedisSerializer();
        template.setKeySerializer(stringRedisSerializer);
        template.setValueSerializer(stringRedisSerializer);
        template.setHashValueSerializer(stringRedisSerializer);
        template.setHashKeySerializer(stringRedisSerializer);
        return template;
    }
}
二、文章管理-CRUD
1. 表结构分析
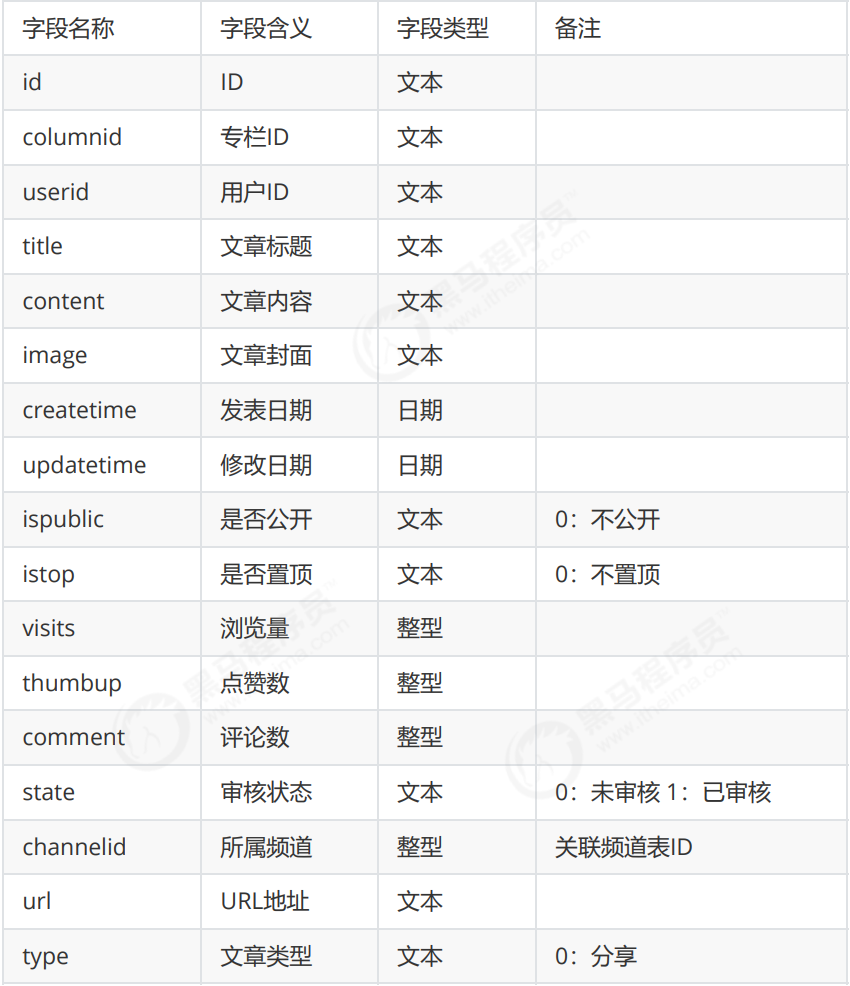
tensquare_article数据库,tb_article表
文章表 tb_article :
2. 集成mybatis plus
2.1 mybatis plus概述
- 是对Mybatis框架的二次封装和扩展
- 纯正血统:完全继承原生 Mybatis 的所有特性
- 最少依赖:仅仅依赖Mybatis以及Mybatis-Spring
- 性能损耗小:启动即会自动注入基本CURD ,性能无损耗,直接面向对象操 作
- 自动热加载:Mapper对应的xml可以热加载,大大减少重启Web服务器时 间,提升开发效率
- 性能分析:自带Sql性能分析插件,开发测试时,能有效解决慢查询
- 全局拦截:提供全表delete、update操作智能分析阻断
- 避免Sql注入:内置Sql注入内容剥离器,预防Sql注入攻击
2.2 在pom.xml文件中引入相关依赖
        <dependency>
            <groupId>com.baomidou</groupId>
            <artifactId>mybatisplus-spring-boot-starter</artifactId>
            <version>${mybatisplus-spring-boot-starter.version}</version>
        </dependency>
        <dependency>
            <groupId>com.baomidou</groupId>
            <artifactId>mybatis-plus</artifactId>
            <version>${mybatisplus.version}</version>
        </dependency>
2.3 在配置文件application.yml中添加相关配置
mybatis-plus:
  #mapper-locations: classpath:/mapper/*Mapper.xml
  type-aliases-package: com.tensquare.article.pojo  #实体扫描,多个package用逗号或者分号分隔
  global-config:
    id-type: 1  #0:数据库ID自增  1:用户输入id
    db-column-underline: false   #映射数据库下划线字段名到数据库实体类的驼峰命名映射
    refresh-mapper: true
    configuration:
      map-underscore-to-camel-case: true #开启驼峰功能,把数据库字段user_name转换为Java对象userName
      cache-enabled: true              #配置的缓存的全局开关
      lazyLoadingEnable: true           #延时加载的开关
      multipleResultSetsEnabled: true  #开启延时加载,否则按需加载属性
      log-impl: org.apache.ibatis.logging.stdout.StdOutImpl  #打印sql语句,调试用
2.4 修改启动类,增加Mapper扫描注解
package com.tensquare.article;

import org.mybatis.spring.annotation.MapperScan;
import org.springframework.boot.SpringApplication;
import org.springframework.boot.autoconfigure.SpringBootApplication;
import org.springframework.cloud.netflix.eureka.EnableEurekaClient;
import org.springframework.cloud.openfeign.EnableFeignClients;

@SpringBootApplication
@MapperScan("com.tensquare.article.dao")
@EnableEurekaClient
@EnableFeignClients
public class ArticleApplication {

    public static void main(String[] args) {
        SpringApplication.run(ArticleApplication.class, args);
    }
}
3. 实现查询所有文章和根据id号查询文章功能
3.1 在com.tensquare.article包下面创建pojo包,并创建Article实体类
package com.tensquare.article.pojo;

import com.baomidou.mybatisplus.annotations.TableId;
import com.baomidou.mybatisplus.annotations.TableName;
import com.baomidou.mybatisplus.enums.IdType;
import lombok.Data;
import java.io.Serializable;
import java.util.Date;

@Data
@TableName("tb_article")
public class Article implements Serializable {
    @TableId(type = IdType.INPUT)
    private String id;          //ID
    private String columnid;   //专栏ID
    private String userid;      //用户ID
    private String title;       //标题
    private String content;     //文章正文
    private String image;       //文章封面
    private Date createtime;    //发表日期
    private Date updatetime;    //修改日期
    private String ispublic;    //是否公开
    private String istop;       //是否置顶
    private Integer visits;     //浏览量
    private Integer thumbup;    //点赞数
    private Integer comment;    //评论数
    private String state;       //审核状态
    private String channelid;   //所属频道
    private String url;         //URL
    private String type;        //类型
}
3.2 编写数据访问接口dao
package com.tensquare.article.dao;

import com.baomidou.mybatisplus.mapper.BaseMapper;
import com.tensquare.article.pojo.Article;

public interface ArticleDao extends BaseMapper<Article> {
}
3.3 编写service
package com.tensquare.article.service;

import com.tensquare.article.dao.ArticleDao;
import com.tensquare.article.pojo.Article;
import com.tensquare.util.IdWorker;
import org.springframework.stereotype.Service;
import javax.annotation.Resource;
import java.util.*;

@Service
public class ArticleService {

    @Resource
    private ArticleDao articleDao;

    public List<Article> findAll(){
        return articleDao.selectList(null);
    }

    public Article findById(String id){
        return articleDao.selectById(id);
    }
}
3.4 编写controller
package com.tensquare.article.controller;

import com.tensquare.article.pojo.Article;
import com.tensquare.article.service.ArticleService;
import com.tensquare.entity.Result;
import com.tensquare.entity.StatusCode;
import org.springframework.beans.factory.annotation.Autowired;
import org.springframework.web.bind.annotation.*;
import java.util.List;
import java.util.Map;

@RestController
@CrossOrigin
@RequestMapping("/article")
public class ArticleController {

    @Autowired
    private ArticleService articleService;

    //文章全部列表
//    @RequestMapping(method = RequestMethod.GET)
    @GetMapping
    public Result findAll(){
        List list = articleService.findAll();
        return new Result(true, StatusCode.OK,"查询成功",list);
    }

    //GET   /article/{articleId} 根据ID查询文章
    @RequestMapping(value = "/{id}",method = RequestMethod.GET)
    public Result findById(@PathVariable String id){
        Article article =  articleService.findById(id);
        return new Result(true,StatusCode.OK,"查询成功",article);
    }
}
4. 添加文章、修改文章和删除文章
4.1 添加文章
ArticleController中添加代码
    @RequestMapping(method = RequestMethod.POST)
    public Result add(@RequestBody Article article){
        articleService.save(article);
        return new Result(true,StatusCode.OK,"添加成功");
    }
ArticleService中添加代码
    @Autowired
    private IdWorker idWorker;

    @Autowired
    private RedisTemplate redisTemplate;

    //新增文章后需要通知订阅的用户
    public void save(Article article) {
        String id = idWorker.nextId()+"";
        article.setId(id);
        article.setVisits(0);
        article.setThumbup(0);
        article.setComment(0);
        articleDao.insert(article);

        //新增文章后,创建消息,通知给订阅者
        //TODO:使用jwt获取当前用户的userid,也就是文章作者id
        String authorId = article.getUserid();

        //获取订阅者信息
        //存放作者订阅者信息的集合key,里面存放订阅者id
        String authorKey = "article_author_"+authorId;
        Set<String> set = redisTemplate.boundSetOps(authorKey).members();
    }
4.2 修改文章
ArticleController中添加代码
    @RequestMapping(value = "/{id}",method = RequestMethod.PUT)
    public Result update(@PathVariable String id,@RequestBody Article article){
        article.setId(id);
        articleService.update(article);
        return new Result(true,StatusCode.OK,"修改成功");
    }
ArticleService中添加代码
    public void update(Article article) {
        //方法1
        articleDao.updateById(article);

        //方法2 根据where查询条件查询
        EntityWrapper<Article> wrapper = new EntityWrapper<>();
        wrapper.eq("id",article.getId());
        articleDao.update(article,wrapper);

        //动态sql,例如<if test="null != field"> and field='xxx' </if>
        //wrapper.eq(null!=map.get(field),field,map.get(field));
    }
4.3 删除文章
ArticleController中添加代码
    @RequestMapping(value = "/{id}",method = RequestMethod.DELETE)
    public Result delete(@PathVariable String id){
        articleService.delete(id);
        return new Result(true,StatusCode.OK,"删除成功");
    }
ArticleService中添加代码
    public void delete(String id) {
        articleDao.deleteById(id);
    }
5. 条件查询和分页
5.1 条件查询
使用Mybatis Plus 提供的EntityWrapper对象封装where查询条件,例如以下使用方式:
EntityWrapper wrapper = new EntityWrapper<Article>();
wrapper.eq("id", article.getId());

//动态sql,例如<if test="null != field"> and field='xxx' </if>
wrapper.eq(null != map.get(field), field, map.get(field));
5.2 分页
- 使用 Mybatis Plus 提供的Page对象
- 向Mybatis Plus中注入PaginationInterceptor插件
- 新建config包,创建MybatisPlusConfig对象,添加下面的代码
package com.tensquare.article.config;

import com.baomidou.mybatisplus.plugins.PaginationInterceptor;
import org.springframework.context.annotation.Bean;
import org.springframework.context.annotation.Configuration;

//这种配置用于Spring Boot项目,注册分页插件
@Configuration
public class MyBatisPlusConfig {

    @Bean
    public PaginationInterceptor createPaginationInterceptor(){
        return new PaginationInterceptor();//配置分页拦截器,该拦截器通过拦截sql语句,在执行时自动添加分页相关的限制(如LIMIT和OFFSET子句),从而实现物理分页
    }
}
5.3 完整代码
ArticleController中添加代码
    //之前接收文章数据使用的是pojo,但是现在根据条件查询
    // //所有的条件都需要进行判断,遍历pojo的所有属性需要使用反射的方式,成本较高,性能较低
    // 直接使用集合的方式遍历,这里接收数据改为map集合(可把Article转成map)
    @RequestMapping(value = "/search/{page}/{size}",method = RequestMethod.POST)
    public Result findByPage(@RequestBody Map map,@PathVariable int page,@PathVariable int size){
        Page page1 = articleService.findByPage(map,page,size);
        return new Result(true,StatusCode.OK,"查询成功",new PageResult(page1.getTotal(),page1.getRecords()));
    }
ArticleService中添加代码
    public Page findByPage(Map map, int page, int size) {
        //设置查询条件
        EntityWrapper wrapper = new EntityWrapper<Article>();
        Set<String> keySet = map.keySet();
        for (String key : keySet) {
//            if(map.get(key) != null){
//                wrapper.eq(key,map.get(key));
//            }
            //和上面的if判断的写法是一样的效果,实现动态sql
            //wrapper.eq(field, map.get(field));
            wrapper.eq(null != map.get(key), key, map.get(key));
        }
        Page page1 = new Page(page,size);
        List list = articleDao.selectPage(page1,wrapper);
        page1.setRecords(list);
        return page1;
    }
三、文章评论实现
SpringDataMongoDB是SpringData家族成员之一,用于操作MongoDb的持久层框架,封装了底层的mongodb-driver。本功能使用SpringDataMongoDB进行开发
1. 需求分析
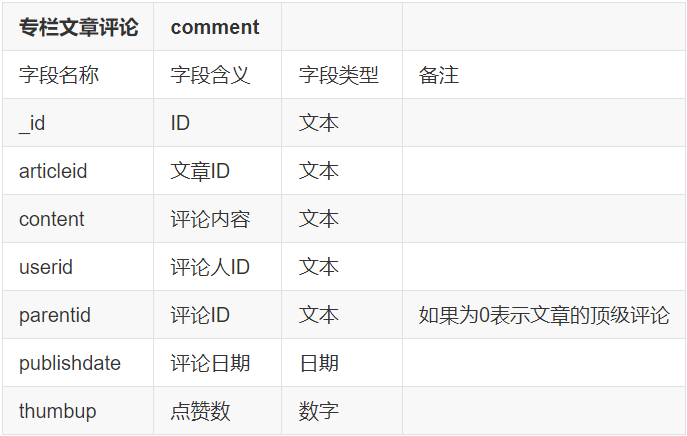
评论集合结构:
需要实现以下功能:
- 基本增删改查API
- 根据文章id查询评论
- 评论点赞
2. 开发准备
在文章微服务添加依赖:
<dependency>
    <groupId>org.springframework.boot</groupId>
    <artifactId>spring-boot-starter-data-mongodb</artifactId>
</dependency>
添加配置文件:
spring:
  data:
    mongodb:
      database: commentdb
      host: 192.168.240.134
      port: 27017
3. 功能实现
3.1 基本增删改查API
创建实体类:
package com.tensquare.article.pojo;

import lombok.Data;
import org.springframework.data.annotation.Id;
import org.springframework.data.mongodb.core.mapping.Document;
import java.io.Serializable;
import java.util.Date;

@Data
@Document("comment")//指定mongodb中的集合名称
public class Comment implements Serializable {

    @Id
    private String _id;
    private String articleid;
    private String content;
    private String userid;
    private String parentid;
    private Date publishdate;
    private Integer thumbup;
}
在com.tensquare.article.repository包中编写CommentRepository,注意不要和MyBatis的接口放在一个包:
package com.tensquare.article.repository;

import com.tensquare.article.pojo.Comment;
import org.springframework.data.mongodb.repository.MongoRepository;

public interface CommentRepository extends MongoRepository<Comment,String> {
}
编写Service:
package com.tensquare.article.service;

import com.tensquare.article.pojo.Comment;
import com.tensquare.article.repository.CommentRepository;
import com.tensquare.util.IdWorker;
import org.springframework.beans.factory.annotation.Autowired;
import org.springframework.data.mongodb.core.MongoTemplate;
import org.springframework.stereotype.Service;
import java.util.Date;
import java.util.List;
import java.util.Optional;

@Service
public class CommentService {

    @Autowired
    private IdWorker idWorker;

    @Autowired
    private CommentRepository commentRepository;

    @Autowired
    private MongoTemplate mongoTemplate;

    public List<Comment> findAll(){
        return commentRepository.findAll();
    }

    public Comment findById(String id){
        Optional<Comment> optional = commentRepository.findById(id);
        if(optional.isPresent()){
            return optional.get();
        }
        return null;
//        return commentRepository.findById(id).get();
    }

    public void save(Comment comment){
        //分布式id生成器生成id
        String id = idWorker.nextId()+"";
        comment.set_id(id);
        //初始化发布时间、点赞数据
        comment.setPublishdate(new Date());
        comment.setThumbup(0);

        commentRepository.save(comment);
    }

    public void update(Comment comment){
        //主键存在则执行修改,如果不存在则执行新增
        commentRepository.save(comment);
    }

    public void deleteById(String id){
        commentRepository.deleteById(id);
    }
}
编写Controller:
package com.tensquare.article.controller;

import com.tensquare.article.pojo.Comment;
import com.tensquare.article.service.CommentService;
import com.tensquare.entity.Result;
import com.tensquare.entity.StatusCode;
import org.springframework.beans.factory.annotation.Autowired;
import org.springframework.data.redis.core.RedisTemplate;
import org.springframework.web.bind.annotation.*;
import java.util.List;

@RestController
@RequestMapping("comment")
@CrossOrigin
public class CommentController {

    @Autowired
    private CommentService commentService;
  //查询所有
    @RequestMapping
    public Result findAll(){
        List<Comment> list = commentService.findAll();
        return new Result(true,StatusCode.OK,"查询成功",list);
    }

    //根据id查询评论
    @RequestMapping("{id}")
    public Result findById(@PathVariable String id){
        Comment comment = commentService.findById(id);
        return new Result(true, StatusCode.OK,"查询成功",comment);
    }

    //新增
    @RequestMapping(method = RequestMethod.POST)
    public Result save(@RequestBody Comment comment){
        commentService.save(comment);
        return new Result(true,StatusCode.OK,"新增成功");
    }

    //修改
    @RequestMapping(value = "{id}",method = RequestMethod.PUT)
    public Result update(@PathVariable String id,@RequestBody Comment comment){
        comment.set_id(id);
        commentService.update(comment);
        return new Result(true,StatusCode.OK,"修改成功");
    }

    //删除
    @RequestMapping(value = "{id}",method = RequestMethod.DELETE)
    public Result deleteById(@PathVariable String id){
        commentService.deleteById(id);
        return new Result(true,StatusCode.OK,"删除成功");
    }
}
3.2 根据文章id查询评论
编写Controller
    //根据文章id查询评论
    @RequestMapping(value = "article/{articleId}",method = RequestMethod.GET)
    public Result findByArticleId(@PathVariable String articleId){
        List<Comment> list = commentService.findByArticleId(articleId);
        return new Result(true,StatusCode.OK,"查询成功",list);
    }
编写Service
    public List<Comment> findByArticleId(String articleId) {
        //调用持久层,根据文章id查询
        return commentRepository.findByArticleid(articleId);
    }
编写dao
public interface CommentRepository extends MongoRepository<Comment,String> {

    //SpringDataMongoDB,支持通过查询方法名进行查询定义的方式
    //根据文章id查询评论列表
    List<Comment> findByArticleid(String articleId);
}
3.3 评论点赞
先根据评论的id查询,再对点赞数加一
编写service
    //评论点赞
    //先根据评论的id查询,再对点赞数+1
    public void thumbup(String id){
        //并不能够保证我们的线程安全
        //解决办法:分布式锁 redis/zookeeper
//        Comment comment = commentRepository.findById(id).get();
//        //修改点赞数
//        comment.setThumbup(comment.getThumbup()+1);
//        commentRepository.save(comment);

        //点赞功能优化
        //修改条件
        Query query = new Query();
        query.addCriteria(Criteria.where("_id").is(id));
        //修改的数据
        Update update = new Update();
        update.inc("thumbup",1);
        mongoTemplate.updateFirst(query,update,"comment");
    }
编写Controller
//评论点赞
@RequestMapping(value = "thumbup/{id}", method = RequestMethod.PUT)
public Result thumbup(@PathVariable String id) {
    commentService.thumbup(id);
    return new Result(true, StatusCode.OK, "点赞成功");
}
3.4 不能重复点赞
点赞功能完成后,发现可以重复点赞,我们应该改为一个人只能点赞一次。
可以使用评论id+用户id进行标记,一个用户只能点赞一次。可以使用redis保存点赞信息,速度较快
pom.xml添加依赖:
<dependency>
    <groupId>org.springframework.boot</groupId>
    <artifactId>spring-boot-starter-data-redis</artifactId>
</dependency>
在Linux虚拟机中创建redis容器:
docker run -id --name=tensquare_redis -p 6379:6379 redis
配置文件添加配置:
spring:
  redis:
    host: 192.168.240.134
    port: 6379
修改Controller方法:
    @Autowired
    private RedisTemplate redisTemplate;

    //根据评论id评论点赞
    @RequestMapping(value = "thumbup/{id}",method = RequestMethod.PUT)
    public Result thumbup(@PathVariable String id){
        //把用户点赞信息保存到redis中,使用评论id+用户id进行标记,一个用户只能点赞一次。使用redis保存点赞信息,速度较快
        //每次点赞之前,先查询用户点赞信息
        //查询用户id
        String userid = commentService.findById(id).getUserid();
        //查询用户点赞信息,根据用户id和评论id
        Object result = redisTemplate.opsForValue().get("thumbup_"+userid+"_"+id);
        //如果有点赞,用户不能重复点赞
        if(result != null){
            return  new Result(false,StatusCode.REMOTEERROR,"不能重复点赞");
        }
        //如没有点赞信息,用户可以点赞
        commentService.thumbup(id);
        //保存点赞记录
        redisTemplate.opsForValue().set("thumbup_"+userid+"_"+id,1);
        return new Result(true,StatusCode.OK,"点赞成功");
    }
四、公共异常处理类
为了使代码容易维护,减少冗余,我们创建一个类集中处理异常
在com.tensquare.user.controller包下创建公共异常处理类BaseExceptionHandler,并添加代码
package com.tensquare.article.controller;

import com.tensquare.entity.Result;
import com.tensquare.entity.StatusCode;
import org.springframework.web.bind.annotation.ControllerAdvice;
import org.springframework.web.bind.annotation.ExceptionHandler;
import org.springframework.web.bind.annotation.ResponseBody;

@ControllerAdvice
public class BaseExceptionHandler {

    @ExceptionHandler(value = Exception.class)//捕捉Exception或其子类异常
    @ResponseBody
    public Result error(Exception e){
        if(e instanceof NullPointerException){
            //空指针异常处理
        }
        System.out.println("处理异常");
        e.printStackTrace();
        return new Result(false, StatusCode.ERROR,e.getMessage());
    }
}
ArticleController中添加测试代码
    //测试公共异常处理
    @RequestMapping(value = "/exception",method = RequestMethod.GET)
    public Result exception() throws Exception{
//        int a = 1/0;
//        return null;
        throw new Exception("测试统一异常处理");
    }
五、跨域处理
1. 何谓跨域
浏览器从一个域名的网页去请求另一个域名的资源时,域名、端口、协议任一不同,都是跨域 。
十次方项目是采用前后端分离开发的,也是前后端分离部署的,必然会存在跨域问题。
2. 如何解决跨域 只需要在controller类上添加注解 @CrossOrigin 即可!
@RestController
@CrossOrigin        //跨域处理,域名、端口、协议任一不同都是跨域
@RequestMapping("/article")
public class ArticleController {
  ......
}

 浙公网安备 33010602011771号