

十次方社交项目-项目介绍和工程搭建1
一、十次方项目需求分析
1. 项目介绍
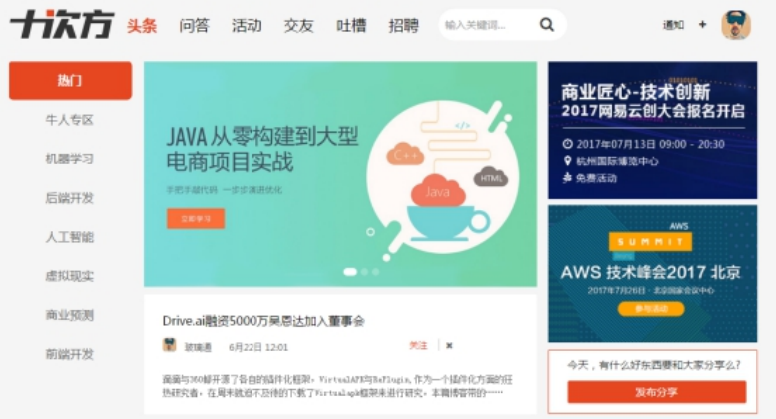
十次方是程序员的专属社交平台,包括头条、问答、活动、交友、吐槽、招聘六大频道。
十次方名称的由来:2的10次方为1024,程序员都懂的。
如果你是一位技术大咖,那么赶快发布文章,增加知名度吧。
如果你是一名技术小白,那么赶快到问答频道寻求帮助的,这里高手如云哦!
如果你不想错过各种技术交流会,那么请经常关注活动频道吧。
如果你还是单身,那么赶快到交友频道找到你心仪的另一半。
如果你有太多的苦恼,那么赶快吐个槽吧。
如果你正在找工作或是想跳槽拿高薪,那么来招聘频道淘金吧。
2. 项目需求
二、系统设计
1. 开发模式
十次方项目采用前后端分离的开发模式
2. 技术选型
后端:springboot + springcloud + mybatis plus + mysql5.7
前端:nodejs + NUXT + elementUI + vue
3. 技术架构
采用前后端分离的系统架构
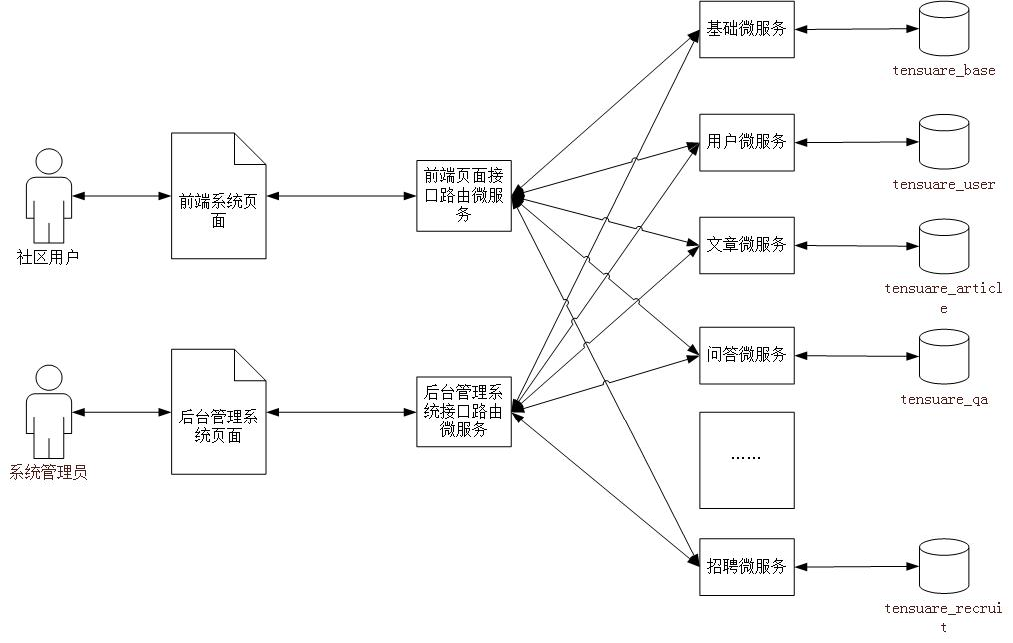
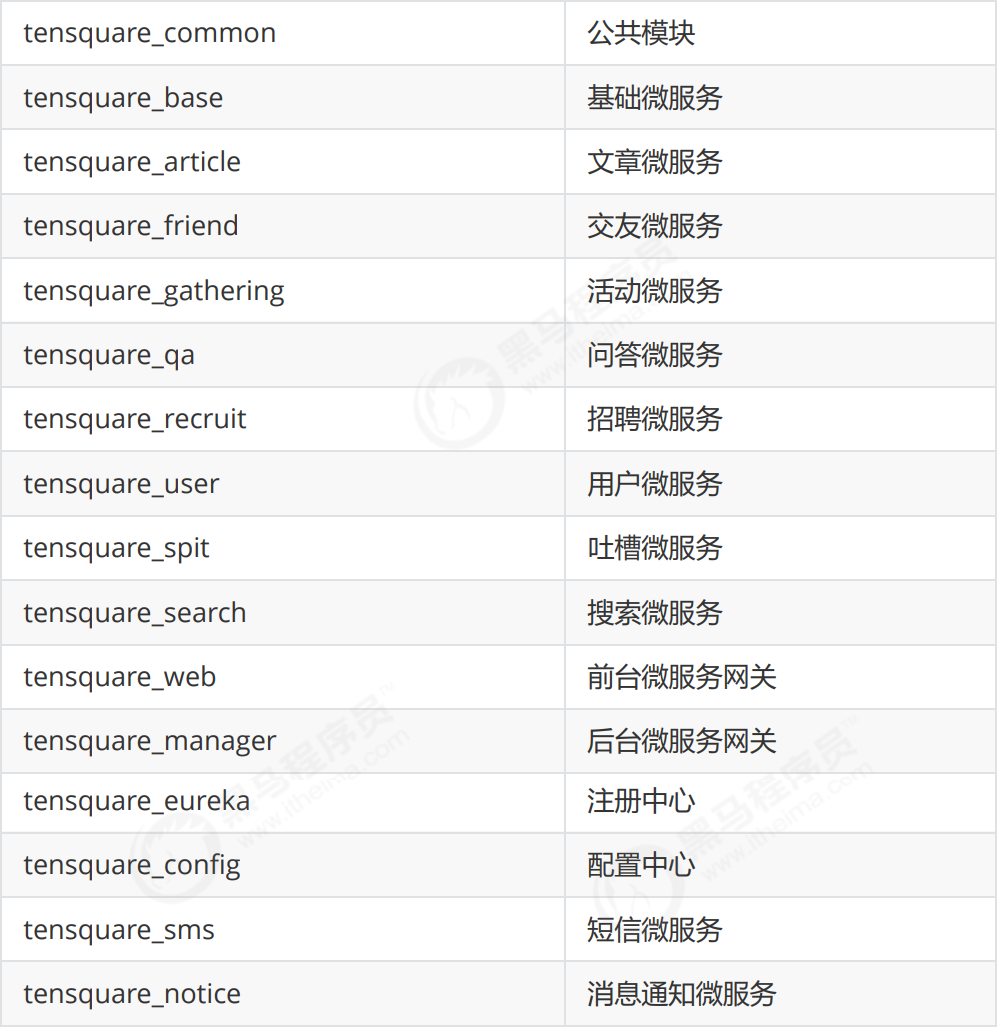
4. 微服务模块划分
5. 数据库表结构分析
采用的分库分表设计,每个微服务模块为1个独立的数据库。
tensquare_article 文章
tensquare_base 基础
tensquare_friend 交友
tensquare_gathering 活动
tensquare_qa 问答
tensquare_recruit 招聘
tensquare_user 用户
tensquare_spit 吐槽
6. API文档
课程提供了前后端开发接口文档(采用Swagger语言进行编写),并与Nginx进行了整合。
双击Nginx执行文件启动后,在地址栏输入http://localhost:801 即可访问API文档。
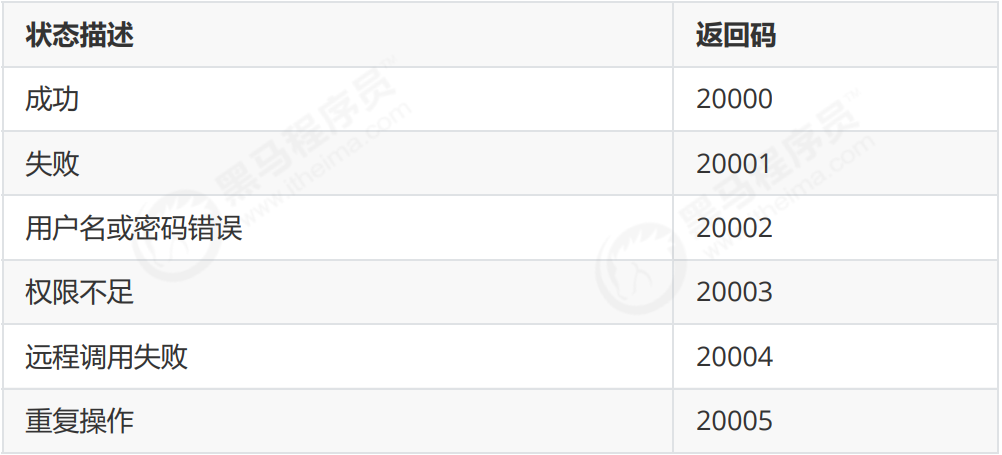
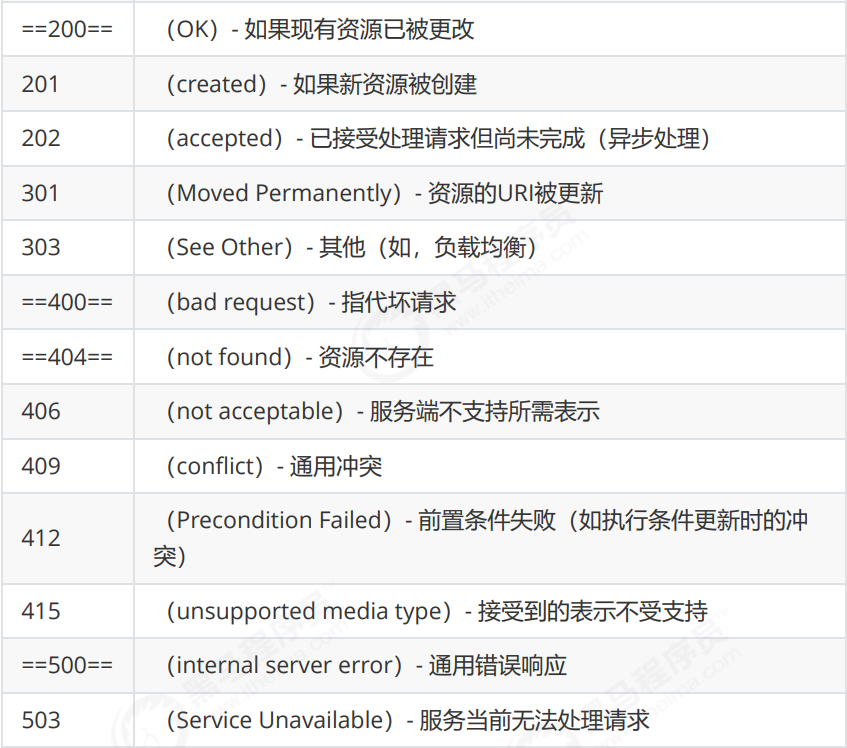
前后端约定的返回码列表:
三、RESTful架构说明
1. 何为RESTful
RESTful架构是目前最流行的一种互联网软件架构。是Roy Thomas Fielding在他2000年的博士论文中提出的;是Representational State Transfer的缩写,翻译过来是”表现层状态转化”;是所有Web应用都应该遵守的架构设计指导原则。
7个HTTP方法:GET、POST、PUT、DELETE、PATCH、HEAD、OPTIONS
2. 接口规范
十次方项目使用GET、POST、PUT、DELETE四种方法
幂等性:不论你请求多少次,资源的状态是一样的
2.1 GET
- 安全且幂等
- 获取表示
- 变更时获取表示(缓存)
==适合查询类的接口使用==
2.2 POST
- 不安全且不幂等
- 使用服务端管理的(自动产生)的实例号创建资源
- 创建子资源
- 部分更新资源
- 如果没有被修改,则不过更新资源(乐观锁)
==适合数据提交类的接口使用==
2.3 PUT
- 不安全但幂等
- 用客户端管理的实例号创建一个资源
- 通过替换的方式更新资源
- 如果未被修改,则更新资源(乐观锁)
==适合更新数据的接口使用==
2.4 DELETE
- 不安全但幂等
- 删除资源
==适合删除数据的接口使用==
3. 请求返回响应码
四、项目开发准备
1. 开发环境
- 虚拟系统环境 VMware Workstation
- 虚拟机系统 CentOS 7
- 容器 docker
- JDK1.8
- 数据库 mysql 5.7
- 开发工具 idea
- 项目构建工具 maven
所有的第三方工具如mysql等都是运行在docker容器中的
注:虚拟机的帐户名root 密码itcast
2. mysql建库建表
进入安装了docker的虚拟机中,按以下顺序执行命令
(1)下载镜像(此步可省略)
docker pull centos/mysql-57-centos7
注:docker默认从国外的镜像网站拉取镜像,速度很慢。可以使用国内的阿里云镜像加速站点提升镜像拉取速度。
(2)创建容器
docker run -di --name=tensquare_mysql -p 3306:3306 -e MYSQL_ROOT_PASSWORD=root centos/mysql-57-centos7
(3)连接MYSQL ,并执行资料中的建表脚本,创建article数据库
3. 接口测试工具postman
postman是一款强大网页调试工具。
- 能够发送任何类型的HTTP 请求 (GET,HEAD, POST,PUT。。。)
- 附带任意数量的参数
五、项目工程搭建
1. 父工程搭建
创建项目类型为maven的父工程
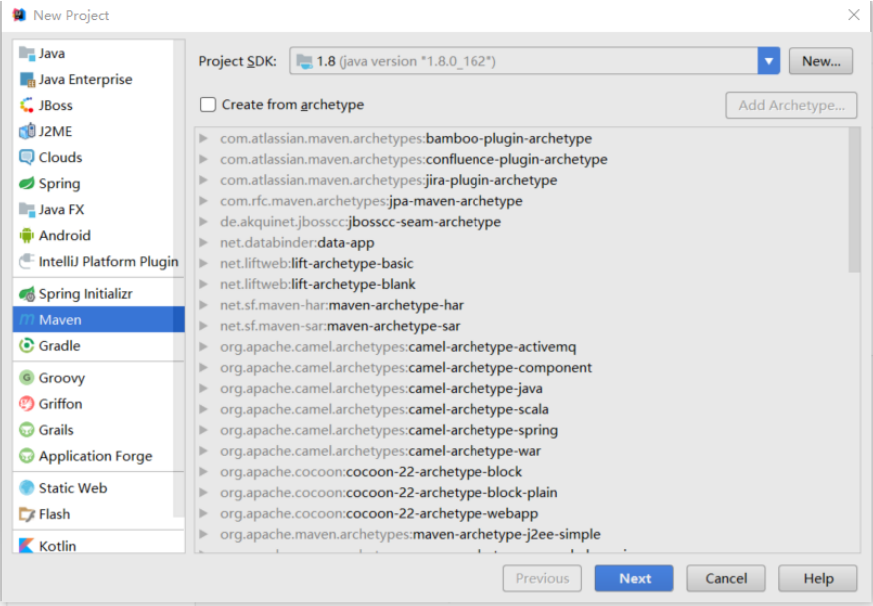
1.1 打开idea开发工具
1.2 选择菜单file-new project ,弹出窗口中左侧菜单选择Maven ,点击next按钮
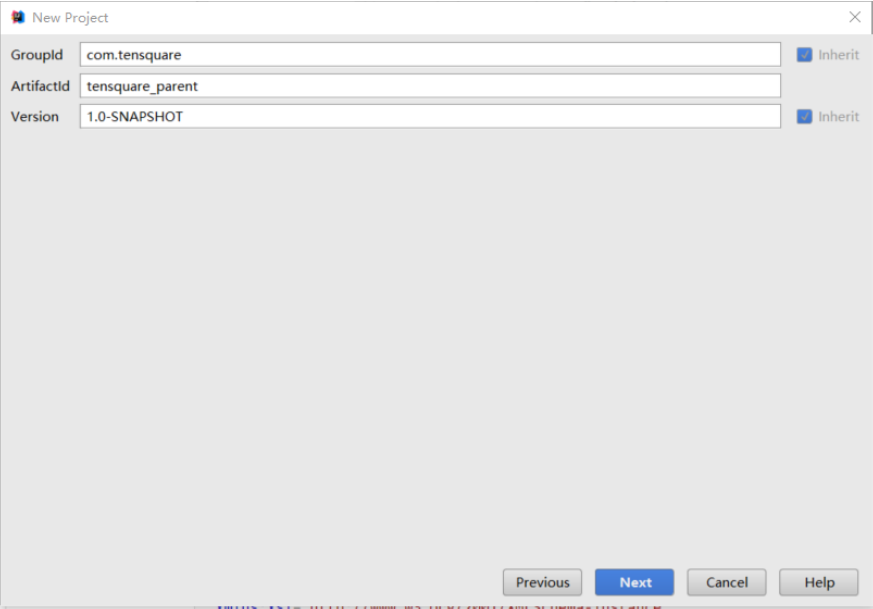
1.3 GroupId填写com.tensquare,ArtifacetId填写tensquare_parent,点击next 按钮
1.4 点击Finish 完成
1.5 修改pom.xml文件,添加以下内容


<?xml version="1.0" encoding="UTF-8"?>
<project xmlns="http://maven.apache.org/POM/4.0.0"
         xmlns:xsi="http://www.w3.org/2001/XMLSchema-instance"
         xsi:schemaLocation="http://maven.apache.org/POM/4.0.0 http://maven.apache.org/xsd/maven-4.0.0.xsd">
    <modelVersion>4.0.0</modelVersion>

    <groupId>com.tensquare</groupId>
    <artifactId>tensquare_parent</artifactId>
    <packaging>pom</packaging>
    <version>1.0-SNAPSHOT</version>
    <modules>
        <module>tensquare_common</module>
        <module>tensquare_article</module>
        <module>mongo_demo</module>
        <module>tesquare_user</module>
        <module>tensquare_eureka</module>
        <module>tensquare_encrypt</module>
        <module>tensquare_notice</module>
        <module>netty_demo</module>
    </modules>

    <parent>
        <groupId>org.springframework.boot</groupId>
        <artifactId>spring-boot-starter-parent</artifactId>
        <version>2.1.5.RELEASE</version>
    </parent>

    <properties>
        <project.build.sourceEncoding>UTF-8</project.build.sourceEncoding>
        <project.reporting.outputEncoding>UTF-8</project.reporting.outputEncoding>
        <java.version>1.8</java.version>
        <maven.compiler.source>1.8</maven.compiler.source>
        <maven.compiler.target>1.8</maven.compiler.target>
        <mybatisplus-spring-boot-starter.version>1.0.5</mybatisplus-spring-boot-starter.version>
        <mybatisplus.version>2.2.0</mybatisplus.version>
        <fastjson.version>1.2.39</fastjson.version>
        <gson.version>2.8.0</gson.version>
    </properties>

    <dependencies>
        <dependency>
            <groupId>org.springframework.cloud</groupId>
            <artifactId>spring-cloud-dependencies</artifactId>
            <version>Greenwich.SR1</version>
            <type>pom</type>
            <scope>import</scope>
        </dependency>
        <dependency>
            <groupId>org.springframework.boot</groupId>
            <artifactId>spring-boot-starter-web</artifactId>
        </dependency>
        <dependency>
            <groupId>org.springframework.boot</groupId>
            <artifactId>spring-boot-starter-test</artifactId>
            <scope>test</scope>
        </dependency>
    </dependencies>

    <repositories>
        <repository>
            <id>spring-snapshots</id>
            <name>Spring Snapshots</name>
            <url>https://repo.spring.io/snapshot</url>
            <snapshots>
                <enabled>true</enabled>
            </snapshots>
        </repository>
        <repository>
            <id>spring-milestones</id>
            <name>Spring Milestones</name>
            <url>https://repo.spring.io/milestone</url>
            <snapshots>
                <enabled>false</enabled>
            </snapshots>
        </repository>
    </repositories>

    <pluginRepositories>
        <pluginRepository>
            <id>spring-snapshots</id>
            <name>Spring Snapshots</name>
            <url>https://repo.spring.io/snapshot</url>
            <snapshots>
                <enabled>true</enabled>
            </snapshots>
        </pluginRepository>
        <pluginRepository>
            <id>spring-milestones</id>
            <name>Spring Milestones</name>
            <url>https://repo.spring.io/milestone</url>
            <snapshots>
                <enabled>false</enabled>
            </snapshots>
        </pluginRepository>
    </pluginRepositories>

</project>
2. 搭建公共子模块
2.1 搭建子模块步骤
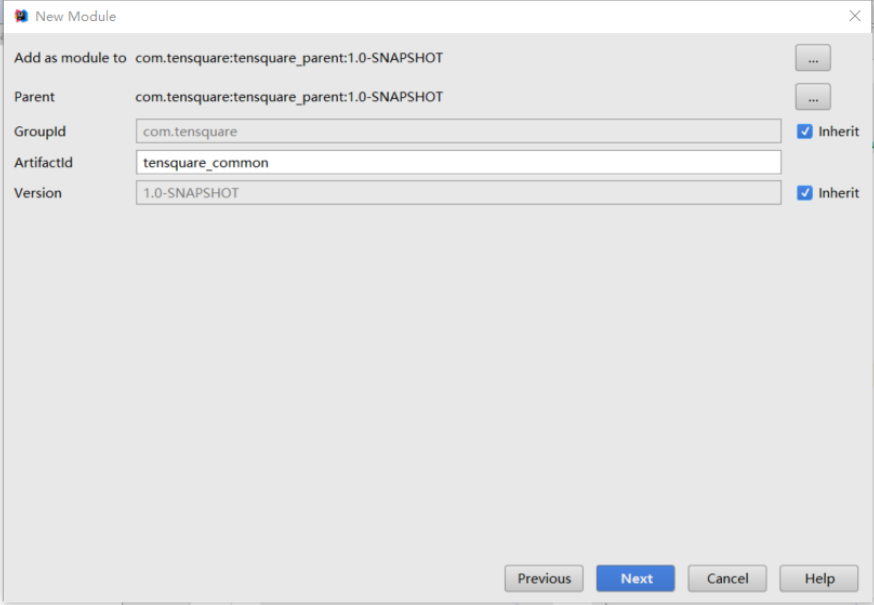
1、右键点击父工程tensquare_parent,选择 New -> Module 弹出窗口选择 Maven ,点击next按钮
2、ArtifacetId填写tensquare_common,点击next按钮
3、点击finish
2.2 创建公共实体类和工具类
1、新建com.tensquare.entity包,包下创建Result类,用于controller返回结果
package com.tensquare.entity;

public class Result {
    private boolean flag;//是否成功
    private Integer code;//返回码
    private String message;//返回信息
    private Object data;//返回数据

    public Result() {
    }

    public Result(boolean flag, Integer code, String message) {
        this.flag = flag;
        this.code = code;
        this.message = message;
    }

    public Result(boolean flag, Integer code, String message, Object data) {
        this.flag = flag;
        this.code = code;
        this.message = message;
        this.data = data;
    }

    public boolean isFlag() {
        return flag;
    }

    public void setFlag(boolean flag) {
        this.flag = flag;
    }

    public Integer getCode() {
        return code;
    }

    public void setCode(Integer code) {
        this.code = code;
    }

    public String getMessage() {
        return message;
    }

    public void setMessage(String message) {
        this.message = message;
    }

    public Object getData() {
        return data;
    }

    public void setData(Object data) {
        this.data = data;
    }
}
2、创建类PageResult ,用于返回分页结果
package com.tensquare.entity;

import java.util.List;

/**
 * 返回分页结果
 * @param <T>
 */
public class PageResult<T> {

    private Long total;
    private List<T> rows;

    public PageResult() {
    }

    public PageResult(Long total, List<T> rows) {
        this.total = total;
        this.rows = rows;
    }

    public Long getTotal() {
        return total;
    }

    public void setTotal(Long total) {
        this.total = total;
    }

    public List<T> getRows() {
        return rows;
    }

    public void setRows(List<T> rows) {
        this.rows = rows;
    }

    @Override
    public String toString() {
        return "PageResult{" +
                "total=" + total +
                ", rows=" + rows +
                '}';
    }
}
3、返回码定义类
package com.tensquare.entity;

/**
 * 返回码定义类
 */
public class StatusCode {
    public static final int OK=200;//成功
    public static final int ERROR=20001;//失败
    public static final int LOGINERROR=20002;//用户名或密码错误
    public static final int ACCESSERROR=20003;//权限不足
    public static final int REMOTEERROR=20004;//远程调用失败
    public static final int REPERROR=20005;//重复操作
}
4、分布式ID生成器
tensquare_common工程创建util包,将IdWorker.java直接拷贝到tensquare_common工程的util包中。
package com.tensquare.util;

import java.lang.management.ManagementFactory;
import java.net.InetAddress;
import java.net.NetworkInterface;

public class IdWorker {
    // 时间起始标记点,作为基准,一般取系统的最近时间(一旦确定不能变动)
    private final static long twepoch = 1288834974657L;
    // 机器标识位数
    private final static long workerIdBits = 5L;
    // 数据中心标识位数
    private final static long datacenterIdBits = 5L;
    // 机器ID最大值
    private final static long maxWorkerId = -1L ^ (-1L << workerIdBits);
    // 数据中心ID最大值
    private final static long maxDatacenterId = -1L ^ (-1L << datacenterIdBits);
    // 毫秒内自增位
    private final static long sequenceBits = 12L;
    // 机器ID偏左移12位
    private final static long workerIdShift = sequenceBits;
    // 数据中心ID左移17位
    private final static long datacenterIdShift = sequenceBits + workerIdBits;
    // 时间毫秒左移22位
    private final static long timestampLeftShift = sequenceBits + workerIdBits + datacenterIdBits;

    private final static long sequenceMask = -1L ^ (-1L << sequenceBits);
    /* 上次生产id时间戳 */
    private static long lastTimestamp = -1L;
    // 0,并发控制
    private long sequence = 0L;

    private final long workerId;
    // 数据标识id部分
    private final long datacenterId;

    public IdWorker(){
        this.datacenterId = getDatacenterId(maxDatacenterId);
        this.workerId = getMaxWorkerId(datacenterId, maxWorkerId);
    }
    /**
     * @param workerId
     *            工作机器ID
     * @param datacenterId
     *            序列号
     */
    public IdWorker(long workerId, long datacenterId) {
        if (workerId > maxWorkerId || workerId < 0) {
            throw new IllegalArgumentException(String.format("worker Id can't be greater than %d or less than 0", maxWorkerId));
        }
        if (datacenterId > maxDatacenterId || datacenterId < 0) {
            throw new IllegalArgumentException(String.format("datacenter Id can't be greater than %d or less than 0", maxDatacenterId));
        }
        this.workerId = workerId;
        this.datacenterId = datacenterId;
    }
    /**
     * 获取下一个ID
     *
     * @return
     */
    public synchronized long nextId() {
        long timestamp = timeGen();
        if (timestamp < lastTimestamp) {
            throw new RuntimeException(String.format("Clock moved backwards.  Refusing to generate id for %d milliseconds", lastTimestamp - timestamp));
        }

        if (lastTimestamp == timestamp) {
            // 当前毫秒内,则+1
            sequence = (sequence + 1) & sequenceMask;
            if (sequence == 0) {
                // 当前毫秒内计数满了,则等待下一秒
                timestamp = tilNextMillis(lastTimestamp);
            }
        } else {
            sequence = 0L;
        }
        lastTimestamp = timestamp;
        // ID偏移组合生成最终的ID,并返回ID
        long nextId = ((timestamp - twepoch) << timestampLeftShift)
                | (datacenterId << datacenterIdShift)
                | (workerId << workerIdShift) | sequence;

        return nextId;
    }

    private long tilNextMillis(final long lastTimestamp) {
        long timestamp = this.timeGen();
        while (timestamp <= lastTimestamp) {
            timestamp = this.timeGen();
        }
        return timestamp;
    }

    private long timeGen() {
        return System.currentTimeMillis();
    }

    /**
     * <p>
     * 获取 maxWorkerId
     * </p>
     */
    protected static long getMaxWorkerId(long datacenterId, long maxWorkerId) {
        StringBuffer mpid = new StringBuffer();
        mpid.append(datacenterId);
        String name = ManagementFactory.getRuntimeMXBean().getName();
        if (!name.isEmpty()) {
            /*
             * GET jvmPid
             */
            mpid.append(name.split("@")[0]);
        }
        /*
         * MAC + PID 的 hashcode 获取16个低位
         */
        return (mpid.toString().hashCode() & 0xffff) % (maxWorkerId + 1);
    }

    /**
     * <p>
     * 数据标识id部分
     * </p>
     */
    protected static long getDatacenterId(long maxDatacenterId) {
        long id = 0L;
        try {
            InetAddress ip = InetAddress.getLocalHost();
            NetworkInterface network = NetworkInterface.getByInetAddress(ip);
            if (network == null) {
                id = 1L;
            } else {
                byte[] mac = network.getHardwareAddress();
                id = ((0x000000FF & (long) mac[mac.length - 1])
                        | (0x0000FF00 & (((long) mac[mac.length - 2]) << 8))) >> 6;
                id = id % (maxDatacenterId + 1);
            }
        } catch (Exception e) {
            System.out.println(" getDatacenterId: " + e.getMessage());
        }
        return id;
    }
}
不能使用数据库本身的自增功能来产生主键值,原因是生产环境为分片部署的。
使用snowflake (雪花)算法(twitter出品)生成唯一的主键值
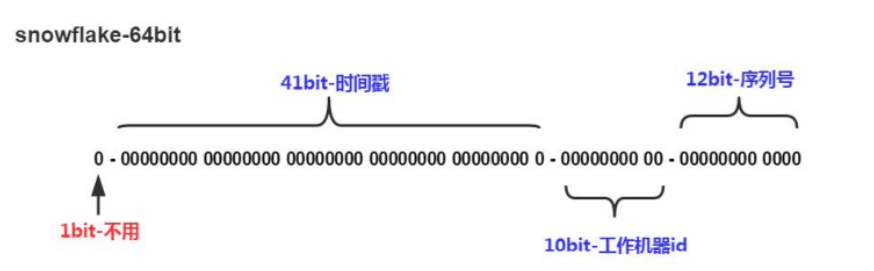
- 41bit的时间戳可以支持该算法使用到2082年
- 10bit的工作机器id可以支持1024台机器
- 序列号支持1毫秒产生4096个自增序列id
- 整体上按照时间自增排序
- 整个分布式系统内不会产生ID碰撞
- 每秒能够产生26万ID左右
3. 搭建Eureka微服务
基于tensquare_parent父工程,创建子工程tensquare_eureka
pom.xml
<?xml version="1.0" encoding="UTF-8"?>
<project xmlns="http://maven.apache.org/POM/4.0.0"
         xmlns:xsi="http://www.w3.org/2001/XMLSchema-instance"
         xsi:schemaLocation="http://maven.apache.org/POM/4.0.0 http://maven.apache.org/xsd/maven-4.0.0.xsd">
    <parent>
        <artifactId>tensquare_parent</artifactId>
        <groupId>com.tensquare</groupId>
        <version>1.0-SNAPSHOT</version>
    </parent>
    <modelVersion>4.0.0</modelVersion>

    <artifactId>tensquare_eureka</artifactId>

    <dependencies>
        <dependency>
            <groupId>org.springframework.cloud</groupId>
            <artifactId>spring-cloud-starter-netflix-eureka-server</artifactId>
            <version>2.1.1.RELEASE</version>
            <exclusions>
                <exclusion>
                    <groupId>javax.servlet</groupId>
                    <artifactId>servlet-api</artifactId>
                </exclusion>
            </exclusions>
        </dependency>
    </dependencies>
</project>
application.yml
server:
  port: 6868
spring:
  application:
    name: tensquare-eureka
eureka:
  client:
    register-with-eureka: false   #是否将自己注册到eureka中
    fetch-registry: false         #是否从eureka中获取信息
    service-url:
      defaultZone: http://127.0.0.1:${server.port}/eureka/
EurekaApplication
package com.tensquare.eureka;

import org.springframework.boot.SpringApplication;
import org.springframework.boot.autoconfigure.SpringBootApplication;
import org.springframework.cloud.netflix.eureka.server.EnableEurekaServer;

@SpringBootApplication
@EnableEurekaServer
public class EurekaApplication {

    public static void main(String[] args) {
        SpringApplication.run(EurekaApplication.class,args);
    }
}
4. 搭建用户微服务
基于tensquare_parent父工程,创建子工程tesquare_user
pom.xml
<?xml version="1.0" encoding="UTF-8"?>
<project xmlns="http://maven.apache.org/POM/4.0.0"
         xmlns:xsi="http://www.w3.org/2001/XMLSchema-instance"
         xsi:schemaLocation="http://maven.apache.org/POM/4.0.0 http://maven.apache.org/xsd/maven-4.0.0.xsd">
    <parent>
        <artifactId>tensquare_parent</artifactId>
        <groupId>com.tensquare</groupId>
        <version>1.0-SNAPSHOT</version>
    </parent>
    <modelVersion>4.0.0</modelVersion>

    <artifactId>tesquare_user</artifactId>

    <dependencies>
        <dependency>
            <groupId>mysql</groupId>
            <artifactId>mysql-connector-java</artifactId>
        </dependency>
        <dependency>
            <groupId>com.tensquare</groupId>
            <artifactId>tensquare_common</artifactId>
            <version>1.0-SNAPSHOT</version>
        </dependency>
        <dependency>
            <groupId>com.baomidou</groupId>
            <artifactId>mybatisplus-spring-boot-starter</artifactId>
            <version>${mybatisplus-spring-boot-starter.version}</version>
        </dependency>
        <dependency>
            <groupId>com.baomidou</groupId>
            <artifactId>mybatis-plus</artifactId>
            <version>${mybatisplus.version}</version>
        </dependency>
        <dependency>
            <groupId>org.projectlombok</groupId>
            <artifactId>lombok</artifactId>
        </dependency>
        <dependency>
            <groupId>org.springframework.cloud</groupId>
            <artifactId>spring-cloud-starter-netflix-eureka-client</artifactId>
            <version>2.1.1.RELEASE</version>
        </dependency>
    </dependencies>

</project>
application.yml
server:
  port: 9008
spring:
  application:
    name: tensquare-user
  datasource:
    driver-class-name: com.mysql.jdbc.Driver
    url: jdbc:mysql://192.168.240.134:3306/tensquare_user?characterEncoding=utf-8
    username: root
    password: root
mybatis-plus:
  type-aliases-package: com.tensquare.user.pojo
  global-config:
    id-type: 1
    db-column-underline: false
    refresh-mapper: true
    configuration:
      map-underscore-to-camel-case: true
      cache-enabled: true              #配置的缓存的全局开关
      lazyLoadingEnable: true           #延时加载的开关,开启延时加载,否则按需加载属性
      multipleResultSetsEnabled: true  #允许单语句返回多结果集
      log-impl: org.apache.ibatis.logging.stdout.StdOutImpl  #打印sql语句,调试用
eureka:
  client:
    service-url:
      defaultZone: http://127.0.0.1:6868/eureka/
  instance:
    prefer-ip-address: true
UserApplication
package com.tensquare.user;

import org.mybatis.spring.annotation.MapperScan;
import org.springframework.boot.SpringApplication;
import org.springframework.boot.autoconfigure.SpringBootApplication;
import org.springframework.cloud.netflix.eureka.EnableEurekaClient;

@SpringBootApplication
@MapperScan("com.tensquare.user.dao")
@EnableEurekaClient
public class UserApplication {
    public static void main(String[] args) {
        SpringApplication.run(UserApplication.class,args);
    }
}

 浙公网安备 33010602011771号