

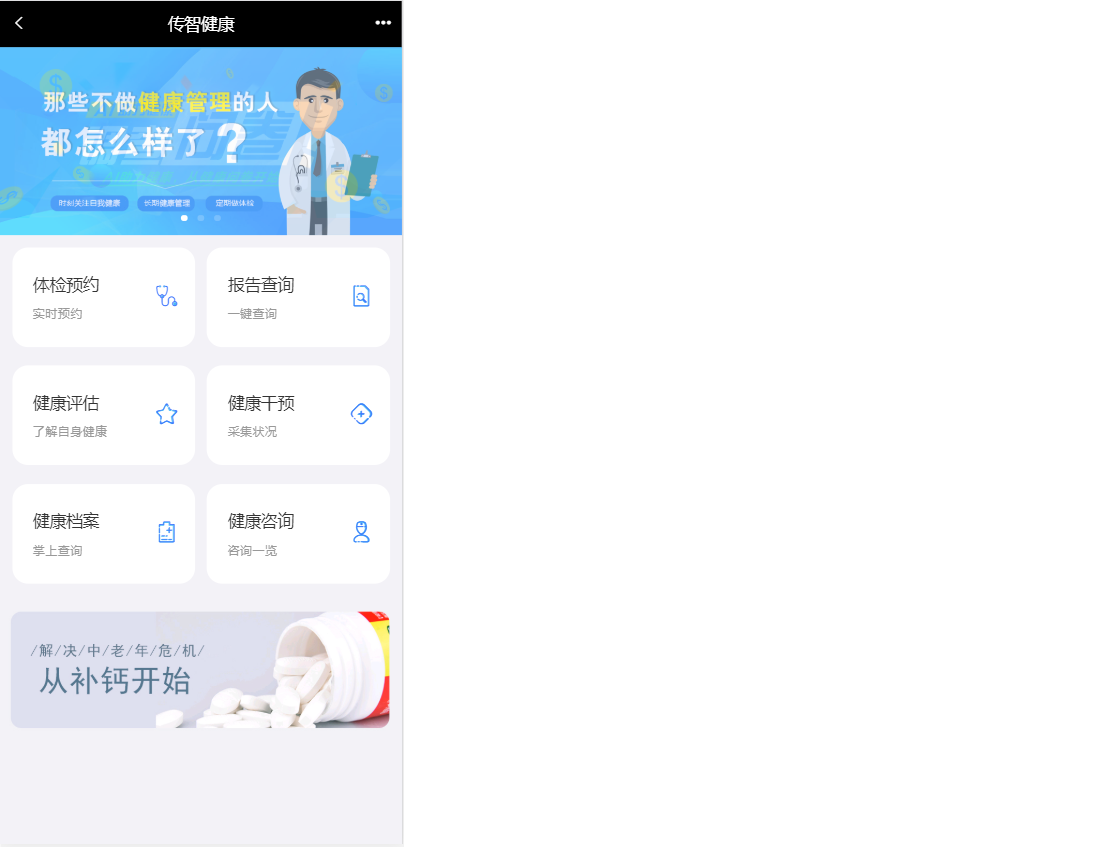
船志健康项目-移动端开发-体检预约6
一、需求分析
用户在体检之前需要进行预约,可以通过电话方式进行预约,此时会由体检中心客服人员通过后台系统录入预约信息。用户也可以通过手机端自助预约。本章节开发的功能为用户通过手机自助预约。
预约流程如下:
1、访问移动端首页
2、点击体检预约进入体检套餐列表页面
3、在体检套餐列表页面点击具体套餐进入套餐详情页面
4、在套餐详情页面点击立即预约进入预约页面
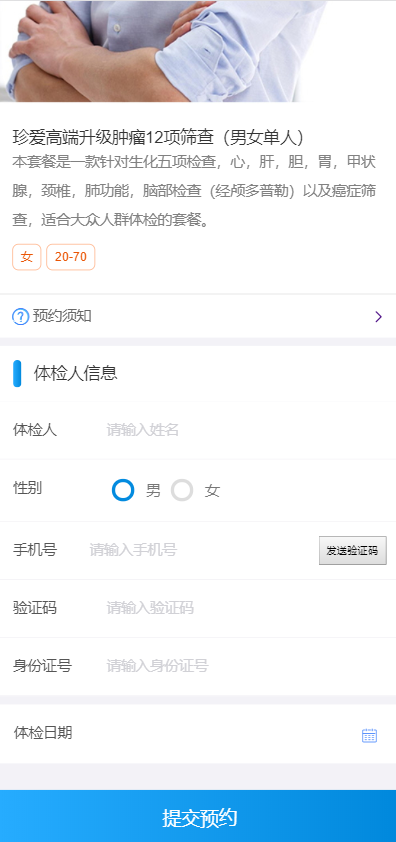
5、在预约页面录入体检人相关信息点击提交预约
效果如下图:

二、环境搭建
搭建移动端工程
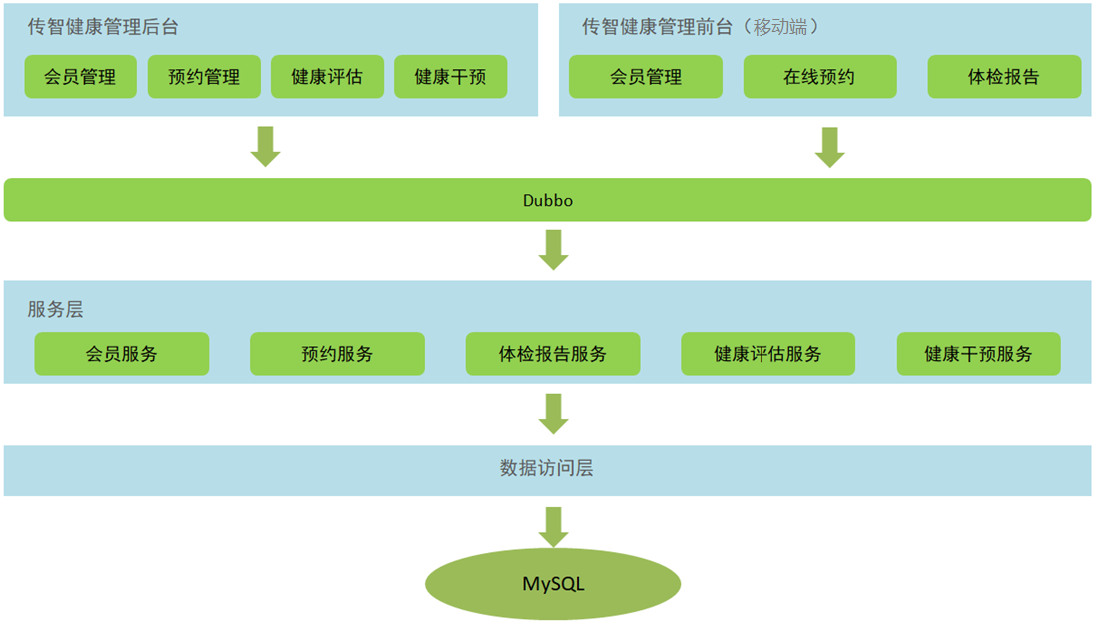
本项目是基于SOA架构进行开发,前面我们已经完成了后台系统的部分功能开发,在后台系统中都是通过Dubbo调用服务层发布的服务进行相关的操作。
本章节我们开发移动端工程也是同样的模式,所以我们也需要在移动端工程中通过Dubbo调用服务层发布的服务,如下图:
1. 导入maven坐标
在health_common工程的pom.xml文件中导入阿里短信发送的maven坐标
<dependency>
  <groupId>com.aliyun</groupId>
  <artifactId>aliyun-java-sdk-core</artifactId>
  <version>3.3.1</version>
</dependency>
<dependency>
  <groupId>com.aliyun</groupId>
  <artifactId>aliyun-java-sdk-dysmsapi</artifactId>
  <version>1.0.0</version>
</dependency>
2. 导入通用组件
在health_common工程中导入如下通用组件
ValidateCodeUtils工具类(随机生成验证码工具类):


package com.itheima.utils;

import java.util.Random;

/**
 * 随机生成验证码工具类
 */
public class ValidateCodeUtils {
    /**
     * 随机生成验证码
     * @param length 长度为4位或者6位
     * @return
     */
    public static Integer generateValidateCode(int length){
        Integer code =null;
        if(length == 4){
            code = new Random().nextInt(9999);//生成随机数,最大为9999
            if(code < 1000){
                code = code + 1000;//保证随机数为4位数字
            }
        }else if(length == 6){
            code = new Random().nextInt(999999);//生成随机数,最大为999999
            if(code < 100000){
                code = code + 100000;//保证随机数为6位数字
            }
        }else{
            throw new RuntimeException("只能生成4位或6位数字验证码");
        }
        return code;
    }

    /**
     * 随机生成指定长度字符串验证码
     * @param length 长度
     * @return
     */
    public static String generateValidateCode4String(int length){
        Random rdm = new Random();
        String hash1 = Integer.toHexString(rdm.nextInt());
        String capstr = hash1.substring(0, length);
        return capstr;
    }
}
SMSUtils工具类(短信发送工具类-阿里云):
package com.itheima.utils;

import com.aliyuncs.DefaultAcsClient;
import com.aliyuncs.IAcsClient;
import com.aliyuncs.dysmsapi.model.v20170525.SendSmsRequest;
import com.aliyuncs.dysmsapi.model.v20170525.SendSmsResponse;
import com.aliyuncs.exceptions.ClientException;
import com.aliyuncs.http.MethodType;
import com.aliyuncs.profile.DefaultProfile;
import com.aliyuncs.profile.IClientProfile;

/**
 * 短信发送工具类-阿里云
 */
public class SMSUtils {
    public static final String VALIDATE_CODE = "SMS_159620392";//发送短信验证码
    public static final String ORDER_NOTICE = "SMS_159771588";//体检预约成功通知

    /**
     * 发送短信
     * @param phoneNumbers
     * @param param
     * @throws ClientException
     */
    public static void sendShortMessage(String templateCode,String phoneNumbers,String param) throws ClientException{
        // 设置超时时间-可自行调整
        System.setProperty("sun.net.client.defaultConnectTimeout", "10000");
        System.setProperty("sun.net.client.defaultReadTimeout", "10000");
        // 初始化ascClient需要的几个参数
        final String product = "Dysmsapi";// 短信API产品名称(短信产品名固定,无需修改)
        final String domain = "dysmsapi.aliyuncs.com";// 短信API产品域名(接口地址固定,无需修改)
        // 替换成你的AK
        //LTAIak3CfAehK7cE
        //LTAIY8Mawj3VMseR
        final String accessKeyId = "LTAIY8Mawj3VMseR";// 你的accessKeyId,参考本文档步骤2
        //zsykwhTIFa48f8fFdU06GOKjHWHel4
        //2eHx00RZf4YzpQebR0f0oXBFLHJCRY
        final String accessKeySecret = "2eHx00RZf4YzpQebR0f0oXBFLHJCRY";// 你的accessKeySecret,参考本文档步骤2
        // 初始化ascClient,暂时不支持多region(请勿修改)
        IClientProfile profile = DefaultProfile.getProfile("cn-hangzhou", accessKeyId, accessKeySecret);
        DefaultProfile.addEndpoint("cn-hangzhou", "cn-hangzhou", product, domain);
        IAcsClient acsClient = new DefaultAcsClient(profile);
        // 组装请求对象
        SendSmsRequest request = new SendSmsRequest();
        // 使用post提交
        request.setMethod(MethodType.POST);
        // 必填:待发送手机号。支持以逗号分隔的形式进行批量调用,批量上限为1000个手机号码,批量调用相对于单条调用及时性稍有延迟,验证码类型的短信推荐使用单条调用的方式
        request.setPhoneNumbers(phoneNumbers);
        // 必填:短信签名-可在短信控制台中找到
        request.setSignName("传智健康");
        // 必填:短信模板-可在短信控制台中找到
        request.setTemplateCode(templateCode);
        // 可选:模板中的变量替换JSON串,如模板内容为"亲爱的${name},您的验证码为${code}"时,此处的值为
        // 友情提示:如果JSON中需要带换行符,请参照标准的JSON协议对换行符的要求,比如短信内容中包含\r\n的情况在JSON中需要表示成\\r\\n,否则会导致JSON在服务端解析失败
        request.setTemplateParam("{\"code\":\""+param+"\"}");
        // 可选-上行短信扩展码(扩展码字段控制在7位或以下,无特殊需求用户请忽略此字段)
        // request.setSmsUpExtendCode("90997");
        // 可选:outId为提供给业务方扩展字段,最终在短信回执消息中将此值带回给调用者
        // request.setOutId("yourOutId");
        // 请求失败这里会抛ClientException异常
        SendSmsResponse sendSmsResponse = acsClient.getAcsResponse(request);
        if (sendSmsResponse.getCode() != null && sendSmsResponse.getCode().equals("OK")) {
            // 请求成功
            System.out.println("请求成功");
        }
    }
}
RedisMessageConstant常量类:
package com.itheima.constant;

public class RedisMessageConstant {
    public static final String SENDTYPE_ORDER = "001";//用于缓存体检预约时发送的验证码
    public static final String SENDTYPE_LOGIN = "002";//用于缓存手机号快速登录时发送的验证码
    public static final String SENDTYPE_GETPWD = "003";//用于缓存找回密码时发送的验证码
}
3. health_mobile
创建移动端工程health_mobile,继承health_parent父工程,打包方式为war,用于存放Controller,在Controller中通过Dubbo可以远程访问服务层相关服务,所以需要依赖health_interface接口工程。
pom.xml:
<?xml version="1.0" encoding="UTF-8"?>

<project xmlns="http://maven.apache.org/POM/4.0.0" xmlns:xsi="http://www.w3.org/2001/XMLSchema-instance"
         xsi:schemaLocation="http://maven.apache.org/POM/4.0.0 http://maven.apache.org/xsd/maven-4.0.0.xsd">
    <parent>
        <artifactId>health_parent</artifactId>
        <groupId>com.itheima</groupId>
        <version>1.0-SNAPSHOT</version>
    </parent>
    <modelVersion>4.0.0</modelVersion>

    <artifactId>health_mobile</artifactId>
    <packaging>war</packaging>

    <properties>
        <project.build.sourceEncoding>UTF-8</project.build.sourceEncoding>
        <maven.compiler.source>1.8</maven.compiler.source>
        <maven.compiler.target>1.8</maven.compiler.target>
    </properties>

    <dependencies>
        <dependency>
            <groupId>com.itheima</groupId>
            <artifactId>health_interface</artifactId>
            <version>1.0-SNAPSHOT</version>
        </dependency>
    </dependencies>

    <build>
        <plugins>
            <plugin>
                <groupId>org.apache.tomcat.maven</groupId>
                <artifactId>tomcat7-maven-plugin</artifactId>
                <configuration>
                    <!-- 指定端口 -->
                    <port>80</port>
                    <!-- 请求路径 -->
                    <path>/</path>
                </configuration>
            </plugin>
        </plugins>
    </build>
</project>
静态资源(CSS、html、img等):
web.xml:
<?xml version="1.0" encoding="UTF-8"?>
<web-app
    version="4.0"
    xmlns="http://xmlns.jcp.org/xml/ns/javaee"
    xmlns:javaee="http://xmlns.jcp.org/xml/ns/javaee"
    xmlns:xml="http://www.w3.org/XML/1998/namespace"
    xmlns:xsi="http://www.w3.org/2001/XMLSchema-instance"
    xsi:schemaLocation="http://xmlns.jcp.org/xml/ns/javaee http://xmlns.jcp.org/xml/ns/javaee/web-app_4_0.xsd">
  <display-name>Archetype Created Web Application</display-name>

  <!-- 解决post乱码 -->
  <filter>
    <filter-name>characterEncodingFilter</filter-name>
    <filter-class>org.springframework.web.filter.CharacterEncodingFilter</filter-class>
    <init-param>
      <param-name>encoding</param-name>
      <param-value>utf-8</param-value>
    </init-param>
    <init-param>
      <param-name>forceEncoding</param-name>
      <param-value>true</param-value>
    </init-param>
  </filter>
  <filter-mapping>
    <filter-name>characterEncodingFilter</filter-name>
    <url-pattern>/*</url-pattern>
  </filter-mapping>
  <servlet>
    <servlet-name>dispatcherServlet</servlet-name>
    <servlet-class>org.springframework.web.servlet.DispatcherServlet</servlet-class>
    <init-param>
      <param-name>contextConfigLocation</param-name>
      <param-value>classpath:springmvc.xml</param-value>
    </init-param>
    <load-on-startup>1</load-on-startup>
  </servlet>
  <servlet-mapping>
    <servlet-name>dispatcherServlet</servlet-name>
    <url-pattern>*.do</url-pattern>
  </servlet-mapping>
  <welcome-file-list>
    <welcome-file>/pages/index.html</welcome-file>
  </welcome-file-list>
</web-app>
springmvc.xml:
<?xml version="1.0" encoding="UTF-8"?>
<beans xmlns="http://www.springframework.org/schema/beans"
       xmlns:xsi="http://www.w3.org/2001/XMLSchema-instance"
       xmlns:dubbo="http://code.alibabatech.com/schema/dubbo"
       xmlns:mvc="http://www.springframework.org/schema/mvc"
       xsi:schemaLocation="http://www.springframework.org/schema/beans
                        http://www.springframework.org/schema/beans/spring-beans.xsd
                        http://www.springframework.org/schema/mvc
                        http://www.springframework.org/schema/mvc/spring-mvc.xsd
                        http://code.alibabatech.com/schema/dubbo
                        http://code.alibabatech.com/schema/dubbo/dubbo.xsd">

    <mvc:annotation-driven>
        <mvc:message-converters>
            <bean class="com.alibaba.fastjson.support.spring.FastJsonHttpMessageConverter">
                <property name="supportedMediaTypes" value="application/json" />
                <property name="features">
                    <list>
                        <value>WriteMapNullValue</value>
                        <value>WriteDateUseDateFormat</value>
                    </list>
                </property>
            </bean>
        </mvc:message-converters>
    </mvc:annotation-driven>

    <!-- 指定应用名称 -->
    <dubbo:application name="health_mobile" />
    <!--指定服务注册中心地址-->
    <dubbo:registry address="zookeeper://192.168.240.134:2181"/>
    <!--批量扫描-->
    <dubbo:annotation package="com.itheima.controller" />
    <!--
        超时全局设置 10分钟
        check=false 不检查服务提供方,开发阶段建议设置为false
        check=true 启动时检查服务提供方,如果服务提供方没有启动则报错
    -->
    <dubbo:consumer timeout="600000" check="false" />
    <import resource="spring-redis.xml" />

</beans>
spring-redis.xml:
<?xml version="1.0" encoding="UTF-8"?>
<beans xmlns="http://www.springframework.org/schema/beans"
       xmlns:xsi="http://www.w3.org/2001/XMLSchema-instance"
       xmlns:context="http://www.springframework.org/schema/context"
       xsi:schemaLocation="http://www.springframework.org/schema/beans
                           http://www.springframework.org/schema/beans/spring-beans-3.2.xsd
                           http://www.springframework.org/schema/context
                           http://www.springframework.org/schema/context/spring-context.xsd">

    <context:property-placeholder location="classpath:redis.properties" />

    <!--Jedis连接池的相关配置-->
    <bean id="jedisPoolConfig" class="redis.clients.jedis.JedisPoolConfig">
        <property name="maxIdle" value="${redis.pool.maxIdle}"/> <!--最大能够保持idel状态的对象数-->
        <property name="maxTotal" value="${redis.pool.maxActive}"/><!--最大分配的对象数-->
        <property name="testOnBorrow" value="true"/><!--当调用borrow Oject方法时,是否进行有效性检查-->
        <property name="testOnReturn" value="true"/><!--连接归还到连接池时进行有效性检查-->
    </bean>

    <bean id="jedisPool" class="redis.clients.jedis.JedisPool">
        <constructor-arg name="poolConfig" ref="jedisPoolConfig"/>
        <constructor-arg name="host" value="${redis.host}"/>
        <constructor-arg name="port" value="${redis.port}" type="int"/>
        <constructor-arg name="timeout" value="${redis.timeout}" type="int"/>
    </bean>
</beans>
redis.properties:
#最大分配的对象数
redis.pool.maxActive=200
#最大能够保持idel状态的对象数
redis.pool.maxIdle=50
redis.pool.minIdle=10
redis.pool.maxWaitMillis=20000
#当池内没有返回对象时,最大等待时间
redis.pool.maxWait=300

#格式:redis://:[密码]@[服务器地址]:[端口]/[db index]
#redis.uri = redis://:12345@127.0.0.1:6379/0
redis.host = 192.168.240.134
redis.port = 6379
redis.timeout = 30000
log4j.properties:
### direct log messages to stdout ###
log4j.appender.stdout=org.apache.log4j.ConsoleAppender
log4j.appender.stdout.Target=System.err
log4j.appender.stdout.layout=org.apache.log4j.PatternLayout
log4j.appender.stdout.layout.ConversionPattern=%d{ABSOLUTE} %5p %c{1}:%L - %m%n

### direct messages to file mylog.log ###
log4j.appender.file=org.apache.log4j.FileAppender
log4j.appender.file.File=c:\\mylog.log
log4j.appender.file.layout=org.apache.log4j.PatternLayout
log4j.appender.file.layout.ConversionPattern=%d{ABSOLUTE} %5p %c{1}:%L - %m%n

### set log levels - for more verbose logging change 'info' to 'debug' ###

log4j.rootLogger=debug, stdout
三、套餐列表页面动态展示
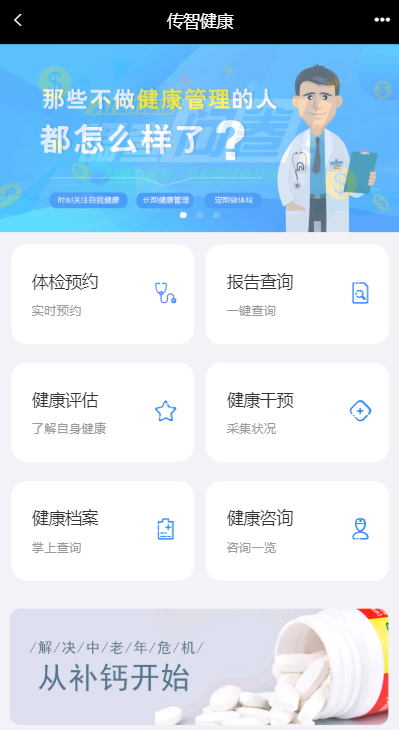
移动端health_mobile首页为/pages/index.html,效果如下:
点击体检预约直接跳转到体检套餐列表页面(/pages/setmeal.html)
1. 完善页面
1.1 展示套餐列表信息setmeal.html
            <ul class="list">
                <li class="list-item" v-for="setmeal in setmealList">
                    <a class="link-page" :href="'setmeal_detail.html?id='+setmeal.id">
                    <!--<img class="img-object f-left" :src="'http://pqjroc654.bkt.clouddn.com/'+setmeal.img" alt="">-->
                    <img class="img-object f-left" :src="'http://smxzg7not.hd-bkt.clouddn.com/'+setmeal.img" alt="">
                    <div class="item-body">
                        <h4 class="ellipsis item-title">{{setmeal.name}}</h4>
                        <p class="ellipsis-more item-desc">{{setmeal.remark}}</p>
                        <p class="item-keywords">
                            <span>{{setmeal.sex == '0' ? '性别不限' : setmeal.sex == '1' ? '男':'女'}}</span>
                            <span>{{setmeal.age}}</span>
                        </p>
                    </div>
                    </a>
                </li>
            </ul>
1.2 获取套餐列表数据
    var vue = new Vue({
        el:'#app',
        data:{
            setmealList:[]  //模型数据,用于套餐列表展示
        },
        mounted (){
            //发送ajax请求,获取所有的套餐数据,赋值给setmealList模型数据,用于页面展示
            axios.post("/setmeal/getAllSetmeal.do").then((response)=>{
                if(response.data.flag){
                    this.setmealList = response.data.data;
                }
            });
        }
    });
2. 后台代码
2.1 Controller
在health_mobile工程中创建SetmealController并提供getSetmeal方法,在此方法中通过Dubbo远程调用套餐服务获取套餐列表数据
package com.itheima.controller;

import com.alibaba.dubbo.config.annotation.Reference;
import com.itheima.constant.MessageConstant;
import com.itheima.entity.Result;
import com.itheima.pojo.Setmeal;
import com.itheima.service.SetmealService;
import org.springframework.web.bind.annotation.RequestMapping;
import org.springframework.web.bind.annotation.RestController;
import java.util.List;

/**
 * 套餐管理
 */
@RestController
@RequestMapping("/setmeal")
public class SetmealController {

    @Reference
    private SetmealService setmealService;

    //查询所有套餐
    @RequestMapping("/getAllSetmeal")
    public Result getAllSetmeal(){
        try{
            List<Setmeal> list = setmealService.findAll();
            return new Result(true, MessageConstant.GET_SETMEAL_LIST_SUCCESS,list);
        }catch (Exception e){
            return new Result(false, MessageConstant.GET_SETMEAL_LIST_FAIL);
        }
    }
}
2.2 服务接口
在health_interface工程SetmealService服务接口中扩展findAll方法
public List<Setmeal> findAll();
2.3 服务实现类
在health_service_provider工程SetmealServiceImpl服务实现类中实现findAll方法
    @Override
    public List<Setmeal> findAll() {
        return setmealDao.findAll();
    }
2.4 Dao接口
在health_service_provider工程SetmealDao接口中扩展findAll方法
public List<Setmeal> findAll();
2.5 Mapper映射文件
在health_service_provider工程SetmealDao.xml映射文件中扩展SQL语句
    <select id="findAll" resultType="com.itheima.pojo.Setmeal">
        select * from t_setmeal
    </select>
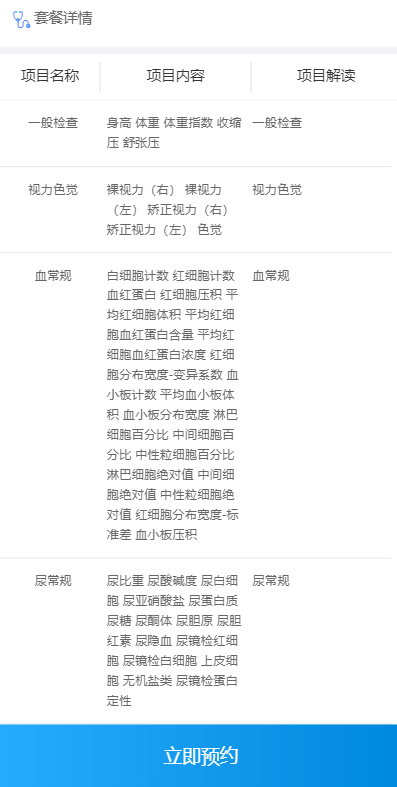
四、套餐详情页面动态展示
前面我们已经完成了体检套餐列表页面动态展示,点击其中任意一个套餐则跳转到对应的套餐详情页面 (/pages/setmeal_detail.html),并且会携带此套餐的id作为参数提交。
请求路径格式:http://localhost/pages/setmeal_detail.html?id=10
在套餐详情页面需要展示当前套餐的信息(包括图片、套餐名称、套餐介绍、适用性别、适用年龄)、此套餐包含的检查组信息、检查组包含的检查项信息等。
1. 完善页面
1.1 获取请求参数中套餐id
在setmeal_detail.html页面中已经引入了healthmobile.js文件,healthmobile.js文件中已经封装了getUrlParam方法可以根据URL请求路径中的参数名获取对应的值
//获取指定的URL参数值 http://localhost/pages/setmeal_detail.html?id=3&name=jack
function getUrlParam(paraName) {
    var url = document.location.toString();
    // alert(url);
    var arrObj = url.split("?");
    if (arrObj.length > 1) {
        var arrPara = arrObj[1].split("&");
        var arr;
        for (var i = 0; i < arrPara.length; i++) {
            arr = arrPara[i].split("=");
            if (arr != null && arr[0] == paraName) {
                return arr[1];
            }
        }
        return "";
    }
    else {
        return "";
    }
}
在setmeal_detail.html中调用上面定义的方法获取套餐id的值
    <script>
        var id = getUrlParam("id");//根据请求URL中的参数名称获取对应的值
    </script>
1.2 获取套餐详细信息
<script>
    var vue = new Vue({
        el:'#app',
        data:{
            imgUrl:null,//套餐对应的图片链接
            setmeal:{}
        },
        methods:{
            toOrderInfo(){
                window.location.href = "orderInfo.html?id=" + id;
            }
        },
        mounted(){
            //发送ajax请求,根据套餐ID查询套餐详细信息(包括套餐基本信息、套餐包含的检查组、检查组里包含的检查项)
            axios.post("/setmeal/findById.do?id=" + id).then((response) => {
                if(response.data.flag){
                    this.setmeal = response.data.data;
                    this.imgUrl = 'http://smxzg7not.hd-bkt.clouddn.com/' + this.setmeal.img;
                }
            });
        }
    });
</script>
1.3 展示套餐信息
    <div class="contentBox">
        <div class="card">
            <div class="project-img">
                <img :src="imgUrl" width="100%" height="100%" />
            </div>
            <div class="project-text">
                <h4 class="tit">{{setmeal.name}}</h4>
                <p class="subtit">{{setmeal.remark}}</p>
                <p class="keywords">
                    <span>{{setmeal.sex == '0' ? '性别不限' : setmeal.sex == '1' ? '男':'女'}}</span>
                    <span>{{setmeal.age}}</span>
                </p>
            </div>
        </div>
        <div class="table-listbox">
            <div class="box-title">
                <i class="icon-zhen"><span class="path1"></span><span class="path2"></span></i>
                <span>套餐详情</span>
            </div>
            <div class="box-table">
                <div class="table-title">
                    <div class="tit-item flex2">项目名称</div>
                    <div class="tit-item  flex3">项目内容</div>
                    <div class="tit-item  flex3">项目解读</div>
                </div>
                <div class="table-content">
                    <ul class="table-list">
                        <li class="table-item" v-for="checkgroup in setmeal.checkGroups">
                            <div class="item flex2">{{checkgroup.name}}</div>
                            <div class="item flex3">
                                <label v-for="checkitem in checkgroup.checkItems">
                                    {{checkitem.name}}
                                </label>
                            </div>
                            <div class="item flex3">{{checkgroup.remark}}</div>
                        </li>
                    </ul>
                </div>
                <div class="box-button">
                    <a @click="toOrderInfo()" class="order-btn">立即预约</a>
                </div>
            </div>
        </div>
    </div>
2. 后台代码
2.1 Controller
在health_mobile工程SetmealController中提供findById方法
    //根据套餐ID查询套餐详细信息(包括套餐基本信息、套餐包含的检查组、检查阻力包含的检查项)
    @RequestMapping("/findById")
    public Result findById(int id){
        try{
            Setmeal setmeal = setmealService.findById(id);
            return new Result(true, MessageConstant.QUERY_SETMEAL_SUCCESS,setmeal);
        }catch (Exception e){
            return new Result(false, MessageConstant.QUERY_SETMEAL_FAIL);
        }
    }
2.2 服务接口
在SetmealService服务接口中提供findById方法
public Setmeal findById(int id);
2.3 服务实现类
在SetmealServiceImpl服务实现类中实现findById方法
    //根据套餐id查询
    @Override
    public Setmeal findById(int id) {
        return setmealDao.findById(id);
    }
2.4 Dao接口
在SetmealDao接口中提供findById方法
public Setmeal findById(int id);
2.5 Mapper映射文件
此处会使用mybatis提供的关联查询,在根据id查询套餐时,同时将此套餐包含的检查组都查询出来, 并且将检查组包含的检查项都查询出来。
SetmealDao.xml文件:
    <resultMap id="baseResultMap" type="com.itheima.pojo.Setmeal">
        <id column="id" property="id"/>
        <result column="name" property="name" />
        <result column="code" property="code" />
        <result column="helpCode" property="helpCode" />
        <result column="sex" property="sex" />
        <result column="age" property="age" />
        <result column="price" property="price" />
        <result column="remark" property="remark" />
        <result column="attention" property="attention" />
        <result column="img" property="img" />
    </resultMap>

    <resultMap id="findByIdResultMap" type="com.itheima.pojo.Setmeal" extends="baseResultMap">
        <!--多对多映射-->
        <collection
                property="checkGroups"
                javaType="ArrayList"
                ofType="com.itheima.pojo.CheckGroup"
                column="id"
                select="com.itheima.dao.CheckGroupDao.findCheckGroupId"><!--checkGroups对应属性名,通过column套餐id传入findCheckGroupId参数-->
        </collection>
    </resultMap>
    <!--根据套餐ID查询套餐详细信息(包括套餐基本信息、套餐包含的检查组、检查组包含的检查项)-->
    <select id="findById" parameterType="int" resultMap="findByIdResultMap">
        select * from t_setmeal where id = #{id}
    </select>
CheckGroupDao.xml文件:
    <resultMap id="baseResultMap" type="com.itheima.pojo.CheckGroup">
        <id column="id" property="id" />
        <result column="code" property="code"/>
        <result column="name" property="name"/>
        <result column="helpCode" property="helpCode"/>
        <result column="sex" property="sex"/>
        <result column="remark" property="remark"/>
        <result column="attention" property="attention"/>
    </resultMap>

    <resultMap id="findByIdResultMap" type="com.itheima.pojo.CheckGroup" extends="baseResultMap">
        <!--多对多映射,检查组和检查项多对多关联查询-->
        <collection
                property="checkItems"
                ofType="com.itheima.pojo.CheckItem"
                javaType="ArrayList"
                column="id"
                select="com.itheima.dao.CheckItemDao.findCheckItemById"><!--id为检查组id-->
        </collection>
    </resultMap>
    <!--根据套餐id查询关联的检查组详情-->
    <select id="findCheckGroupId" parameterType="int" resultMap="findByIdResultMap">
      select * from t_checkgroup where id in (select checkgroup_id from t_setmeal_checkgroup where setmeal_id=#{setmeal_id})
    </select>
CheckItemDao.xml文件:
    <!--根据检查组id查询关联的检查项信息-->
    <select id="findCheckItemById" parameterType="int" resultType="com.itheima.pojo.CheckItem">
        select * from t_checkitem where id in (select checkitem_id from t_checkgroup_checkitem where checkgroup_id = #{id})
    </select>
五、短信发送
本项目中体检预约用到发送验证码,这里我们选择的是阿里云提供的短信服务。
参考:短信发送-阿里云
1. health_common工程导入maven坐标
<dependency>
  <groupId>com.aliyun</groupId>
  <artifactId>aliyun-java-sdk-core</artifactId>
  <version>3.3.1</version>
</dependency>
<dependency>
  <groupId>com.aliyun</groupId>
  <artifactId>aliyun-java-sdk-dysmsapi</artifactId>
  <version>1.0.0</version>
</dependency>
2. 封装工具类
SMSUtils
package com.itheima.utils;

import com.aliyuncs.DefaultAcsClient;
import com.aliyuncs.IAcsClient;
import com.aliyuncs.dysmsapi.model.v20170525.SendSmsRequest;
import com.aliyuncs.dysmsapi.model.v20170525.SendSmsResponse;
import com.aliyuncs.exceptions.ClientException;
import com.aliyuncs.http.MethodType;
import com.aliyuncs.profile.DefaultProfile;
import com.aliyuncs.profile.IClientProfile;

/**
 * 短信发送工具类-阿里云
 */
public class SMSUtils {
    public static final String VALIDATE_CODE = "SMS_159620392";//发送短信验证码
    public static final String ORDER_NOTICE = "SMS_159771588";//体检预约成功通知

    /**
     * 发送短信
     * @param phoneNumbers
     * @param param
     * @throws ClientException
     */
    public static void sendShortMessage(String templateCode,String phoneNumbers,String param) throws ClientException{
        // 设置超时时间-可自行调整
        System.setProperty("sun.net.client.defaultConnectTimeout", "10000");
        System.setProperty("sun.net.client.defaultReadTimeout", "10000");
        // 初始化ascClient需要的几个参数
        final String product = "Dysmsapi";// 短信API产品名称(短信产品名固定,无需修改)
        final String domain = "dysmsapi.aliyuncs.com";// 短信API产品域名(接口地址固定,无需修改)
        // 替换成你的AK
        //LTAIak3CfAehK7cE
        //LTAIY8Mawj3VMseR
        final String accessKeyId = "LTAIY8Mawj3VMseR";// 你的accessKeyId,参考本文档步骤2
        //zsykwhTIFa48f8fFdU06GOKjHWHel4
        //2eHx00RZf4YzpQebR0f0oXBFLHJCRY
        final String accessKeySecret = "2eHx00RZf4YzpQebR0f0oXBFLHJCRY";// 你的accessKeySecret,参考本文档步骤2
        // 初始化ascClient,暂时不支持多region(请勿修改)
        IClientProfile profile = DefaultProfile.getProfile("cn-hangzhou", accessKeyId, accessKeySecret);
        DefaultProfile.addEndpoint("cn-hangzhou", "cn-hangzhou", product, domain);
        IAcsClient acsClient = new DefaultAcsClient(profile);
        // 组装请求对象
        SendSmsRequest request = new SendSmsRequest();
        // 使用post提交
        request.setMethod(MethodType.POST);
        // 必填:待发送手机号。支持以逗号分隔的形式进行批量调用,批量上限为1000个手机号码,批量调用相对于单条调用及时性稍有延迟,验证码类型的短信推荐使用单条调用的方式
        request.setPhoneNumbers(phoneNumbers);
        // 必填:短信签名-可在短信控制台中找到
        request.setSignName("传智健康");
        // 必填:短信模板-可在短信控制台中找到
        request.setTemplateCode(templateCode);
        // 可选:模板中的变量替换JSON串,如模板内容为"亲爱的${name},您的验证码为${code}"时,此处的值为
        // 友情提示:如果JSON中需要带换行符,请参照标准的JSON协议对换行符的要求,比如短信内容中包含\r\n的情况在JSON中需要表示成\\r\\n,否则会导致JSON在服务端解析失败
        request.setTemplateParam("{\"code\":\""+param+"\"}");
        // 可选-上行短信扩展码(扩展码字段控制在7位或以下,无特殊需求用户请忽略此字段)
        // request.setSmsUpExtendCode("90997");
        // 可选:outId为提供给业务方扩展字段,最终在短信回执消息中将此值带回给调用者
        // request.setOutId("yourOutId");
        // 请求失败这里会抛ClientException异常
        SendSmsResponse sendSmsResponse = acsClient.getAcsResponse(request);
        if (sendSmsResponse.getCode() != null && sendSmsResponse.getCode().equals("OK")) {
            // 请求成功
            System.out.println("请求成功");
        }
    }
}
3. 测试短信发送
import com.itheima.utils.SMSUtils;

public class SendMessage {
    public static void main(String[] args)throws Exception {
        SMSUtils.sendShortMessage("SMS_159620392","13581838710","1234");
    }
}

 浙公网安备 33010602011771号