
mybatis-plus的基础入门
简介
MyBatis-Plus(简称 MP)是一个 MyBatis 的增强工具,在 MyBatis 的基础上只做增强不做改变,为简化开发、提高效率而生。
愿景
我们的愿景是成为 MyBatis 最好的搭档,就像 魂斗罗 中的 1P、2P,基友搭配,效率翻倍。
特性
无侵入:只做增强不做改变,引入它不会对现有工程产生影响,如丝般顺滑
损耗小:启动即会自动注入基本 CURD,性能基本无损耗,直接面向对象操作
强大的 CRUD 操作:内置通用 Mapper、通用 Service,仅仅通过少量配置即可实现单表大部分 CRUD 操作,更有强大的条件构造器,满足各类使用需求
支持 Lambda 形式调用:通过 Lambda 表达式,方便的编写各类查询条件,无需再担心字段写错
支持主键自动生成:支持多达 4 种主键策略(内含分布式唯一 ID 生成器 - Sequence),可自由配置,完美解决主键问题
支持 ActiveRecord 模式:支持 ActiveRecord 形式调用,实体类只需继承 Model 类即可进行强大的 CRUD 操作
支持自定义全局通用操作:支持全局通用方法注入( Write once, use anywhere )
内置代码生成器:采用代码或者 Maven 插件可快速生成 Mapper 、 Model 、 Service 、 Controller 层代码,支持模板引擎,更有超多自定义配置等您来使用
内置分页插件:基于 MyBatis 物理分页,开发者无需关心具体操作,配置好插件之后,写分页等同于普通 List 查询
分页插件支持多种数据库:支持 MySQL、MariaDB、Oracle、DB2、H2、HSQL、SQLite、Postgre、SQLServer 等多种数据库
内置性能分析插件:可输出 Sql 语句以及其执行时间,建议开发测试时启用该功能,能快速揪出慢查询
内置全局拦截插件:提供全表 delete 、 update 操作智能分析阻断,也可自定义拦截规则,预防误操作
支持数据库
mysql 、 mariadb 、 oracle 、 db2 、 h2 、 hsql 、 sqlite 、 postgresql 、 sqlserver
达梦数据库 、 虚谷数据库 、 人大金仓数据库
使用
pom.xml
<!--mybatis-plus启动器-->
        <dependency>
            <groupId>com.baomidou</groupId>
            <artifactId>mybatis-plus-boot-starter</artifactId>
            <version>3.5.1</version>
        </dependency>

        <!--Lombok用于简化实体开发-->
        <dependency>
            <groupId>org.projectlombok</groupId>
            <artifactId>lombok</artifactId>
            <scope>true</scope>
        </dependency>

        <!--mysql驱动-->
        <dependency>
            <groupId>mysql</groupId>
            <artifactId>mysql-connector-java</artifactId>
            <scope>runtime</scope>
        </dependency>

<!--Web项目-->
<dependency>
    <groupId>org.springframework.boot</groupId>
    <artifactId>spring-boot-starter-web</artifactId>
    <exclusions>
        <exclusion>
            <groupId>org.springframework.boot</groupId>
            <artifactId>spring-boot-starter-logging</artifactId>
        </exclusion>
    </exclusions>
</dependency>
配置文件application.yml
spring:
  #配置信息源信息
  datasource:
    #配置数据源类型
    #type:
    #配置连接数据库的各个信息
    driver-class-name: com.mysql.cj.jdbc.Driver
    #连接地址
    url: jdbc:mysql://127.0.0.1:3306/mp?serverTimezone=UTC&useUnicode=true&characterEncoding=utf-8&useSSL=true
    #密码
    password: root
    #用户名
    username: root
注意
springboot2.0(内置JDBC5驱动),驱动类使用
  driver-class-name: com.mysql.jdbc.Driver
驱动类2.1及以上(内置JDBC8驱动),驱动类使用
 driver-class-name: com.mysql.cj.jdbc.Driver
否则运行的时候会有WARN信息
连接地址url
mysql5.7
url: jdbc:mysql://localhost:3306/test?useUnicode=true&characterEncoding=UTF-8&serverTimezone=UTC
mysql8
jdbc:mysql://localhost:3306/dataSourceName?useUnicode=true&characterEncoding=utf-8&useSSL=false&serverTimezone=UTC
MyBatisX插件
MybatisX 是一款基于 IDEA 的快速开发插件,为效率而生。
安装方法:打开 IDEA,进入 File -> Settings -> Plugins -> Browse Repositories,输入 mybatisx 搜索并安装。
连接数据库
示例连接MySQL
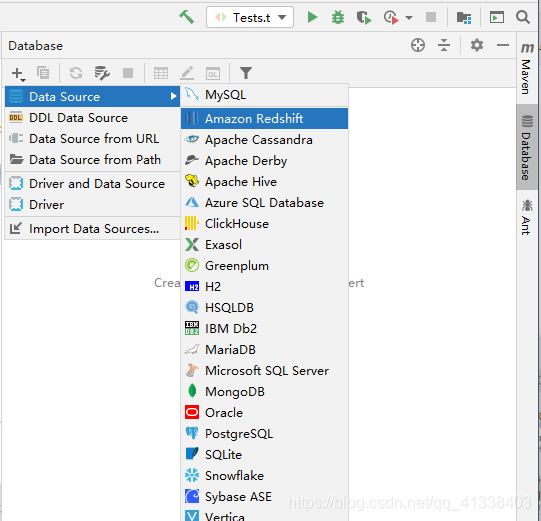
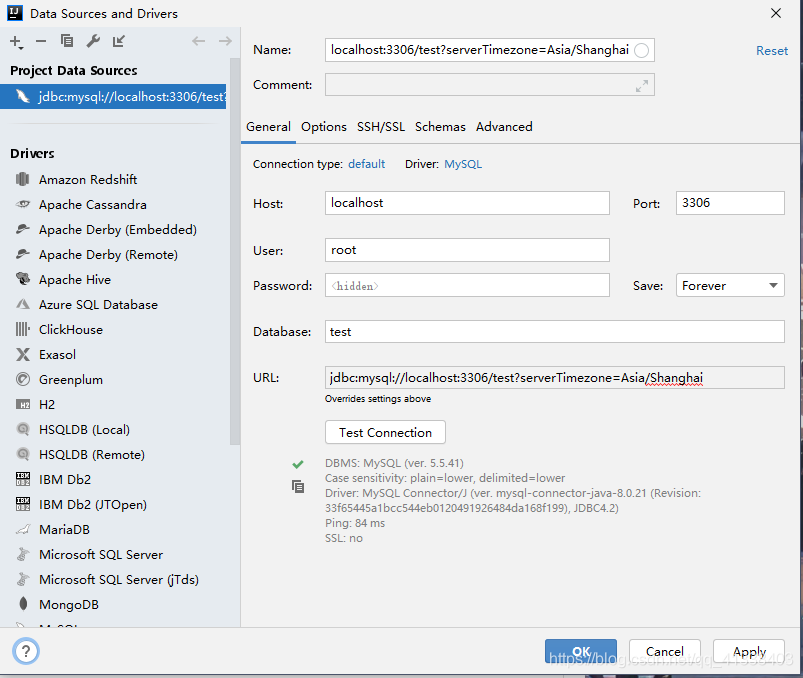
点击Mysql ,输入账户密码 Database 也可不填(最好填上数据库),在连接时可能会报错连接时区错误,时区问题在URL后面添加?serverTimezone=Asia/Shanghai即可连接成功
?serverTimezone=Asia/Shanghai
点击Apply 即可在页面看到
快速生成
选择表右键点击MybatisX-Generator

选择配置
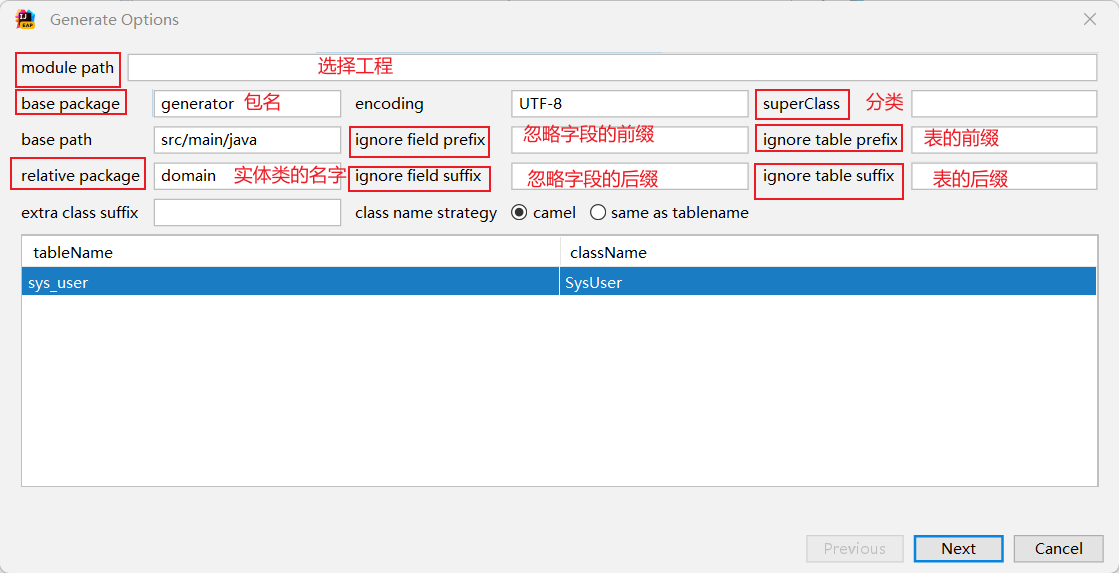
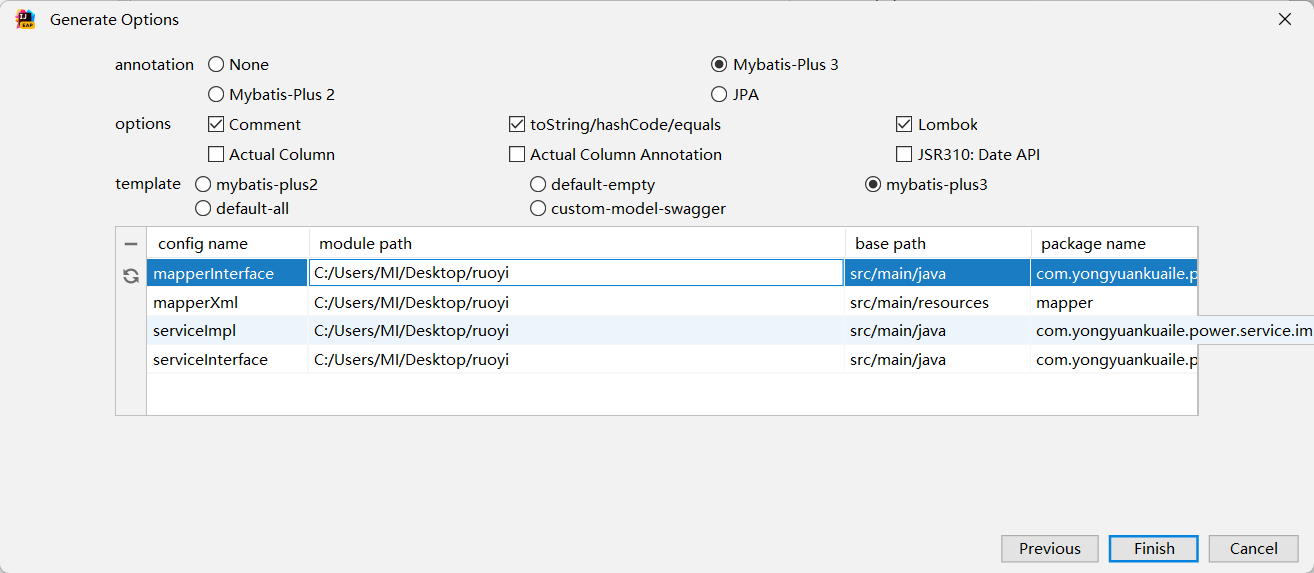
点击ok即可看到文件生成成功

MybatisX自定义CURD
mapper层
mapper层编写insertSelective方法
使用的时候需要Alt+Enter键
deleteByIdAndName方法
By是根据And是和
updateNameAndGenderById
前面两个是修改的参数By是根据
selectCreateTimeAndCreateTimeByGenderBetween
查询开始时间、结束时间根据性别between是区间
selectNameOrderByIdDesc
查询姓名倒序
测试类验证
import com.yongyuankuaile.power.mapper.UserMapper;
import com.yongyuankuaile.power.pojo.User;
import org.junit.jupiter.api.Test;
import org.springframework.beans.factory.annotation.Autowired;
import org.springframework.boot.test.context.SpringBootTest;

import java.util.List;

@SpringBootTest
class PowerApplicationTests {
    @Autowired
    private UserMapper userMapper;

    @Test
    void contextLoads() {
        //通过条件构造器查询一个List集合,若没有条件,则可以设置null为参数
        List<User> list = userMapper.selectList(null);
        list.forEach(System.out::println);
    }

}
Mybatisplus教程
1.加入日志功能
配置文件
mybatis-plus:
  configuration:
    log-impl: org.apache.ibatis.logging.stdout.StdOutImpl
统一CURD的使用
Mapper包XxxMapper.java
/*
* Mapper接口
* 基于Mybatis: 在Mapper接口中编写CRUD相关的方法,提供Mapper接口对应的SQL映射文件以及方法对应的SQL语句
*
* 基于MP: 让XxxMapper接口继承BaseMapper接口即可
*         BaseMapper<T>:泛型指定的就是当前Mapper接口所操作的实体类类型
* */
@Mapper
public interface MpMapper extends BaseMapper<MpEmployee> {
}
实体类Employee层
/*
* 实体类
* MybatisPlus会默认使用实体类的类名到数据库中找对应的表
* */
@Data
@TableName("mp")
public class MpEmployee {
    /*
    * @TableId
    *  value: 指定表中的主键列的列明,入股实体属性名与列名一致,可以省略不指定
    *  type: 指定主键策略
    * */
    @TableId(value = "id",type = IdType.AUTO)
    private Integer id;
  @TableField(value = "last_name")
  private String lastName;
    private String email;
    private Integer gender;
    private Integer age;

}
简单的增删改查操作
添加操作
    @Test
    void Test1() {
        User user = new User();
        user.setName("张三1");
        user.setEmail("zhangsan1@163.com");
        user.setGender(0);
        int insert = userMapper.insert(user);
        System.out.println("insert:"+insert);
        System.out.println("id:"+user.getId());

    }
根据id删除
   @Test
    void Test2() {
        int result = userMapper.deleteById(3);
        System.out.println("result:"+result);
    }
键值对的方式删除
@Test
    void Test2() {
        HashMap<String, Object> map = new HashMap<>();
        map.put("name","张三1");
        map.put("age",23);
        int result = userMapper.deleteByMap(map);
        System.out.println("result:"+result);
    }
通过id批量删除
 @Test
    void Test2() {
    List<Long> list = Arrays.asList(1L,2L,3L);
        int result = userMapper.deleteBatchIds(list);
        System.out.println("result:"+result);
    }
根据id进行修改
   @Test
    void TestUpdate() {
        User user = new User();
        user.setId(1L);
        user.setName("张三2");
        user.setEmail("zhangsan2@163.com");
        user.setGender(1);
        int insert = userMapper.updateById(user);
        System.out.println("insert:"+insert);
        System.out.println("id:"+user.getId());
    }
查询通过id查询用户信息
  @Test
    void TestSelect() {
        User user = userMapper.selectById(1L);
        System.out.println("user:"+user);
    }
根据多个id查询多个用户的信息
  @Test
    void TestSelect() {
        List<Long> list = Arrays.asList(1L, 2L, 3L);
        List<User> users = userMapper.selectBatchIds(list);
        users.forEach(System.out::println);
    }
根据条件查询
 @Test
    void TestSelect() {
        HashMap<String, Object> map = new HashMap<>();
        map.put("name","张三2");
        map.put("email","zhangsan2@163.com");
        List<User> users = userMapper.selectByMap(map);
        users.forEach(System.out::println);
    }
查询所有数据
 @Test
    void TestSelect() {
        List<User> users = userMapper.selectList(null);
        users.forEach(System.out::println);
    }
通用Service接口
通用 Service CRUD 封装IService (opens new window)接口,进一步封装 CRUD 采用 get 查询单行 remove 删除 list 查询集合 page 分页 前缀命名方式区分 Mapper 层避免混淆,
实体类
public interface UserService extends IService<User> {

}
Impl层
@Service
public class UserServiceImpl extends ServiceImpl<UserMapper, User>
    implements UserService{

}
//查询总记录数
 @Test
    void Test() {
        //查询总记录数
        long count = userService.count();
        System.out.println("总记录数:"+count);
    }
批量添加
 @Test
    void TestSaveBathch() {
        ArrayList<User> list = new ArrayList<>();
        for (int i = 0; i < 10; i++) {
            User user = new User();
            user.setName("爱你"+i);
            user.setEmail("aini@163.com"+i);
            list.add(user);
        }
        boolean b = userService.saveBatch(list);
        System.out.println(b);
    }
批量修改
@Test
public void  bach1(){
    List<User> listuser=new ArrayList<User>();
    for(int i=1;i<6;i++){
        User user=  new User();
        user.setId((long)i);
        user.setUserName(i+"康康2");
        user.setPassword("123456");
        listuser.add(user);
    }
    userService.updateBatchById(listuser);//批量导入
    System.out.println("成功");
}
@TableName注解
设置实体类对应的表名
@TableName(value ="sys_user")
配置文件
mybatis-plus:
  configuration:
    #打印日志
    log-impl: org.apache.ibatis.logging.stdout.StdOutImpl
    #设置mybatisplus全局变量
  global-config:
    db-config:
      #设置实体类所对应的表统一前缀
      table-prefix: sys_
@TableId
将属性对应的字段指定为主键
 @TableId(type = IdType.AUTO)
TableId注解的value属性用于指定主键的字段也就是数据库中的字段名
@TableId(value = "id")
TableId注解的type属性设置主键的生成策略
@TableId(type = IdType.AUTO)
IdType.AUTO数据库自整长的策略,首先必须保证数据库设置了id自增否则无效
ASSIGN_ID默认基于雪花算法生成的数据id与数据库id自增无关
通过全局配置配置主键生成策略
mybatis-plus:
  configuration:
    #打印日志
    log-impl: org.apache.ibatis.logging.stdout.StdOutImpl
    #设置mybatisplus全局变量
  global-config:
    db-config:
      #设置实体类所对应的表统一前缀
      table-prefix: sys_
      #设置统一的主键策略
      id-type: auto
雪花算法
雪花算法的原始版本是scala版,用于生成分布式ID(纯数字,时间顺序),订单编号等。
自增ID:对于数据敏感场景不宜使用,且不适合于分布式场景。
GUID:采用无意义字符串,数据量增大时造成访问过慢,且不宜排序。

算法描述:
- 最高位是符号位,始终为0,不可用。
- 41位的时间序列,精确到毫秒级,41位的长度可以使用69年。时间位还有一个很重要的作用是可以根据时间进行排序。
- 10位的机器标识,10位的长度最多支持部署1024个节点。
- 12位的计数序列号,序列号即一系列的自增id,可以支持同一节点同一毫秒生成多个ID序号,12位的计数序列号支持每个节点每毫秒产生4096个ID序号。
Donet版本
using System;

namespace System
{
    /// <summary>
    /// 分布式ID算法(雪花算法)
    /// </summary>
    public class Snowflake
    {
        private static long machineId;//机器ID
        private static long datacenterId = 0L;//数据ID
        private static long sequence = 0L;//计数从零开始

        private static long twepoch = 687888001020L; //唯一时间随机量

        private static long machineIdBits = 5L; //机器码字节数
        private static long datacenterIdBits = 5L;//数据字节数
        public static long maxMachineId = -1L ^ -1L << (int)machineIdBits; //最大机器ID
        private static long maxDatacenterId = -1L ^ (-1L << (int)datacenterIdBits);//最大数据ID

        private static long sequenceBits = 12L; //计数器字节数,12个字节用来保存计数码
        private static long machineIdShift = sequenceBits; //机器码数据左移位数,就是后面计数器占用的位数
        private static long datacenterIdShift = sequenceBits + machineIdBits;
        private static long timestampLeftShift = sequenceBits + machineIdBits + datacenterIdBits; //时间戳左移动位数就是机器码+计数器总字节数+数据字节数
        public static long sequenceMask = -1L ^ -1L << (int)sequenceBits; //一微秒内可以产生计数,如果达到该值则等到下一微妙在进行生成
        private static long lastTimestamp = -1L;//最后时间戳

        private static object syncRoot = new object();//加锁对象
        static Snowflake snowflake;

        public static Snowflake Instance()
        {
            if (snowflake == null)
                snowflake = new Snowflake();
            return snowflake;
        }

        public Snowflake()
        {
            Snowflakes(0L, -1);
        }

        public Snowflake(long machineId)
        {
            Snowflakes(machineId, -1);
        }

        public Snowflake(long machineId, long datacenterId)
        {
            Snowflakes(machineId, datacenterId);
        }

        private void Snowflakes(long machineId, long datacenterId)
        {
            if (machineId >= 0)
            {
                if (machineId > maxMachineId)
                {
                    throw new Exception("机器码ID非法");
                }
                Snowflake.machineId = machineId;
            }
            if (datacenterId >= 0)
            {
                if (datacenterId > maxDatacenterId)
                {
                    throw new Exception("数据中心ID非法");
                }
                Snowflake.datacenterId = datacenterId;
            }
        }

        /// <summary>
        /// 生成当前时间戳
        /// </summary>
        /// <returns>毫秒</returns>
        private static long GetTimestamp()
        {
            return (long)(DateTime.UtcNow - new DateTime(1970, 1, 1, 0, 0, 0, DateTimeKind.Utc)).TotalMilliseconds;
        }

        /// <summary>
        /// 获取下一微秒时间戳
        /// </summary>
        /// <param name="lastTimestamp"></param>
        /// <returns></returns>
        private static long GetNextTimestamp(long lastTimestamp)
        {
            long timestamp = GetTimestamp();
            if (timestamp <= lastTimestamp)
            {
                timestamp = GetTimestamp();
            }
            return timestamp;
        }

        /// <summary>
        /// 获取长整型的ID
        /// </summary>
        /// <returns></returns>
        public long GetId()
        {
            lock (syncRoot)
            {
                long timestamp = GetTimestamp();
                if (Snowflake.lastTimestamp == timestamp)
                { //同一微妙中生成ID
                    sequence = (sequence + 1) & sequenceMask; //用&运算计算该微秒内产生的计数是否已经到达上限
                    if (sequence == 0)
                    {
                        //一微妙内产生的ID计数已达上限,等待下一微妙
                        timestamp = GetNextTimestamp(lastTimestamp);
                    }
                }
                else
                {
                    //不同微秒生成ID
                    sequence = 0L;
                }
                if (timestamp < lastTimestamp)
                {
                    throw new Exception("时间戳比上一次生成ID时时间戳还小,故异常");
                }
                Snowflake.lastTimestamp = timestamp; //把当前时间戳保存为最后生成ID的时间戳
                long Id = ((timestamp - twepoch) << (int)timestampLeftShift)
                    | (datacenterId << (int)datacenterIdShift)
                    | (machineId << (int)machineIdShift)
                    | sequence;
                return Id;
            }
        }
    }
}
Golang版
snowflake.go
package snowflake
// twitter 雪花算法
// 把时间戳,工作机器ID, 序列号组合成一个 64位 int
// 第一位置零, [2,42]这41位存放时间戳,[43,52]这10位存放机器id,[53,64]最后12位存放序列号

import "time"
var (
    machineID    int64 // 机器 id 占10位, 十进制范围是 [ 0, 1023 ]
    sn            int64 // 序列号占 12 位,十进制范围是 [ 0, 4095 ]
    lastTimeStamp int64 // 上次的时间戳(毫秒级), 1秒=1000毫秒, 1毫秒=1000微秒,1微秒=1000纳秒
)

func init() {
    lastTimeStamp = time.Now().UnixNano() / 1000000
}

func SetMachineId(mid int64) {
    // 把机器 id 左移 12 位,让出 12 位空间给序列号使用
    machineID = mid << 12
}

func GetSnowflakeId() int64 {
    curTimeStamp := time.Now().UnixNano() / 1000000
    // 同一毫秒
    if curTimeStamp == lastTimeStamp {
        sn++
        // 序列号占 12 位,十进制范围是 [ 0, 4095 ]
        if sn > 4095 {
            time.Sleep(time.Millisecond)
            curTimeStamp = time.Now().UnixNano() / 1000000
            lastTimeStamp = curTimeStamp
            sn = 0
        }

        // 取 64 位的二进制数 0000000000 0000000000 0000000000 0001111111111 1111111111 1111111111  1 ( 这里共 41 个 1 )和时间戳进行并操作
        // 并结果( 右数 )第 42 位必然是 0,  低 41 位也就是时间戳的低 41 位
        rightBinValue := curTimeStamp & 0x1FFFFFFFFFF
        // 机器 id 占用10位空间,序列号占用12位空间,所以左移 22 位; 经过上面的并操作,左移后的第 1 位,必然是 0
        rightBinValue <<= 22
        id := rightBinValue | machineID | sn
        return id
    }
    if curTimeStamp > lastTimeStamp {
        sn = 0
        lastTimeStamp = curTimeStamp
        // 取 64 位的二进制数 0000000000 0000000000 0000000000 0001111111111 1111111111 1111111111  1 ( 这里共 41 个 1 )和时间戳进行并操作
        // 并结果( 右数 )第 42 位必然是 0,  低 41 位也就是时间戳的低 41 位
        rightBinValue := curTimeStamp & 0x1FFFFFFFFFF
        // 机器 id 占用10位空间,序列号占用12位空间,所以左移 22 位; 经过上面的并操作,左移后的第 1 位,必然是 0
        rightBinValue <<= 22
        id := rightBinValue | machineID | sn
        return id
    }
    if curTimeStamp < lastTimeStamp {
        return 0
    }
    return 0
}
main.go
package main
import (
    "fmt"
    "reflect"
    "snowflake"
    "time"
)

func main() {
    //var ids = []int64{}
    var ids = make([]int64, 0)

    //设置一个机器标识,如IP编码,防止分布式机器生成重复码
    snowflake.SetMachineId(192168100101)

    fmt.Println("start", time.Now().Format("13:04:05"))
    for i := 0; i < 10000000; i++ {
        id := snowflake.GetSnowflakeId()
        ids = append(ids, id)
    }
    fmt.Println("end  ", time.Now().Format("13:04:05"))

    result := Duplicate(ids)
    fmt.Println("去重后数量:", len(result))
    fmt.Println(result[10], result[11], result[12], result[13], result[14])
    fmt.Println(result[9990], result[9991], result[9992], result[9993], result[9994])
}

//去重
func Duplicate(a interface{}) (ret []interface{}) {
    va := reflect.ValueOf(a)
    for i := 0; i < va.Len(); i++ {
        if i > 0 && reflect.DeepEqual(va.Index(i-1).Interface(), va.Index(i).Interface()) {
            continue
        }
        ret = append(ret, va.Index(i).Interface())
    }
    return ret
}
注意:在分布式系统中给每台机器设置一个int64的机器码,可以是IP编号+随机数,如
192168011234(192.168.0.1+1234)
测试结果:

结论:
- 理论上生成速率为kw/秒,所以完全满足一般企业级应用, 算法可靠(去重处理在此也是多此一举);
- 性能:100W+/秒;
java
package util;

import java.util.Date;

/**
 * @ClassName: SnowFlakeUtil
 * @Author: jiaoxian
 * @Date: 2022/4/24 16:34
 * @Description:
 */
public class SnowFlakeUtil {

    private static SnowFlakeUtil snowFlakeUtil;
    static {
        snowFlakeUtil = new SnowFlakeUtil();
    }

    // 初始时间戳(纪年),可用雪花算法服务上线时间戳的值
    // 1650789964886:2022-04-24 16:45:59
    private static final long INIT_EPOCH = 1650789964886L;

    // 时间位取&
    private static final long TIME_BIT = 0b1111111111111111111111111111111111111111110000000000000000000000L;

    // 记录最后使用的毫秒时间戳,主要用于判断是否同一毫秒,以及用于服务器时钟回拨判断
    private long lastTimeMillis = -1L;

    // dataCenterId占用的位数
    private static final long DATA_CENTER_ID_BITS = 5L;

    // dataCenterId占用5个比特位,最大值31
    // 0000000000000000000000000000000000000000000000000000000000011111
    private static final long MAX_DATA_CENTER_ID = ~(-1L << DATA_CENTER_ID_BITS);

    // dataCenterId
    private long dataCenterId;

    // workId占用的位数
    private static final long WORKER_ID_BITS = 5L;

    // workId占用5个比特位,最大值31
    // 0000000000000000000000000000000000000000000000000000000000011111
    private static final long MAX_WORKER_ID = ~(-1L << WORKER_ID_BITS);

    // workId
    private long workerId;

    // 最后12位,代表每毫秒内可产生最大序列号,即 2^12 - 1 = 4095
    private static final long SEQUENCE_BITS = 12L;

    // 掩码(最低12位为1,高位都为0),主要用于与自增后的序列号进行位与,如果值为0,则代表自增后的序列号超过了4095
    // 0000000000000000000000000000000000000000000000000000111111111111
    private static final long SEQUENCE_MASK = ~(-1L << SEQUENCE_BITS);

    // 同一毫秒内的最新序号,最大值可为 2^12 - 1 = 4095
    private long sequence;

    // workId位需要左移的位数 12
    private static final long WORK_ID_SHIFT = SEQUENCE_BITS;

    // dataCenterId位需要左移的位数 12+5
    private static final long DATA_CENTER_ID_SHIFT = SEQUENCE_BITS + WORKER_ID_BITS;

    // 时间戳需要左移的位数 12+5+5
    private static final long TIMESTAMP_SHIFT = SEQUENCE_BITS + WORKER_ID_BITS + DATA_CENTER_ID_BITS;

    /**
     * 无参构造
     */
    public SnowFlakeUtil() {
        this(1, 1);
    }

    /**
     * 有参构造
     * @param dataCenterId
     * @param workerId
     */
    public SnowFlakeUtil(long dataCenterId, long workerId) {
        // 检查dataCenterId的合法值
        if (dataCenterId < 0 || dataCenterId > MAX_DATA_CENTER_ID) {
            throw new IllegalArgumentException(
                    String.format("dataCenterId 值必须大于 0 并且小于 %d", MAX_DATA_CENTER_ID));
        }
        // 检查workId的合法值
        if (workerId < 0 || workerId > MAX_WORKER_ID) {
            throw new IllegalArgumentException(String.format("workId 值必须大于 0 并且小于 %d", MAX_WORKER_ID));
        }
        this.workerId = workerId;
        this.dataCenterId = dataCenterId;
    }

    /**
     * 获取唯一ID
     * @return
     */
    public static Long getSnowFlakeId() {
        return snowFlakeUtil.nextId();
    }

    /**
     * 通过雪花算法生成下一个id,注意这里使用synchronized同步
     * @return 唯一id
     */
    public synchronized long nextId() {
        long currentTimeMillis = System.currentTimeMillis();
        System.out.println(currentTimeMillis);
        // 当前时间小于上一次生成id使用的时间,可能出现服务器时钟回拨问题
        if (currentTimeMillis < lastTimeMillis) {
            throw new RuntimeException(
                    String.format("可能出现服务器时钟回拨问题,请检查服务器时间。当前服务器时间戳:%d,上一次使用时间戳:%d", currentTimeMillis,
                            lastTimeMillis));
        }
        if (currentTimeMillis == lastTimeMillis) {
            // 还是在同一毫秒内,则将序列号递增1,序列号最大值为4095
            // 序列号的最大值是4095,使用掩码(最低12位为1,高位都为0)进行位与运行后如果值为0,则自增后的序列号超过了4095
            // 那么就使用新的时间戳
            sequence = (sequence + 1) & SEQUENCE_MASK;
            if (sequence == 0) {
                currentTimeMillis = getNextMillis(lastTimeMillis);
            }
        } else { // 不在同一毫秒内,则序列号重新从0开始,序列号最大值为4095
            sequence = 0;
        }
        // 记录最后一次使用的毫秒时间戳
        lastTimeMillis = currentTimeMillis;
        // 核心算法,将不同部分的数值移动到指定的位置,然后进行或运行
        // <<:左移运算符, 1 << 2 即将二进制的 1 扩大 2^2 倍
        // |:位或运算符, 是把某两个数中, 只要其中一个的某一位为1, 则结果的该位就为1
        // 优先级:<< > |
        return
                // 时间戳部分
                ((currentTimeMillis - INIT_EPOCH) << TIMESTAMP_SHIFT)
                // 数据中心部分
                | (dataCenterId << DATA_CENTER_ID_SHIFT)
                // 机器表示部分
                | (workerId << WORK_ID_SHIFT)
                // 序列号部分
                | sequence;
    }

    /**
     * 获取指定时间戳的接下来的时间戳,也可以说是下一毫秒
     * @param lastTimeMillis 指定毫秒时间戳
     * @return 时间戳
     */
    private long getNextMillis(long lastTimeMillis) {
        long currentTimeMillis = System.currentTimeMillis();
        while (currentTimeMillis <= lastTimeMillis) {
            currentTimeMillis = System.currentTimeMillis();
        }
        return currentTimeMillis;
    }

    /**
     * 获取随机字符串,length=13
     * @return
     */
    public static String getRandomStr() {
        return Long.toString(getSnowFlakeId(), Character.MAX_RADIX);
    }

    /**
     * 从ID中获取时间
     * @param id 由此类生成的ID
     * @return
     */
    public static Date getTimeBySnowFlakeId(long id) {
        return new Date(((TIME_BIT & id) >> 22) + INIT_EPOCH);
    }

    public static void main(String[] args) {
        SnowFlakeUtil snowFlakeUtil = new SnowFlakeUtil();
        long id = snowFlakeUtil.nextId();
        System.out.println(id);
        Date date = SnowFlakeUtil.getTimeBySnowFlakeId(id);
        System.out.println(date);
        long time = date.getTime();
        System.out.println(time);
        System.out.println(getRandomStr());

    }

}
算法优缺点
雪花算法有以下几个优点:
高并发分布式环境下生成不重复 id,每秒可生成百万个不重复 id。
基于时间戳,以及同一时间戳下序列号自增,基本保证 id 有序递增。
不依赖第三方库或者中间件。
算法简单,在内存中进行,效率高。
雪花算法有如下缺点:
依赖服务器时间,服务器时钟回拨时可能会生成重复 id。算法中可通过记录最后一个生成 id 时的时间戳来解决,每次生成 id 之前比较当前服务器时钟是否被回拨,避免生成重复 id。
注意事项
其实雪花算法每一部分占用的比特位数量并不是固定死的。例如你的业务可能达不到 69 年之久,那么可用减少时间戳占用的位数,雪花算法服务需要部署的节点超过1024 台,那么可将减少的位数补充给机器码用。
注意,雪花算法中 41 位比特位不是直接用来存储当前服务器毫秒时间戳的,而是需要当前服务器时间戳减去某一个初始时间戳值,一般可以使用服务上线时间作为初始时间戳值。
对于机器码,可根据自身情况做调整,例如机房号,服务器号,业务号,机器 IP 等都是可使用的。对于部署的不同雪花算法服务中,最后计算出来的机器码能区分开来即可。
@TableField
 //指定属性所对应的字段名
    @TableField("name")
@TableLogic
用于逻辑删除
物理删除是指将数据的索引区和数据区的数据一起删除,不可恢复。
逻辑删除是指删除数据的索引,真实数据还存储在数据库的数据区。
在互联网产品设计中,涉及用户删除数据的时候,一般都是“假删除”,也就是“逻辑删除”,意思是对数据进行删除标记,实际上并没有在物理上真的删除数据,例如用户删除一个订单或者删除一张照片。其实文件或者数据没有被真正的删除,只不过是文件名的第一个字节被改成操作系统无法识别的字符,通常这种删除操作是可逆的,就是说用适当的工具或软件可以把删除的文件恢复出来。
当然,这些被“删除”的数据并不是永远不会删除,因为数据存储是需要开销数据硬盘的,如果所有被用户删除的数据都一直存储下来,占用的数据硬盘会越来越大,而这部分数据的价值其实并不是很大。所以,通常情况是存储某一个时间范围内的已删除数据,超出时间数据就进行物理删除。物理删除是指文件存储所用到的磁存储区域被真正的擦除或清零,这样删除的文件是不可以恢复的。
条件构造器和常用接口
wapper介绍
Wrapper : 条件构造抽象类,最顶端父类
AbstractWrapper : 用于查询条件封装,生成 sql 的 where 条件
QueryWrapper : 查询条件封装
UpdateWrapper : Update 条件封装
AbstractLambdaWrapper : 使用Lambda 语法
LambdaQueryWrapper :用于Lambda语法使用的查询Wrapper
LambdaUpdateWrapper : Lambda 更新封装Wrapper
测试案例:
组装查询条件
    @Test
    void FindAge(){
        //查询用户名包含爱你,年龄在20-30之间,邮箱信息不为空的用户信息
        QueryWrapper<User> wrapper = new QueryWrapper<>();
        wrapper.like("name","爱你")
                .between("age",40,60)
                .isNotNull("email");
        List<User> list = userMapper.selectList(wrapper);
        list.forEach(System.out::println);

    }
组装排序条件
    @Test
    void FindAge2(){
        //查询用户信息,按照年龄的降序排序,若年龄相同,则按照id什序排序
        QueryWrapper<User> wrapper = new QueryWrapper<>();
        wrapper.orderByDesc("age")
                .orderByAsc("id");
        List<User> list = userMapper.selectList(wrapper);
        list.forEach(System.out::println);

    }
组装删除条件
    @Test
    void FindAge2(){
        //删除邮箱地址为null的用户信息
        QueryWrapper<User> wrapper = new QueryWrapper<>();
        wrapper.isNull("email");
        int result = userMapper.delete(wrapper);
        System.out.println("result:"+result);
    }
封装修改条件
    @Test
    void FindAge3(){
        //将(年龄大于20并且用户名中包含有爱你)或者邮箱为null的用户信息进行修改
        QueryWrapper<User> wrapper = new QueryWrapper<>();
        wrapper.gt("age",20)
                .like("name","爱你")
                .or()
                .isNull("email");
        User user = new User();
        user.setName("爱你");
        user.setEmail("aini@163.com");
        int result = userMapper.update(user,wrapper);
        System.out.println("result:"+result);
    }
根据单个条件更新修改
@Test
void testUpdate(){
    MpEmployee employee = new MpEmployee();
    employee.setGender(0);
    employee.setAge(20);
    QueryWrapper<MpEmployee> wrapper = new QueryWrapper<>();
    wrapper.eq("last_name","张三");
    //根据条件做更新匹配lastName="张三"
    int update = mapper.update(employee, wrapper);
    System.out.println("修改成功:"+update);
}
根据多个条件更新修改
@Test
void testUpdate(){
    MpEmployee employee = new MpEmployee();
    employee.setEmail("cs@163.com");
    employee.setSalary(10.0);
    QueryWrapper<MpEmployee> wrapper = new QueryWrapper<>();
    wrapper.eq("gender",0).eq("age",20);
    //根据条件做更新匹配lastName="张三"
    int update = mapper.update(employee, wrapper);
    System.out.println("修改成功:"+update);
}
条件的优先级
    @Test
    void FindAge4(){
        //将用户名中包含爱你并且(年龄大于20或邮箱为null)的用户信息修改
        //lambda中的条件优先执行
        QueryWrapper<User> wrapper = new QueryWrapper<>();
        wrapper.like("age","20")
                .and(i->i.gt("age",20).or().isNull("email"));
        User user = new User();
        user.setName("小红");
        user.setEmail("test@163.com");
        int result = userMapper.update(user,wrapper);
        System.out.println("result:"+result);
    }
组装select字句
   @Test
    void FindSelect(){
        //查询用户的用户名、年龄、邮箱信息
        QueryWrapper<User> wrapper = new QueryWrapper<>();
        wrapper.select("age","email","name");
        List<Map<String, Object>> maps = userMapper.selectMaps(wrapper);
        maps.forEach(System.out::println);
    }
封装子查询
    @Test
    void FindSelect2(){
        //查询id小于等于100的用户信息
        QueryWrapper<User> wrapper = new QueryWrapper<>();
        wrapper.inSql("id","select id from sys_user where id<=7");
        List<User> list = userMapper.selectList(wrapper);
        list.forEach(System.out::println);
    }
通过UpdateWrapper实现修改功能
   @Test
    void FindUpdate(){
        //将用户名中包含爱你并且(年龄大于20或邮箱为null)的用户信息修改
        //lambda中的条件优先执行
        UpdateWrapper<User> wrapper = new UpdateWrapper<>();
        wrapper.like("age","20")
                .and(i->i.gt("age",20).or().isNull("email"));
        wrapper.set("name","小黑").set("email","xiaohei@163.com");
        int result = userMapper.update(null,wrapper);
        System.out.println("result:"+result);
    }
模拟开发使用的情况
    @Test
    void moni(){
     String username="";
     Integer ageBegin=20;
     Integer ageEnd=30;
     QueryWrapper<User> wrapper = new QueryWrapper<>();
     if (StringUtils.isNotBlank(username)){
         //isNotBlank判断其中一个字段是否不为空字符串,不为空,不为空白符
         wrapper.like("name","爱你");
     }
    if (ageBegin!=null){
        wrapper.ge("age",ageBegin);
    }
    if (ageEnd!=null){
        wrapper.le("age",ageEnd);
    }
        List<User> list = userMapper.selectList(wrapper);
    list.forEach(System.out::println);

    }
使用condition组装条件
    @Test
    void cond(){
        String username="爱你";
        Integer ageBegin=null;
        Integer ageEnd=30;
        QueryWrapper<User> wrapper = new QueryWrapper<>();
        wrapper.like(StringUtils.isNotBlank(username),"name",username)
                .ge(ageBegin!=null,"age",ageBegin)
                .le(ageEnd!=null,"age",ageEnd);
        List<User> list = userMapper.selectList(wrapper);
        list.forEach(System.out::println);

    }
LambdaQueryWrapper
 @Test
    void LambdaQueryWrapper(){
        String username="爱你";
        Integer ageBegin=null;
        Integer ageEnd=30;
        LambdaQueryWrapper<User> wrapper = new LambdaQueryWrapper<>();
        wrapper.like(StringUtils.isNotBlank(username),User::getName,username)
                .ge(ageBegin!=null,User::getAge,ageBegin)
                .le(ageEnd!=null,User::getAge,ageEnd);
        List<User> list = userMapper.selectList(wrapper);
        list.forEach(System.out::println);

    }
LambdaUpdateWrapper
 @Test
    void LambdaQueryWrapper1(){
      //将用户名中包含有爱你并且(爱你大于20或邮箱为null的用户信息修改)
        LambdaUpdateWrapper<User> wrapper = new LambdaUpdateWrapper<>();
        wrapper.like(User::getName,"爱你0")
                .and(i->i.gt(User::getAge,20).or().isNull(User::getEmail));
        wrapper.set(User::getName,"小黑1").set(User::getEmail,"xiaohei.com");
        int result = userMapper.update(null, wrapper);
        System.out.println("result"+result);
    }
分页插件
mybatis-plus自带分页插件,只要简单的配置既可实现分页插件功能
添加配置类
import com.baomidou.mybatisplus.annotation.DbType;
import com.baomidou.mybatisplus.extension.plugins.MybatisPlusInterceptor;
import com.baomidou.mybatisplus.extension.plugins.inner.PaginationInnerInterceptor;
import org.mybatis.spring.annotation.MapperScan;
import org.springframework.context.annotation.Bean;
import org.springframework.context.annotation.Configuration;

@Configuration
@MapperScan("com.yongyuankuaile.power.mapper")
public class MybatisPlusConfig {

    @Bean
    public MybatisPlusInterceptor mybatisPlusInterceptor(){
        MybatisPlusInterceptor interceptor = new MybatisPlusInterceptor();
        interceptor.addInnerInterceptor(new PaginationInnerInterceptor(DbType.MYSQL));
        return interceptor;
    }
}
测试
import com.baomidou.mybatisplus.extension.plugins.pagination.Page;
import com.yongyuankuaile.power.mapper.UserMapper;
import com.yongyuankuaile.power.pojo.User;
import org.junit.jupiter.api.Test;
import org.springframework.beans.factory.annotation.Autowired;
import org.springframework.boot.test.context.SpringBootTest;

@SpringBootTest
public class MybatisPlusTest {

    @Autowired
    private UserMapper userMapper;

    @Test
    void testPage(){
        Page<User> page = new Page<>(1, 3);
        userMapper.selectPage(page,null);
        System.out.println(page);
    }
}
分页相关数据获取
    @Test
    void testPage(){
        Page<User> page = new Page<>(2, 3);
        userMapper.selectPage(page,null);
        System.out.println(page.getRecords());
        System.out.println(page.getPages());
        System.out.println(page.getTotal());
    }
自定义分页功能
mapper层
 /*
    * 自定义分页
    * 通过年龄查询用户信息并分页
    * */
    Page<User>selectPageVo
    (@Param("page") Page<User>page,@Param("age")Integer age);
配置文件
mybatis-plus:
  configuration:
    #打印日志
    log-impl: org.apache.ibatis.logging.stdout.StdOutImpl
    #设置mybatisplus全局变量
  global-config:
    db-config:
      #设置实体类所对应的表统一前缀
      table-prefix: sys_
      #设置统一的主键策略
      id-type: auto
  #配置类型别名所对应的包
  type-aliases-package: com.yongyuankuaile.power.pojo
mapper.xml
  <select id="selectPageVo" resultType="com.yongyuankuaile.power.pojo.User">
        select id,name,age,email from sys_user
where age > #{age}
    </select>
测试类
    @Test
    void testPageVo(){
        Page<User> page = new Page<>(1, 3);
        userMapper.selectPageVo(page,20);
        System.out.println(page.getRecords());
        System.out.println(page.getPages());
        System.out.println(page.getTotal());
    }
乐观锁和悲观锁
模拟修改冲突
创建需要的表
create table t_product(
    id bigint(20) not null comment '主键id',
    name varchar(30) null default null comment '商品名称',
    price int(11) default 0 comment '价格',
    version int(11) default 0 comment '乐观锁版本号',
    primary key (id)
);
添加模拟的数据
insert into  t_product
(id, name, price) VALUES
(1,'外星人笔记本',100);
实体类
@Data
public class Product {
    private Long id;
    private String name;
    private Integer price;
    private Integer version;
}
mapper层
import com.baomidou.mybatisplus.core.mapper.BaseMapper;
import com.yongyuankuaile.power.pojo.Product;
import org.apache.ibatis.annotations.Mapper;

@Mapper
public interface ProductMapper extends BaseMapper<Product> {
}
模拟修改冲突
import com.yongyuankuaile.power.mapper.ProductMapper;
import com.yongyuankuaile.power.mapper.UserMapper;
import com.yongyuankuaile.power.pojo.Product;
import org.junit.jupiter.api.Test;
import org.springframework.beans.factory.annotation.Autowired;
import org.springframework.boot.test.context.SpringBootTest;

@SpringBootTest
public class MybatisPlusTest {

    @Autowired
    private UserMapper userMapper;

    @Autowired
    private ProductMapper productMapper;

    @Test
    void testProduct01(){
        //小李查询价格
        Product productLi = productMapper.selectById(1);
        System.out.println("小李查询的商品价格"+productLi.getPrice());
        //小王查询商品价格
        Product productWang = productMapper.selectById(1);
        System.out.println("小王查询的商品价格"+productWang.getPrice());
        //小李将商品价格+50
        productLi.setPrice(productLi.getPrice()+50);
        productMapper.updateById(productLi);
        //小王将商品价格-30
        productWang.setPrice(productWang.getPrice()-30);
        productMapper.updateById(productWang);
        //老板查询商品价格
        Product productLaoban = productMapper.selectById(1);
        System.out.println("老板查询的商品价格"+productLaoban.getPrice());

    }
}
字段加上乐观锁注释
 @Version//标识乐观锁版本号字段
    private Integer version;
配置类
import com.baomidou.mybatisplus.annotation.DbType;
import com.baomidou.mybatisplus.extension.plugins.MybatisPlusInterceptor;
import com.baomidou.mybatisplus.extension.plugins.inner.OptimisticLockerInnerInterceptor;
import com.baomidou.mybatisplus.extension.plugins.inner.PaginationInnerInterceptor;
import org.mybatis.spring.annotation.MapperScan;
import org.springframework.context.annotation.Bean;
import org.springframework.context.annotation.Configuration;

@Configuration
@MapperScan("com.yongyuankuaile.power.mapper")
public class MybatisPlusConfig {

    @Bean
    public MybatisPlusInterceptor mybatisPlusInterceptor(){
        MybatisPlusInterceptor interceptor = new MybatisPlusInterceptor();
        //添加分页插件
        interceptor.addInnerInterceptor(new PaginationInnerInterceptor(DbType.MYSQL));
        //添加乐观锁插件
        interceptor.addInnerInterceptor(new OptimisticLockerInnerInterceptor());
        return interceptor;
    }
}
优化修改流程
import com.yongyuankuaile.power.mapper.ProductMapper;
import com.yongyuankuaile.power.mapper.UserMapper;
import com.yongyuankuaile.power.pojo.Product;
import org.junit.jupiter.api.Test;
import org.springframework.beans.factory.annotation.Autowired;
import org.springframework.boot.test.context.SpringBootTest;

@SpringBootTest
public class MybatisPlusTest {

    @Autowired
    private UserMapper userMapper;

    @Autowired
    private ProductMapper productMapper;

    @Test
    void testProduct01(){
        //小李查询价格
        Product productLi = productMapper.selectById(1);
        System.out.println("小李查询的商品价格"+productLi.getPrice());
        //小王查询商品价格
        Product productWang = productMapper.selectById(1);
        System.out.println("小王查询的商品价格"+productWang.getPrice());
        //小李将商品价格+50
        productLi.setPrice(productLi.getPrice()+50);
        productMapper.updateById(productLi);
        //小王将商品价格-30
        productWang.setPrice(productWang.getPrice()-30);
        int result = productMapper.updateById(productWang);
        if (result==0){
            //操作失败重试
            Product productNew = productMapper.selectById(1);
            productWang.setPrice(productWang.getPrice()-30);
            productMapper.updateById(productNew);
        }
        //老板查询商品价格
        Product productLaoban = productMapper.selectById(1);
        System.out.println("老板查询的商品价格"+productLaoban.getPrice());

    }
}
通用枚举
数据库有些字段是固定的,例如性别(男或者女)
1.数据库表添加字段sex
@Getter
public enum SexEnum {
    MALE(1,"男"),
    FEMALE(2,"女")
    ;
    private Integer sex;
    private String sexName;


    SexEnum(Integer sex, String sexName) {
        this.sex = sex;
        this.sexName = sexName;
    }
}
测试类
import com.yongyuankuaile.power.emnu.SexEnum;
import com.yongyuankuaile.power.mapper.UserMapper;
import com.yongyuankuaile.power.pojo.User;
import org.junit.jupiter.api.Test;
import org.springframework.beans.factory.annotation.Autowired;
import org.springframework.boot.test.context.SpringBootTest;

@SpringBootTest
public class MybatisPlusEnumTest {

    @Autowired
    private UserMapper userMapper;

   @Test
    void test(){
       User user = new User();
       user.setName("admin");
       user.setAge(33);
       user.setGender(SexEnum.MALE);
       int result = userMapper.insert(user);
       System.out.println("result"+result);
   }
}
使用的时候在枚举类加一个注解
import com.baomidou.mybatisplus.annotation.EnumValue;
import lombok.Getter;

@Getter
public enum SexEnum {
    MALE(1,"男"),
    FEMALE(2,"女")
    ;
    @EnumValue//将注解所标识的属性的值存储到数据库中
    private Integer sex;
    private String sexName;


    SexEnum(Integer sex, String sexName) {
        this.sex = sex;
        this.sexName = sexName;
    }
}
添加配置类
mybatis-plus:
  configuration:
    #打印日志
    log-impl: org.apache.ibatis.logging.stdout.StdOutImpl
    #设置mybatisplus全局变量
  global-config:
    db-config:
      #设置实体类所对应的表统一前缀
      table-prefix: sys_
      #设置统一的主键策略
      id-type: auto
  #配置类型别名所对应的包
  type-aliases-package: com.yongyuankuaile.power.pojo
  #扫描通用枚举的包
  type-enums-package: com.yongyuankuaile.power.emnu
在进行测试就不会报错
代码生成器
依赖
<!-- 数据库驱动 -->
        <dependency>
            <groupId>mysql</groupId>
            <artifactId>mysql-connector-java</artifactId>
        </dependency>

        <!-- lombok -->
        <dependency>
            <groupId>org.projectlombok</groupId>
            <artifactId>lombok</artifactId>
        </dependency>

        <!-- mybatis-plus -->
        <dependency>
            <groupId>com.baomidou</groupId>
            <artifactId>mybatis-plus-boot-starter</artifactId>
            <version>3.0.5</version>
        </dependency>

        <!-- 代码自动生成器依赖-->
        <dependency>
            <groupId>com.baomidou</groupId>
            <artifactId>mybatis-plus-generator</artifactId>
            <version>3.0.5</version>
        </dependency>
    <!--velocity页面引擎-->
    <dependency>
        <groupId>org.springframework.boot</groupId>
        <artifactId>spring-boot-starter-velocity</artifactId>
        <version>1.4.7.RELEASE</version>
    </dependency>
    <!--freemarker页面模板-->
    <dependency>
        <groupId>org.freemarker</groupId>
        <artifactId>freemarker</artifactId>
    </dependency>
测试类
import com.baomidou.mybatisplus.generator.FastAutoGenerator;
import com.baomidou.mybatisplus.generator.config.OutputFile;
import com.baomidou.mybatisplus.generator.engine.FreemarkerTemplateEngine;

import java.util.Collections;

public class MybatisplusTest {

    public static void main(String[] args) {
        FastAutoGenerator.create("jdbc:mysql://localhost:3306/test?useUnicode=true&characterEncoding=UTF-8&userSSL=false&serverTimezone=GMT%2B8", "root", "root")
                .globalConfig(builder -> {
                    builder.author("zyy") // 设置作者
                            //.enableSwagger() // 开启 swagger 模式
                            .fileOverride() // 覆盖已生成文件
                            .outputDir("C:\\Users\\17166\\Desktop\\工作demo\\qx\\yy-power\\yy-admin"); // 指定输出目录
                })
                .packageConfig(builder -> {
                    builder.parent("com.yongyuankuaile") // 设置父包名
                            .moduleName("admin") // 设置父包模块名
                            .pathInfo(Collections.singletonMap(OutputFile.mapperXml, "C:\\Users\\17166\\Desktop\\工作demo\\qx\\yy-power\\yy-admin")); // 设置mapperXml生成路径
                })
                .strategyConfig(builder -> {
                    builder.addInclude("sys_user") // 设置需要生成的表名
                            .addTablePrefix("sys_", "c_"); // 设置过滤表前缀
                })
                .templateEngine(new FreemarkerTemplateEngine()) // 使用Freemarker引擎模板,默认的是Velocity引擎模板
                .execute();
    }
}
配置多数据源
配置表
create table t_product(
    id bigint(20) not null comment '主键id',
    name varchar(30) null default null comment '商品名称',
    price int(11) default 0 comment '价格',
    version int(11) default 0 comment '乐观锁版本号',
    primary key (id)
);
添加模拟的数据
insert into  t_product
(id, name, price) VALUES
(1,'外星人笔记本',100);
所需要的依赖
       <!-- 数据库驱动 -->
        <dependency>
            <groupId>mysql</groupId>
            <artifactId>mysql-connector-java</artifactId>
        </dependency>

        <!-- lombok -->
        <dependency>
            <groupId>org.projectlombok</groupId>
            <artifactId>lombok</artifactId>
        </dependency>

        <!-- mybatis-plus -->
        <dependency>
            <groupId>com.baomidou</groupId>
            <artifactId>mybatis-plus-boot-starter</artifactId>
            <version>${mybatis-plus.version}</version>
        </dependency>

    <!--多数据源配置-->
        <dependency>
            <groupId>com.baomidou</groupId>
            <artifactId>dynamic-datasource-spring-boot-starter</artifactId>
            <version>3.5.0</version>
        </dependency>
配置类
spring:
  #配置数据源信息
  datasource:
    dynamic:
      #设置默认的数据源或者数据源组,默认是master
      primary: master
      #严格匹配数据源,默认false、true未匹配指定数据源时抛出异常、false使用默认配置源
      strict: false
      datasource:
        master:
          #连接地址
          url: jdbc:mysql://127.0.0.1:3306/test?serverTimezone=UTC&useUnicode=true&characterEncoding=utf-8&useSSL=true
          #配置连接数据库的各个信息
          driver-class-name: com.mysql.cj.jdbc.Driver
          #密码
          password: root
          #用户名
          username: root
        slave_1:
          #连接地址
          url: jdbc:mysql://127.0.0.1:3306/test?serverTimezone=UTC&useUnicode=true&characterEncoding=utf-8&useSSL=true
          #配置连接数据库的各个信息
          driver-class-name: com.mysql.cj.jdbc.Driver
          #密码
          password: root
          #用户名
          username: root
使用的时候在serviceImpl加上注释
@DS("slave_1")
测试多数据源
import com.yongyuankuaile.admin.service.IUserService;
import com.yongyuankuaile.admin.service.ProductService;
import org.junit.jupiter.api.Test;
import org.springframework.beans.factory.annotation.Autowired;
import org.springframework.boot.test.context.SpringBootTest;

@SpringBootTest
class YyAdminApplicationTests {

    @Autowired
    private IUserService userService;
    @Autowired
    private ProductService productService;
    @Test
    void contextLoads() {
        System.out.println(userService.getById(1));
        System.out.println(productService.getById(1));
    }

}
Mybatis-plus模糊查询
like concat('%',#{model.enclosureName},'%')

 浙公网安备 33010602011771号