Android(一) 入门
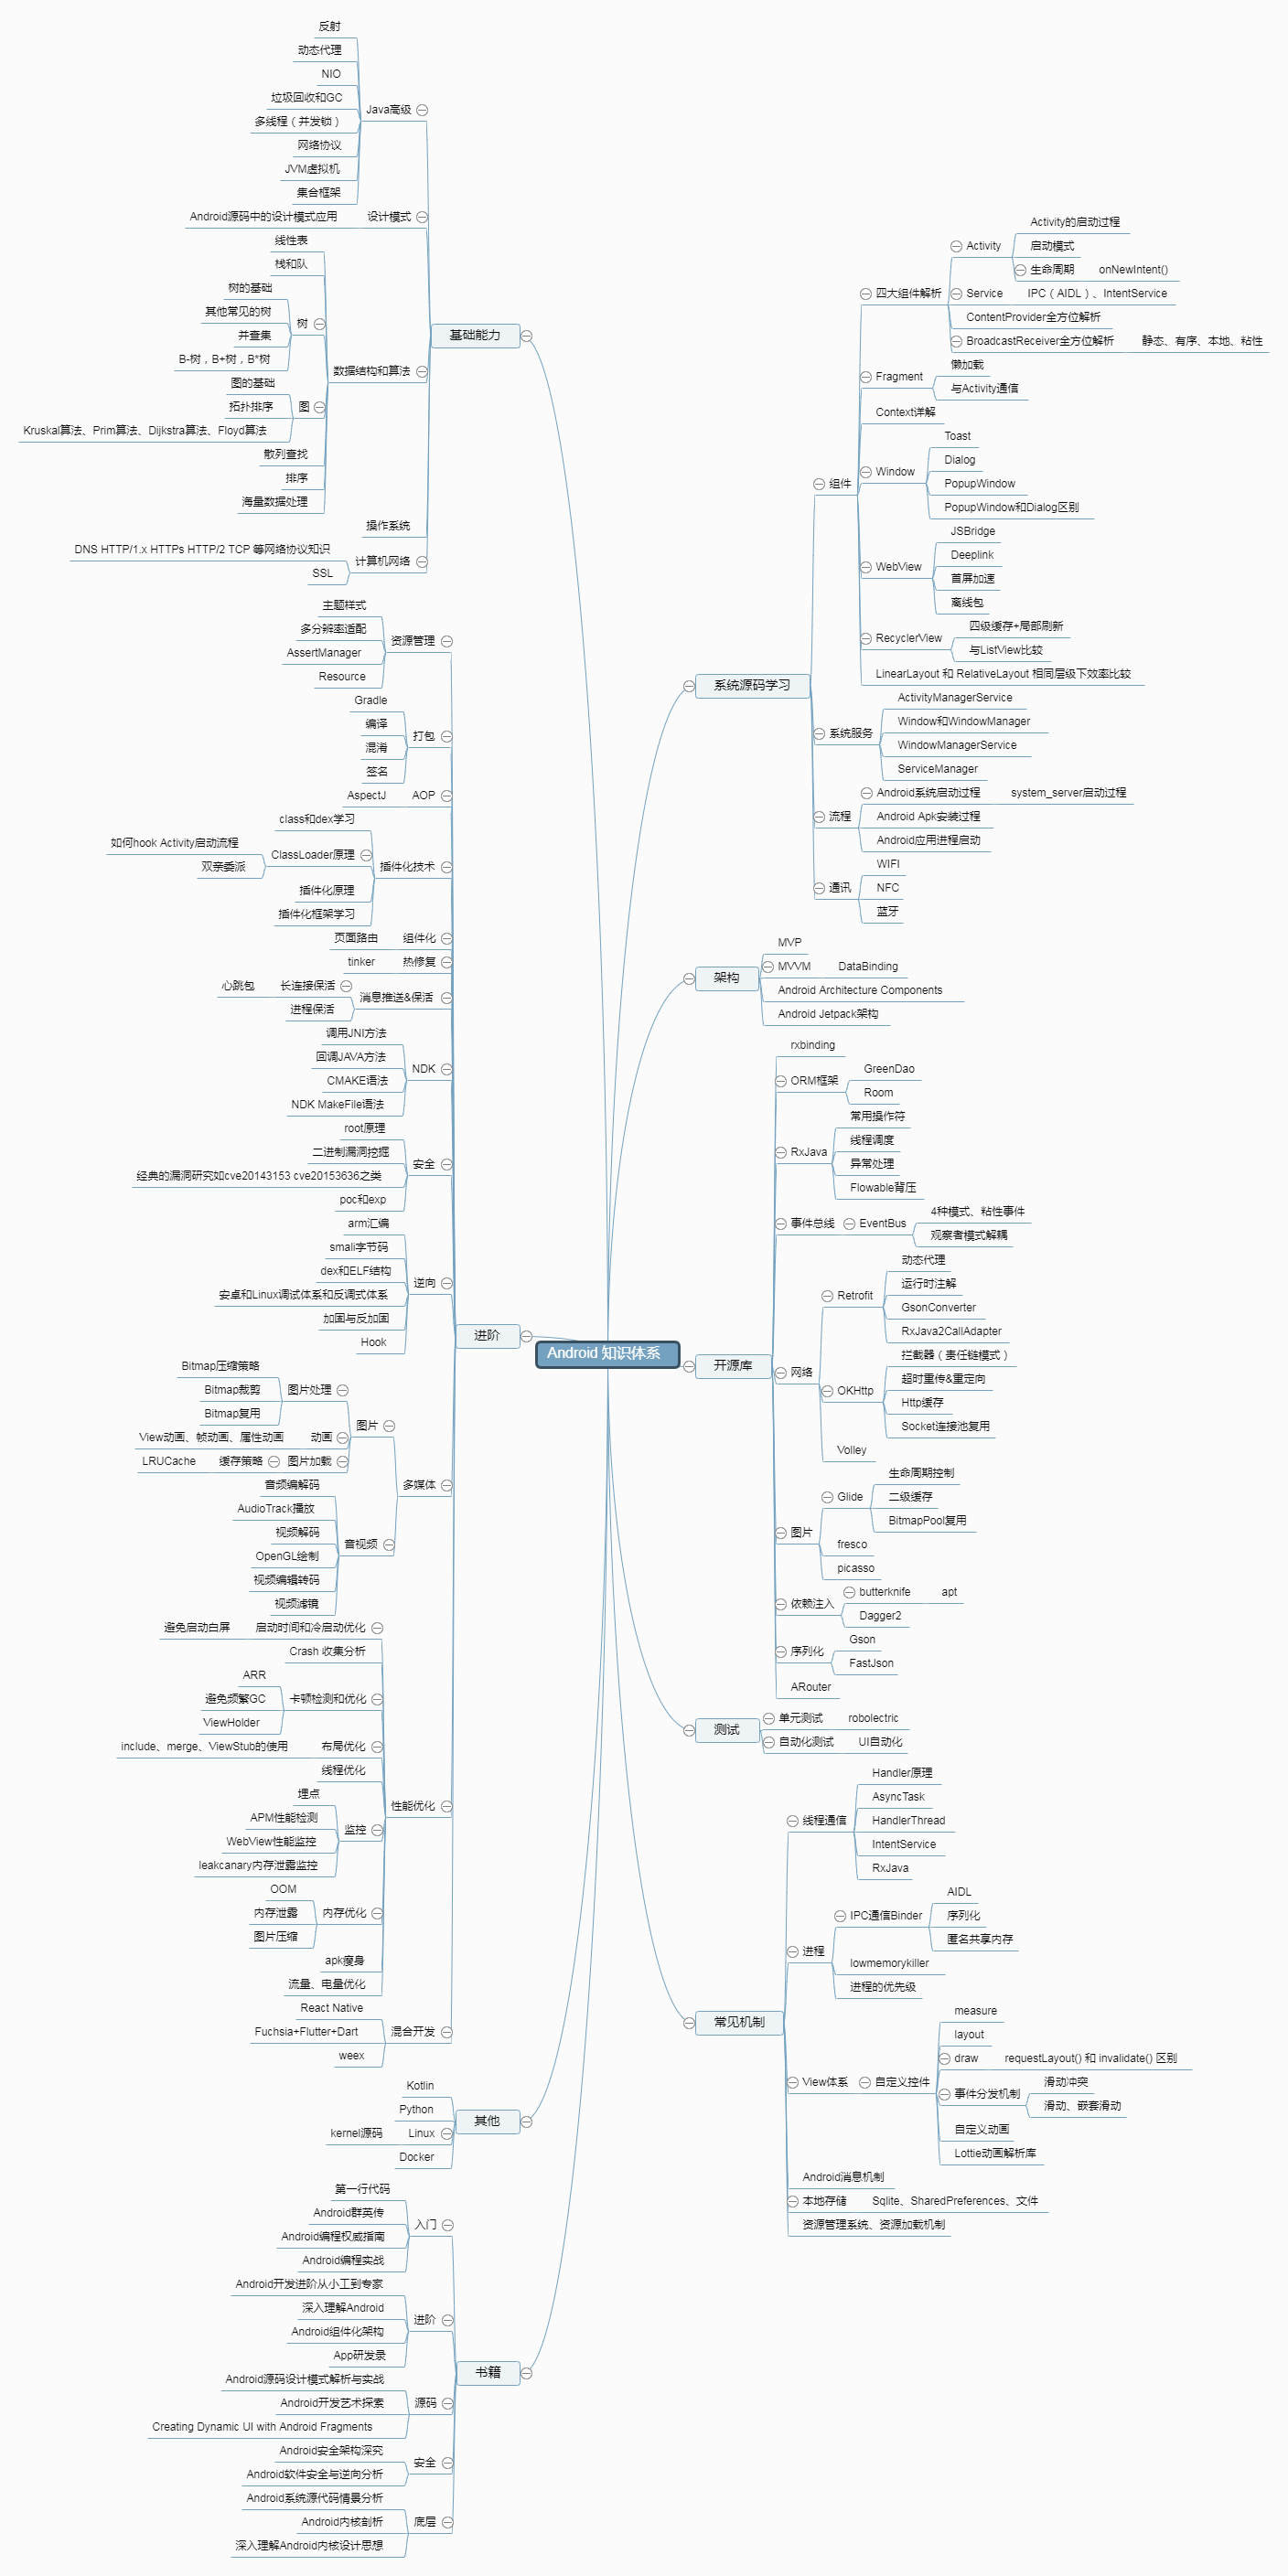
Android知识体系图
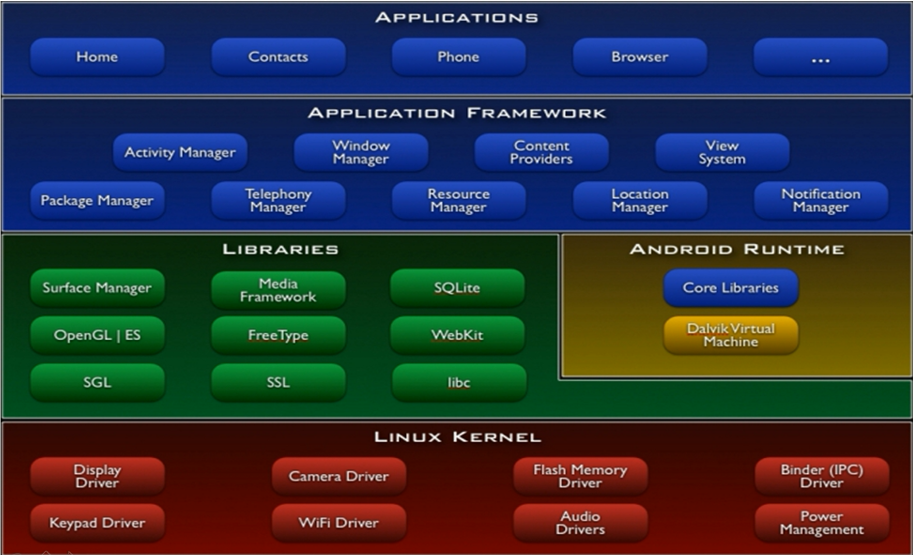
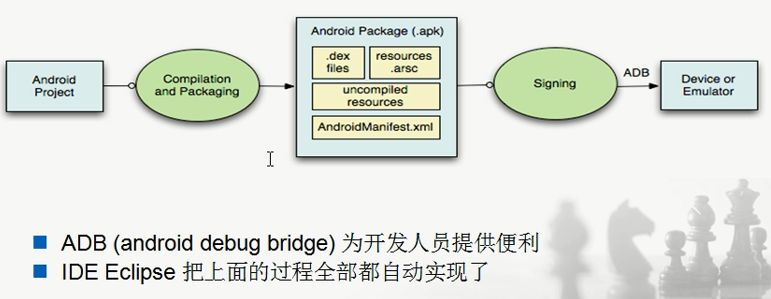
安卓架构
华为手机真机连接
运行平台和测试环境
官方开发IDE:Android Studio,基于Intellij平台,自带JDK。
手机上运行APP
设置--------->关于手机------------>连续点击 版本号 选项,会提示“已经进入开发者模式”
------------->找到开发人员选项---------->打开 USB调试 选项----------->华为手机,一并将“'仅充电'模式下允许ADB调试”选项开关打开。这样,华为手机usb调试打开后,就不会自动关闭了
下载360手机助手并安装
连接手机,如果连接成功会自动下载安装手机所需驱动
卸载手机助手
速览Android三大核心
AS新建空Activity项目
项目目录
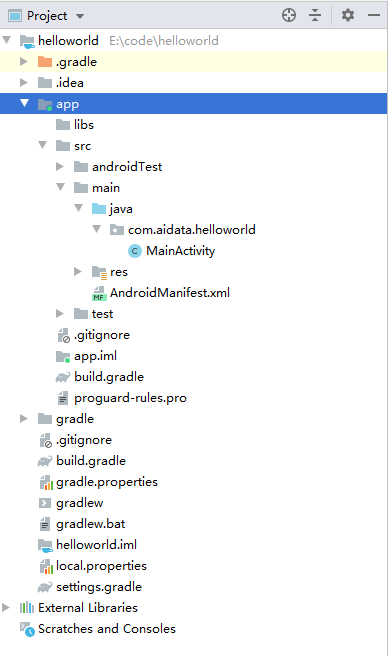
可以直接运行,运行之后,app目录下会多出一个build文件夹
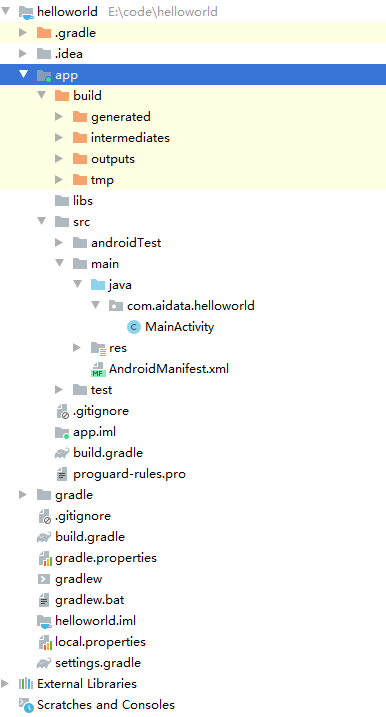
现在要关注的是src/main下的三项
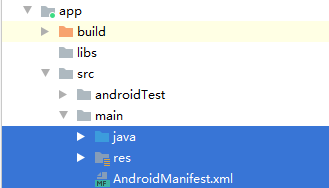
- java底下用来编写代码,如Activity
- res下面是各种资源,如布局文件
- AndroidManifest.xml是清单文件
对应下面要说的三大核心
- Activity
- 布局
- 清单文件
Activity
- MainActivity
- onCreate()
- setContentView()
Activity是可视化的界面,打开界面就会加载onCreate()方法,相当于入口方法
public class MainActivity extends AppCompatActivity {

    @Override
    protected void onCreate(Bundle savedInstanceState) {
        super.onCreate(savedInstanceState);
        // 设置内容视图
        // R:为每个资源文件按类别分配一个索引,使程序员可以通过R.类别名.资源名去操作对应的资源
        setContentView(R.layout.activity_main);
    }
}
R是一个类,自动生成的,有很多内部静态类 ,内部类中有静态属性
res目录下的资源文件会被扫描,并生成一个资源清单类,因此,你可以通过R.xx.xx来访问res下的资源
AS3.6后找不到这个R.java,很奇怪
在代码中使用R来访问资源,在XML中则按如下格式访问:
@<资源对应的内部类的类名>/<资源项的名称>
通过
setContentView(R.layout.activity_main);
将Activity与一个布局文件绑在了一起,或者说加载了一个布局文件。
布局文件
我们发现在res/layout目录下有上面代码绑定的文件 activity_main.xml
<?xml version="1.0" encoding="utf-8"?>
<androidx.constraintlayout.widget.ConstraintLayout xmlns:android="http://schemas.android.com/apk/res/android"
    xmlns:app="http://schemas.android.com/apk/res-auto"
    xmlns:tools="http://schemas.android.com/tools"
    android:layout_width="match_parent"
    android:layout_height="match_parent"
    tools:context=".MainActivity">

    <TextView
        android:layout_width="wrap_content"
        android:layout_height="wrap_content"
        android:text="Hello World!"
        app:layout_constraintBottom_toBottomOf="parent"
        app:layout_constraintLeft_toLeftOf="parent"
        app:layout_constraintRight_toRightOf="parent"
        app:layout_constraintTop_toTopOf="parent" />

</androidx.constraintlayout.widget.ConstraintLayout>
布局里面可以添加控件
清单文件
但有多个布局文件的时候,怎么知道要先加载MainActivity呢?使用清单文件。
AndroidManifest.xml
<?xml version="1.0" encoding="utf-8"?>
<manifest xmlns:android="http://schemas.android.com/apk/res/android"
    package="com.example.myapplication">

    <application
        android:allowBackup="true"
        android:icon="@mipmap/ic_launcher"
        android:label="@string/app_name"
        android:roundIcon="@mipmap/ic_launcher_round"
        android:supportsRtl="true"
        android:theme="@style/AppTheme">
        <activity android:name=".MainActivity">
            <intent-filter>
                <action android:name="android.intent.action.MAIN" />

                <category android:name="android.intent.category.LAUNCHER" />
            </intent-filter>
        </activity>
    </application>

</manifest>
每创建一个activity,Android Studio会自动添加一个配置
intent-filter 意图过滤器
<action android:name="android.intent.action.MAIN" /> 启动程序
<category android:name="android.intent.category.LAUNCHER" /> 在应用列表中形成图标
有上面意图过滤器的Activity是入口Activity

资源
一个项目的res目录
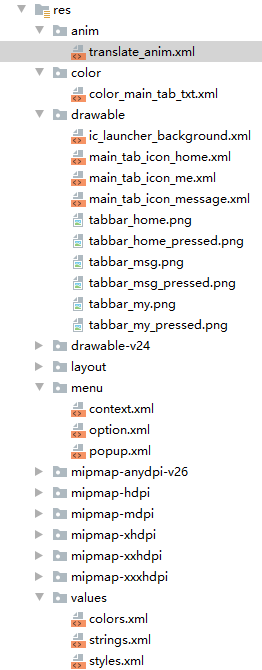
res目录下的资源,sdk会在编译应用时,自动在R.java文件中为这些资源创建索引,程序可直接通过R资源清单类进行访问。
/res/animator/
- 存放定义属性动画的XML文件
/res/anim/
- 存放定义补间动画的XML文件
/res/drawable
- 存放图片文件,可以编译成Drawable对象的XML文件
- Drawable对象
- StateListDrawble对象,XML文件根元素为<selector>,可以组织多个Drawable对象,根据不同的状态显示不同图片
-
<?xml version="1.0" encoding="utf-8"?>
<selector xmlns:android="http://schemas.android.com/apk/res/android">
    <item android:state_selected="true" android:drawable="@drawable/tabbar_home_pressed"/>
    <item android:state_pressed="true" android:drawable="@drawable/tabbar_home_pressed"/>
    <item android:drawable="@drawable/tabbar_home"/>
</selector>
state_后面可以跟: active(激活) checkable(勾选) enabled first focused last middle pressed selected windwon_focused(窗口得到焦点)
-
- StateListDrawble对象,XML文件根元素为<selector>,可以组织多个Drawable对象,根据不同的状态显示不同图片
- LayerDrawable
- ShapeDrawable
- ClipDrawable
- AnimationDrawable
/res/layout
- 布局文件
/res/menu
- 菜单资源,包括选项菜单、子菜单、上下文菜单
-
<?xml version="1.0" encoding="utf-8"?>
<menu xmlns:android="http://schemas.android.com/apk/res/android"
    xmlns:app="http://schemas.android.com/apk/res-auto">
    <item android:title="保存"
        android:id="@+id/save"
        android:icon="@mipmap/ic_launcher"
        app:showAsAction="always|withText"
        />
    <item android:title="设置" android:id="@+id/setting"/>
    <item android:title="更多操作">
        <!-- 子菜单 -->
        <menu>
            <item android:title="退出" android:id="@+id/exit"/>
            <item android:title="子菜单2"/>
            <item android:title="子菜单3"/>
        </menu>
    </item>
</menu>
-
/res/values
- 存放各种简单值的XML文件,包括字符串、整数值、颜色值、数组等。
- 根元素都是<resources>
- 子元素
- string/integer/bool
- color
- array
- style
- dimen
- ...
- 不同子元素放在不同文件中
- arrays.xml
- colors.xml
- strings.xml
- style.xml
- ...
布局
1、px和dpi
平常所说的1920×1080只是像素数量,也就是1920px×1080px,代表手机高度上有1920个像素点,宽度上有1080个像素点。
要想判别手机屏幕的显示好坏,还要考虑屏幕的宽高(英寸),也就是用dpi即每英寸多少像素来评价屏幕的显示效果。(不然假如手机分辨率是1920×1080,但是屏幕是几十寸的,那显示效果将不会很好,甚至你有可能看到小的像素块,那将更影响视觉效果。)
- 其实dp就是为了使得开发者设置的长度能够根据不同屏幕(分辨率/尺寸也就是dpi)获得不同的像素(px)数量。比如:我将一个控件设置长度为1dp,那么在160dpi上该控件长度为1px,在240dpi的屏幕上该控件的长度为1*240/160=1.5个像素点。
- 也就是dp会随着不同屏幕而改变控件长度的像素数量。
- 关于dp的官方叙述为当屏幕每英寸有160个像素时(也就是160dpi),dp与px等价的。那如果每英寸240个像素呢?1dp—>1*240/160=1.5px,即1dp与1.5px等价了。
- 其实记住一点,dp最终都要化为像素数量来衡量大小的,因为只有像素数量最直观。
- 通常来说,我们写程序时几乎没用到计算dp,就是直接凭着自己的感觉写的。此处计算dp只是为了大家更好理解dp,如果有的人想精确设置控件大小,也可以这样计算的。
- 计算dp往往是由程序员完成的,是创造的过程,顺叙的过程。但是写程序总会有两个历程的,一个是进行写,一个是返回读,这个读的话就用到了将dp转换了。
- 前面已经看到一个例子了如下(注:等号都是等价,是理解上的等于,不是直接的等于的):安卓中如果手机每英寸有160px,即手机是160dpi,那么此时1dp就可以理解为1px,假如现在手机是240dpi,那么1dp=240/160 px=1.5px,
从上可以看出dp转px只与屏幕的dpi有关。- 对于android 来说,最终我们能读懂或者衡量的都是px,所以最后我们都将dp化为px好理解一点。我总结了dp转px的公式如下:
- 公式:dp值×(当前dpi/160dpi)=>得出当前的像素数目
- 那么问题来了,一个手机屏幕最大有多大的dp呢,我能不能设置成100000dp呢?其实这也是我所思考的,下面我慢慢来讲。
- 假如现在将控件宽度设置为160dp,那不同dpi的手机所得到的像素是多少呢?

从中可以看出最后所得像素值与dpi值相同,也就是说不管什么屏幕160dp,就相当于1英寸。- 所以要得到全屏最长的的dp,就等于160*宽(或者高英寸长)
如第三个1080*1920例子,160*3=480dp,所以0-480dp就是宽的dp范围。因为480*360/160=1080个像素,正好等于宽的最大像素数量。
即像素,1px代表屏幕上一个物理的像素点;
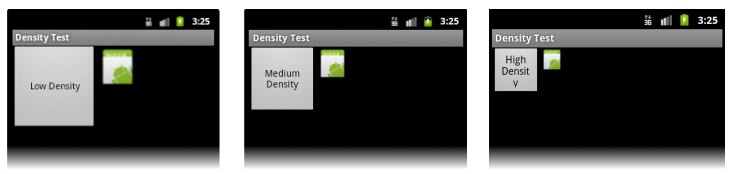
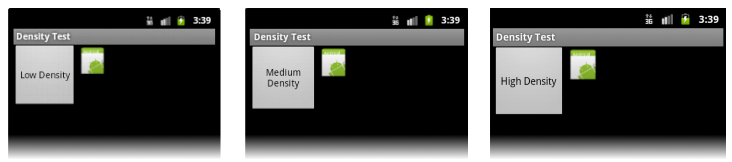
px单位不被建议使用,因为同样100px的图片,在不同手机上显示的实际大小可能不同,如下图所示(图片来自android developer guide,下同)。
偶尔用到px的情况,是需要画1像素表格线或阴影线的时候,用其他单位如dp会显得模糊。
这个是最常用但也最难理解的尺寸单位。它与“像素密度”密切相关,所以首先我们解释一下什么是像素密度。假设有一部手机,屏幕的物理尺寸为1.5英寸x2英寸,屏幕分辨率为240x320,则我们可以计算出在这部手机的屏幕上,每英寸包含的像素点的数量为240/1.5=160dpi(横向)或320/2=160dpi(纵向),160dpi就是这部手机的像素密度,像素密度的单位dpi是Dots Per Inch的缩写,即每英寸像素数量。横向和纵向的这个值都是相同的,原因是大部分手机屏幕使用正方形的像素点。
不同的手机/平板可能具有不同的像素密度,例如同为4寸手机,有480x320分辨率的也有800x480分辨率的,前者的像素密度就比较低。Android系统定义了四种像素密度:低(120dpi)、中(160dpi)、高(240dpi)和超高(320dpi),它们对应的dp到px的系数分别为0.75、1、1.5和2,这个系数乘以dp长度就是像素数。例如界面上有一个长度为“80dp”的图片,那么它在240dpi的手机上实际显示为80x1.5=120px,在320dpi的手机上实际显示为80x2=160px。如果你拿这两部手机放在一起对比,会发现这个图片的物理尺寸“差不多”,这就是使用dp作为单位的效果,见下图。
更新20140701: 是不是所有android手机的屏幕宽度用dp衡量都是固定值(例如320dp)呢?答案是否定的,如果写一个程序画宽度等于320dp的横线,在不同手机上运行,会发现在有些手机上横线比手机屏幕短,有些则比屏幕长,在平板上与手机上相比差别则更加明显。
与dp完全相同,只是名字不同而已。在早期的Android版本里多使用dip,后来为了与sp统一就建议使用dp这个名字了。
与缩放无关的抽象像素(Scale-independent Pixel)。sp和dp很类似但唯一的区别是,Android系统允许用户自定义文字尺寸大小(小、正常、大、超大等等),当文字尺寸是“正常”时1sp=1dp=0.00625英寸,而当文字尺寸是“大”或“超大”时,1sp>1dp=0.00625英寸。类似我们在windows里调整字体尺寸以后的效果——窗口大小不变,只有文字大小改变。
还有几个比较少用到的尺寸单位:
即毫米;
即英寸,1英寸=2.54厘米(约);
1pt=1/72英寸=0.035厘米;
最佳实践:
文字的尺寸一律用sp单位,非文字的尺寸一律使用dp单位。例如textSize="16sp"、layout_width="60dp";偶尔需要使用px单位,例如需要在屏幕上画一条细的分隔线时:
<View layout_width="match_parent" layout_height="1px"/>
布局是指对界面结构的全面规划与安排,通过api中提供的各种布局能够快速的完成对于界面的设计。
常用布局:
- 线性布局 LinearLayout
- 相对布局 RelativeLayout 选取参照物
- 帧布局 FrameLayout
- 表格布局 TableLayout
- 网格布局 GridLayout
- 约束布局 ConstraintLayout
添加布局
- 利用xml文件设计 主要方式
- 使用java代码添加
public class MainActivity extends AppCompatActivity {

    @Override
    protected void onCreate(Bundle savedInstanceState) {
        super.onCreate(savedInstanceState);
        // 设置内容视图
        // R:为每个资源文件按类别分配一个索引,使程序员可以通过R.类别名.资源名去操作对应的资源
        //setContentView(R.layout.activity_main);

        // 1.根布局为线性布局
        LinearLayout ll = new LinearLayout(this);
        // 2.设置宽高
        ll.setLayoutParams(new LinearLayout.LayoutParams(ViewGroup.LayoutParams.MATCH_PARENT, ViewGroup.LayoutParams.MATCH_PARENT));
        // 3.背景设为红色
        ll.setBackgroundColor(Color.RED);
        // 4.指定此Activity的内容视图为该线性布局
        setContentView(ll);
    }
}
利用Java代码比较麻烦,不直观,界面和逻辑代码耦合在一起,一般使用XML
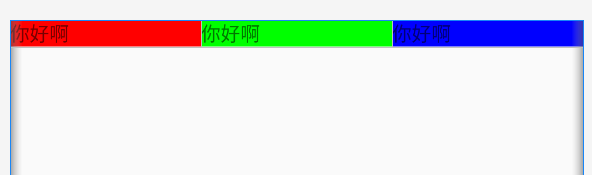
线性布局
从上往下,从左往右
添加布局文件,右键layout文件夹,创建布局文件,名字要小写
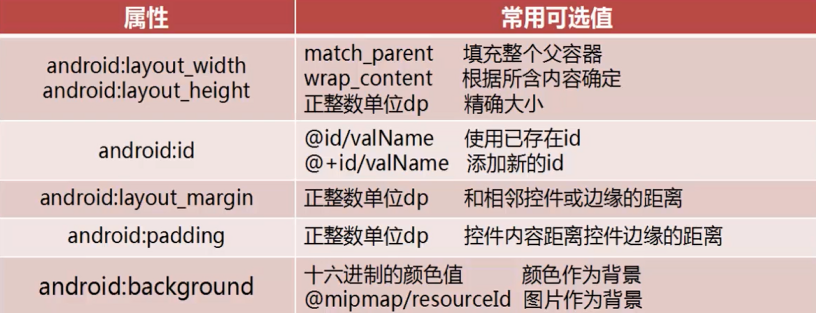
布局属性
各布局共有的属性:
- android:layout_width 指定Container组件的宽度
- android:layout_height 指定Container组件的高度
- android:layout_padding 内边距
- android:layout_margin 外边距
线性布局的重要属性:
- android:orientation 方向
- android:layout_weitht 权重
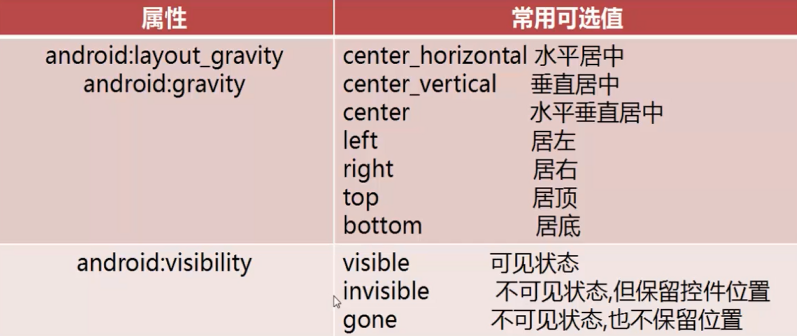
- android:layout_gravity 重力
layout_weight 是给布局用的
需要一个整型
有该属性,值无论多少都可以,其他两个控件没有该属性,则有该属性的控件会填满剩余的空间
match_parent表示让当前控件的大小和父布局的大小一样,也就是由父布局来决定当前控件的大小
wrap_content表示让当前的控件大小能够刚好包含里面的内容,也就是由控件内容决定当前控件的大小
<?xml version="1.0" encoding="utf-8"?>
<LinearLayout xmlns:android="http://schemas.android.com/apk/res/android"
    android:orientation="horizontal" android:layout_width="match_parent"
    android:layout_height="match_parent">

    <!-- vertival:垂直  horizontal:水平 -->
    <!-- layout_weight:权重-->

    <TextView
        android:layout_width="wrap_content"
        android:layout_height="wrap_content"
        android:text="你好啊"
        android:background="#ff0000"
        android:layout_weight="1"/>
    <TextView
        android:layout_width="wrap_content"
        android:layout_height="wrap_content"
        android:text="你好啊"
        android:background="#00ff00"/>
    <TextView
        android:layout_width="wrap_content"
        android:layout_height="wrap_content"
        android:text="你好啊"
        android:background="#0000ff"/>

</LinearLayout>

相当于有weight属性的元素会填充剩余空间
按比例划分空间
layout_width 设为 0dp,layout_weight 设置比例,下面设为1:1:1
<?xml version="1.0" encoding="utf-8"?>
<LinearLayout xmlns:android="http://schemas.android.com/apk/res/android"
    android:orientation="horizontal" android:layout_width="match_parent"
    android:layout_height="match_parent">

    <!-- vertival:垂直  horizontal:水平 -->
    <!-- layout_weight:权重-->

    <TextView
        android:layout_width="0dp"
        android:layout_height="wrap_content"
        android:text="你好啊"
        android:background="#ff0000"
        android:layout_weight="1"/>
    <TextView
        android:layout_width="0dp"
        android:layout_height="wrap_content"
        android:text="你好啊"
        android:background="#00ff00"
        android:layout_weight="1"/>
    <TextView
        android:layout_width="0dp"
        android:layout_height="wrap_content"
        android:text="你好啊"
        android:background="#0000ff"
        android:layout_weight="1"/>

</LinearLayout>
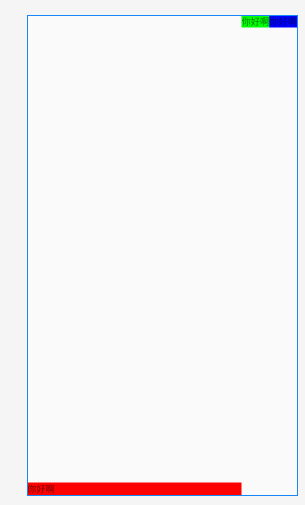
重力
<?xml version="1.0" encoding="utf-8"?>
<LinearLayout xmlns:android="http://schemas.android.com/apk/res/android"
    android:orientation="horizontal" android:layout_width="match_parent"
    android:layout_height="match_parent">

    <!-- vertival:垂直  horizontal:水平 -->
    <!-- layout_weight:权重-->

    <TextView
        android:layout_width="wrap_content"
        android:layout_height="wrap_content"
        android:text="你好啊"
        android:background="#ff0000"
        android:layout_weight="1"
        android:layout_gravity="bottom"/>
    <TextView
        android:layout_width="wrap_content"
        android:layout_height="wrap_content"
        android:text="你好啊"
        android:background="#00ff00"/>
    <TextView
        android:layout_width="wrap_content"
        android:layout_height="wrap_content"
        android:text="你好啊"
        android:background="#0000ff"/>

</LinearLayout>
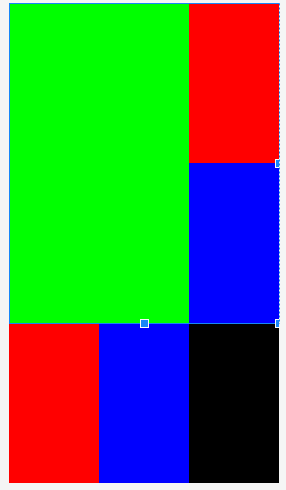
相对布局
相对于父容器(取值:true/false)
android:layout_alignParentRight
相对于其他控件(取值:其他控件id),如:
android:layout_toRightOf
<?xml version="1.0" encoding="utf-8"?>
<RelativeLayout xmlns:android="http://schemas.android.com/apk/res/android"
    android:layout_width="match_parent" android:layout_height="match_parent">

    <!--
        android:layout_centerInParent="true"
        android:layout_alignParentLeft="true"
        android:layout_alignParentRight="true"
        android:layout_alignParentTop="true"
        android:layout_alignParentBottom="true"
        android:layout_centerVertical="true"
        android:layout_centerHorizontal="true"
    -->

    <TextView
        android:id="@+id/center"
        android:layout_width="100dp"
        android:layout_height="100dp"
        android:textSize="30sp"
        android:text="屏幕正中"
        android:background="#ff0000"
        android:layout_centerInParent="true"
        />
        <!--
        android:layout_alignParentRight="true"
        android:layout_alignParentBottom="true"
        -->


    <!--
        1.在参照物的某边
        android:layout_toLeftOf
        android:layout_toRightOf
        android:layout_above
        android:layout_below
        2.和参照物的某边线对齐
        android:layout_alignTop
        android:layout_alignBottom
        android:layout_alignLeft
        android:layout_alignRight
    -->

    <TextView
        android:layout_width="100dp"
        android:layout_height="100dp"
        android:textSize="30sp"
        android:text="中偏左上"
        android:background="#0000ff"
        android:layout_above="@id/center"
        android:layout_toLeftOf="@id/center"
    />

    <TextView
        android:layout_width="100dp"
        android:layout_height="100dp"
        android:textSize="30sp"
        android:text="中偏右上"
        android:background="#00ff00"
        android:layout_above="@id/center"
        android:layout_toRightOf="@id/center"
        />

    <TextView
        android:layout_width="100dp"
        android:layout_height="100dp"
        android:textSize="30sp"
        android:text="中偏左下"
        android:background="#0000ff"
        android:layout_below="@id/center"
        android:layout_toLeftOf="@id/center"
        />

    <TextView
        android:layout_width="100dp"
        android:layout_height="100dp"
        android:textSize="30sp"
        android:text="中偏右下"
        android:background="#00ff00"
        android:layout_below="@id/center"
        android:layout_toRightOf="@id/center"
        />

    <TextView
        android:layout_width="wrap_content"
        android:layout_height="wrap_content"
        android:text="和中间上边线对齐"
        android:background="#00ff00"
        android:layout_alignTop="@id/center"
        />

</RelativeLayout>

案例
<?xml version="1.0" encoding="utf-8"?>
<LinearLayout xmlns:android="http://schemas.android.com/apk/res/android"
    android:orientation="vertical" android:layout_width="match_parent"
    android:layout_height="match_parent">

    <LinearLayout
        android:orientation="horizontal"
        android:layout_width="match_parent"
        android:layout_height="0dp"
        android:layout_weight="2"
        android:background="#00ff00">
        <RelativeLayout
            android:layout_width="0dp"
            android:layout_height="match_parent"
            android:layout_weight="2"
            android:background="#0000"
            />
        <LinearLayout
            android:layout_width="0dp"
            android:layout_height="match_parent"
            android:orientation="vertical"
            android:layout_weight="1"
            >
            <RelativeLayout
                android:layout_width="match_parent"
                android:layout_height="0dp"
                android:layout_weight="1"
                android:background="#ff0000"
                />
            <RelativeLayout
                android:layout_width="match_parent"
                android:layout_height="0dp"
                android:layout_weight="1"
                android:background="#0000ff"
                />
        </LinearLayout>>
    </LinearLayout>


    <LinearLayout
        android:orientation="horizontal"
        android:layout_width="match_parent"
        android:layout_height="0dp"
        android:layout_weight="1"
        android:background="#00ff00">
        <RelativeLayout
            android:layout_width="0dp"
            android:layout_height="match_parent"
            android:layout_weight="1"
            android:background="#ff0000"
            />
        <RelativeLayout
            android:layout_width="0dp"
            android:layout_height="match_parent"
            android:layout_weight="1"
            android:background="#0000ff"
            />
        <RelativeLayout
            android:layout_width="0dp"
            android:layout_height="match_parent"
            android:layout_weight="1"
            android:background="#000000"
            />
    </LinearLayout>

</LinearLayout>
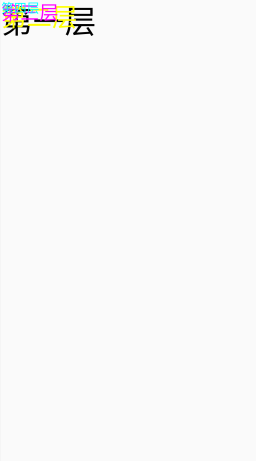
帧布局
FrameLayout是最简单的布局了。所有放在布局里的控件,都按照层次堆叠在屏幕的左上角。后加进来的控件覆盖前面的控件。
一层层的从上往下覆盖,上面的会遮挡下面的。
布局文件
<?xml version="1.0" encoding="utf-8"?>
<FrameLayout xmlns:android="http://schemas.android.com/apk/res/android"
    android:layout_width="fill_parent"
    android:layout_height="fill_parent"
    >
    <TextView
        android:layout_width="fill_parent"
        android:layout_height="wrap_content"
        android:textSize="50sp"
        android:textColor="#000000"
        android:text="第一层"/>
    <TextView
        android:layout_width="fill_parent"
        android:layout_height="wrap_content"
        android:textSize="40sp"
        android:textColor="#ffff00"
        android:text="第二层"/>
    <TextView
        android:layout_width="fill_parent"
        android:layout_height="wrap_content"
        android:textSize="30sp"
        android:textColor="#ff00ff"
        android:text="第三层"/>
    <TextView
        android:layout_width="fill_parent"
        android:layout_height="wrap_content"
        android:textSize="20sp"
        android:textColor="#00ffff"
        android:text="第四层"/>
</FrameLayout>
表格布局
行列的形式
重要属性:
- android:stretchColumns
- android:collapseColumns
- android:shrinkColumns
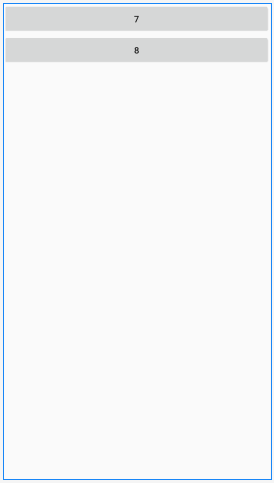
如果直接在TableLayout中添加控件,那么控件将和父容器等宽
<?xml version="1.0" encoding="utf-8"?>
<TableLayout xmlns:android="http://schemas.android.com/apk/res/android"
    android:layout_width="match_parent"
    android:layout_height="match_parent"
    >
    <Button
        android:text="7"
        />
    <Button
        android:text="8"
        />
</TableLayout>
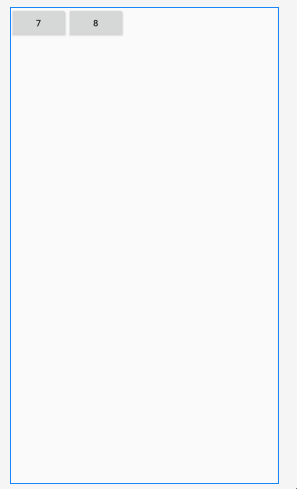
如果想让控件出现在同一行,那么这些控件的外层一定要加一对<TableRow>标签。在TableRow标签中的控件,宽度默认都是wrap_content
<?xml version="1.0" encoding="utf-8"?>
<TableLayout xmlns:android="http://schemas.android.com/apk/res/android"
    android:layout_width="match_parent"
    android:layout_height="match_parent"
    >
    <TableRow>
    <Button
        android:text="7"
        />
    <Button
        android:text="8"
        />
    </TableRow>
</TableLayout>
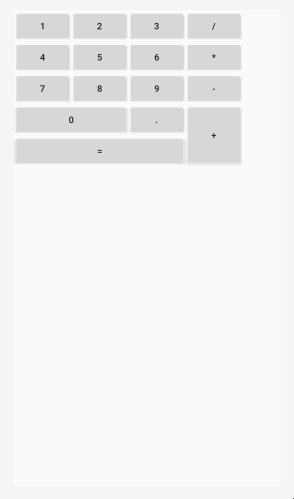
<?xml version="1.0" encoding="utf-8"?>
<TableLayout xmlns:android="http://schemas.android.com/apk/res/android"
    android:layout_width="match_parent"
    android:layout_height="match_parent"
    >
    <TableRow>
        <Button android:text="7" />
        <Button android:text="8" />
        <Button android:text="9" />
        <Button android:text="/" />
    </TableRow>
    <TableRow>
        <Button android:text="4" />
        <Button android:text="5" />
        <Button android:text="6" />
        <Button android:text="*" />
    </TableRow>
</TableLayout>
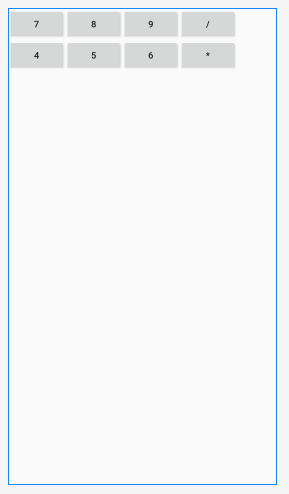
我们发现右边有个空白
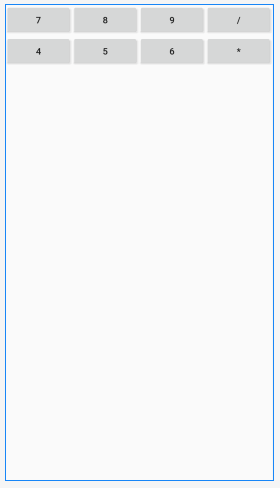
这时可以使用 android:stretchColumns ,会将列拉长,只需要设置要拉长的列的索引,拉长所有的列可以用*。下面等同于 android:stretchColumns="0,1,2,3"
<?xml version="1.0" encoding="utf-8"?>
<TableLayout xmlns:android="http://schemas.android.com/apk/res/android"
    android:layout_width="match_parent"
    android:layout_height="match_parent"
    android:stretchColumns="*"
    >
    <TableRow>
        <Button android:text="7" />
        <Button android:text="8" />
        <Button android:text="9" />
        <Button android:text="/" />
    </TableRow>
    <TableRow>
        <Button android:text="4" />
        <Button android:text="5" />
        <Button android:text="6" />
        <Button android:text="*" />
    </TableRow>
</TableLayout>
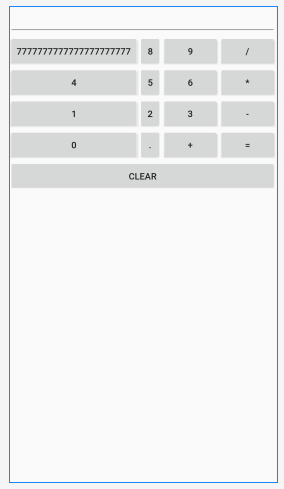
android:shrinkColumns 设置可以收缩的列,如下面将第二列设为可以收缩
<?xml version="1.0" encoding="utf-8"?>
<TableLayout xmlns:android="http://schemas.android.com/apk/res/android"
    android:layout_width="match_parent"
    android:layout_height="match_parent"
    android:shrinkColumns="1"
    >
    <EditText/>
    <TableRow>
        <Button android:text="7777777777777777777777" />
        <Button android:text="8" />
        <Button android:text="9" />
        <Button android:text="/" />
    </TableRow>
    <TableRow>
        <Button android:text="4" />
        <Button android:text="5" />
        <Button android:text="6" />
        <Button android:text="*" />
    </TableRow>
    <TableRow>
        <Button android:text="1" />
        <Button android:text="2" />
        <Button android:text="3" />
        <Button android:text="-" />
    </TableRow>
    <TableRow>
        <Button android:text="0" />
        <Button android:text="." />
        <Button android:text="+" />
        <Button android:text="=" />
    </TableRow>
    <Button
        android:text="clear"
        />
</TableLayout>
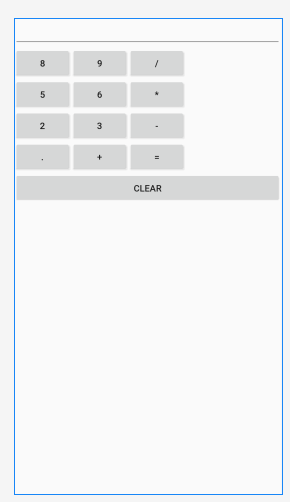
android:collapseColumns 设置可隐藏的列
<?xml version="1.0" encoding="utf-8"?>
<TableLayout xmlns:android="http://schemas.android.com/apk/res/android"
    android:layout_width="match_parent"
    android:layout_height="match_parent"
    android:collapseColumns="0"
    >
    <EditText/>
    <TableRow>
        <Button android:text="7777777777777777777777" />
        <Button android:text="8" />
        <Button android:text="9" />
        <Button android:text="/" />
    </TableRow>
    <TableRow>
        <Button android:text="4" />
        <Button android:text="5" />
        <Button android:text="6" />
        <Button android:text="*" />
    </TableRow>
    <TableRow>
        <Button android:text="1" />
        <Button android:text="2" />
        <Button android:text="3" />
        <Button android:text="-" />
    </TableRow>
    <TableRow>
        <Button android:text="0" />
        <Button android:text="." />
        <Button android:text="+" />
        <Button android:text="=" />
    </TableRow>
    <Button
        android:text="clear"
        />
</TableLayout>
网格布局
重要属性:
- android:rowCount 行数量
- android:columnCount 列数量
- android:layout_row 位于第几列
- android:layout_rowSpan 跨几行
网格布局可以自己定义好自身有多少行,多少列
<?xml version="1.0" encoding="utf-8"?>
<GridLayout xmlns:android="http://schemas.android.com/apk/res/android"
    android:layout_width="match_parent"
    android:layout_height="match_parent"
    android:rowCount="5"
    android:columnCount="4"
    android:orientation="vertical"
    >
    <Button android:text="1"/>
    <Button android:text="2"/>
    <Button android:text="3"/>
    <Button android:text="4"/>
    <Button android:text="5"/>
    <Button android:text="6"/>
</GridLayout>
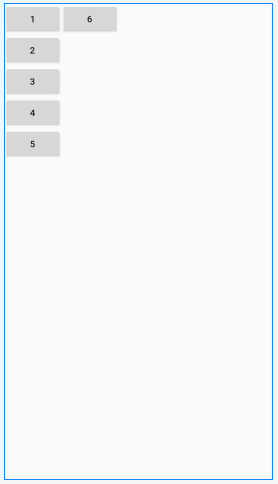
<?xml version="1.0" encoding="utf-8"?>
<GridLayout xmlns:android="http://schemas.android.com/apk/res/android"
    android:layout_width="wrap_content"
    android:layout_height="wrap_content"
    android:rowCount="5"
    android:columnCount="4"
    >
    <Button android:text="1"/>
    <Button android:text="2"/>
    <Button android:text="3"/>
    <Button android:text="/"/>
    <Button android:text="4"/>
    <Button android:text="5"/>
    <Button android:text="6"/>
    <Button android:text="*"/>
    <Button android:text="7"/>
    <Button android:text="8"/>
    <Button android:text="9"/>
    <Button android:text="-"/>
    <Button android:text="0"
        android:layout_columnSpan="2" 跨两列
        android:layout_gravity="fill" 使用fill才能呈现出视觉效果
        />
    <Button android:text="."/>
    <Button android:text="+"
        android:layout_rowSpan="2"
        android:layout_gravity="fill"
        />
    <Button android:text="="
        android:layout_columnSpan="3"
        android:layout_gravity="fill"
        />
</GridLayout>
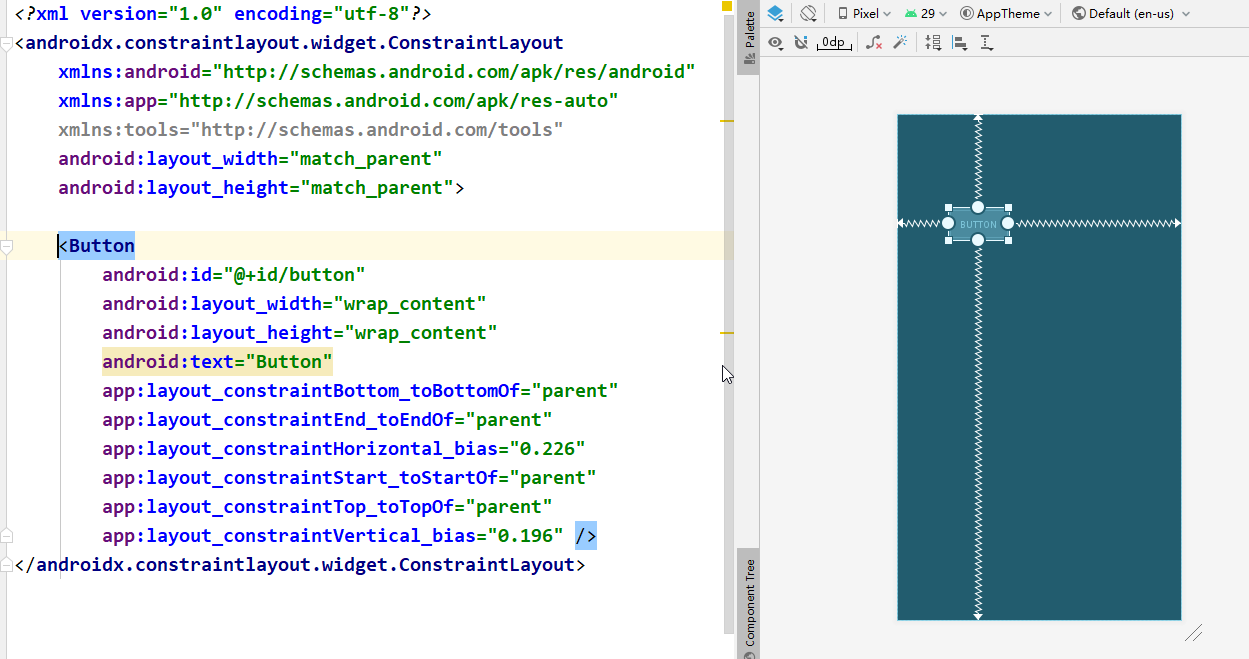
约束布局
适合通过可视化界面进行编写
可有效解决布局嵌套过多的问题
重要属性:
app:layout_constrainBottom_toBottomOf 约束当前view的底部位置
app:layout_constraintHorizontal_bias 水平偏移量,取值0~1,默认0.5
基本操作 拖圆点

这个button会自动添加一些属性
Inspector的认识

自动添加约束,不推荐
Guidelines
添加一条基线,让你的组件相对于这条基线添加约束。这个基线可以看成一个只帮助你布局的组件。
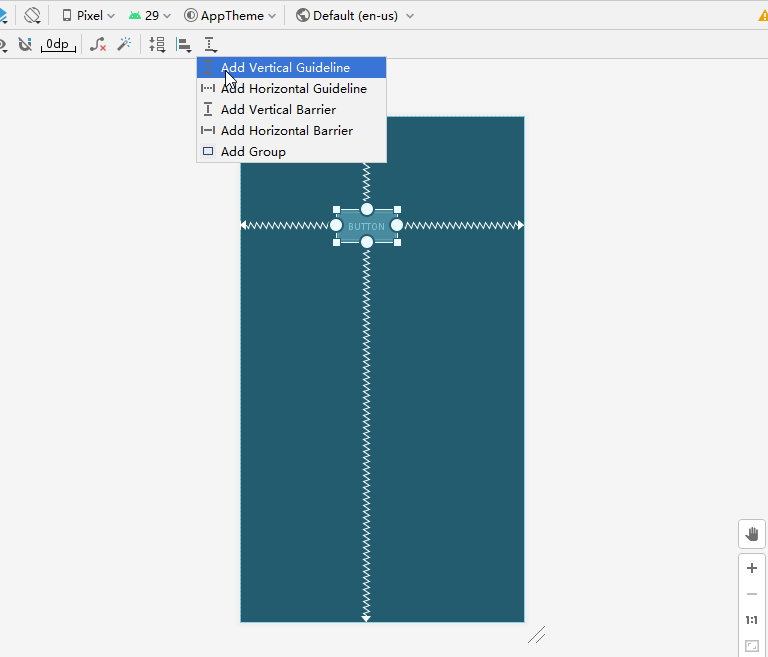
可以使用基准线进行快速布局

四大组件
Activity
前台界面,你看到的页面都是activity
1) 创建Activity,继承 AppCompatActivity
2) 在AndroidManifest.xml文件中声明
<activity android:name=".ProgressBarActivity" />-
3) 如果是入口,设置为启动的Activity
        <activity android:name="com.example.ProgressBarActivity" android:label="main">
            <intent-filter>
                <action android:name="android.intent.action.MAIN" />
                <category android:name="android.intent.category.LAUNCHER" />
            </intent-filter>
        </activity>
Activity与Layout的关系
layout 中添加自己想要的控件
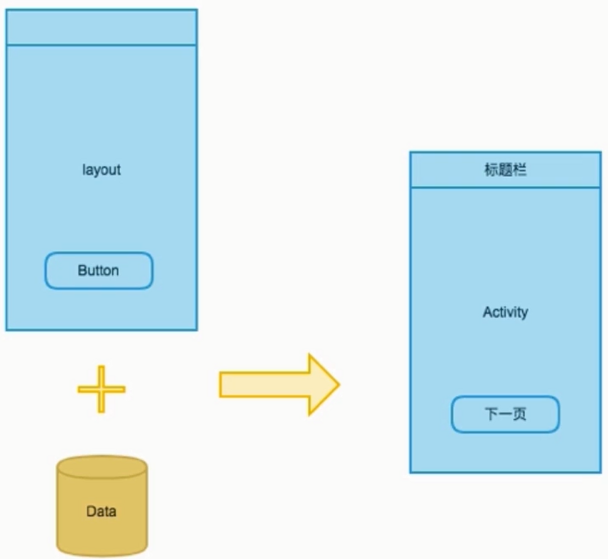
关联
    @Override
    protected void onCreate(Bundle savedInstanceState) {
        super.onCreate(savedInstanceState);
        setContentView(R.layout.activity_progress_bar);
        ...
启动Activity,Activity会去加载布局,然后渲染出界面
Activity与View的关系
XML很好的处理了静态控件
但是如果想要实现动态效果,XML就不够用了,需要使用代码
要改变控件,第一步当然是拿到控件
取出视图,如button、textview等
XML中为控件添加id
    <TextView
        android:id="@+id/textView"
        android:layout_width="match_parent"
        android:layout_height="wrap_content"/>
在代码中通过 findViewById(R.layout.id)
public class ProgressBarActivity extends AppCompatActivity {

    @Override
    protected void onCreate(Bundle savedInstanceState) {
        super.onCreate(savedInstanceState);
        setContentView(R.layout.activity_progress_bar);

        // 通过id寻址视图,并转为view
        TextView textView = findViewById(R.id.textView);
        // 通过资源获得字符串
        textView.setText(getString(R.string.long_txt));
    }
}
Activity之间的跳转
需要 Intent ,意图
传值:从哪里跳到哪里,即当前Activity,跳转的Activity
发送意图 startActivity(intent)
配置清单中
        <activity android:name="com.example.ProgressBarActivity" />
        <activity android:name="com.example.ButtonActivity" android:label="main">
            <intent-filter>
                <action android:name="android.intent.action.MAIN" />
                <category android:name="android.intent.category.LAUNCHER" />
            </intent-filter>
        </activity>
layout文件中
    <Button
        android:id="@+id/btn5"
        android:layout_width="match_parent"
        android:layout_height="wrap_content"
        android:text="btn5:XML中绑定"
        android:onClick="myClick"/>
代码,省略 ProgressBarActivity
public class ButtonActivity extends AppCompatActivity{

    @Override
    protected void onCreate(Bundle savedInstanceState) {
        super.onCreate(savedInstanceState);
        setContentView(R.layout.activity_button);
    }

    // 在XML中注册
    public void myClick(View v) {
        Intent intent = new Intent(ButtonActivity.this, ProgressBarActivity.class);
        startActivity(intent);
    }
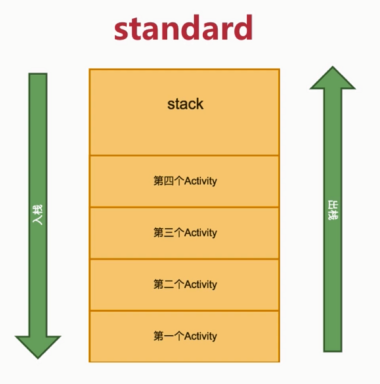
四种启动模式
Activity之间的跳转
栈的方式
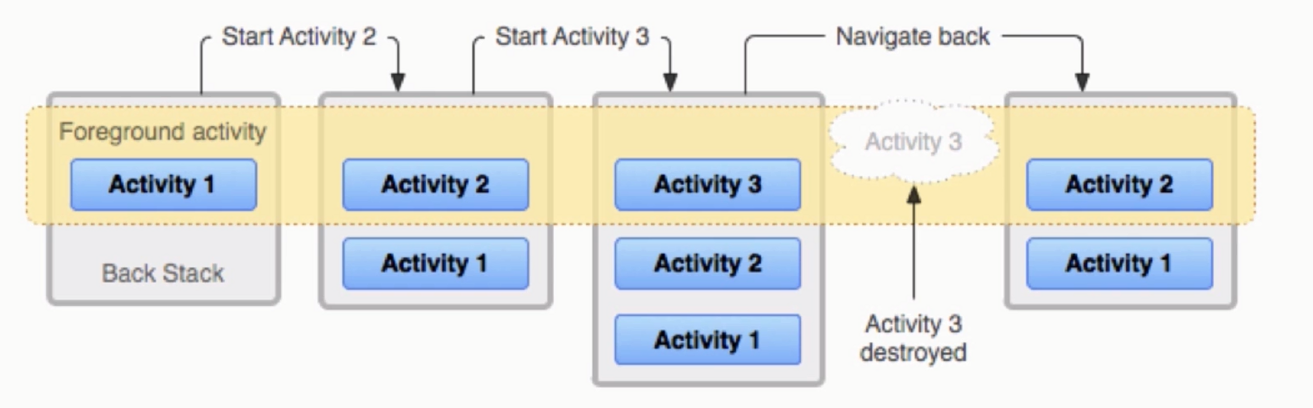
如果不想重复打开同一个Activity,而是复用它,怎么办
来看一下四种启动模式
- 1) standard
- 2) singleTop
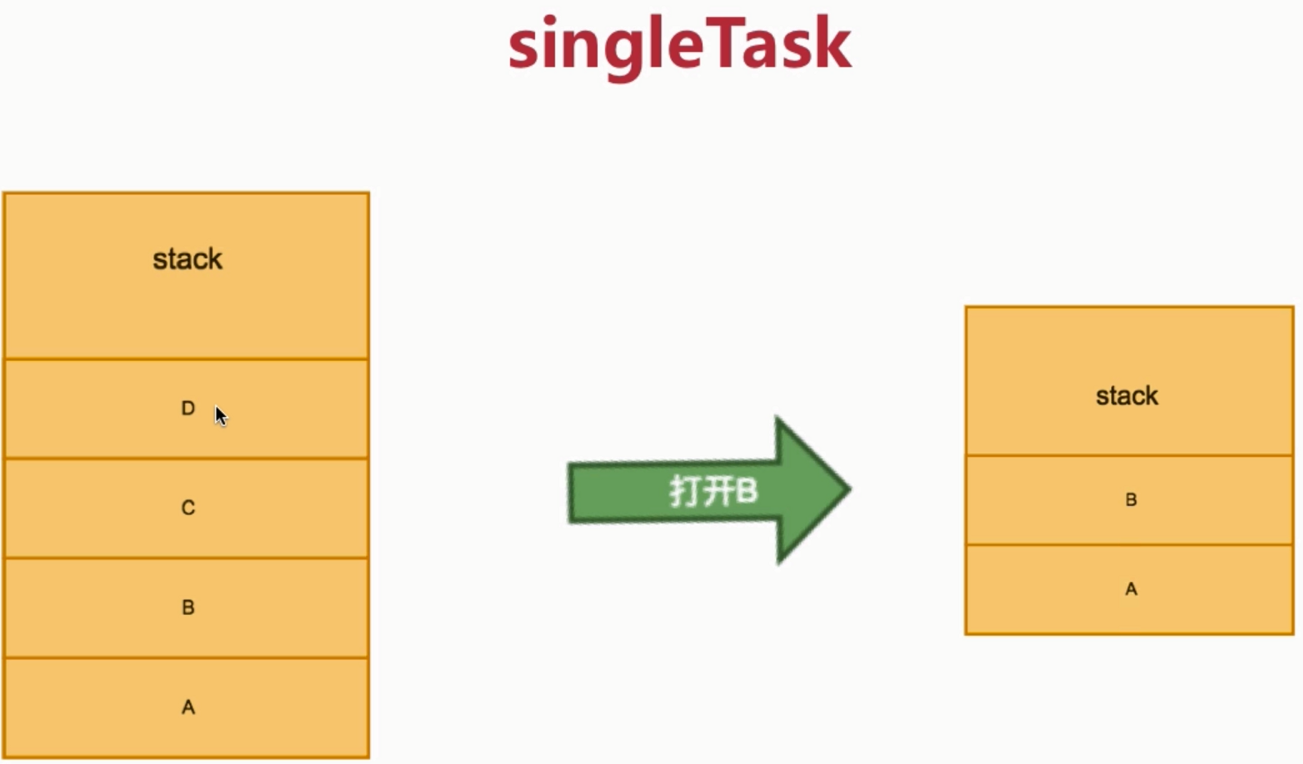
- 3) singleTask
- 4) singleInstance
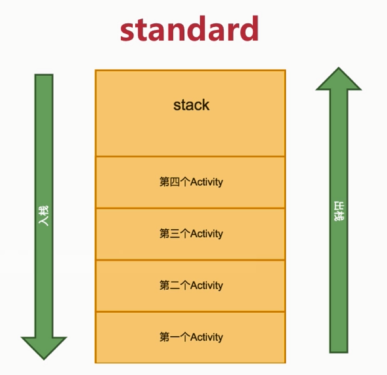
只会复用顶部: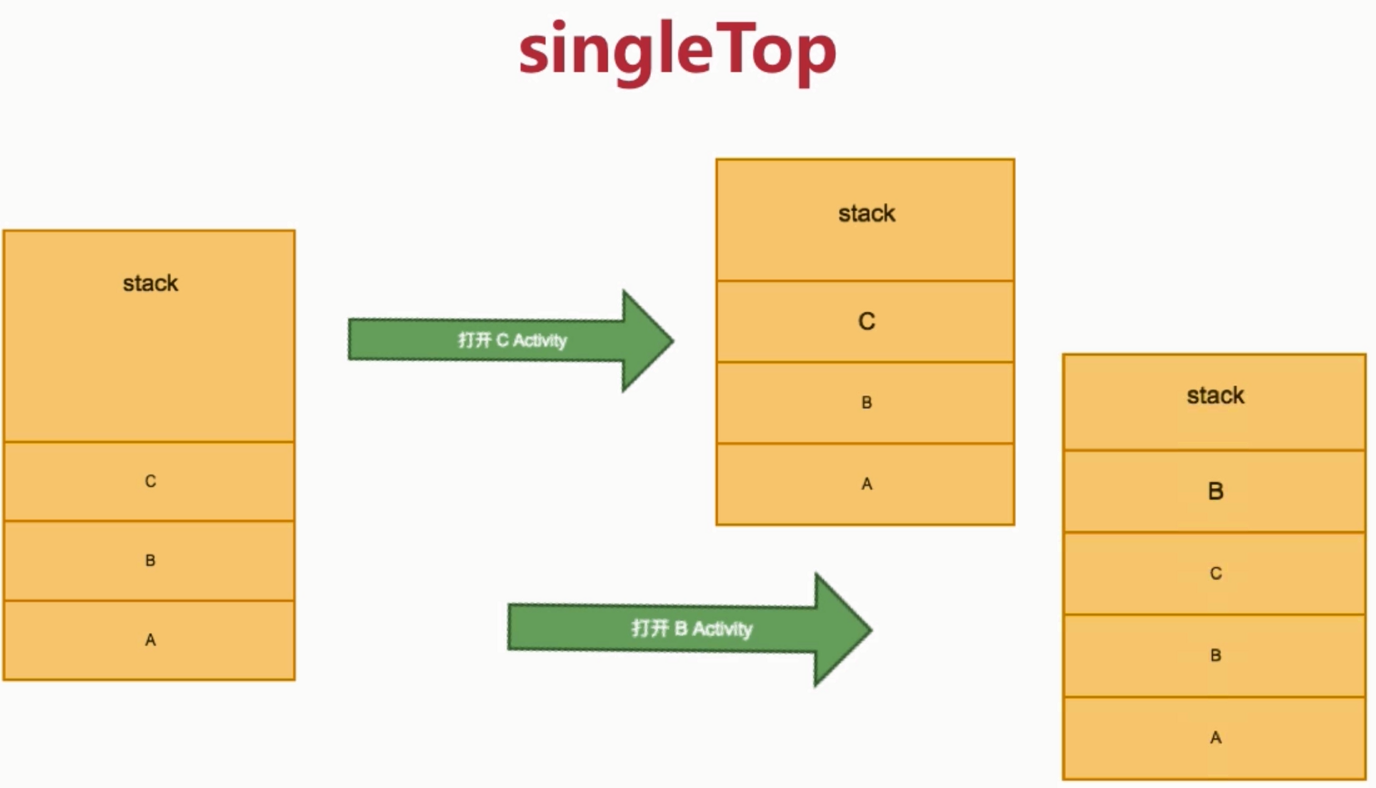
把上面的全都清除:
新建栈,全局只有一个特定的Activity

在清单文件中配置
        <activity android:name="com.example.ButtonActivity"
            android:label="main"
            android:launchMode="singleInstance">
            <intent-filter>
                <action android:name="android.intent.action.MAIN" />
                <category android:name="android.intent.category.LAUNCHER" />
            </intent-filter>
        </activity>
代码
Intent intent = new Intent(ButtonActivity.this, ProgressBarActivity.class);
intent.addFlags(Intent.FLAG_ACTIVITY_NEW_TASK);
startActivity(intent);
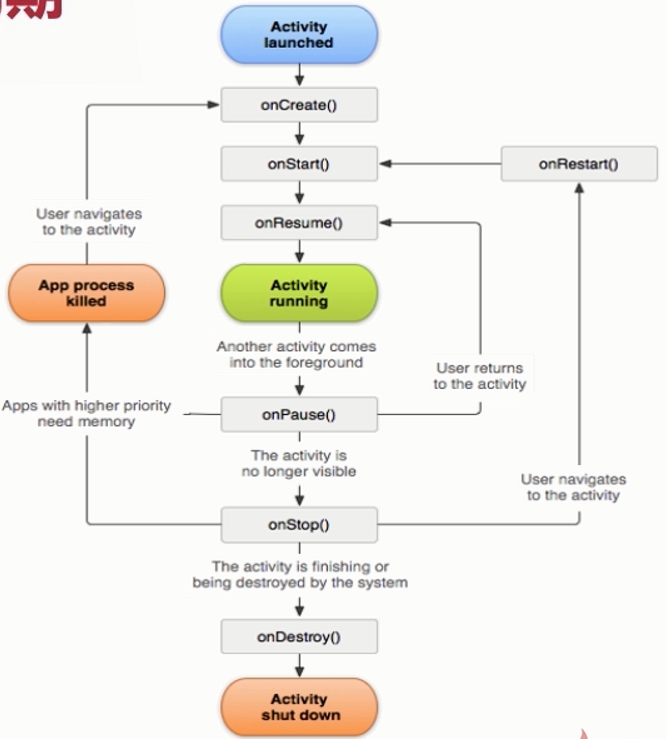
生命周期
- onCreate()
- onStart()
- onResume()
- onPause()
- onStop()
- onDestroy()
- onRestart()
两个Activity之间数据传递
activity_main.xml
<?xml version="1.0" encoding="utf-8"?>
<LinearLayout xmlns:android="http://schemas.android.com/apk/res/android"
    xmlns:app="http://schemas.android.com/apk/res-auto"
    xmlns:tools="http://schemas.android.com/tools"
    android:layout_width="match_parent"
    android:layout_height="match_parent"
    tools:context="com.example.MainActivity"
    android:orientation="vertical">

    <Button
        android:id="@+id/buttonActivity"
        android:layout_width="wrap_content"
        android:layout_height="wrap_content"
        android:layout_gravity="center_horizontal"
        android:text="mainActivity"
        />
</LinearLayout>
activity_second.xml
<?xml version="1.0" encoding="utf-8"?>
<LinearLayout xmlns:android="http://schemas.android.com/apk/res/android"
    xmlns:app="http://schemas.android.com/apk/res-auto"
    xmlns:tools="http://schemas.android.com/tools"
    android:layout_width="match_parent"
    android:layout_height="match_parent"
    tools:context="com.example.SecondActivity">

    <Button
        android:id="@+id/buttonFinish"
        android:layout_width="wrap_content"
        android:layout_height="wrap_content"/>


</LinearLayout>
第一个
public class MainActivity extends AppCompatActivity {

    public static final String BUTTON_TITLE="button_title";
    @Override
    protected void onCreate(Bundle savedInstanceState) {
        super.onCreate(savedInstanceState);
        setContentView(R.layout.activity_main);
        initViews();
    }

    private void initViews(){
        findViewById(R.id.buttonActivity).setOnClickListener(new View.OnClickListener() {
            @Override
            public void onClick(View v) {
                final Intent intent = new Intent(MainActivity.this, SecondActivity.class);
                // 传递字符串,第一个参数是键,获取数据时会根据键来获取,第二个参数是值
                intent.putExtra(BUTTON_TITLE, getString(R.string.aidata));
                startActivity(intent);
            }
        });

    }
}
第二个
public class SecondActivity extends AppCompatActivity {

    @Override
    protected void onCreate(Bundle savedInstanceState) {
        super.onCreate(savedInstanceState);
        setContentView(R.layout.activity_second);
        final Button button = (Button)findViewById(R.id.buttonFinish);
        button.setOnClickListener((v)->{finish();});
        // 通过 getIntent() 获取传过来的intent
        if (getIntent() != null){
            String buttonTitle = getIntent().getStringExtra(MainActivity.BUTTON_TITLE);
            button.setText(buttonTitle);
        }
    }
}
可以使用Bundel,看成map,一次传多个值
    private void initViews(){
        findViewById(R.id.buttonActivity).setOnClickListener(new View.OnClickListener() {
            @Override
            public void onClick(View v) {
                final Intent intent = new Intent(MainActivity.this, SecondActivity.class);
                Bundle bundle = new Bundle();
                bundle.putString("str", "abc");
                bundle.putBoolean("bool", true);
                // 传递字符串,第一个参数是键,获取数据时会根据键来获取,第二个参数是值
                intent.putExtra(BUTTON_TITLE, bundle);
                startActivity(intent);
            }
        });
    }
public class SecondActivity extends AppCompatActivity {

    @Override
    protected void onCreate(Bundle savedInstanceState) {
        super.onCreate(savedInstanceState);
        setContentView(R.layout.activity_second);
        final Button button = (Button)findViewById(R.id.buttonFinish);
        button.setOnClickListener((v)->{finish();});
        // 通过 getIntent() 获取传过来的intent
        if (getIntent() != null){
            Bundle bundle = getIntent().getBundleExtra(MainActivity.BUTTON_TITLE);
            String buttonTitle = (String)bundle.get("str");
            button.setText(buttonTitle);
        }
    }
}
可以传递序列化对象
public class User implements Serializable {
    private String name;

    public void setName(String name) {
        this.name = name;
    }

    public String getName() {
        return name;
    }
}
    private void initViews(){
        findViewById(R.id.buttonActivity).setOnClickListener(new View.OnClickListener() {
            @Override
            public void onClick(View v) {
                final Intent intent = new Intent(MainActivity.this, SecondActivity.class);
                User user = new User();
                user.setName("wang");
                // 传递对象,必须序列化
                intent.putExtra(BUTTON_TITLE, user);
                startActivity(intent);
            }
        });
    }
public class SecondActivity extends AppCompatActivity {

    @Override
    protected void onCreate(Bundle savedInstanceState) {
        super.onCreate(savedInstanceState);
        setContentView(R.layout.activity_second);
        final Button button = (Button)findViewById(R.id.buttonFinish);
        button.setOnClickListener((v)->{finish();});
        // 通过 getIntent() 获取传过来的intent
        if (getIntent() != null){
            User user = (User)getIntent().getSerializableExtra(MainActivity.BUTTON_TITLE);
            button.setText(user.getName());
        }
    }
}
第二个Activity传回数据
打开页面用startActivityForResult()
生命周期 onActivityResult
public class MainActivity extends AppCompatActivity {

    public static final String BUTTON_TITLE="button_title";
    @Override
    protected void onCreate(Bundle savedInstanceState) {
        super.onCreate(savedInstanceState);
        setContentView(R.layout.activity_main);
        initViews();
    }

    @Override
    protected void onActivityResult(int requestCode, int resultCode, @Nullable Intent data) {
        super.onActivityResult(requestCode, resultCode, data);
        // 可以根据请求码和返回码判断一个Activity
        if (requestCode==999 && requestCode==RESULT_OK){
            TextView textView = findViewById(R.id.txt);
            textView.setText(data.getStringExtra("message"));
        }
    }

    private void initViews(){
        findViewById(R.id.buttonActivity).setOnClickListener(new View.OnClickListener() {
            @Override
            public void onClick(View v) {
                final Intent intent = new Intent(MainActivity.this, SecondActivity.class);
                User user = new User();
                user.setName("wang");
                // 传递对象,必须序列化
                intent.putExtra(BUTTON_TITLE, user);
                // 第二个参数是请求的code
                startActivityForResult(intent, 999);
            }
        });
    }
}
public class SecondActivity extends AppCompatActivity {

    @Override
    protected void onCreate(Bundle savedInstanceState) {
        super.onCreate(savedInstanceState);
        setContentView(R.layout.activity_second);
        final Button button = (Button)findViewById(R.id.buttonFinish);
        button.setOnClickListener(
                new View.OnClickListener() {
                    @Override
                    public void onClick(View v) {
                        Intent intent = new Intent();
                        intent.putExtra("message", "第二个activity关闭");
                        setResult(RESULT_OK, intent);
                        finish();
                    }
                }
        );
        // 通过 getIntent() 获取传过来的intent
        if (getIntent() != null){
            User user = (User)getIntent().getSerializableExtra(MainActivity.BUTTON_TITLE);
            button.setText(user.getName());
        }
    }
}
Service
Service服务是Android四大组件之一,是一种程序后台运行的方案,用于不需要用户交互,长期运行的任务。Service并不是在单独进程中运行,也是运行在应用程序进程的主线程中,在执行具体耗时任务过程中要手动开启子线程,应用程序进程被杀死,所有依赖该进程的服务也会停止运行。
Service(服务)是一个一种可以在后台执行长时间运行操作而没有用户界面的应用组件。服务可由其他应用组件启动(如Activity),服务一旦被启动将在后台一直运行,即使启动服务的组件(Activity)已销毁也不受影响。 此外,组件可以绑定到服务,以与之进行交互,甚至是执行进程间通信 (IPC)。 例如,服务可以处理网络事务、播放音乐,执行文件 I/O 或与内容提供程序交互,而所有这一切均可在后台进行,Service基本上分为两种形式:
- 启动状态
当应用组件(如 Activity)通过调用 startService() 启动服务时,服务即处于“启动”状态。一旦启动,服务即可在后台无限期运行,即使启动服务的组件已被销毁也不受影响,除非手动调用才能停止服务, 已启动的服务通常是执行单一操作,而且不会将结果返回给调用方。
- 绑定状态
当应用组件通过调用 bindService() 绑定到服务时,服务即处于“绑定”状态。绑定服务提供了一个客户端-服务器接口,允许组件与服务进行交互、发送请求、获取结果,甚至是利用进程间通信 (IPC) 跨进程执行这些操作。 仅当与另一个应用组件绑定时,绑定服务才会运行。 多个组件可以同时绑定到该服务,但全部取消绑定后,该服务即会被销毁。
BroadcastReceiver
在安卓开发中,当我们需要接收系统发出或者别的程序发出来的消息的时候,就需要用到广播接收器。或者我们需要在应用之中传递一些数据时,我们也可以用本地广播来发送和接收这些消息。Android中的广播分为标准广播和有序广播。BroadCastReceiver是广播接收器。
ContentProvider
要的作用就是将程序的内部的数据和外部进行共享,为数据提供外部访问接口,被访问的数据主要以数据库的形式存在,而且还可以选择共享哪一部分的数据。这样一来,对于程序当中的隐私数据可以不共享,从而更加安全。
Intent和IntentFilter
Intent 封装Android应用程序启动某个组件的“意图”,可以启动Activity、Service、BroadcastReceiver。不仅如此,Intent还是应用程序组件之间通信的重要媒介,即可以传递数据,如前面提到的Activity之间传递数据。
下图展示了使用Intent启动不同组件的方法。
| 组件类型 | 启动方法 |
| Activity |
startActivity(Intent intent) startActivity(Intent intent,int requestCode) |
| Service |
ComponentName startService(Intent service) boolean bindService(Intent service,ServiceConnection conn,int flags) |
| BoradcastReceiver |
sendBroadcast(Intent intent) sendBroadcast(Intent intent,String receiverPermission) sendOrderedBroadcast(Intent intent,String receiverPermission,BroadcastReceiver resultReceiver,Handler scheduler,int initialCode,String initialData,Bundle initialExtras) sendOrderedBroadcast(Intent intent,String receiverPermission) sendStickyBroadcast(Intent intent) sendStickyOrderedBroadcast(Intent intent,BroadcastReceiver resultReceiver,Handler scheduler,int initialCode,String initialData,Bundle initialExtras) |
Intent对象大致包含Component、Action、Category、Data、Type、Extra和Flag这7种属性,其中Component用于明确指定需要启动的目标组件,而Extra则用于“携带”需要交换的数据。
Intent 常用的有两种构造函数
- new Intent(Package, Class) 如new Intent(this, MainAcitivity.class)
- new Intent(ACTION)
对应了显示Intent和隐式Intent
显式Intent:即直接指定需要打开的activity对应的类
隐式Intent:即不是像显式的那样直接指定需要调用的Activity,隐式不明确指定启动哪个Activity,而是设置Action、Data、Category,让系统来筛选出合适的Activity。筛选是根据所有的intent-filter来筛选
设置Intent时所传入的类必须要注册,隐性设置Intent时需要设置action和category 属性,常见的category 属性如下
显示Intent举例
1、构造方法传入Component
Intent intent = new Intent(this, SecondActivity.class);
startActivity(intent);
2、setComponent方法
ComponentName componentName = new ComponentName(this, SecondActivity.class);
// 或者ComponentName componentName = new ComponentName(this, "com.example.app016.SecondActivity");
// 或者ComponentName componentName = new ComponentName(this.getPackageName(), "com.example.app016.SecondActivity");

Intent intent = new Intent();
intent.setComponent(componentName);
startActivity(intent);
3、setClass/setClassName方法
Intent intent = new Intent();

intent.setClass(this, SecondActivity.class);
// 或者intent.setClassName(this, "com.example.app016.SecondActivity");
// 或者intent.setClassName(this.getPackageName(), "com.example.app016.SecondActivity");

startActivity(intent);
隐式Intent举例
设置一个Action,
<activity
    android:name="com.example.app016.SecondActivity">
    <intent-filter>
        <action android:name="abcdefg"/>
        <category android:name="android.intent.category.DEFAULT"/>
    </intent-filter>
</activity>
然后,在MainActivity中有如下方法设置
1、setAction方法
Intent intent = new Intent();
intent.setAction("abcdefg");
startActivity(intent);
2、构造方法直接设置Action
Intent intent = new Intent("abvdefg");
startActivity(intent);
其他程序可以调用这个Activity只要使用这个Action字符串即可,我们也可以调用其他程序的Action例如:
Intent intent = new Intent(Intent.ACTION_DIAL);
// 或者Intent intent = new Intent("android.intent.action.DIAL");
// Intent.ACTION_DIAL是内置常量,值为"android.intent.action.DIAL"
startActivity(intent);
我们可以调用拨号界面
3、一个Activity可调用多个Action
如果我们设置的intent-filter中的Action为”ACTION_DIAL”那么在启动该Intent时会自动跳出选择界面,而且一个Activity中可以处理多个Action
<activity
    android:name="com.example.app016.SecondActivity">
    <intent-filter>
        <!-- 可以处理下面三种Intent -->
        <action android:name="com.example.app016.SEND_EMAIL"/>
        <action android:name="com.example.app016.SEND_MESSAGE"/>
        <action android:name="com.example.app016.DAIL"/>
        <category android:name="android.intent.category.DEFAULT" />
    </intent-filter>
</activity>
如果没有该Activity系统会抛出ActivityNotFoundException异常,我们应该要用try/catch捕获或者也可以使用Intent的resolveActivity方法判断这个Intent是否能找到合适的Activity
Intent intent = new Intent(Intent.ACTION_DIAL);
if(intent.resolveActivity(getPackageManager()) == null)
{
    // 设置控件不可用
}
注意resolveActivity方法返回值就是显式Intent上面讲到的ComponentName对象,如果有多个Activity那么返回用户所选择的对象
Intent intent = new Intent(Intent.ACTION_DIAL);
ComponentName componentName = intent.resolveActivity(getPackageManager());
if(componentName != null)
{
    String className = componentName.getClassName();
    Toast.makeText(this, className, Toast.LENGTH_SHORT).show();
}
参考:
Intent的中文意思是“意图,目的”的意思,可以理解为不同组件之间通信的“媒介”或者“信使”。

目标组件一般要通过Intent来声明自己的条件,一般通过组件中的<intent-filter>元素来过滤。

Intent在由以下几个部分组成:动作(action),数据(data),分类(Category),类型(Type),组件(Component),和扩展信息(Extra)。

Intent在寻找目标组件的时候有两种方法:第一,通过组件名称直接指定;第二,通过Intent Filter过滤指定

Intent启动不同组件的方法
组件名称  方法名称
Activity  startActivity()  startActivityForResult()
Service  startService()  bindService()
Broadcasts  sendBroadcast()  sendOrderedBroadcast()  sendStickyBroadcast()


常见的Activity Action Intent常量
常量名称   常量值  意义
ACTION_MAIN  android.intent.action.MAIN   应用程序入口
ACTION_VIEW  android.intent.action.VIEW  显示数据给用户
ACTION_ATTACH_DATA  android.intent.action.ATTACH_DATA  指明附加信息给其他地方的一些数据
ACTION_EDIT  android.intent.action.EDIT  显示可编辑的数据
ACTION_PICK  android.intent.action.PICK  选择数据
ACTION_CHOOSER  android.intent.action.CHOOSER  显示一个Activity选择器
ACTION_GET_CONTENT  android.intent.action.GET_CONTENT  获得内容
ACTION_DIAL  android.intent.action.GET_CONTENT  显示打电话面板
ACITON_CALL  android.intent.action.DIAL  直接打电话
ACTION_SEND  android.intent.action.SEND  直接发短信
ACTION_SENDTO  android.intent.action.SENDTO  选择发短信
ACTION_ANSWER  android.intent.action.ANSWER  应答电话
ACTION_INSERT  android.intent.action.INSERT  插入数据
ACTION_DELETE  android.intent.action.DELETE  删除数据
ACTION_RUN  android.intent.action.RUN  运行数据
ACTION_SYNC  android.intent.action.SYNC  同步数据
ACTION_PICK_ACTIVITY  android.intent.action.PICK_ACTIVITY  选择Activity
ACTION_SEARCH  android.intent.action.SEARCH  搜索
ACTION_WEB_SEARCH  android.intent.action.WEB_SEARCH  Web搜索
ACTION_FACTORY_TEST  android.intent.action.FACTORY_TEST  工厂测试入口点


常见的BroadcastIntent Action常量  BroadcastIntent
Action字符串常量  描述
ACTION_TIME_TICK  系统时间每过一分钟发出的广播
ACTION_TIME_CHANGED  系统时间通过设置发生了变化
ACTION_TIMEZONE_CHANGED  时区改变
ACTION_BOOT_COMPLETED  系统启动完毕
ACTION_PACKAGE_ADDED  新的应用程序apk包安装完毕
ACTION_PACKAGE_CHANGED  现有应用程序apk包改变
ACTION_PACKAGE_REMOVED  现有应用程序apk包被删除
ACTION_UID_REMOVED  用户id被删除


Intent的Action和Data属性匹配
Action属性  Data属性  说明
ACTION_VIEW  content://contacts/people/1  显示id为1的联系人信息
ACTION_DIAL  content://contacts/people/1  将id为1的联系人电话号码显示在拨号界面中
ACITON_VIEW  tel:123  显示电话为123的联系人信息
ACTION_VIEW  http://www.google.com  在浏览器中浏览该网站
ACTION_VIEW  file://sdcard/mymusic.mp3  播放MP3
ACTION_VIEW  geo:39.2456,116.3523  显示地图


常见的Category常量
Category字符串常量  描述
CATEGORY_BROWSABLE  目标Activity能通过在网页浏览器中点击链接而激活(比如,点击浏览器中的图片链接)
CATEGORY_GADGET  表示目标Activity可以被内嵌到其他Activity当中
CATEGORY_HOME  目标Activity是HOME Activity,即手机开机启动后显示的Activity,或按下HOME键后显示的Activity
CATEGORY_LAUNCHER  表示目标Activity是应用程序中最优先被执行的Activity
CATEGORY_PREFERENCE  表示目标Activity是一个偏爱设置的Activity


常见的Extra常量
Extra键值字符串常量  描述
EXTRA_BCC  装有邮件密送地址的字符串数组
EXTRA_CC  装有邮件抄送地址的字符串数组
EXTRA_EMAIL  装有邮件发送地址的字符串数组
EXTRA_INTENT  使用ACTION_PICK_ACTIVITY动作时装有Intent选项的键
EXTRA_KEY_EVENT  触发该Intent的案件的KeyEvent对象
EXTRA_PHONE_NUMBER  使用拨打电话相关的Action时,电话号码字符串的键,类型为String
EXTRA_SHORTCUT_ICON  使用ACTION_CREATE_SHORTCUT在HomeActivity创建快捷方式时,对快捷方式的描述信息。
其中ICON和ICON_RESOURCE描述的是快捷方式的图标,类型分别为Bitmap和ShortcutIconResource。INTENT描述的是快捷方式相对应的Intent对象。NAME描述的是快捷方式的名字。
EXTRA_SHORTCUT_ICON_RESOURCE  EXTRA_SHORTCUT_INTENT  EXTRA_SHORTCUT_NAME  EXTRA_SUBJECT  描述信息主题的键
EXTRA_TEXT  使用ACTION_SEND动作时,用来描述要发送的文本信息,类型为CharSequence
EXTRA_TITLE  使用ACTION_CHOOSER动作时,描述对话框标题的键,类型为CharSequence
EXTRA_UID  使用ACTION_UID_REMOVED动作时,描述删除的用户id的键,类型为int


Android.telephony包中的类
类名  描述
CellLocation  表示设备位置的抽象类
PhoneNumberFormattingTextWather  监视一个TextView控件,如果有电话号码输入,则用formatNumber()方法处理电话号码
PhoneNumberUtils  包含各种处理电话号码字符串的使用工具
PhoneStateListener  监视手机中电话状态变化的监听类
ServiceState  包含电话状态和相关的服务信息
TelephonyManager  提供对手机中电话服务信息的访问


与短信服务相关的类主要在包android.telephony.gsm中
类名  描述
GsmCellLocation  表示GSM手机的基站位置
SmsManager  管理各种短信操作
SmsMessage  表示具体的短信


1.Intent的用法:
(1)用Action跳转
1、使用Action跳转,如果有一个程序的AndroidManifest.xml中的某一个 Activity的IntentFilter段中 定义了包含了相同的Action那么这个Intent就与这个目标Action匹配。如果这个IntentFilter段中没有定义 Type,Category,那么这个 Activity就匹配了。但是如果手机中有两个以上的程序匹配,那么就会弹出一个对话可框来提示说明。
Action 的值在Android中有很多预定义,如果你想直接转到你自己定义的Intent接收者,你可以在接收者的IntentFilter 中加入一个自定义的Action值(同时要设定 Category值为"android.intent.category.DEFAULT"),在你的Intent中设定该值为Intent的 Action,就直接能跳转到你自己的Intent接收者中。因为这个Action在系统中是唯一的。
2,data/type,你可以用Uri 来做为data,比如Uri uri = Uri.parse(http://www.google.com);
Intent i = new Intent(Intent.ACTION_VIEW,uri);手机的Intent分发过程中,会根据http://www.google.com 的scheme判断出数据类型type 。手机的Brower则能匹配它,在Brower的Manifest.xml中的IntenFilter中 首先有ACTION_VIEW Action,也能处理http:的type,
3, 至于分类Category,一般不要去在Intent中设置它,如果你写Intent的接收者,就在Manifest.xml的Activity的 IntentFilter中包含android.category.DEFAULT,这样所有不设置 Category(Intent.addCategory(String c);)的Intent都会与这个Category匹配。
4,extras(附 加信息),是其它所有附加信息的集合。使用extras可以为组件提供扩展信息,比如,如果要执行“发送电子邮件”这个动 作,可以将电子邮件的标题、正文等保存在extras里,传给电子邮件发送组件。
(2)用类名跳转
    Intent负责对应用中一次操作的动作、动作涉及数据、附加数据进行描 述,Android则根据此Intent的描述, 负责找到对应的组件,将 Intent传递给调用的组件,并完成组件的调用。Intent在这里起着实现调用者与被调用者之间的解耦作用。Intent传递过程中,要找 到目标消费者(另一个Activity,IntentReceiver或Service),也就是Intent的响 应者。
Intent intent = new Intent();
intent.setClass(context, targetActivy.class);
//或者直接用 Intent intent = new Intent(context, targetActivity.class);

startActivity(intent);
不过注意用类名跳转,需要在AndroidManifest.xml中申明activity
<activity android:name="targetActivity"></activity>
2.几种Intent的用法
android 中intent是经常要用到的。不管是页面牵转,还是传递数据,或是调用外部程序,系统功能都要用到intent。在做了一些intent的例子之后,整理了一下intent,希望对大家有用。由于intent内容太多,不可能真的写全,难免会有遗落,以后我会随时更新。如果你们有疑问或新的intent内容,希望交流。
★intent大全:
1.从google搜索内容
Intent intent = new Intent();
intent.setAction(Intent.ACTION_WEB_SEARCH);
intent.putExtra(SearchManager.QUERY,"searchString")
startActivity(intent);

2.浏览网页
Uri uri = Uri.parse("http://www.google.com");
Intent it  = new Intent(Intent.ACTION_VIEW,uri);
startActivity(it);

3.显示地图
Uri uri = Uri.parse("geo:38.899533,-77.036476");
Intent it = new Intent(Intent.Action_VIEW,uri);
startActivity(it);

4.路径规划
Uri uri = Uri.parse("http://maps.google.com/maps?f=dsaddr=startLat%20startLng&daddr=endLat%20endLng&hl=en");
Intent it = new Intent(Intent.ACTION_VIEW,URI);
startActivity(it);

5.拨打电话
Uri uri = Uri.parse("tel:xxxxxx");
Intent it = new Intent(Intent.ACTION_DIAL, uri);
startActivity(it);

6.调用发短信的程序
Intent it = new Intent(Intent.ACTION_VIEW);
it.putExtra("sms_body", "The SMS text");
it.setType("vnd.android-dir/mms-sms");
startActivity(it);

7.发送短信
Uri uri = Uri.parse("smsto:0800000123");
Intent it = new Intent(Intent.ACTION_SENDTO, uri);
it.putExtra("sms_body", "The SMS text");
startActivity(it);
String body="this is sms demo";
Intent mmsintent = new Intent(Intent.ACTION_SENDTO, Uri.fromParts("smsto", number, null));
mmsintent.putExtra(Messaging.KEY_ACTION_SENDTO_MESSAGE_BODY, body);
mmsintent.putExtra(Messaging.KEY_ACTION_SENDTO_COMPOSE_MODE, true);
mmsintent.putExtra(Messaging.KEY_ACTION_SENDTO_EXIT_ON_SENT, true);
startActivity(mmsintent);

8.发送彩信
Uri uri = Uri.parse("content://media/external/images/media/23");
Intent it = new Intent(Intent.ACTION_SEND);
it.putExtra("sms_body", "some text");
it.putExtra(Intent.EXTRA_STREAM, uri);
it.setType("image/png");
startActivity(it);
StringBuilder sb = new StringBuilder();
sb.append("file://");
sb.append(fd.getAbsoluteFile());
Intent intent = new Intent(Intent.ACTION_SENDTO, Uri.fromParts("mmsto", number, null));
// Below extra datas are all optional.
intent.putExtra(Messaging.KEY_ACTION_SENDTO_MESSAGE_SUBJECT, subject);
intent.putExtra(Messaging.KEY_ACTION_SENDTO_MESSAGE_BODY, body);
intent.putExtra(Messaging.KEY_ACTION_SENDTO_CONTENT_URI, sb.toString());
intent.putExtra(Messaging.KEY_ACTION_SENDTO_COMPOSE_MODE, composeMode);
intent.putExtra(Messaging.KEY_ACTION_SENDTO_EXIT_ON_SENT, exitOnSent);
startActivity(intent);

9.发送Email
Uri uri = Uri.parse("mailto:xxx@abc.com");
Intent it = new Intent(Intent.ACTION_SENDTO, uri);
startActivity(it);
Intent it = new Intent(Intent.ACTION_SEND);
it.putExtra(Intent.EXTRA_EMAIL, "me@abc.com");
it.putExtra(Intent.EXTRA_TEXT, "The email body text");
it.setType("text/plain");
startActivity(Intent.createChooser(it, "Choose Email Client"));
Intent it=new Intent(Intent.ACTION_SEND);
String[] tos={"me@abc.com"};
String[] ccs={"you@abc.com"};
it.putExtra(Intent.EXTRA_EMAIL, tos);
it.putExtra(Intent.EXTRA_CC, ccs);
it.putExtra(Intent.EXTRA_TEXT, "The email body text");
it.putExtra(Intent.EXTRA_SUBJECT, "The email subject text");
it.setType("message/rfc822");
startActivity(Intent.createChooser(it, "Choose Email Client"));

Intent it = new Intent(Intent.ACTION_SEND);
it.putExtra(Intent.EXTRA_SUBJECT, "The email subject text");
it.putExtra(Intent.EXTRA_STREAM, "file:///sdcard/mysong.mp3");
sendIntent.setType("audio/mp3");
startActivity(Intent.createChooser(it, "Choose Email Client"));

10.播放多媒体
Intent it = new Intent(Intent.ACTION_VIEW);
Uri uri = Uri.parse("file:///sdcard/song.mp3");
it.setDataAndType(uri, "audio/mp3");
startActivity(it);
Uri uri = Uri.withAppendedPath(MediaStore.Audio.Media.INTERNAL_CONTENT_URI, "1");
Intent it = new Intent(Intent.ACTION_VIEW, uri);
startActivity(it);

11.uninstall apk
Uri uri = Uri.fromParts("package", strPackageName, null);
Intent it = new Intent(Intent.ACTION_DELETE, uri);
startActivity(it);

12.install apk
Uri installUri = Uri.fromParts("package", "xxx", null);
returnIt = new Intent(Intent.ACTION_PACKAGE_ADDED, installUri);

13. 打开照相机
<1>Intent i = new Intent(Intent.ACTION_CAMERA_BUTTON, null);
    this.sendBroadcast(i);
<2>long dateTaken = System.currentTimeMillis();
    String name = createName(dateTaken) + ".jpg";
    fileName = folder + name;
    ContentValues values = new ContentValues();
    values.put(Images.Media.TITLE, fileName);
    values.put("_data", fileName);
    values.put(Images.Media.PICASA_ID, fileName);
    values.put(Images.Media.DISPLAY_NAME, fileName);
    values.put(Images.Media.DESCRIPTION, fileName);
    values.put(Images.ImageColumns.BUCKET_DISPLAY_NAME, fileName);
    Uri photoUri = getContentResolver().insert(
            MediaStore.Images.Media.EXTERNAL_CONTENT_URI, values);

    Intent inttPhoto = new Intent(MediaStore.ACTION_IMAGE_CAPTURE);
    inttPhoto.putExtra(MediaStore.EXTRA_OUTPUT, photoUri);
    startActivityForResult(inttPhoto, 10);

14.从gallery选取图片
Intent i = new Intent();
i.setType("image/*");
i.setAction(Intent.ACTION_GET_CONTENT);
startActivityForResult(i, 11);

15. 打开录音机
Intent mi = new Intent(Media.RECORD_SOUND_ACTION);
startActivity(mi);

16.显示应用详细列表
Uri uri = Uri.parse("market://details?id=app_id");
Intent it = new Intent(Intent.ACTION_VIEW, uri);
startActivity(it);
//where app_id is the application ID, find the ID
//by clicking on your application on Market home
//page, and notice the ID from the address bar

刚才找app id未果,结果发现用package name也可以
Uri uri = Uri.parse("market://details?id=<packagename>");
这个简单多了

17寻找应用
Uri uri = Uri.parse("market://search?q=pname:pkg_name");
Intent it = new Intent(Intent.ACTION_VIEW, uri);
startActivity(it);
//where pkg_name is the full package path for an application

18打开联系人列表
    <1>
    Intent i = new Intent();
    i.setAction(Intent.ACTION_GET_CONTENT);
    i.setType("vnd.android.cursor.item/phone");
    startActivityForResult(i, REQUEST_TEXT);

    <2>
    Uri uri = Uri.parse("content://contacts/people");
    Intent it = new Intent(Intent.ACTION_PICK, uri);
    startActivityForResult(it, REQUEST_TEXT);

19 打开另一程序
Intent i = new Intent();
ComponentName cn = new ComponentName("com.yellowbook.android2",
        "com.yellowbook.android2.AndroidSearch");
i.setComponent(cn);
i.setAction("android.intent.action.MAIN");
startActivityForResult(i, RESULT_OK);

20.调用系统编辑添加联系人(高版本SDK有效):
Intent it = newIntent(Intent.ACTION_INSERT_OR_EDIT);
it.setType("vnd.android.cursor.item/contact");
//it.setType(Contacts.CONTENT_ITEM_TYPE);
it.putExtra("name","myName");
it.putExtra(android.provider.Contacts.Intents.Insert.COMPANY,  "organization");
it.putExtra(android.provider.Contacts.Intents.Insert.EMAIL,"email");
it.putExtra(android.provider.Contacts.Intents.Insert.PHONE,"homePhone");
it.putExtra(android.provider.Contacts.Intents.Insert.SECONDARY_PHONE,
               "mobilePhone");
it.putExtra(  android.provider.Contacts.Intents.Insert.TERTIARY_PHONE,
               "workPhone");
it.putExtra(android.provider.Contacts.Intents.Insert.JOB_TITLE,"title");
startActivity(it);

21.调用系统编辑添加联系人(全有效):
Intent intent = newIntent(Intent.ACTION_INSERT_OR_EDIT);
intent.setType(People.CONTENT_ITEM_TYPE);
intent.putExtra(Contacts.Intents.Insert.NAME, "My Name");
intent.putExtra(Contacts.Intents.Insert.PHONE, "+1234567890");
intent.putExtra(Contacts.Intents.Insert.PHONE_TYPE,Contacts.PhonesColumns.TYPE_MOBILE);
intent.putExtra(Contacts.Intents.Insert.EMAIL, "com@com.com");
intent.putExtra(Contacts.Intents.Insert.EMAIL_TYPE,                    Contacts.ContactMethodsColumns.TYPE_WORK);
startActivity(intent);
UI控件
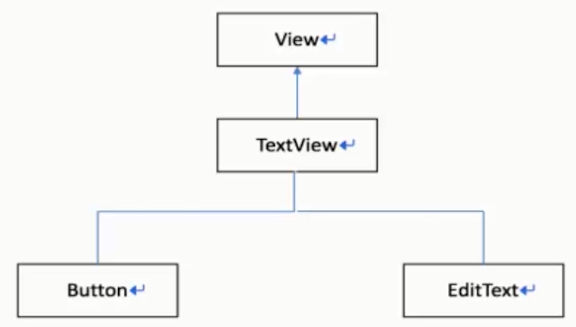
View
处理文本内容的View(TextView)
被点击的View(Button)
处理图片内容的View(ImageView)
接收用户信息输入的View(EditText)
进度条类的View(ProgressBar)
通用属性
TextView
TextView的继承关系
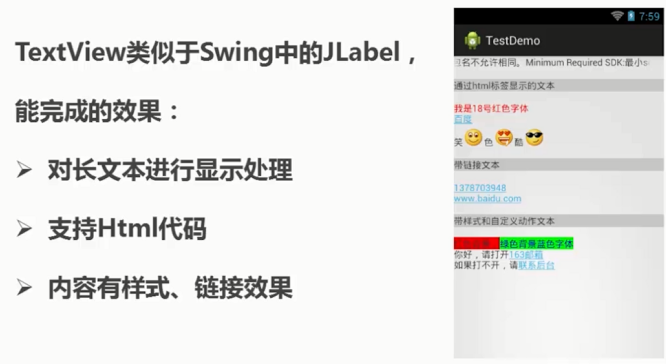
长文本处理
新建Activity
文本资源
res目录的values目录下
strings.xml
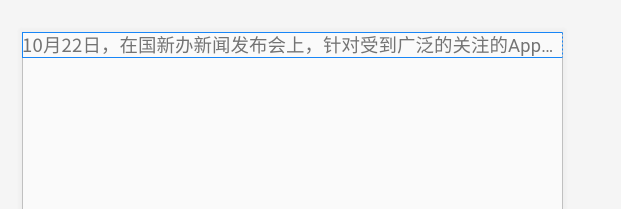
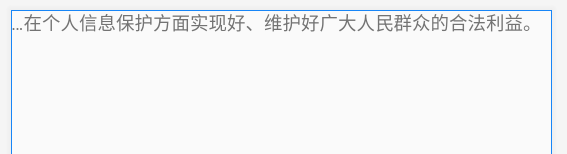
<resources>
    <string name="app_name">My Application</string>
    <string name="long_txt">
        10月22日,在国新办新闻发布会上,针对受到广泛的关注的App违规收集使用个人信息的问题,工业和信息化部新闻发言人、信息通信发展司司长闻库表示,当前工信部里已经完成了国内主流应用商店32万款APP的技术检测工作,督促1100多家企业进行整改。
        闻库表示,工业和信息化部作为电信行业的主管部门,非常重视电信和互联网领域个人用户信息保护工作,严格贯彻落实《网络安全法》,颁布实施了《电信和互联网用户个人信息保护规定》和智能终端、应用程序等重点领域个人信息保护制度;并依法履职主动作为,按照“发现、取证、处置、曝光”工作机制,强化监督检查,聚焦大家所反映热烈的、社会也高度关注的APP侵害用户权益的行为。已经连续两年组织开展了相关的整治行动,持续加大个人信息的保护力度。
        闻库表示,去年,工信部重点整治了“私自收集个人信息”“超范围收集个人信息”“不给权就不让使用App”“过度索取权限”等8类损害用户权益的行为。
        闻库表示,今年,工信部在去年工作的基础上,还加强对App常使用的SDK以及应用分发平台的监管,重点针对“APP、SDK违规处理个人用户信息”“设置障碍、频繁骚扰用户”“欺骗误导用户”“应用分发平台责任落实不到位”等四个方面10类问题进行集中专项整治。
        闻库表示,目前,工信部里已经完成了国内主流应用商店32万款App的技术检测工作,督促1100多家企业进行整改,公开通报了246款未在期限内完成整改的App。根据整改的情况,下架了34款拒不整改的App。这项工作取得了很大成效,社会上对这项工作寄予了很大的期望。
        闻库表示,下一步,工信部将继续坚持以人民为中心,以老百姓和社会反映的问题为导向,积极从完善制度规范、加强常态化监管、提升技术检测能力、推动行业自律等多个方面,进一步加大工作力度,切实在个人信息保护方面实现好、维护好广大人民群众的合法利益。
    </string>
</resources>
布局文件里引用
<?xml version="1.0" encoding="utf-8"?>
<LinearLayout xmlns:android="http://schemas.android.com/apk/res/android"
    xmlns:app="http://schemas.android.com/apk/res-auto"
    xmlns:tools="http://schemas.android.com/tools"
    android:layout_width="match_parent"
    android:layout_height="match_parent"
    tools:context="com.example.TextActivity">
    <!--
        android:textSize="5sp" 字体大小
        android:textColor="#00ffff" 字体颜色
        android:lineSpacingMultiplier="2" 倍距
     -->
    <TextView
        android:layout_width="match_parent"
        android:layout_height="match_parent"
        android:text="@string/long_txt"
        android:textSize="5sp"
        android:textColor="#00ffff"
        android:lineSpacingMultiplier="2"/>
</LinearLayout>
如果文字太多,一屏显示不过来怎么办?
使用滚动条。
<?xml version="1.0" encoding="utf-8"?>
<ScrollView xmlns:android="http://schemas.android.com/apk/res/android"
    xmlns:app="http://schemas.android.com/apk/res-auto"
    xmlns:tools="http://schemas.android.com/tools"
    android:layout_width="match_parent"
    android:layout_height="match_parent"
    tools:context="com.example.TextActivity">
    <!--
        android:textSize="5sp" 字体大小
        android:textColor="#00ffff" 字体颜色
        android:lineSpacingMultiplier="2" 倍距
     -->
    <TextView
        android:layout_width="match_parent"
        android:layout_height="match_parent"
        android:text="@string/long_txt"
        android:textSize="5sp"
        android:textColor="#00ffff"
        android:lineSpacingMultiplier="2"/>
</ScrollView>
ScrollView 中只能有一个直接子空间,因此不能放两个 TextView,如果想放请在外部先放一个布局
可以只显示一行
       <TextView
        android:layout_width="match_parent"
        android:layout_height="match_parent"
        android:text="@string/long_txt"
        android:singleLine="true" />
可以控制上面的省略号
    <!--
        android:singleLine="true"  单行显示
        android:ellipsize="start" 省略号显示位置
     -->
    <TextView
        android:layout_width="match_parent"
        android:layout_height="match_parent"
        android:text="@string/long_txt"
        android:singleLine="true"
        android:ellipsize="start"/>
可以设置跑马灯
    <!--
        android:ellipsize="marquee"
        android:focusable="true" 设置可以获取焦点
        android:focusableInTouchMode="true" 设置触摸时可以获取焦点
        android:marqueeRepeatLimit="marquee_forever" 设置跑马灯设置时长
     -->
    <TextView
        android:layout_width="match_parent"
        android:layout_height="match_parent"
        android:text="@string/long_txt"
        android:singleLine="true"
        android:ellipsize="marquee"
        android:focusable="true"
        android:focusableInTouchMode="true"
        android:marqueeRepeatLimit="marquee_forever"/>
TextView的文字动态赋值,高版本直接写在布局Xml里面已经不生效了,需要先给TextView赋值,然后再在代码里面重新把属性设置一遍:

    public static void setTextMarquee(TextView textView) {
        if (textView != null) {
            textView.setEllipsize(TextUtils.TruncateAt.MARQUEE);
            textView.setSingleLine(true);
            textView.setSelected(true);
            textView.setFocusable(true);
            textView.setFocusableInTouchMode(true);
        }
    }
EditText
输入框
    <!--
        android:inputType 输入类型
        textPassword 密码
        number 正整数
        numberSigned 整数
        numberDecimal 小数
     -->
    <EditText
        android:layout_width="match_parent"
        android:layout_height="wrap_content"
        android:layout_marginTop="200dp"
        android:layout_marginLeft="20dp"
        android:layout_marginRight="20dp"
        android:inputType="textEmailAddress"/>
设置提示
设置最大长度
    <EditText
        android:layout_width="match_parent"
        android:layout_height="wrap_content"
        android:layout_marginTop="40dp"
        android:layout_marginLeft="20dp"
        android:layout_marginRight="20dp"
        android:inputType="textEmailAddress"
        android:hint="Email"
        android:gravity="center"
        android:textColorHint="#cccccc"
        android:maxLength="12"/>
gravity是设置自身内部元素的对齐方式。比如一个TextView,则是设置内部文字的对齐方式。如果是ViewGroup组件如LinearLayout的话,则为设置它内部view组件的对齐方式。
layout_gravity是设置自身相当于父容器的对齐方式。比如,一个TextView设置layout_gravity属性,则表示这TextView相对于父容器的对齐方式。
事件监听
四种实现
<?xml version="1.0" encoding="utf-8"?>
<LinearLayout xmlns:android="http://schemas.android.com/apk/res/android"
    xmlns:app="http://schemas.android.com/apk/res-auto"
    xmlns:tools="http://schemas.android.com/tools"
    android:layout_width="match_parent"
    android:layout_height="match_parent"
    tools:context="com.example.ButtonActivity"
    android:orientation="vertical">

    <Button
        android:id="@+id/btn1"
        android:layout_width="match_parent"
        android:layout_height="wrap_content"
        android:text="通过自定义内部类实现点击事件"/>
    <Button
        android:id="@+id/btn2"
        android:layout_width="match_parent"
        android:layout_height="wrap_content"
        android:text="通过自匿名内部类实现点击事件"/>
    <Button
        android:id="@+id/btn3"
        android:layout_width="match_parent"
        android:layout_height="wrap_content"
        android:text="通过当前Activity实现点击事件"/>
    <Button
        android:id="@+id/btn4"
        android:layout_width="match_parent"
        android:layout_height="wrap_content"
        android:text="XML中绑定"/>
</LinearLayout>
自定义内部类
public class ButtonActivity extends AppCompatActivity {

    @Override
    protected void onCreate(Bundle savedInstanceState) {
        super.onCreate(savedInstanceState);
        setContentView(R.layout.activity_button);
        // 1.获取按钮
        Button btn1 = findViewById(R.id.btn1);
        // 点击事件:被点击时触发的事件
        MyClickListener mc1 = new MyClickListener();
        // 2.为按钮注册点击事件监听器,参数是接口,下面用自定义内部类 MyClickListener 来实现该接口
        btn1.setOnClickListener(mc1);
    }
    // 自定义内部类
    class MyClickListener implements View.OnClickListener{
        // 点击按钮后执行的操作 onClick,即点击后的回调方法
        @Override
        public void onClick(View v) {
            // 弹出对话框
            new AlertDialog.Builder(ButtonActivity.this)
                    .setTitle("hello")
                    .setMessage("This is a button message!")
                    .setPositiveButton("确定", null)
                    .show();
        }
    }
}
匿名内部类
public class ButtonActivity extends AppCompatActivity {

    @Override
    protected void onCreate(Bundle savedInstanceState) {
        super.onCreate(savedInstanceState);
        setContentView(R.layout.activity_button);
        // 1.获取按钮
        Button btn2 = findViewById(R.id.btn2);

        // 2.为按钮注册点击事件监听器,使用匿名内部类
        btn2.setOnClickListener(new View.OnClickListener() {
            @Override
            public void onClick(View v) {
                new AlertDialog.Builder(ButtonActivity.this)
                        .setTitle("hello")
                        .setMessage("This is a button message!")
                        .setPositiveButton("确定", null)
                        .show();
            }
        });
    }
}
适合有唯一操作的按钮
通过当前Activity实现点击事件
可以自己实现接口,然后注册自己就可以了
public class ButtonActivity extends AppCompatActivity implements View.OnClickListener {

    @Override
    protected void onCreate(Bundle savedInstanceState) {
        super.onCreate(savedInstanceState);
        setContentView(R.layout.activity_button);
        // 1.获取按钮
        Button btn3 = findViewById(R.id.btn3);

        // 2.为按钮注册点击事件监听器
        btn3.setOnClickListener(this);
    }

    @Override
    public void onClick(View v) {
        new AlertDialog.Builder(ButtonActivity.this)
                .setTitle("hello")
                .setMessage("This is a button message!")
                .setPositiveButton("确定", null)
                .show();
    }
}
在XML中绑定
    <Button
        android:id="@+id/btn4"
        android:layout_width="match_parent"
        android:layout_height="wrap_content"
        android:text="XML中绑定"
        android:onClick="myClick"/>
频繁使用
public class ButtonActivity extends AppCompatActivity{

    @Override
    protected void onCreate(Bundle savedInstanceState) {
        super.onCreate(savedInstanceState);
        setContentView(R.layout.activity_button);
    }

    // 在XML中注册
    public void myClick(View v) {
        new AlertDialog.Builder(ButtonActivity.this)
                .setTitle("hello")
                .setMessage("This is a button message!")
                .setPositiveButton("确定", null)
                .show();
    }
}
你会发现代码中只定义了方法并没有调用
参数 View 类型,Button继承了该类,不仅Button有点击事件,其他View类也有。
多个按钮
    <Button
        android:id="@+id/btn4"
        android:layout_width="match_parent"
        android:layout_height="wrap_content"
        android:text="btn4:XML中绑定"
        android:onClick="myClick"/>
    <Button
        android:id="@+id/btn5"
        android:layout_width="match_parent"
        android:layout_height="wrap_content"
        android:text="btn5:XML中绑定"
        android:onClick="myClick"/>
public class ButtonActivity extends AppCompatActivity{

    @Override
    protected void onCreate(Bundle savedInstanceState) {
        super.onCreate(savedInstanceState);
        setContentView(R.layout.activity_button);
    }

    // 在XML中注册
    public void myClick(View v) {
        switch (v.getId()){
            case R.id.btn4:
                new AlertDialog.Builder(ButtonActivity.this)
                        .setTitle("hello")
                        .setMessage("This is a btn4 message!")
                        .setPositiveButton("确定", null)
                        .show();
                break;
            case R.id.btn5:
                new AlertDialog.Builder(ButtonActivity.this)
                        .setTitle("hello")
                        .setMessage("This is a btn5 message!")
                        .setPositiveButton("确定", null)
                        .show();
                break;
        }
    }
}
ImageView
显示和控制图像的空间,可以放大、缩小、旋转
常用属性
android:src
android:background
将图片放在资源文件夹中
图片命名:小写英文字母、数字(不能开头)、下划线
文件夹
mipmap 图片暂时都放该文件夹
drawable
    <!--
          android:src 指定前景图片资源,会保持图片比例,不会变形
          android:background 设置背景,图片会变形
     -->
    <ImageView
        android:layout_width="wrap_content"
        android:layout_height="wrap_content"
        android:src="@mipmap/ic_launcher_round"
        android:background="@mipmap/ic_launcher"
        android:layout_marginTop="10dp"
        android:layout_marginLeft="50dp"/>
    <!-- 带图片的按钮 -->
    <ImageButton
        android:layout_width="wrap_content"
        android:layout_height="wrap_content"
        android:src="@mipmap/ic_launcher"
        android:layout_marginTop="5dp"
        android:layout_marginLeft="50dp"/>
ProgressBar
进度条,默认是圆形,没有刻度,只是一个不断旋转的动画效果。通过设置style,可以显示传统的水平刻度进度条。

<?xml version="1.0" encoding="utf-8"?>
<LinearLayout xmlns:android="http://schemas.android.com/apk/res/android"
    xmlns:app="http://schemas.android.com/apk/res-auto"
    xmlns:tools="http://schemas.android.com/tools"
    android:layout_width="match_parent"
    android:layout_height="match_parent"
    tools:context="com.example.ProgressBar">

    <!--
        进度条:默认样式是转圈
    -->
    <ProgressBar
        android:layout_width="wrap_content"
        android:layout_height="wrap_content" />
</LinearLayout>
可以修改风格
<?xml version="1.0" encoding="utf-8"?>
<LinearLayout xmlns:android="http://schemas.android.com/apk/res/android"
    xmlns:app="http://schemas.android.com/apk/res-auto"
    xmlns:tools="http://schemas.android.com/tools"
    android:layout_width="match_parent"
    android:layout_height="match_parent"
    tools:context="com.example.ProgressBar"
    android:orientation="vertical">

    <!--
        style设置风格 progressBarStyleHorizontal 水平进度条
        android:progress="30" 设置进度
        android:max="200" 设置最大值
    -->
    <ProgressBar
        android:layout_width="wrap_content"
        android:layout_height="wrap_content"
        style="?android:attr/progressBarStyleHorizontal"
        android:progress="30"
        android:max="200"/>

    <!--
        android:indeterminate="true" 永恒滚动
    -->
    <ProgressBar
        android:layout_width="wrap_content"
        android:layout_height="wrap_content"
        style="?android:attr/progressBarStyleHorizontal"
        android:indeterminate="true"/>
</LinearLayout>
使用代码操作进度条的进度
    <ProgressBar
        android:id="@+id/pb1"
        android:layout_width="wrap_content"
        android:layout_height="wrap_content"
        style="?android:attr/progressBarStyleHorizontal"/>
新建一个线程,专门操作进度条,每30毫秒进度条加1
public class ProgressBarActivity extends AppCompatActivity {

    @Override
    protected void onCreate(Bundle savedInstanceState) {
        super.onCreate(savedInstanceState);
        setContentView(R.layout.activity_progress_bar);

        final ProgressBar pb = findViewById(R.id.pb1);
        pb.setProgress(80);
        new Thread(){
            @Override
            public void run() {
                for (int i=1; i<100; i++){
                    pb.setProgress(i);
                    try {
                        Thread.sleep(30);
                    } catch (InterruptedException e) {
                        e.printStackTrace();
                    }
                }
            }
        }.start();
    }
}
注意:Android4以后是不能直接在线程中操作控件的,否则程序崩溃。进度条是个特例。
Menu
3.0是个分水岭
3.0当用户按”菜单“按钮时,选项菜单的内容会出现在屏幕底部,可包含多达6个菜单项,超出部分则以”更多“来显示。
3.0以后,选项菜单中的项目将出现在操作栏中,用户可以使用操作栏右侧的图标或者按设备的菜单键显示操作溢出菜单。
分类
- 选项菜单 option menu
- 上下文菜单 context menu
- 弹出菜单 popup menu
选项菜单
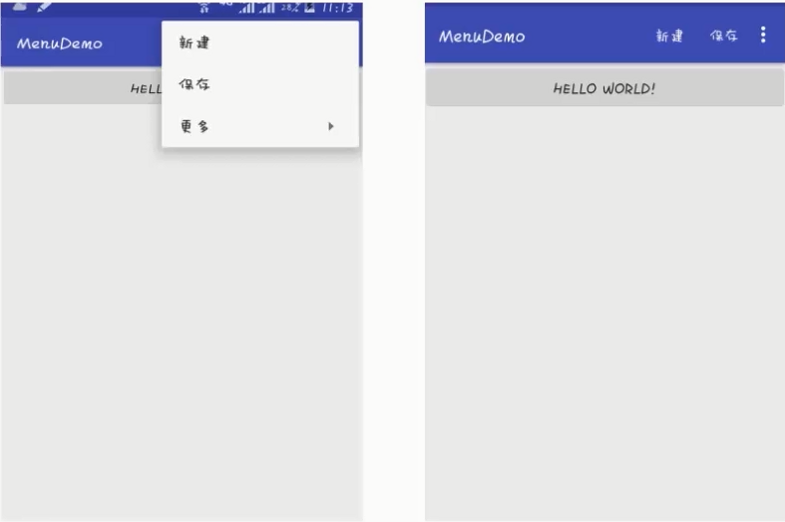
选项菜单是一个应用的主菜单项,用于放置对应用产生全局影响的操作
创建
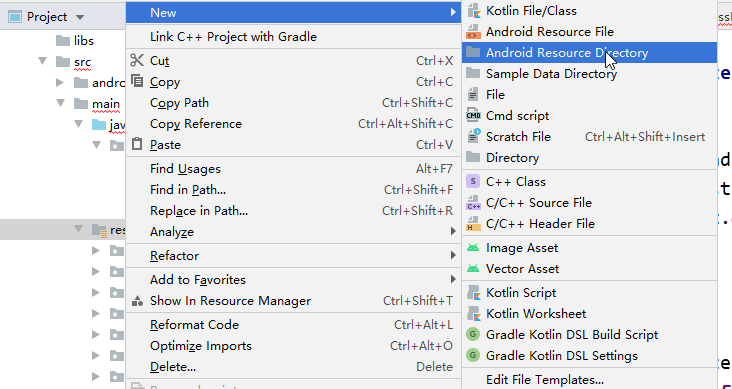
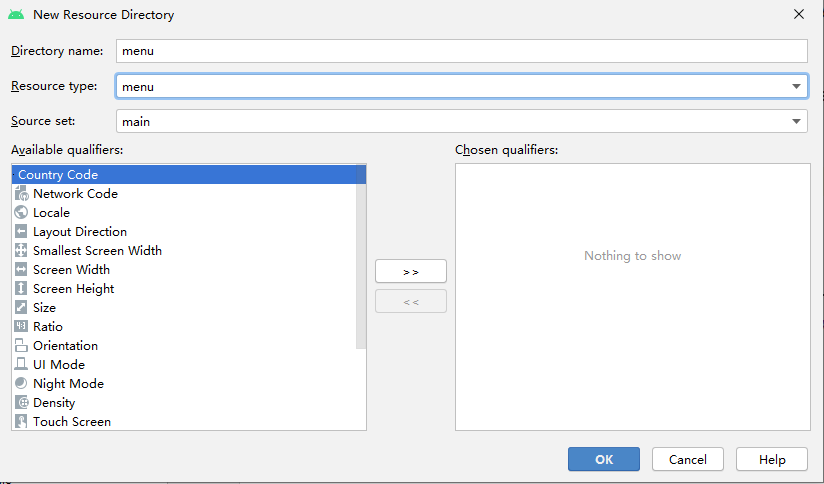
新建资源目录
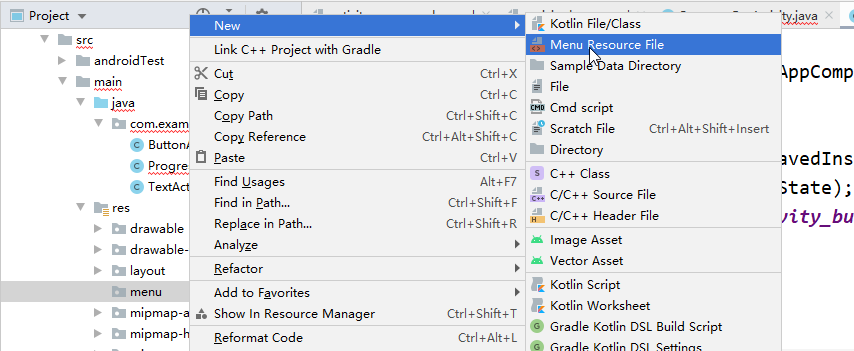
然后,新建menu resource file
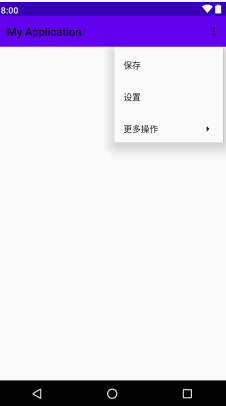
<?xml version="1.0" encoding="utf-8"?>
<menu xmlns:android="http://schemas.android.com/apk/res/android">
    <item android:title="保存"/>
    <item android:title="设置"/>
    <item android:title="更多操作">
        <!-- 子菜单 -->
        <menu>
            <item android:title="子菜单1"/>
            <item android:title="子菜单2"/>
            <item android:title="子菜单3"/>
        </menu>
    </item>
</menu>
显示到页面中,代码操作
public class MainActivity extends AppCompatActivity {

    @Override
    protected void onCreate(Bundle savedInstanceState) {
        super.onCreate(savedInstanceState);
        setContentView(R.layout.activity_main);
    }

    // 覆盖下面方法
    @Override
    public boolean onCreateOptionsMenu(Menu menu) {
        // 加载菜单资源
        getMenuInflater().inflate(R.menu.option, menu);
        return true;
    }
}
属性
显示图标,always总是显示,直接在标题栏显示
    <item android:title="保存"
        android:icon="@mipmap/ic_launcher"
        app:showAsAction="always"
        />
同时显示图标和文本
    <item android:title="保存"
        android:icon="@mipmap/ic_launcher"
        app:showAsAction="always|withText"
        />
ifRoom 有空间就显示
选中menu时操作
添加id
<?xml version="1.0" encoding="utf-8"?>
<menu xmlns:android="http://schemas.android.com/apk/res/android"
    xmlns:app="http://schemas.android.com/apk/res-auto">
    <item android:title="保存"
        android:id="@+id/save"
        android:icon="@mipmap/ic_launcher"
        app:showAsAction="always|withText"
        />
    <item android:title="设置" android:id="@+id/setting"/>
    <item android:title="更多操作">
        <!-- 子菜单 -->
        <menu>
            <item android:title="退出" android:id="@+id/exit"/>
            <item android:title="子菜单2"/>
            <item android:title="子菜单3"/>
        </menu>
    </item>
</menu>
public class MainActivity extends AppCompatActivity {

    @Override
    protected void onCreate(Bundle savedInstanceState) {
        super.onCreate(savedInstanceState);
        setContentView(R.layout.activity_main);
    }

    // 覆盖下面方法
    @Override
    public boolean onCreateOptionsMenu(Menu menu) {
        // 加载菜单资源
        getMenuInflater().inflate(R.menu.option, menu);
        return true;
    }

    @Override
    public boolean onOptionsItemSelected(@NonNull MenuItem item) {
        switch (item.getItemId()){
            case R.id.save:
                Toast.makeText(this, "保存", Toast.LENGTH_SHORT).show();
                break;
            case R.id.exit:
                finish();
                break;
        }
        return super.onOptionsItemSelected(item);
    }
}
上下文Menu
长按某个view不放,就会在屏幕出现上下文菜单
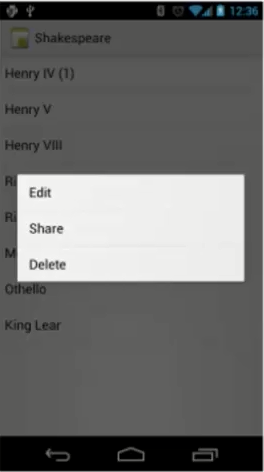
public class MainActivity extends AppCompatActivity {

    @Override
    protected void onCreate(Bundle savedInstanceState) {
        super.onCreate(savedInstanceState);
        setContentView(R.layout.activity_main);
        // 1.注册
        registerForContextMenu(findViewById(R.id.button1));
        // 2.创建,覆盖 onCreateContextMenu
        // 3.菜单项的操作,覆盖 onContextItemSelected

    }// 上下菜单的创建
    @Override
    public void onCreateContextMenu(ContextMenu menu, View v, ContextMenu.ContextMenuInfo menuInfo) {
        getMenuInflater().inflate(R.menu.context, menu);
    }

    @Override
    public boolean onContextItemSelected(@NonNull MenuItem item) {
        switch (item.getItemId()){
            case R.id.delete:
                Toast.makeText(this, "已删除", Toast.LENGTH_SHORT).show();
                break;
            case R.id.rename:
                Toast.makeText(this, "请输入名字", Toast.LENGTH_SHORT).show();
                break;
        }
        return super.onContextItemSelected(item);
    }

}
上下文操作模式
public class MainActivity extends AppCompatActivity {

    @Override
    protected void onCreate(Bundle savedInstanceState) {
        super.onCreate(savedInstanceState);
        setContentView(R.layout.activity_main);
// 4.1 实现接口 ActionMode CallBack
        // 4.2 在view的长按事件中启动上下文操作模式
        findViewById(R.id.button1).setOnLongClickListener(new View.OnLongClickListener() {
            @Override
            public boolean onLongClick(View v) {
                startActionMode(cb);
                return false;
            }
        });
    }

    ActionMode.Callback cb = new ActionMode.Callback() {
        // 创建,在启动上下文操作模式(startActionMode(Callback))时调用
        // 返回 true
        @Override
        public boolean onCreateActionMode(ActionMode mode, Menu menu) {
            getMenuInflater().inflate(R.menu.context, menu);
            return true;
        }
        // 在创建方法后调用
        @Override
        public boolean onPrepareActionMode(ActionMode mode, Menu menu) {
            return false;
        }

        // 菜单项被点击
        @Override
        public boolean onActionItemClicked(ActionMode mode, MenuItem item) {
            switch (item.getItemId()){
                case R.id.delete:
                    Toast.makeText(MainActivity.this, "已删除", Toast.LENGTH_SHORT).show();
                    break;
                case R.id.rename:
                    Toast.makeText(MainActivity.this, "请输入名字", Toast.LENGTH_SHORT).show();
                    break;
            }
            return true;
        }
        // 上下文操作模式结束时被调用
        @Override
        public void onDestroyActionMode(ActionMode mode) {
            Toast.makeText(MainActivity.this, "已结束", Toast.LENGTH_SHORT).show();
        }
    };
弹出菜单
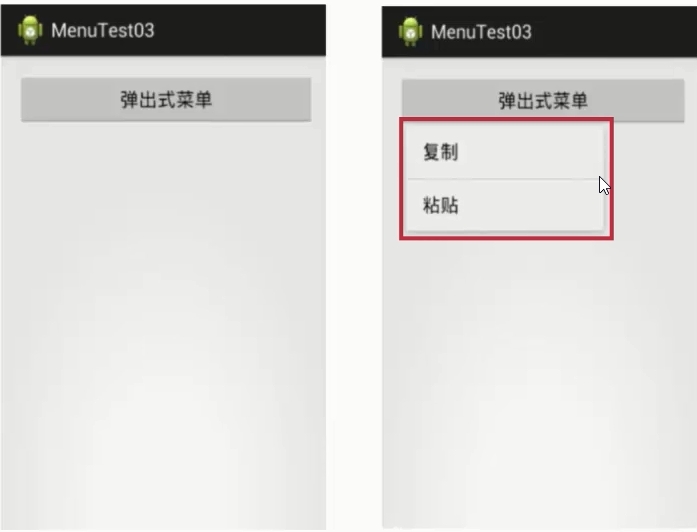
一个模态形式展示的弹出风格菜单,绑在某个View上,一般出现在被绑定的View下方
绑定在点击事件上
布局文件中的按钮
    <Button
        android:id="@+id/button2"
        android:layout_width="wrap_content"
        android:layout_height="wrap_content"
        android:text="弹出菜单"/>
菜单资源文件
<?xml version="1.0" encoding="utf-8"?>
<menu xmlns:android="http://schemas.android.com/apk/res/android">
    <item android:title="保存" android:id="@+id/save"/>
    <item android:title="删除" android:id="@+id/delete"/>
</menu>
代码
public class MainActivity extends AppCompatActivity {

    @Override
    protected void onCreate(Bundle savedInstanceState) {
        super.onCreate(savedInstanceState);
        setContentView(R.layout.activity_main);
        final Button popupBtn = findViewById(R.id.button2);
        // 按钮的监听
        popupBtn.setOnClickListener(new View.OnClickListener() {
            @Override
            public void onClick(View v) {
                // 1) 实例化PopupMenu对象,参数二是被锚定的view
                PopupMenu popupMenu = new PopupMenu(MainActivity.this, popupBtn);
                // 2) 加载菜单资源:利用Menuflater将menu资源加载到PopupMenu.getMenu()所返回的Menu对象中
                // 将R.menu.xx对于菜单的资源加载到弹出式菜单中,即第一个参数加载到第二个参数
                popupMenu.getMenuInflater().inflate(R.menu.popup, popupMenu.getMenu());
                // 菜单的监听
                // 3) 为PopupMenu设置点击监听器
                popupMenu.setOnMenuItemClickListener(new PopupMenu.OnMenuItemClickListener() {
                    @Override
                    public boolean onMenuItemClick(MenuItem item) {
                        switch (item.getItemId()){
                            case R.id.delete:
                                Toast.makeText(MainActivity.this, "已删除", Toast.LENGTH_SHORT).show();
                                break;
                            case R.id.save:
                                Toast.makeText(MainActivity.this, "已保存", Toast.LENGTH_SHORT).show();
                                break;
                        }
                        return false;
                    }
                });
                // 4) show,千万不能忘
                popupMenu.show();
            }
        });
    }
}
对话框
消息提示机制,常用于向用户传递信息、提示或警告用户的行动。通用方法:
- setTitle
- setMessage
- create
- show
<?xml version="1.0" encoding="utf-8"?>
<LinearLayout xmlns:android="http://schemas.android.com/apk/res/android"
    xmlns:app="http://schemas.android.com/apk/res-auto"
    xmlns:tools="http://schemas.android.com/tools"
    android:layout_width="match_parent"
    android:layout_height="match_parent"
    tools:context="com.example.MainActivity">

    <Button
        android:id="@+id/normal_dialog_btn"
        android:layout_width="wrap_content"
        android:layout_height="wrap_content"
        android:text="显示一个普通的对话框"
        android:onClick="myClick" />

    <Button
        android:id="@+id/diy_dialog_btn"
        android:layout_width="wrap_content"
        android:layout_height="wrap_content"
        android:text="显示一个自定义对话框"
        android:onClick="myClick"/>

</LinearLayout>
public class MainActivity extends AppCompatActivity {

    @Override
    protected void onCreate(Bundle savedInstanceState) {
        super.onCreate(savedInstanceState);
        setContentView(R.layout.activity_main);
    }

    public void myClick(View view){
        switch (view.getId()){
            case R.id.normal_dialog_btn:
                // 1.实例化一个Builder
            // AlertDialog 的构造方法是protected的
                AlertDialog.Builder builder = new AlertDialog.Builder(this);
                // 2.设置对话框样式
                builder.setTitle("提示");
                builder.setMessage("您确定退出程序吗?");
                // 设置按钮
                builder.setPositiveButton("确定", new DialogInterface.OnClickListener() {
                    @Override
                    public void onClick(DialogInterface dialog, int which) {
                        finish();
                    }
                });
                // 取消,什么都不做
                builder.setNegativeButton("取消", null);
               // 3.显示
                builder.show();
                // 等价于
//                AlertDialog dialog = builder.create();
//                dialog.show();
                break;
            case R.id.diy_dialog_btn:

                break;
        }
    }
}
自定义对话框

- 设置布局
- 设置style
- 自定义Dialog
- 显示
素材


创建布局
dialog_layout.xml
<?xml version="1.0" encoding="utf-8"?>
<LinearLayout xmlns:android="http://schemas.android.com/apk/res/android"
    xmlns:app="http://schemas.android.com/apk/res-auto"
    xmlns:tools="http://schemas.android.com/tools"
    android:layout_width="match_parent"
    android:layout_height="match_parent"
    tools:context="com.example.MainActivity"
    android:orientation="vertical"
    android:gravity="center_horizontal"
    android:background="@mipmap/dialog_bg">

    <TextView
        android:layout_width="wrap_content"
        android:layout_height="wrap_content"
        android:text="宝宝,确定要退出吗?"
        android:textSize="34sp"
        android:textColor="#e61414"
        android:textStyle="bold"
        android:layout_marginTop="450dp"/>
    <LinearLayout
        android:layout_width="wrap_content"
        android:layout_height="wrap_content"
        android:orientation="horizontal"
        android:layout_margin="50dp">
        <Button
            android:id="@+id/yes_btn"
            android:layout_width="120dp"
            android:layout_height="50dp"
            android:background="@mipmap/yes_btn"/>
        <Button
            android:id="@+id/no_btn"
            android:layout_width="120dp"
            android:layout_height="50dp"
            android:background="@mipmap/no_btn"
            android:layout_marginLeft="20dp"/>
    </LinearLayout>
</LinearLayout>
style设置
去掉标题栏,去掉背景
<resources>

    <!-- Base application theme. -->
    <style name="AppTheme" parent="Theme.AppCompat.Light.DarkActionBar">
        <!-- Customize your theme here. -->
        <item name="colorPrimary">@color/colorPrimary</item>
        <item name="colorPrimaryDark">@color/colorPrimaryDark</item>
        <item name="colorAccent">@color/colorAccent</item>
    </style>
    <!-- 对话框风格体系 -->
    <style name="mydialog" parent="android:style/Theme.Dialog">
        <!-- 没有标题 -->
        <item name="android:windowNoTitle">true</item>
        <!-- 没有背景,即透明色 -->
        <item name="android:windowBackground">@android:color/transparent</item>
    </style>
</resources>
自定义类
参数一是环境上下文,参数二是上面的style
public class MyDialog extends Dialog {

    public MyDialog(@NonNull Context context, int themeResId) {
        super(context, themeResId);
        // 为对话框设置布局
        setContentView(R.layout.dialog_layout);
        findViewById(R.id.yes_btn).setOnClickListener(new View.OnClickListener() {
            @Override
            public void onClick(View v) {
                // 对话框没有finish方法
                System.exit(0);
            }
        });
        findViewById(R.id.no_btn).setOnClickListener(new View.OnClickListener() {
            @Override
            public void onClick(View v) {
                // 对话框消失
                dismiss();
            }
        });
    }
}
使用
public class MainActivity extends AppCompatActivity {

    @Override
    protected void onCreate(Bundle savedInstanceState) {
        super.onCreate(savedInstanceState);
        setContentView(R.layout.activity_main);
    }

    public void myClick(View view){
        switch (view.getId()){
            case R.id.normal_dialog_btn:
                // AlertDialog 的构造方法是protected的
                AlertDialog.Builder builder = new AlertDialog.Builder(this);
                builder.setTitle("提示");
                builder.setMessage("您确定退出程序吗?");
                builder.setPositiveButton("确定", new DialogInterface.OnClickListener() {
                    @Override
                    public void onClick(DialogInterface dialog, int which) {
                        finish();
                    }
                });
                // 取消,什么都不做
                builder.setNegativeButton("取消", null);
                builder.show();
                // 等价于
//                AlertDialog dialog = builder.create();
//                dialog.show();
                break;
            case R.id.diy_dialog_btn:
                MyDialog md = new MyDialog(this, R.style.mydialog);
                md.show();
                break;
        }
    }
}
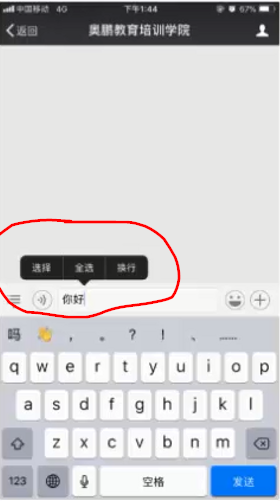
PopupWindow
使用步骤:
- 1.创建PopupWindow对象实例
- 2.设置背景、注册事件监听器和添加动画
- 3.显式PopupWindow
控制出现的位置和出现的方式
布局文件 activity_main.xml
<?xml version="1.0" encoding="utf-8"?>
<LinearLayout xmlns:android="http://schemas.android.com/apk/res/android"
    xmlns:app="http://schemas.android.com/apk/res-auto"
    xmlns:tools="http://schemas.android.com/tools"
    android:layout_width="match_parent"
    android:layout_height="match_parent"
    tools:context="com.example.MainActivity"
    android:orientation="vertical">

    <Button
        android:id="@+id/normal_dialog_btn"
        android:layout_width="match_parent"
        android:layout_height="wrap_content"
        android:text="显示一个普通的对话框"
        android:onClick="myClick" />

    <Button
        android:id="@+id/diy_dialog_btn"
        android:layout_width="match_parent"
        android:layout_height="wrap_content"
        android:text="显示一个自定义对话框"
        android:onClick="myClick"/>

    <Button
        android:id="@+id/popup_btn"
        android:layout_width="wrap_content"
        android:layout_height="wrap_content"
        android:text="显式弹窗"
        android:layout_gravity="center_horizontal"
        android:onClick="myClick"/>

</LinearLayout>
弹窗布局文件popup_layout.xml
<?xml version="1.0" encoding="utf-8"?>
<LinearLayout
    xmlns:android="http://schemas.android.com/apk/res/android"
    android:layout_width="match_parent"
    android:layout_height="wrap_content"
    android:orientation="horizontal"
    android:background="#00ffff"
    android:padding="2dp">

    <TextView
        android:id="@+id/choose"
        android:layout_width="60dp"
        android:layout_height="30dp"
        android:text="选择"
        android:textColor="#ffffff"
        android:gravity="center"
        android:background="#000000"/>
    <TextView
        android:id="@+id/selectall"
        android:layout_width="60dp"
        android:layout_height="30dp"
        android:text="全选"
        android:textColor="#ffffff"
        android:gravity="center"
        android:background="#000000"/>
    <TextView
        android:id="@+id/copy"
        android:layout_width="60dp"
        android:layout_height="30dp"
        android:text="复制"
        android:textColor="#ffffff"
        android:gravity="center"
        android:background="#000000"/>
</LinearLayout>
代码
public class MainActivity extends AppCompatActivity {

    @Override
    protected void onCreate(Bundle savedInstanceState) {
        super.onCreate(savedInstanceState);
        setContentView(R.layout.activity_main);
    }

    public void myClick(View view){
        switch (view.getId()){
            case R.id.normal_dialog_btn:
                // AlertDialog 的构造方法是protected的
                AlertDialog.Builder builder = new AlertDialog.Builder(this);
                builder.setTitle("提示");
                builder.setMessage("您确定退出程序吗?");
                builder.setPositiveButton("确定", new DialogInterface.OnClickListener() {
                    @Override
                    public void onClick(DialogInterface dialog, int which) {
                        finish();
                    }
                });
                // 取消,什么都不做
                builder.setNegativeButton("取消", null);
                builder.show();
                // 等价于
//                AlertDialog dialog = builder.create();
//                dialog.show();
                break;
            case R.id.diy_dialog_btn:
                MyDialog md = new MyDialog(this, R.style.mydialog);
                md.show();
                break;
            case R.id.popup_btn:
                showPopupWindow(view);
                break;
        }
    }

    // 设置popupWindow
    public void showPopupWindow(View view){
        // 准备弹出所需要的视图对象
        View v = LayoutInflater.from(this).inflate(R.layout.popup_layout, null);
        // 1.实例化对象

        // 参数1:用在弹窗中的view
        // 参数2、3:弹窗的宽高
        // 参数4(focusable):能否获取焦点
        final PopupWindow window = new PopupWindow(v, 520, 100, true);
        // 2.设置(背景,图画) 不设置,点屏幕弹窗框不消失
        // 设置背景
        window.setBackgroundDrawable(new ColorDrawable(Color.TRANSPARENT));
        // 设置能响应外部的点击事件
        window.setOutsideTouchable(true);
        // 设置能响应点击事件
        window.setTouchable(true);
        // 3.显示
        // 参数1:anchor,锚,这里以按钮为参照物
        // 参数2、3:相对于锚在x、y方向的偏移量
        window.showAsDropDown(view, 20, 20);
        // 为弹窗中的文本添加点击事件
        // 如果直接findViewById()是在activity_main中找
        v.findViewById(R.id.choose).setOnClickListener(new View.OnClickListener() {
            @Override
            public void onClick(View v) {
                Toast.makeText(MainActivity.this, "您点击了选择", Toast.LENGTH_SHORT ).show();
                // 弹窗消失
                window.dismiss();
            }
        });
        v.findViewById(R.id.selectall).setOnClickListener(new View.OnClickListener() {
            @Override
            public void onClick(View v) {
                Toast.makeText(MainActivity.this, "您点击了全选", Toast.LENGTH_SHORT ).show();
                window.dismiss();
            }
        });
        v.findViewById(R.id.copy).setOnClickListener(new View.OnClickListener() {
            @Override
            public void onClick(View v) {
                Toast.makeText(MainActivity.this, "您点击了复制", Toast.LENGTH_SHORT ).show();
                window.dismiss();
            }
        });
可以添加动画
创建动画资源文件
新建动画资源目录 anim,文件translate_anim.xml
<?xml version="1.0" encoding="utf-8"?>
<set xmlns:android="http://schemas.android.com/apk/res/android">
    <translate
        android:fromXDelta="0"
        android:toXDelta="0"
        android:fromYDelta="300"
        android:toYDelta="0"
        android:duration="2000"
        ></translate>
</set>
styles.xml中添加
    <style name="translate_anim">
        <item name="android:windowEnterAnimation">@anim/translate_anim</item>
    </style>
代码
 // 设置popupWindow
    public void showPopupWindow(View view){
        // 准备弹出所需要的视图对象
        View v = LayoutInflater.from(this).inflate(R.layout.popup_layout, null);
        // 1.实例化对象

        // 参数1:用在弹窗中的view
        // 参数2、3:弹窗的宽高
        // 参数4(focusable):能否获取焦点
        final PopupWindow window = new PopupWindow(v, 520, 100, true);
        // 2.设置(背景,图画)
        // 设置背景
        window.setBackgroundDrawable(new ColorDrawable(Color.TRANSPARENT));
        // 设置能响应外部的点击事件
        window.setOutsideTouchable(true);
        // 设置能响应点击事件
        window.setTouchable(true);
        // 1.创建动画资源 2.创建一个style应用动画资源 3.对当前弹窗的动画设置为第二步的资源索引
        window.setAnimationStyle(R.style.translate_anim);
        // 3.显示
        // 参数1:anchor,锚,这里以按钮为参照物
        // 参数2、3:相对于锚在x、y方向的偏移量
        window.showAsDropDown(view, 20, 20);
        // 为弹窗中的文本添加点击事件
        // 如果直接findViewById()是在activity_main中找
        v.findViewById(R.id.choose).setOnClickListener(new View.OnClickListener() {
            @Override
            public void onClick(View v) {
                Toast.makeText(MainActivity.this, "您点击了选择", Toast.LENGTH_SHORT ).show();
                // 弹窗消失
                window.dismiss();
            }
        });
        v.findViewById(R.id.selectall).setOnClickListener(new View.OnClickListener() {
            @Override
            public void onClick(View v) {
                Toast.makeText(MainActivity.this, "您点击了全选", Toast.LENGTH_SHORT ).show();
                window.dismiss();
            }
        });
        v.findViewById(R.id.copy).setOnClickListener(new View.OnClickListener() {
            @Override
            public void onClick(View v) {
                Toast.makeText(MainActivity.this, "您点击了复制", Toast.LENGTH_SHORT ).show();
                window.dismiss();
            }
        });
    }
ArrayAdapter
数组适配器,只能用来显示单一的文本。构造方法:
ArrayAdapter(Context context, int resource, int textviewId, List<T> objects)
    <Button
        android:id="@+id/btn6"
        android:layout_width="wrap_content"
        android:layout_height="wrap_content"
        android:layout_gravity="center_horizontal"
        android:text="数组适配器"
        android:onClick="myClick"/>
public class MainActivity extends AppCompatActivity {

    @Override
    protected void onCreate(Bundle savedInstanceState) {
        super.onCreate(savedInstanceState);
        setContentView(R.layout.activity_main);
    }

    public void myClick(View view){
        switch (view.getId()){
            case R.id.normal_dialog_btn:
                // AlertDialog 的构造方法是protected的
                AlertDialog.Builder builder = new AlertDialog.Builder(this);
                builder.setTitle("提示");
                builder.setMessage("您确定退出程序吗?");
                builder.setPositiveButton("确定", new DialogInterface.OnClickListener() {
                    @Override
                    public void onClick(DialogInterface dialog, int which) {
                        finish();
                    }
                });
                // 取消,什么都不做
                builder.setNegativeButton("取消", null);
                builder.show();
                // 等价于
//                AlertDialog dialog = builder.create();
//                dialog.show();
                break;
            case R.id.diy_dialog_btn:
                MyDialog md = new MyDialog(this, R.style.mydialog);
                md.show();
                break;
            case R.id.popup_btn:
                showPopupWindow(view);
                break;
            case R.id.btn6:
                showArrayDialog();
                break;
        }
    }

    private void showArrayDialog(){
        final String[] items = {"Java", "Mysql", "C"};
        // 数组适配器
        // 参数1:环境
        // 参数2:布局资源索引,指的是每一项数据所呈现的样式 android.R.layout.xxx
        // 参数3:数据源
        ArrayAdapter adpter = new ArrayAdapter(this,android.R.layout.simple_dropdown_item_1line, items);

        AlertDialog.Builder builder = new AlertDialog.Builder(this)
                .setTitle("请选择")
                .setAdapter(adpter, null); // 参数1:适配器对象(对数据显示样式的规则指定器) 参数2:监听器
        builder.show();
    }


}
但是上面只能显示文字,不能显示图片
自定义布局
<?xml version="1.0" encoding="utf-8"?>
<LinearLayout xmlns:android="http://schemas.android.com/apk/res/android"
    android:layout_width="match_parent"
    android:layout_height="wrap_content"
    android:orientation="horizontal"
    android:padding="10dp"
    android:gravity="center_vertical">

    <ImageView
        android:layout_width="40dp"
        android:layout_height="40dp"
        android:src="@mipmap/star"/>

    <TextView
        android:id="@+id/item_txt"
        android:layout_width="wrap_content"
        android:layout_height="wrap_content"
        android:text="测试"/>

</LinearLayout>
修改代码
ArrayAdapter adpter = new ArrayAdapter(this,android.R.layout.simple_dropdown_item_1line, items);
android.R.layout.simple_dropdown_item_1line ,你会发现其根元素是TextView
而我们这里为了显示图片,肯定不能是TextView,那就指出TextView,否则会出错,下面的id就是TextView的id
参数二为自定义布局,参数三修改为textView的id了:
        // 参数3:数据源
        //ArrayAdapter adpter = new ArrayAdapter(this,android.R.layout.simple_dropdown_item_1line, items);
        // 参数3:int textviewId,指定文本需要放在布局中对应id文本控制的位置
        ArrayAdapter adpter = new ArrayAdapter(this, R.layout.arrayadapter_layout,R.id.item_txt, items);
这就可以显示前面星星,后面文字
当然,可以添加点击监听器
        AlertDialog.Builder builder = new AlertDialog.Builder(this)
                .setTitle("请选择")
                .setAdapter(adpter, new DialogInterface.OnClickListener() {
                    @Override
                    public void onClick(DialogInterface dialog, int i) {
                        Toast.makeText(MainActivity.this, items[i], Toast.LENGTH_SHORT).show();
                        dialog.dismiss();
                    }
                }); // 参数1:适配器对象(对数据显示样式的规则指定器) 参数2:监听器
Fragment
为什么使用Fragment?
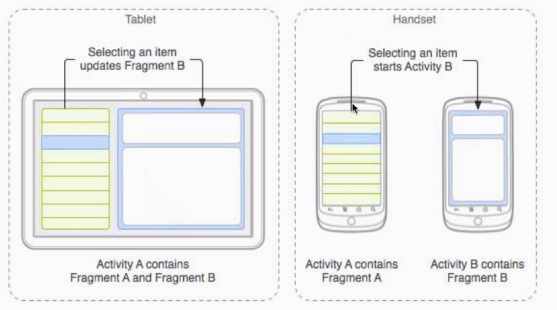
Fragment的出现可以一次编写,适应不同的屏幕,不用每个类型的屏幕编写一套代码。
检测到是平板的时候,FragmentA、FragmentB组成一个ActivityA,显示在整个平板平面上。
当检测是手机的时候,可以用两个Activity,一个包含FramnetA,另一个包含FragmentB,分别显示。
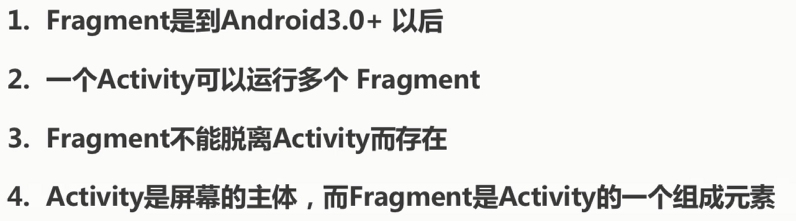
生命周期
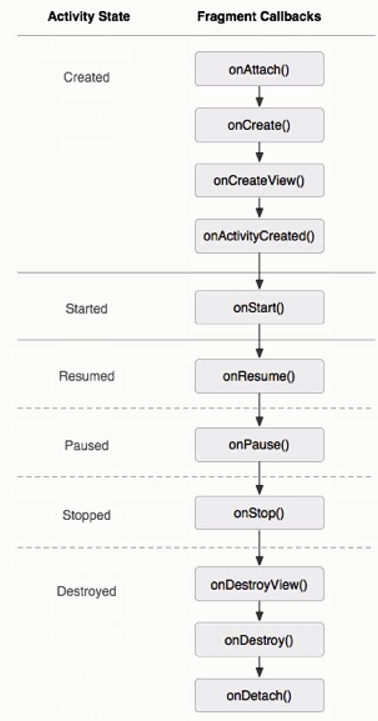
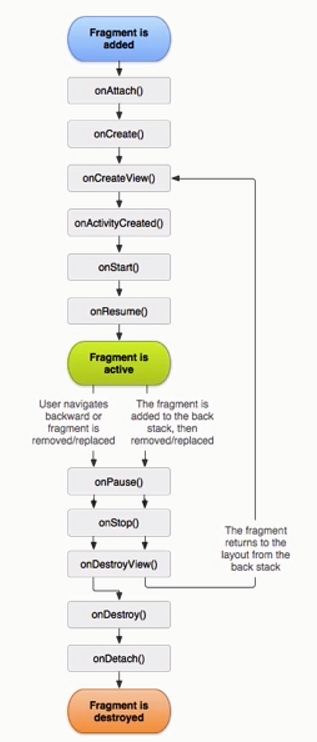
静态加载和动态加载
静态使用XML,动态使用代码
静态加载
实现当点击的时候,会出现两个Fragment
点击 static load fragment

出现两个红块
第一个Activity布局
<?xml version="1.0" encoding="utf-8"?>
<LinearLayout xmlns:android="http://schemas.android.com/apk/res/android"
    xmlns:app="http://schemas.android.com/apk/res-auto"
    xmlns:tools="http://schemas.android.com/tools"
    android:layout_width="match_parent"
    android:layout_height="match_parent"
    tools:context="com.example.MainActivity"
    android:orientation="vertical">

    <TextView
        android:id="@+id/textView"
        android:layout_width="match_parent"
        android:layout_height="100dp"
        android:gravity="center"
        android:text="static load fragment" />

</LinearLayout>
点击textView,跳转到第二个Activity,第二个Activity由Fragment组成
下面在第一个Activity中设置了跳转第二个Activity的点击事件
public class MainActivity extends AppCompatActivity {

    public static final String BUTTON_TITLE = "button_title";

    @Override
    protected void onCreate(Bundle savedInstanceState) {
        super.onCreate(savedInstanceState);
        // setContentView(R.layout.activity_main);
        setContentView(R.layout.activity_main);
        findViewById(R.id.textView).setOnClickListener(new View.OnClickListener() {
            @Override
            public void onClick(View v) {
                startActivity(new Intent(MainActivity.this, StaticLoadFragment.class));
            }
        });
    }

}
点击后会跳转第二个Activity
public class StaticLoadFragment extends AppCompatActivity {

    @Override
    protected void onCreate(@Nullable Bundle savedInstanceState) {
        super.onCreate(savedInstanceState);
        setContentView(R.layout.activity_static_load_fragment);
    }
}
加载XML文件来显示Fragment
activity_static_load_fragment.xml
<?xml version="1.0" encoding="utf-8"?>
<LinearLayout xmlns:android="http://schemas.android.com/apk/res/android"
    xmlns:app="http://schemas.android.com/apk/res-auto"
    xmlns:tools="http://schemas.android.com/tools"
    android:layout_width="match_parent"
    android:layout_height="match_parent"
    android:orientation="vertical">

   <fragment
       android:id="@+id/listFragment"
       android:name="com.example.ListFragment"
       android:layout_width="100dp"
       android:layout_height="100dp"/>
</LinearLayout>
通过 android:name="com.example.ListFragment" 来静态绑定一个类,这个类可以配置在Fragment中显示什么
可以有两个Fragment
<?xml version="1.0" encoding="utf-8"?>
<LinearLayout xmlns:android="http://schemas.android.com/apk/res/android"
    xmlns:app="http://schemas.android.com/apk/res-auto"
    xmlns:tools="http://schemas.android.com/tools"
    android:layout_width="match_parent"
    android:layout_height="match_parent"
    android:orientation="vertical">

   <fragment
       android:id="@+id/listFragment"
       android:name="com.example.ListFragment"
       android:layout_width="100dp"
       android:layout_height="100dp"/>
   <fragment
       android:id="@+id/DetailFragment"
       android:name="com.example.ListFragment"
       android:layout_marginTop="200dp"
       android:layout_gravity="center_horizontal"
       android:layout_width="100dp"
       android:layout_height="100dp"/>
</LinearLayout>
注意: android:name="com.example.ListFragment" ,即指向一个Fragment实现类,是每个<fragment>布局必须有的,否则是个空的fragment,会报空指针异常。
id不同,指向的Fragment类相同
下面创建 ListFragment 类
实现 Fragment
主要的生命周期是 onCreateView
里面可以创建你想要在Fragment中显示的东西
public class ListFragment  extends Fragment {

    @Override
    public void onAttach(Context context) {
        super.onAttach(context);
    }

    @Override
    public void onCreate(@Nullable Bundle savedInstanceState) {
        super.onCreate(savedInstanceState);
    }

    @Override
    public void onActivityCreated(@Nullable Bundle savedInstanceState) {
        super.onActivityCreated(savedInstanceState);
    }

    // 创建视图
    // 主要使用的
    @Nullable
    @Override
    public View onCreateView(@NonNull LayoutInflater inflater, @Nullable ViewGroup container, @Nullable Bundle savedInstanceState) {
        View view = inflater.inflate(R.layout.fragment_layout, container, false);
        TextView v = view.findViewById(R.id.textview);
        v.setText("aidata");
        return view;
    }

    @Override
    public void onStart() {
        super.onStart();
    }

    @Override
    public void onPause() {
        super.onPause();
    }

    @Override
    public void onStop() {
        super.onStop();
    }

    @Override
    public void onDestroyView() {
        super.onDestroyView();
    }

    @Override
    public void onDestroy() {
        super.onDestroy();
    }
}
View view = inflater.inflate(R.layout.fragment_layout, container, false) ,Fragment也可以加载布局文件来装饰自己
<?xml version="1.0" encoding="utf-8"?>
<RelativeLayout xmlns:android="http://schemas.android.com/apk/res/android"
    android:orientation="vertical" android:layout_width="match_parent"
    android:layout_height="match_parent"
    android:background="@color/colorAccent">

    <TextView
        android:id="@+id/textview"
        android:layout_width="match-parent"
        android:layout_height="match-parent"
        android:background="#ff0000"
        android:textColor="#ffffff"
        android:textSize="20sp"
        android:text="TextView"/>
</RelativeLayout>
里面有TextView
动态加载
第二个Activity不再加载Fragment的布局文件
需要容器
在布局文件中定义两个布局作为容器来放Fragment
<?xml version="1.0" encoding="utf-8"?>
<LinearLayout xmlns:android="http://schemas.android.com/apk/res/android"
    xmlns:app="http://schemas.android.com/apk/res-auto"
    xmlns:tools="http://schemas.android.com/tools"
    android:layout_width="match_parent"
    android:layout_height="match_parent"
    tools:context="com.example.MainActivity"
    android:orientation="vertical">

    <TextView
        android:id="@+id/textView"
        android:layout_width="match_parent"
        android:layout_height="100dp"
        android:gravity="center"
        android:text="static load fragment" />

    <LinearLayout
        android:layout_width="match_parent"
        android:layout_height="match_parent"
        android:orientation="horizontal">
        <LinearLayout
            android:id="@+id/listContainer"
            android:orientation="horizontal"
            android:layout_margin="2dp"
            android:layout_width="150dp"
            android:layout_height="match_parent"
            >
        </LinearLayout>
        <LinearLayout
            android:id="@+id/detailContainer"
            android:orientation="horizontal"
            android:layout_margin="2dp"
            android:layout_width="250dp"
            android:layout_height="match_parent">
        </LinearLayout>
    </LinearLayout>
</LinearLayout>
代码
public class MainActivity extends AppCompatActivity {

    public static final String BUTTON_TITLE = "button_title";

    @Override
    protected void onCreate(Bundle savedInstanceState) {
        super.onCreate(savedInstanceState);
        // setContentView(R.layout.activity_main);
        setContentView(R.layout.activity_main);
        findViewById(R.id.textView).setOnClickListener(new View.OnClickListener() {
            @Override
            public void onClick(View v) {
                startActivity(new Intent(MainActivity.this, StaticLoadFragment.class));
            }
        });
        // 1.container 2.fragment 3.fragment-->container
        ListFragment fragment = new ListFragment();
        getSupportFragmentManager()
                .beginTransaction()
                .add(R.id.listContainer, fragment)
                .commit();
        // 一个fragment用一次,这里新建一个
        getSupportFragmentManager()
                .beginTransaction()
                .add(R.id.detailContainer, new ListFragment())
                .commit();
        // 移除
        getSupportFragmentManager()
                .beginTransaction()
                .remove(fragment)
                .commit();
    }
}
Activity向Fragment传值
setAarguments()
public class ListFragment  extends Fragment {

    public static final String BUNDLE_TITLE = "bundle_title";
    private String title = "aidata";

    // activity传进来的值
    public static ListFragment newInstance(String title){
        ListFragment fragment = new ListFragment();
        Bundle bundle = new Bundle();
        bundle.putString(BUNDLE_TITLE, title);
        fragment.setArguments(bundle);
        return fragment;
    }

    @Override
    public void onAttach(Context context) {
        super.onAttach(context);
    }

    @Override
    public void onCreate(@Nullable Bundle savedInstanceState) {
        super.onCreate(savedInstanceState);
        // 接收 arguments 传进来的值
        if (getArguments() != null){
            title = getArguments().getString(BUNDLE_TITLE);
        }
    }

    @Override
    public void onActivityCreated(@Nullable Bundle savedInstanceState) {
        super.onActivityCreated(savedInstanceState);
    }

    // 创建视图
    // 主要使用的
    @Nullable
    @Override
    public View onCreateView(@NonNull LayoutInflater inflater, @Nullable ViewGroup container, @Nullable Bundle savedInstanceState) {
        View view = inflater.inflate(R.layout.fragment_layout, container, false);
        TextView v = view.findViewById(R.id.textview);
        // 使用传进来的值
        v.setText(title);
        return view;
    }

    @Override
    public void onStart() {
        super.onStart();
    }

    @Override
    public void onPause() {
        super.onPause();
    }

    @Override
    public void onStop() {
        super.onStop();
    }

    @Override
    public void onDestroyView() {
        super.onDestroyView();
    }

    @Override
    public void onDestroy() {
        super.onDestroy();
    }
}
public class MainActivity extends AppCompatActivity {

    public static final String BUTTON_TITLE = "button_title";

    @Override
    protected void onCreate(Bundle savedInstanceState) {
        super.onCreate(savedInstanceState);
        // setContentView(R.layout.activity_main);
        setContentView(R.layout.activity_main);
        findViewById(R.id.textView).setOnClickListener(new View.OnClickListener() {
            @Override
            public void onClick(View v) {
                startActivity(new Intent(MainActivity.this, StaticLoadFragment.class));
            }
        });
        // 1.container 2.fragment 3.fragment-->container
        // 传值的时候不再需要无参构造函数
        //ListFragment fragment = new ListFragment();
        getSupportFragmentManager()
                .beginTransaction()
                .add(R.id.listContainer, ListFragment.newInstance("list"))
                .commit();
        // 一个fragment用一次,这里新建一个
        getSupportFragmentManager()
                .beginTransaction()
                .add(R.id.detailContainer, ListFragment.newInstance("detail"))
                .commit();
        // 移除
//        getSupportFragmentManager()
//                .beginTransaction()
//                .remove(fragment)
//                .commit();
    }
}
你会发现add的时候添加了Fragment对象,对象中有了参数,但是Fragment对象中onCreate()等方法还没被执行。
Fragment向Activity传值
使用回调的方式
定义接口接口
public class ListFragment  extends Fragment {

    public static final String BUNDLE_TITLE = "bundle_title";
    private String title = "aidata";

    // activity传进来的值
    public static ListFragment newInstance(String title){
        ListFragment fragment = new ListFragment();
        Bundle bundle = new Bundle();
        bundle.putString(BUNDLE_TITLE, title);
        fragment.setArguments(bundle);
        return fragment;
    }

    @Override
    public void onAttach(Context context) {
        super.onAttach(context);
    }

    @Override
    public void onCreate(@Nullable Bundle savedInstanceState) {
        super.onCreate(savedInstanceState);
        // 接收 arguments 传进来的值
        if (getArguments() != null){
            title = getArguments().getString(BUNDLE_TITLE);
        }
    }

    @Override
    public void onActivityCreated(@Nullable Bundle savedInstanceState) {
        super.onActivityCreated(savedInstanceState);
    }

    // 创建视图
    // 主要使用的
    @Nullable
    @Override
    public View onCreateView(@NonNull LayoutInflater inflater, @Nullable ViewGroup container, @Nullable Bundle savedInstanceState) {
        View view = inflater.inflate(R.layout.fragment_layout, container, false);
        TextView v = view.findViewById(R.id.textview);
        // 使用传进来的值
        v.setText(title);

        v.setOnClickListener(new View.OnClickListener() {
            @Override
            public void onClick(View v) {
                // 当外界调用了其set方法时不为空
                if (onTitleClickListener != null){
                    onTitleClickListener.onClick(title);
                }
            }
        });

        return view;
    }

    @Override
    public void onStart() {
        super.onStart();
    }

    @Override
    public void onPause() {
        super.onPause();
    }

    @Override
    public void onStop() {
        super.onStop();
    }

    @Override
    public void onDestroyView() {
        super.onDestroyView();
    }

    @Override
    public void onDestroy() {
        super.onDestroy();
    }

    // 设置接口的方法
    public void setOnTitleClickListener(OnTitleClickListener onTitleClickListener) {
        this.onTitleClickListener = onTitleClickListener;
    }

    // 定义个接口的全局变量
    OnTitleClickListener onTitleClickListener;

    // 定义接口
    public interface  OnTitleClickListener{
        void onClick(String title);
    }

}
public class MainActivity extends AppCompatActivity implements ListFragment.OnTitleClickListener{

    public static final String BUTTON_TITLE = "button_title";

    @Override
    protected void onCreate(Bundle savedInstanceState) {
        super.onCreate(savedInstanceState);
        // setContentView(R.layout.activity_main);
        setContentView(R.layout.activity_main);
        findViewById(R.id.textView).setOnClickListener(new View.OnClickListener() {
            @Override
            public void onClick(View v) {
                startActivity(new Intent(MainActivity.this, StaticLoadFragment.class));
            }
        });
        // 1.container 2.fragment 3.fragment-->container

        ListFragment fragment = ListFragment.newInstance("list");
        getSupportFragmentManager()
                .beginTransaction()
                .add(R.id.listContainer, fragment)
                .commit();
        fragment.setOnTitleClickListener(this);
        // 一个fragment用一次,这里新建一个
        getSupportFragmentManager()
                .beginTransaction()
                .add(R.id.detailContainer, ListFragment.newInstance("detail"))
                .commit();
        // 移除
//        getSupportFragmentManager()
//                .beginTransaction()
//                .remove(fragment)
//                .commit();
    }

    @Override
    public void onClick(String title) {
        setTitle(title);
    }
}
在Fragment被创建的时候,通过 fragment.setOnTitleClickListener(this) 将Activity传入到了Fragment中去,在Fragment中调用Activity的方法(这里就是onClick)
这里使用接口实现,更好的解耦
比如,在Fragment中定义
    MainActivity appCompatActivity;

    public void setAppCompatActivity(MainActivity appCompatActivity) {
        this.appCompatActivity = appCompatActivity;
    }
也可以,但是完全和这个Activity耦合在了一起
PageView
view_first.xml、view_second.xml、view_third.xml
<?xml version="1.0" encoding="utf-8"?>
<RelativeLayout xmlns:android="http://schemas.android.com/apk/res/android"
    android:layout_width="match_parent" android:layout_height="match_parent"
    android:orientation="vertical">

    <TextView
        android:layout_width="match_parent"
        android:layout_height="match_parent"
        android:text="first"
        android:textSize="40sp"/>
</RelativeLayout>


==========================================
<?xml version="1.0" encoding="utf-8"?>
<RelativeLayout xmlns:android="http://schemas.android.com/apk/res/android"
    android:layout_width="match_parent" android:layout_height="match_parent"
    android:orientation="vertical">

    <TextView
        android:layout_width="match_parent"
        android:layout_height="match_parent"
        android:text="second"
        android:textSize="40sp"/>
</RelativeLayout>

=========================================

<?xml version="1.0" encoding="utf-8"?>
<RelativeLayout xmlns:android="http://schemas.android.com/apk/res/android"
    android:layout_width="match_parent" android:layout_height="match_parent"
    android:orientation="vertical">

    <TextView
        android:layout_width="match_parent"
        android:layout_height="match_parent"
        android:text="third"
        android:textSize="40sp"/>
</RelativeLayout>
public class MainActivity extends AppCompatActivity{

    private ViewPager mViewPager;

    private int[] mLayoutIDs = {
      R.layout.view_first,
      R.layout.view_second,
      R.layout.view_third
    };
    private List<View> mViews;
    @Override
    protected void onCreate(Bundle savedInstanceState) {
        super.onCreate(savedInstanceState);
        // setContentView(R.layout.activity_main);
        setContentView(R.layout.activity_main);
        mViewPager = (ViewPager) findViewById(R.id.view_pager);
        // 初始化数据
        mViews = new ArrayList<>();
        for (int index=0; index< mLayoutIDs.length; index++){
            mViews.add(getLayoutInflater().inflate(mLayoutIDs[index], null));
        }
        // 设置adapter
        mViewPager.setAdapter(mPagerAdapter);
    }

    PagerAdapter mPagerAdapter = new PagerAdapter() {
        @Override
        public int getCount() {
            return mLayoutIDs.length;
        }

        @Override
        public boolean isViewFromObject(@NonNull View view, @NonNull Object object) {
            return view == object;
        }


        @NonNull
        @Override
        public Object instantiateItem(@NonNull ViewGroup container, int position) {
            View child = mViews.get(position);
            container.addView(child);
            return child;
        }

        @Override
        public void destroyItem(@NonNull ViewGroup container, int position, @NonNull Object object) {
            container.removeView(mViews.get(position));
        }
    };

}
activity_main.xml
<?xml version="1.0" encoding="utf-8"?>
<LinearLayout xmlns:android="http://schemas.android.com/apk/res/android"
    xmlns:app="http://schemas.android.com/apk/res-auto"
    xmlns:tools="http://schemas.android.com/tools"
    android:layout_width="match_parent"
    android:layout_height="match_parent"
    tools:context="com.example.MainActivity"
    android:orientation="vertical">

    <androidx.viewpager.widget.ViewPager
        android:id="@+id/view_pager"
        android:layout_width="match_parent"
        android:layout_height="match_parent">

    </androidx.viewpager.widget.ViewPager>
</LinearLayout>
图片下面加点
<?xml version="1.0" encoding="utf-8"?>
<RelativeLayout xmlns:android="http://schemas.android.com/apk/res/android"
    xmlns:app="http://schemas.android.com/apk/res-auto"
    xmlns:tools="http://schemas.android.com/tools"
    android:layout_width="match_parent"
    android:layout_height="match_parent"
    tools:context="com.example.MainActivity"
    android:orientation="vertical">

    <androidx.viewpager.widget.ViewPager
        android:id="@+id/view_pager"
        android:layout_width="match_parent"
        android:layout_height="match_parent">
    </androidx.viewpager.widget.ViewPager>

    <LinearLayout
        android:id="@+id/dot_layout"
        android:layout_width="120dp"
        android:layout_height="30dp"
        android:layout_alignParentBottom="true"
        android:layout_centerHorizontal="true"
        android:layout_marginBottom="30dp"
        android:orientation="horizontal"/>


</RelativeLayout>
public class MainActivity extends AppCompatActivity{

    private ViewPager mViewPager;

    private int[] mLayoutIDs = {
      R.layout.view_first,
      R.layout.view_second,
      R.layout.view_third
    };
    private List<View> mViews;
    private ViewGroup mDotViewGroup;
    private List<ImageView> mDotViews = new ArrayList<>();

    @Override
    protected void onCreate(Bundle savedInstanceState) {
        super.onCreate(savedInstanceState);
        // setContentView(R.layout.activity_main);
        setContentView(R.layout.activity_main);
        mViewPager = (ViewPager) findViewById(R.id.view_pager);
        mDotViewGroup = (ViewGroup) findViewById(R.id.dot_layout);
        // 初始化数据
        mViews = new ArrayList<>();
        for (int index=0; index< mLayoutIDs.length; index++){
            ImageView imageView = new ImageView(this);
            imageView.setImageResource(R.mipmap.ic_launcher);
            mViews.add(imageView);
            ImageView dot = new ImageView(this);
            dot.setImageResource(R.mipmap.ic_launcher);
            dot.setMaxWidth(100);
            dot.setMaxHeight(100);

            LinearLayout.LayoutParams layoutParams = new LinearLayout.LayoutParams(20, 20);
            layoutParams.leftMargin = 20;
            dot.setLayoutParams(layoutParams);
            dot.setEnabled(false);
            mDotViewGroup.addView(dot);
            mDotViews.add(dot);
        }
        // 设置adapter
        mViewPager.setAdapter(mPagerAdapter);
        mViewPager.setOffscreenPageLimit(4);
        mViewPager.setCurrentItem(0); // 设置第一页为当前页
        setDotViews(0);
        // 监听每页改变
        mViewPager.addOnPageChangeListener(new ViewPager.OnPageChangeListener() {
            // 滚动
            @Override
            public void onPageScrolled(int position, float positionOffset, int positionOffsetPixels) {

            }

            // 选中
            @Override
            public void onPageSelected(int position) {
                setDotViews(position);
            }

            // 滚动状态变化
            @Override
            public void onPageScrollStateChanged(int state) {

            }
        });
    }
    private void setDotViews(int position){
        for(int index=0; index<mDotViews.size(); index++){
            mDotViews.get(index).setImageResource(position == index? R.mipmap.star: R.mipmap.ic_launcher);
        }
    }
    PagerAdapter mPagerAdapter = new PagerAdapter() {
        @Override
        public int getCount() {
            return mLayoutIDs.length;
        }

        @Override
        public boolean isViewFromObject(@NonNull View view, @NonNull Object object) {
            return view == object;
        }


        @NonNull
        @Override
        public Object instantiateItem(@NonNull ViewGroup container, int position) {
            View child = mViews.get(position);
            container.addView(child);
            return child;
        }

        @Override
        public void destroyItem(@NonNull ViewGroup container, int position, @NonNull Object object) {
            container.removeView(mViews.get(position));
        }
    };
}
Fragment配置ViewPager
创建Activity
activity_tab_viewpager.xml
<?xml version="1.0" encoding="utf-8"?>
<LinearLayout xmlns:android="http://schemas.android.com/apk/res/android"
    android:orientation="vertical" android:layout_width="match_parent"
    android:layout_height="match_parent">

    <androidx.viewpager.widget.ViewPager
        android:id="@+id/view_pager"
        android:layout_width="match_parent"
        android:layout_height="match_parent"/>
</LinearLayout>
public class TabViewPagerActivity extends AppCompatActivity {
    @Override
    protected void onCreate(@Nullable Bundle savedInstanceState) {
        super.onCreate(savedInstanceState);
        setContentView(R.layout.activity_tab_viewpager);

        ViewPager viewPager = (ViewPager)findViewById(R.id.view_pager);
        viewPager.setAdapter(new FragmentPagerAdapter(getSupportFragmentManager()) {
            @Override
            public Fragment getItem(int position) {
                return TestFragment.newInstance(position);
            }

            @Override
            public int getCount() {
                return 4;
            }
        });
    }
}
创建Fragment
public class TestFragment extends Fragment {

    public static final String POSITION = "position";
    public static TestFragment newInstance(int position){
        TestFragment testFragment = new TestFragment();
        Bundle bundle = new Bundle();
        bundle.putInt(POSITION, position);
        testFragment.setArguments(bundle);
        return testFragment;
    }

    String mPostion;
    @Override
    public void onCreate(@Nullable Bundle savedInstanceState) {
        super.onCreate(savedInstanceState);
        if(getArguments() != null){
            mPostion = String.valueOf(getArguments().getInt(POSITION));
        }
    }

    @Nullable
    @Override
    public View onCreateView(@NonNull LayoutInflater inflater, @Nullable ViewGroup container, @Nullable Bundle savedInstanceState) {
        View view = inflater.inflate(R.layout.fragment_test, null);
        TextView textView = (TextView)view.findViewById(R.id.text_view);
        textView.setText(mPostion);
        return view;
    }
}
fragment_test.xml
<?xml version="1.0" encoding="utf-8"?>
<RelativeLayout xmlns:android="http://schemas.android.com/apk/res/android"
    android:orientation="vertical" android:layout_width="match_parent"
    android:layout_height="match_parent">

    <TextView
        android:id="@+id/text_view"
        android:layout_width="match_parent"
        android:layout_height="match_parent"
        android:textSize="36sp"
        android:layout_centerInParent="true"
        android:text="@string/aidata"
        android:gravity="center"/>

</RelativeLayout>
实现底部导航
使用TabHost + ViewPager
使用TabHost显然是为了使用底部tab标签,使用ViewPager是为了什么?为了 实现滑动功能。
TabHost布局,必须有一个帧布局和一个TabWidget
即使帧布局在此案例中没用,也必须要,只需要将其 visibility设置为gone
activity_tab_viewpager.xml
<?xml version="1.0" encoding="utf-8"?>
<TabHost xmlns:android="http://schemas.android.com/apk/res/android"
    android:orientation="vertical" android:layout_width="match_parent"
    android:layout_height="match_parent">
    <RelativeLayout
        android:layout_width="match_parent"
        android:layout_height="match_parent">

        <androidx.viewpager.widget.ViewPager
            android:id="@+id/view_pager"
            android:layout_width="match_parent"
            android:layout_height="match_parent"
            android:layout_above="@id/tab_divider"/>

        <FrameLayout
            android:id="@+id/tabcontent"
            android:layout_width="match_parent"
            android:layout_height="match_parent"
            android:visibility="gone"
            android:layout_above="@id/tab_divider"/>

        <View
            android:id="@+id/tab_divider"
            android:layout_width="match_parent"
            android:layout_height="1dp"
            android:background="#dfdfdf"
            android:layout_above="@id/tabs"/>

        <TabWidget
            android:id="@+id/tabs"
            android:layout_width="match_parent"
            android:layout_height="60dp"
            android:layout_alignParentBottom="true"/>
    </RelativeLayout>
</TabHost>
public class TabViewPagerActivity extends AppCompatActivity {
    @Override
    protected void onCreate(@Nullable Bundle savedInstanceState) {
        super.onCreate(savedInstanceState);
        setContentView(R.layout.activity_tab_viewpager);

        Fragment[] fragments = new Fragment[]{
                TestFragment.newInstance("home"),
                TestFragment.newInstance("message"),
                TestFragment.newInstance("me")
        };

        ViewPager viewPager = (ViewPager)findViewById(R.id.view_pager);
        viewPager.setAdapter(new FragmentPagerAdapter(getSupportFragmentManager()) {
            @Override
            public Fragment getItem(int position) {
                return fragments[position];
            }

            @Override
            public int getCount() {
                return fragments.length;
            }
        });
    }
}
public class TestFragment extends Fragment {

    public static final String TITLE = "title";
    public static TestFragment newInstance(String title){
        TestFragment testFragment = new TestFragment();
        Bundle bundle = new Bundle();
        bundle.putString(TITLE, title);
        testFragment.setArguments(bundle);
        return testFragment;
    }

    private String mTitle;
    @Override
    public void onCreate(@Nullable Bundle savedInstanceState) {
        super.onCreate(savedInstanceState);
        if(getArguments() != null){
            mTitle = getArguments().getString(TITLE);
        }
    }

    @Nullable
    @Override
    public View onCreateView(@NonNull LayoutInflater inflater, @Nullable ViewGroup container, @Nullable Bundle savedInstanceState) {
        View view = inflater.inflate(R.layout.fragment_test, null);
        TextView textView = (TextView)view.findViewById(R.id.text_view);
        textView.setText(mTitle);
        return view;
    }
}
下面添加最底部的按钮


<?xml version="1.0" encoding="utf-8"?>
<TabHost xmlns:android="http://schemas.android.com/apk/res/android"
    android:orientation="vertical" android:layout_width="match_parent"
    android:layout_height="match_parent"
    android:id="@+id/tab_host">
    <RelativeLayout
        android:layout_width="match_parent"
        android:layout_height="match_parent">

        <androidx.viewpager.widget.ViewPager
            android:id="@+id/view_pager"
            android:layout_width="match_parent"
            android:layout_height="match_parent"
            android:layout_above="@+id/tab_divider"/>

        <FrameLayout
            android:id="@android:id/tabcontent"
            android:layout_width="match_parent"
            android:layout_height="match_parent"
            android:visibility="gone"
            android:layout_above="@+id/tab_divider"/>

        <View
            android:id="@+id/tab_divider"
            android:layout_width="match_parent"
            android:layout_height="1dp"
            android:background="#dfdfdf"
            android:layout_above="@android:id/tabs"/>

        <TabWidget
            android:id="@android:id/tabs"
            android:layout_width="match_parent"
            android:layout_height="60dp"
            android:layout_alignParentBottom="true"
            android:showDividers="none"/>
    </RelativeLayout>
</TabHost>
图标
main_tab_icon_home
<?xml version="1.0" encoding="utf-8"?>
<selector xmlns:android="http://schemas.android.com/apk/res/android">
    <item android:state_selected="true" android:drawable="@drawable/tabbar_home_pressed"/>
    <item android:state_pressed="true" android:drawable="@drawable/tabbar_home_pressed"/>
    <item android:drawable="@drawable/tabbar_home"/>
</selector>
main_tab_icon_message
<?xml version="1.0" encoding="utf-8"?>
<selector xmlns:android="http://schemas.android.com/apk/res/android">
    <item android:state_selected="true" android:drawable="@drawable/tabbar_msg_pressed"/>
    <item android:state_pressed="true" android:drawable="@drawable/tabbar_msg_pressed"/>
    <item android:drawable="@drawable/tabbar_msg"/>
</selector>
main_tab_icon_me
<?xml version="1.0" encoding="utf-8"?>
<selector xmlns:android="http://schemas.android.com/apk/res/android">
    <item android:state_selected="true" android:drawable="@drawable/tabbar_my_pressed"/>
    <item android:state_pressed="true" android:drawable="@drawable/tabbar_my_pressed"/>
    <item android:drawable="@drawable/tabbar_my"/>
</selector>
public class TabViewPagerActivity extends AppCompatActivity implements TabHost.TabContentFactory {

    public TabHost mTabHost;
    @Override
    protected void onCreate(@Nullable Bundle savedInstanceState) {
        super.onCreate(savedInstanceState);
        setContentView(R.layout.activity_tab_viewpager);

        // 初始化总布局
        mTabHost = (TabHost)findViewById(R.id.tab_host);
        mTabHost.setup();
        // 三个tab做处理
        int[] titleIDs = {R.string.home, R.string.message, R.string.me};
        int [] drawableIDs = {R.drawable.main_tab_icon_home, R.drawable.main_tab_icon_message, R.drawable.main_tab_icon_me};

        // 数据塞到视图里
        for (int index=0; index < titleIDs.length; index++){
            View view = getLayoutInflater().inflate(R.layout.main_tab_layout, null, false);
            ImageView icon = (ImageView)view.findViewById(R.id.main_tab_icon);
            TextView title = (TextView) view.findViewById(R.id.main_tab_txt);
            View tab = view.findViewById(R.id.tab_bg);
            icon.setImageResource(drawableIDs[index]);
            title.setText(titleIDs[index]);
            tab.setBackgroundColor(getResources().getColor(R.color.white));
            mTabHost.addTab(mTabHost.newTabSpec(getString(titleIDs[index]))
                    .setIndicator(view)
                    .setContent(this)
            );
        }

        // 三个fragment组成的viewpager
        final Fragment[] fragments = new Fragment[]{
                TestFragment.newInstance("home"),
                TestFragment.newInstance("message"),
                TestFragment.newInstance("me")
        };

        ViewPager viewPager = (ViewPager)findViewById(R.id.view_pager);
        viewPager.setAdapter(new FragmentPagerAdapter(getSupportFragmentManager()) {
            @Override
            public Fragment getItem(int position) {
                return fragments[position];
            }

            @Override
            public int getCount() {
                return fragments.length;
            }
        });
        // 添加监听,当滑动的时候下面的按钮出现变化
        viewPager.addOnPageChangeListener(new ViewPager.OnPageChangeListener() {
            @Override
            public void onPageScrolled(int position, float positionOffset, int positionOffsetPixels) {

            }

            @Override
            public void onPageSelected(int position) {
                if (mTabHost != null){
                    mTabHost.setCurrentTab(position);
                }
            }

            @Override
            public void onPageScrollStateChanged(int state) {

            }
        });
        // TAB动,viewpager也动
        mTabHost.setOnTabChangedListener(new TabHost.OnTabChangeListener() {
            @Override
            public void onTabChanged(String tabId) {
                if (mTabHost != null){
                    int position = mTabHost.getCurrentTab();
                    viewPager.setCurrentItem(position);
                }
            }
        });
    }

    @Override
    public View createTabContent(String tag) {
        View view = new View(this);
        view.setMinimumHeight(0);
        view.setMinimumWidth(0);
        return view;
    }
}
main_tab_layout.xml
<?xml version="1.0" encoding="utf-8"?>
<RelativeLayout
    android:id="@+id/tab_bg"
    xmlns:android="http://schemas.android.com/apk/res/android" android:layout_width="match_parent"
    android:layout_height="match_parent">
    <LinearLayout
        android:layout_width="wrap_content"
        android:layout_height="wrap_content"
        android:gravity="center"
        android:layout_centerInParent="true"
        android:orientation="vertical">
        <ImageView
            android:id="@+id/main_tab_icon"
            android:layout_width="30dp"
            android:layout_height="30dp"
            android:src="@mipmap/ic_launcher"
            android:layout_marginTop="4dp"/>
        <TextView
            android:id="@+id/main_tab_txt"
            android:layout_width="wrap_content"
            android:layout_height="wrap_content"
            android:text="@string/aidata"
            android:layout_marginTop="5dp"
            android:textColor="@color/color_main_tab_txt"/>
    </LinearLayout>
    <ImageView
        android:visibility="gone"
        android:layout_width="wrap_content"
        android:layout_height="wrap_content"/>
</RelativeLayout>
在实际开发中LayoutInflater这个类还是非常有用的,它的作用类似于findViewById()。不同点是LayoutInflater是用来找res/layout/下的xml布局文件,并且实例化;而findViewById()是找xml布局文件下的具体widget控件(如Button、TextView等)。
1. LayoutInflater inflater = getLayoutInflater();//调用Activity的getLayoutInflater()
2. LayoutInflater inflater = LayoutInflater.from(context);
3. LayoutInflater inflater =  (LayoutInflater)context.getSystemService (Context.LAYOUT_INFLATER_SERVICE);
这三种方式最终本质是都是调用的Context.getSystemService()。
传入的Name     返回的对象    说明
WINDOW_SERVICE    WindowManager    管理打开的窗口程序
LAYOUT_INFLATER_SERVICE    LayoutInflater    取得xml里定义的view
ACTIVITY_SERVICE    ActivityManager    管理应用程序的系统状态
POWER_SERVICE    PowerManger    电源的服务
ALARM_SERVICE    AlarmManager    闹钟的服务
NOTIFICATION_SERVICE    NotificationManager    状态栏的服务
KEYGUARD_SERVICE    KeyguardManager    键盘锁的服务
LOCATION_SERVICE    LocationManager    位置的服务,如GPS
SEARCH_SERVICE    SearchManager    搜索的服务
VEBRATOR_SERVICE    Vebrator    手机震动的服务
CONNECTIVITY_SERVICE    Connectivity    网络连接的服务
WIFI_SERVICE    WifiManager    Wi-Fi服务
TELEPHONY_SERVICE    TeleponyManager    电话服务
在Android APP中,所有的用户界面元素都是由View和ViewGroup的对象构成的。View是绘制在屏幕上的用户能与之交互的一个对象。而ViewGroup则是一个用于存放其他View(和ViewGroup)对象的布局容器! Android为我们提供了一个View和ViewGroup子类的集合,集合中提供了一些常用的输入控件(比如按钮和文本域)和各种各样的布局模式(比如线性或相对布局)
你的APP的用户界面上的每一个组件都是使用View和ViewGroup对象的层次结构来构成的,比如 图 1。每个ViewGroup都是要给看不见的用于组织子View的容器,而它的子View可能是输入控件 或者在UI上绘制了某块区域的小部件。有了层次树,你就可以根据自己的需要,设计简单或者复 杂的布局了(布局越简单性能越好)
 图 1.一个UI布局的层次结构的插图


 浙公网安备 33010602011771号