

架构探险笔记1
新建Maven项目
IDEA新建Maven项目,选择导包方式,Import Changes为手动导包,Enable Auto-Import为自动导包。注意Maven配置(全局配置File->Other Setting->Default Settings)。

在pom.xml中设置maven编译编码及编译JDK
    <!--编码方式UTF-8-->
    <properties>
        <project.build.sourceEncoding>UTF-8</project.build.sourceEncoding>
    </properties>

    <build>
        <plugins>
            <!--编译Compile,使用JDK1.7开发-->
            <plugin>
                <groupId>org.apache.maven.plugins</groupId>
                <artifactId>maven-compiler-plugin</artifactId>
                <version>3.3</version>
                <configuration>
                    <source>1.7</source>
                    <target>1.7</target>
                </configuration>
            </plugin>
        </plugins>
    </build>
Maven中央仓库http://search.maven.org/
设置打包时跳过测试
            <!--打包时跳过测试-->
            <plugin>
                <groupId>org.apache.maven.plugins</groupId>
                <artifactId>maven-surefire-plugin</artifactId>
                <version>2.18.1</version>
                <configuration>
                    <skipTests>true</skipTests>
                </configuration>
            </plugin>
新建项目完成

将项目转为Java Web项目
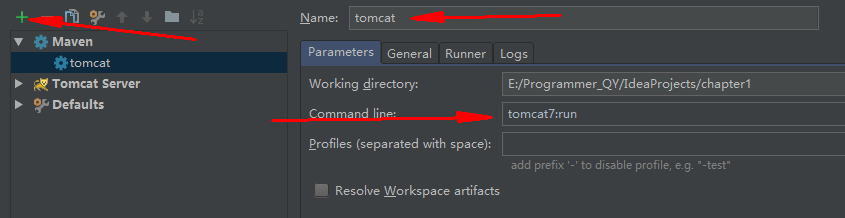
在main下面新建webapp,在webapp下面新建WEB-INF,在WEB-INF下面新建web.xml
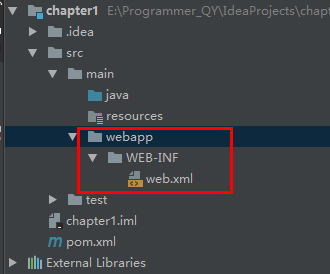
新建好web.xml文件之后,弹出检测到项目为web,点击Configure配置。
在web.xml中添加代码
<?xml version="1.0" encoding="UTF-8"?>
<web-app version="3.0"
             xmlns="http://java.sun.com/xml/ns/javaee"
             xmlns:xsi="http://www.w3.org/2001/XMLSchema-instance"
             xsi:schemaLocation="http://java.sun.com/xml/ns/javaee
             http://java.sun.com/xml/ns/javaee/web-app_3_0.xsd">

</web-app>
添加Maven依赖
web项目是要打包成war包的,所以要在pom.xml文件里设置packaging为war(默认为jar)
<packaging>war</packaging>
添加servlet、jsp、jstl等依赖
    <dependencies>
        <!--servlet-->
        <dependency>
            <groupId>javax.servlet</groupId>
            <artifactId>javax.servlet-api</artifactId>
            <version>3.1.0</version>
            <scope>provided</scope>
        </dependency>
        <!--jsp-->
        <dependency>
            <groupId>javax.servlet.jsp</groupId>
            <artifactId>jsp-api</artifactId>
            <version>2.2</version>
            <scope>provided</scope>
        </dependency>
        <!--jstl-->
        <dependency>
            <groupId>javax.servlet</groupId>
            <artifactId>jstl</artifactId>
            <version>1.2</version>
            <scope>runtime</scope>
        </dependency>
    </dependencies>
Maven依赖三坐标(groupId、artifactId、version)必须提供
某些依赖只需编译,无需参与打包(例如,Tomcat自带了servlet与jsp所对应的jar包),可将其scope设置为provided。
某些依赖只在运行时需要,无须参与编译(JSTL的jar包),可将其scope设置为runtime。
完整版的pom.xml配置
<?xml version="1.0" encoding="UTF-8"?>
<project xmlns="http://maven.apache.org/POM/4.0.0"
         xmlns:xsi="http://www.w3.org/2001/XMLSchema-instance"
         xsi:schemaLocation="http://maven.apache.org/POM/4.0.0 http://maven.apache.org/xsd/maven-4.0.0.xsd">
    <modelVersion>4.0.0</modelVersion>

    <groupId>org.smart4j</groupId>
    <artifactId>chapter1</artifactId>
    <version>1.0-SNAPSHOT</version>
    <packaging>war</packaging>

    <dependencies>
        <!--servlet-->
        <dependency>
            <groupId>javax.servlet</groupId>
            <artifactId>javax.servlet-api</artifactId>
            <version>3.1.0</version>
            <scope>provided</scope>
        </dependency>
        <!--jsp-->
        <dependency>
            <groupId>javax.servlet.jsp</groupId>
            <artifactId>jsp-api</artifactId>
            <version>2.2</version>
            <scope>provided</scope>
        </dependency>
        <!--jsp-->
        <dependency>
            <groupId>javax.servlet</groupId>
            <artifactId>jstl</artifactId>
            <version>1.2</version>
            <scope>runtime</scope>
        </dependency>
    </dependencies>


    <!--编码方式UTF-8-->
    <properties>
        <project.build.sourceEncoding>UTF-8</project.build.sourceEncoding>
    </properties>

    <build>
        <plugins>
            <!--编译Compile,使用JDK1.7开发-->
            <plugin>
                <groupId>org.apache.maven.plugins</groupId>
                <artifactId>maven-compiler-plugin</artifactId>
                <version>3.3</version>
                <configuration>
                    <source>1.7</source>
                    <target>1.7</target>
                </configuration>
            </plugin>
            <!--打包时跳过测试-->
            <plugin>
                <groupId>org.apache.maven.plugins</groupId>
                <artifactId>maven-surefire-plugin</artifactId>
                <version>2.18.1</version>
                <configuration>
                    <skipTests>true</skipTests>
                </configuration>
            </plugin>
            <!--Tomcat-->
            <plugin>
                <groupId>org.apache.tomcat.maven</groupId>
                <artifactId>tomcat7-maven-plugin</artifactId>
                <version>2.2</version>
                <configuration>
                    <path>/${project.artifactId}</path>     <!--最后面不能多个/,不能写成/${project.artifactId}/,否则会找不到-->
                </configuration>
            </plugin>

        </plugins>
    </build>

</project>
编写web应用
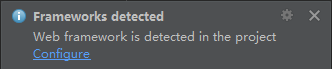
新建servlet,因为是servlet3.0所以可以用注解
@WebServlet("/hello")
public class HelloServlet extends HttpServlet{
    @Override
    protected void doGet(HttpServletRequest req, HttpServletResponse resp) throws ServletException, IOException {
        DateFormat dateFormat = new SimpleDateFormat("yyyy-MM-dd HH:mm:ss");
        String currentTime = dateFormat.format(new Date());
        req.setAttribute("currentTime",currentTime);
        req.getRequestDispatcher("/WEB-INF/JSP/Hello.jsp").forward(req,resp);    /*注意url大小写,不要写错,否则找不到,比较坑*/
    }
}
新建jsp,这里新建在WEB-INF下面,WEB-INF下面的资源是不可以直接请求的
IDEA中配置Tomcat
点击Edit Configuration,点击左上角+号,选择Tomcat Server->Local。
输入Name,取消勾选After launch选项(为了不自动打开界面)。
点击Application server右侧的Configuration,配置Tomcat环境。
切换到Deploment选项卡,点击+(alt+insert),选择Artifact选项,弹出Select Artifact to Deploy对话框,选择chapter1:war exploded,在Application contect中输入/chapter1。
在server选项卡中,在On frame deactivation下拉框中选择“Update resources”选项。这样配置可以进行热部署(自动部署),只需使用Ctrl+F9键手工编译即可,注意此种方式热部署要使用Debug模式。不可进行热部署情况:修改了类名、方法名、成员变量。
on ‘update‘ action:当用户主动执行更新的时候更新 快捷键:Ctrl + F9
on frame deactication:在编辑窗口失去焦点的时候更新
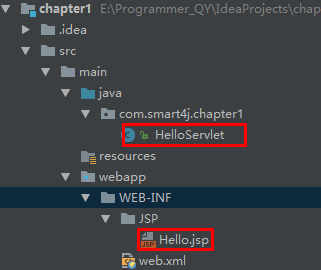
Tomcat插件Debug模式
选择Edit Configurations添加Maven,输入Name和Command line。然后选择这个配置,以Debug模式运行。即可实现tomcat插件热部署。
Git仓库
新建.gitignore文件,用来忽略不不需要放入到Git中的文件,例如Maven的target目录、IDEA/Eclipse的工程文件。文件内容如下
# Maven #
target/

# IDEA #
.idea/
*.iml

# Eclipse #
.settings/
.metadata/
.classpath
.project
Servers/
# Svn #
.svn
windows系统下新建.gitignore文件是不允许的,创建方法如下。
用git bash
cd 到 相应目录 touch .gitignore
用dos 命令 ren
在相应目录先建一个t.txt文件,然后切换到cmd命令行模式里,ren t.txt .gitignore

本地Git仓库
VCS->Import into Version Control->Create Git Repository,选择项目文件夹,创建本地仓库。如果报错,要先安装Git,并在Setting->Version Control->Git中配置Path to Git executable为Git安装Path/bin/git.exe。
右击项目Git->add,可以将.gitignore文件中忽略的所有文件添加到本地Git仓库(快捷键Ctrl+Alt+A)。
然后再Git->Commit Directory提交到本地仓库(快捷键Ctrl+K)。
提示:提交代码时,建议勾选Optimize imports,可以优化import语句,去掉没有使用的包。
远程Git仓库
可以随时将Git本地仓库推送到远程仓库,只需在IDEA中的VCS菜单中点击Git/Push即可。
建立本地仓库与远程仓库之间的连接
在GitHub或者开源中国上新建一个项目
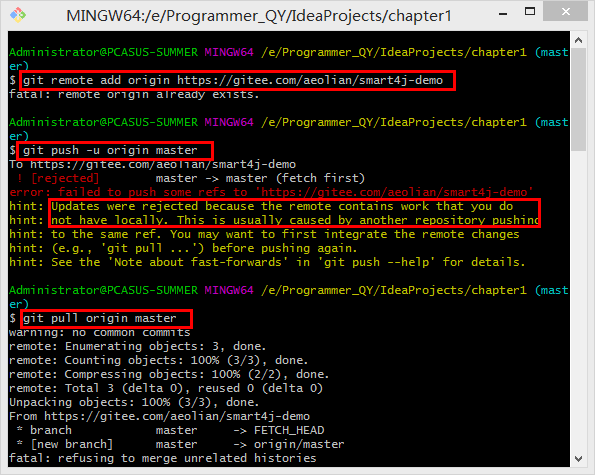
git remote add origin <Git仓库地址>

git push -u origin master
git remote add origin <Git仓库地址> 意思是添加远程仓库地址命名为orign
git push -u origin master 将本地的master分支推送到origin主机,同时指定origin为默认主机
第一次git push -u origin master报错,意思是远程仓库的内容没有本地化,执行下git pull origin master更新一下
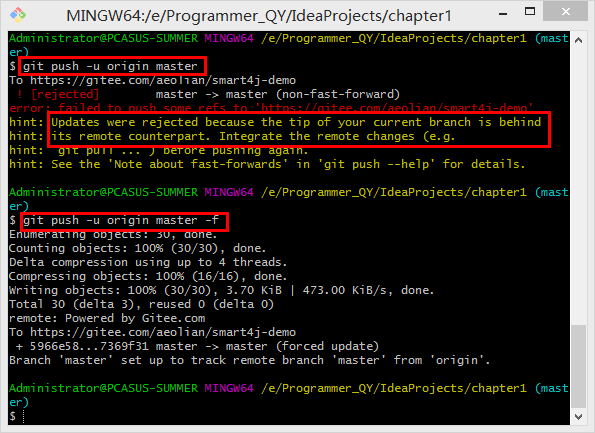
再一次push依然报错,这次是报当前分支落后于远程仓库当前版本,因为是第一次push,所以直接强行push执行git push -u origin master -f,但是在开发中不可取。
直接分享到github方式:
首先在File->Default Setting->Version Control->GitHub中选择Auth Type为Password输入账号密码,把Connection Timout设为50000。
在完成本地git操作下,VCS-》Import into Version Control-》Share Project on GitHub输入描述即可


 浙公网安备 33010602011771号