VUE动态(自动)Loading【绑定到URL】,同页面多个Loading互不冲突
需求来源:当使用React时,使用 umi loading 很方便,页面对http请求发生改变时,也会自动改变loading的相关状态(true/false)

对VUE插件进行找寻,发现没找到合适内容,就参考思路自行设计了一套
功能实现
界面Loading自动加载,不需要在每个请求前后进行拦截,且配置简单、实现方便,如图:

技术栈
vue、vuex、axios(http请求)
开始实现
第一步,文件目录结构介绍:
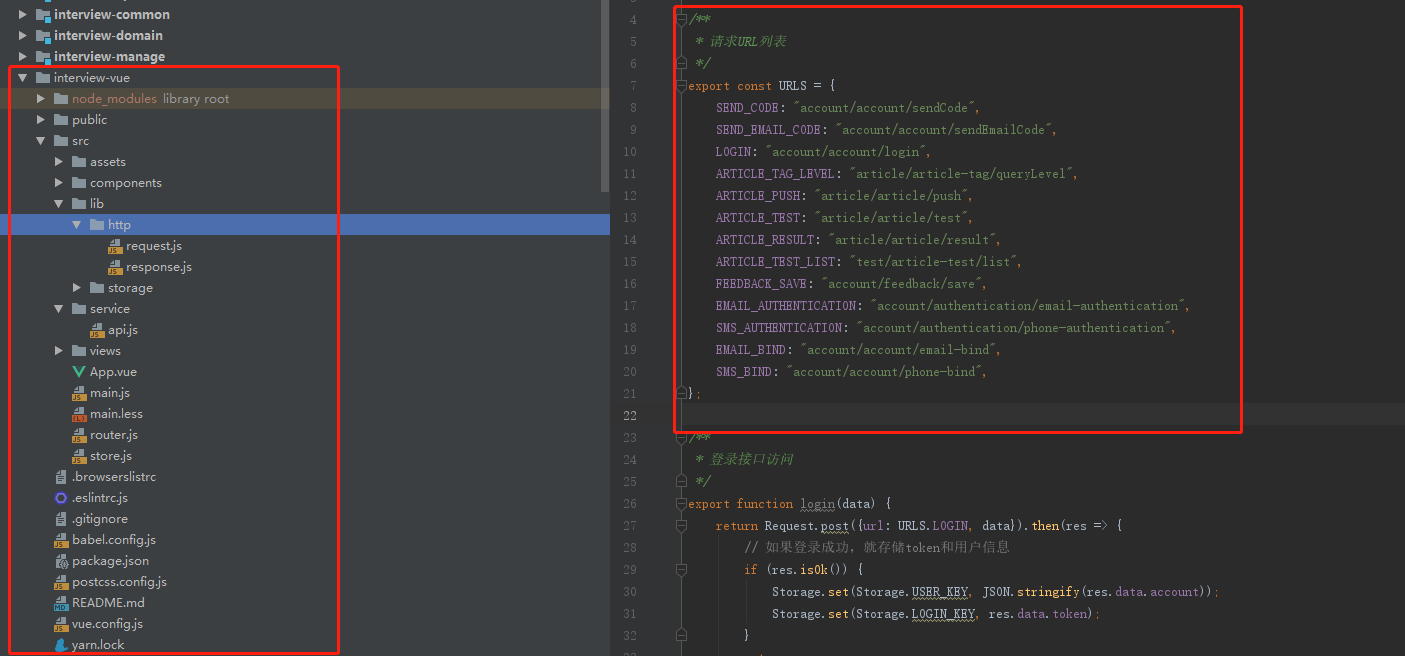
lib/http: Http封装,对系统请求进行封装
service/api.js: 请求接口提取(统一管理请求URL,详细内容见右)
store.js: 全局状态
第二步,接口统一提取(service/api.js)
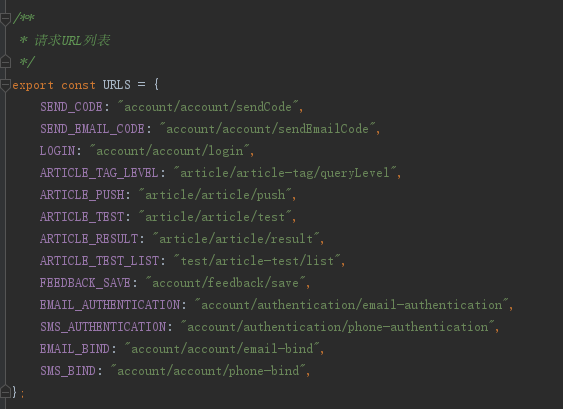
如上是提取的统一URL内容,使用时直接引入
第三步,全局状态封装(store.js)
 1 import Vue from "vue";
 2 import Vuex from "vuex";
 3 import * as Service from '@/service/api';
 4
 5 Vue.use(Vuex);
 6
 7 // 实现自动注册loading URl
 8 const loading = {};
 9 Object.values(Service.URLS).forEach(value => {
10     loading[value] = false;
11 });
12
13 export default new Vuex.Store({
14     state: {
15         // url请求列表,自动注册
16         loading: loading
17     },
18     mutations: {
19         loading(state, url) {
20             state.loading[url] = true;
21         },
22         unloading(state, url) {
23             state.loading[url] = false;
24         }
25     },
26     actions: {}
27 });
第四步,Http封装
 1 import axios from 'axios';
 2 import store from '../../store'
 3
 4
 5 /**
 6  * 设置请求前缀(末尾必须包含 / 否则会导致动态loading失败)
 7  */
 8 axios.defaults.baseURL = "http://www.huic.top/";
 9
10 /**
11  * 定义一个请求拦截器(Loading设置true)
12  */
13 axios.interceptors.request.use(function (config) {
14     store.commit("loading", config.url);
15     return config
16 });
17 /**
18  * 定义一个响应拦截器(Loading设置为false)
19  */
20 axios.interceptors.response.use(function (response) {
21     store.commit("unloading", response.config.url.replace(axios.defaults.baseURL, ""));
22     return response
23 });
这里的封装只封装了拦截器,并未对具体请求进行封装,因为请求封装在这里可有可无,如需要的请留一下邮箱
第五步,使用
 1 <script>
 2     import './index.less';
 3     import * as Service from '@/service/api';
 4
 5     export default {
 6         data: () => ({
 7             // 题目标签
 8             tags: [],
 9         }),
10         computed: {
11             tagLoading() {
12                 return this.$store.state.loading[Service.URLS.ARTICLE_TAG_LEVEL];
13             },
14             testLoading() {
15                 return this.$store.state.loading[Service.URLS.ARTICLE_TEST];
16             }
17         },
18         created() {
19             this.queryTags();
20         },
21         components: {
22         },
23         methods: {
24             /**
25              * 查询标签列表(请求封装查询,也可直接使用 axios.post 等内容)
26              */
27             queryTags() {
28                 Service.articleTagLevel({}).then(res => {
29                     if (res.isOk()) {
30                         this.tags = res.data.records;
31                     }
32                 });
33             }
34         }
35     };
36 </script>
以上代码为VUE简单使用,则将loading - url - 组件进行绑定,则代表在本页面进行请求,例如:articleTagLevel,则会自动绑定loading(见12行)
以上核心代码为10-17行,代表将url和loading属性绑定,使用方法见下:
 1 <div class="test-body-item">
 2     <Row>
 3         <Col span="2" class="test-body-item-title">
 4             标签选择
 5         </Col>
 6         <Col span="21" offset="1">
 7             <TagGroup :data="tags" :loading="tagLoading"/>
 8         </Col>
 9     </Row>
10 </div>
使用方法:第 7 行,其中 :loading="tagLoading" 则代表将tagLoading属性绑定到loading参数中
至此,实现成功.
End.
I love you

 浙公网安备 33010602011771号