spring-security实现前后端分离的登陆与认证
spring security实现前后端分离的登陆与认证
强烈推荐兄弟们看这个帖子Spring Security做JWT认证和授权
我的毕设项目是类斗鱼软件开发,所以我为了给我的项目增加亮点,权限认证与授权肯定就不能用之前的过滤器来弄了,现在我决定使用spring security来接管我的项目。具体源码已经上传Github
spring security认证流程
- 用户使用用户名和密码进行登录。
- Spring Security将获取到的用户名和密码封装成一个实现了Authentication接口的UsernamePasswordAuthenticationToken。
- 将上述产生的token对象传递给AuthenticationManager进行登录认证。
- AuthenticationManager认证成功后将会返回一个封装了用户权限等信息的Authentication对象。
- 通过调用SecurityContextHolder.getContext().setAuthentication(...)将AuthenticationManager返回的Authentication对象赋予给当前的SecurityContext。
spring security的基本组件与流程
我们首先要知道,spring security是一个一个的过滤器,他的过滤流程是下面这样:
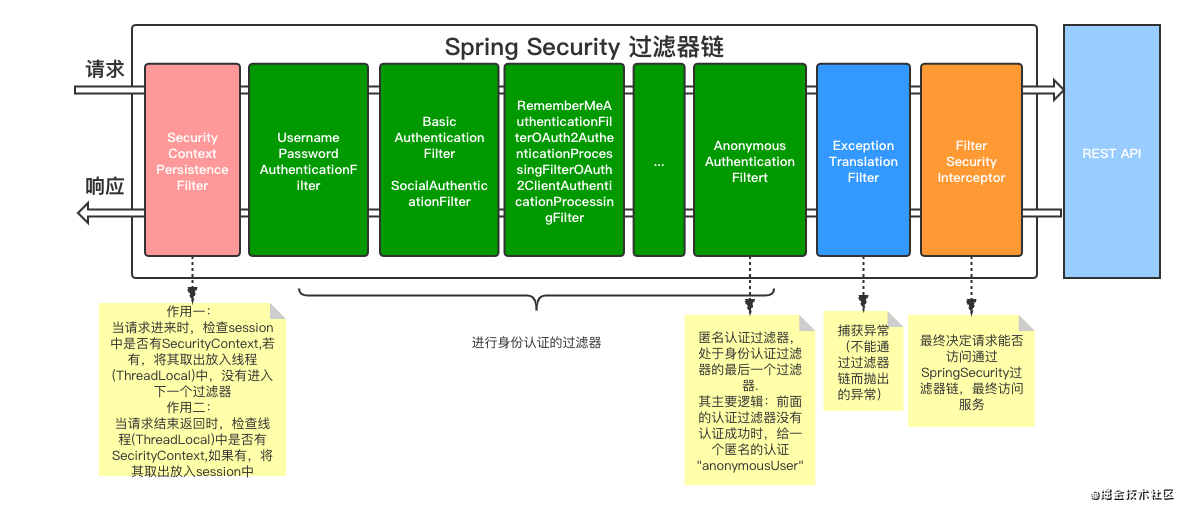
spring security重要组件
UsernamePasswordAuthenticationFilter
首先就是我们的UsernamePasswordAuthenticationFilter,按照我的理解是,只要你在后面的configure函数里面设定了表单登录,你就得走着个过滤器,并且我们一般都会设置那个。
他这个过滤器的关键函数就是attemptAuthentication,源码如下:
public Authentication attemptAuthentication(HttpServletRequest request, HttpServletResponse response) throws AuthenticationException {
        if (this.postOnly && !request.getMethod().equals("POST")) {
            throw new AuthenticationServiceException("Authentication method not supported: " + request.getMethod());
        } else {
            String username = this.obtainUsername(request);
            String password = this.obtainPassword(request);
            if (username == null) {
                username = "";
            }

            if (password == null) {
                password = "";
            }

            username = username.trim();
            UsernamePasswordAuthenticationToken authRequest = new UsernamePasswordAuthenticationToken(username, password);
            this.setDetails(request, authRequest);
            return this.getAuthenticationManager().authenticate(authRequest);
        }
    }
不算是很复杂,我们看到我们最熟悉的username和password,也就是说,他其实就是一个将请求获取一下用户名和密码的东西。
所以,我自定义了这个文件,代码如下:
public class CustomAuthenticationFilter extends UsernamePasswordAuthenticationFilter {

    @Autowired
    @Override
    public void setAuthenticationManager(AuthenticationManager authenticationManager) {
        super.setAuthenticationManager(authenticationManager);
    }

        public Authentication attemptAuthentication(HttpServletRequest request, HttpServletResponse response){
        JSONObject json = null;
        try {
            json = ServletUtils.getRequestJsonObject(request);
        } catch (IOException e) {
            throw  new AppException("服务器错误,请重试");
        }

//        获取json值
        String username = json.getString("username");
        String password = json.getString("password");
        if (username == null) {
            username = "";
        }

        if (password == null) {
            password = "";
        }


        UsernamePasswordAuthenticationToken authRequest = new UsernamePasswordAuthenticationToken(username, password);
        this.setDetails(request, authRequest);
        return this.getAuthenticationManager().authenticate(authRequest);
    }

}
这个ServletUtils请具体看我的源码,具体作用就是将请求过来的参数转化成为Json对象
登录成功和登录失败以及未登录
- 登陆失败:AuthenticationFailureHandler
- 登陆成功:AuthenticationSuccessHandler
- 未登录:AuthenticationEntryPoint
- 403没有权限: AccessDeniedHandler
这三个是可以自定义状态返回结果,都需要自定义
WebSecurityConfigurerAdapter
我们将上面的东西都写完了,最后就是要组装了,集成上面这个类,实现configure方法,就可以做到这一点。
@Configuration
public class SecurityConfig extends WebSecurityConfigurerAdapter {

    @Autowired
    LoginSuccessHandler loginSuccessHandler;

    @Autowired
    LoginFailedHandler loginFailedHandler;


    @Autowired
    AuthenticationEntryPoint anonymousAuthenticationEntryPoint;


    @Bean
    public UserDetailsService userDetailsService(){
        return new UsrServiceImpl();
    }

//    @Autowired
//    UsernamePasswordAuthenticationFilter customAuthenticationFilter;


    @Bean
    CustomAuthenticationFilter customAuthenticationFilter() throws Exception {
        CustomAuthenticationFilter filter = new CustomAuthenticationFilter();
        filter.setAuthenticationSuccessHandler(loginSuccessHandler);
        filter.setFilterProcessesUrl("/loginUsr");
        filter.setAuthenticationManager(authenticationManager());
        filter.setAuthenticationFailureHandler(loginFailedHandler);
        return filter;
    }

    @Bean
    @Override
    protected AuthenticationManager authenticationManager() throws Exception {
        return super.authenticationManager();
    }


        @Bean
    public BCryptPasswordEncoder getPW(){
        return new BCryptPasswordEncoder();
    }

    @Override
    protected void configure(AuthenticationManagerBuilder auth) throws Exception {
        auth.userDetailsService(userDetailsService());
    }


    @Override
    protected void configure(HttpSecurity http) throws Exception {
        http.csrf().and().cors().disable();
        http
                .authorizeRequests()
                .antMatchers("/authTest").permitAll()
                .anyRequest().authenticated()


                .and()
              .and()
                .formLogin()
//                .loginPage("/login")
                .loginProcessingUrl("/loginUsr")

                .permitAll();

        http.exceptionHandling().authenticationEntryPoint(anonymousAuthenticationEntryPoint);

        http.addFilterAt(customAuthenticationFilter(),UsernamePasswordAuthenticationFilter.class);
    }


    @Override
    public void configure(WebSecurity web) throws Exception {
//  这个会在上面的过滤器执行之前执行
        web.ignoring().antMatchers("/loginUsr");
    }


}
configure里面的注意事项
这个我单独拿出来说,因为特别重要
- 由于我们不需要Spring security自带的登录页面,所以.loginPage()我们不需要写!!
- 这个.loginUsr我们不需要写一个controller,因为我们在访问这个网址的时候,spring security自动将请求进入这几个过滤器
- .loginUsr需要在web.ignoring().antMatchers("/loginUsr");这段代码里面放行,而不是用 http.antMatchers里面写!
- 因为我们自定义了UsernamePassword..那个过滤器,所以他的认证管理器如果我们new一个的话,他会直接报错,因为这个时候他自己的认证管理器已经指向不明确了。
鉴权
上面只是告诉你了如何登录,现在就是我们的授权问题。 我的想法是,登录成功之后,返回给用户一个jwt,然后用户在请求头上面带着这个jwt直接验证。后端收到之后如果你这个jwt没有问题,直接放行,不需要去数据库再次进行验证(核心目标)。

 浙公网安备 33010602011771号