笔记-Web开发实战:入门、进阶与原理解析
加载配置
.env文件内添加全局变量如flask 密钥,邮箱账号密码
大写key
SECREAT_KEY='das'
.flaskenv 添加flask设置项,如设置debug模式
FLASK_DEBUG=True
使用方式
点击查看代码
print('secret key:',os.getenv('SECREAT_KEY'))
app.secret_key=os.getenv('SECREAT_KEY')
print('flask debug:',os.getenv('FLASK_DEBUG'))
app.debug=os.getenv('FLASK_DEBUG')
命令行函数
输入flask say 输出hello
点击查看代码
# 命令行
@app.cli.command('say')
def hello():
    click.echo('hello')
get参数限制
限制数字,可选项其一
点击查看代码
# 转换器
@app.route('/back/<int:year>')
def func_name2312(year):
    return f'go back:{2023-year}'

# 选择器
colors=['red','black','white']
@app.route('/colors/<any({}):color>'.format(','.join(colors)))
def func_name2432(color):
    return f'color:{color}'
向模板开放方法
方法,过滤器,判别器
使用方法:装饰器方式,直接修改字典
点击查看代码
# 全局模板变量
@app.context_processor
def fdsa():
    return {'flag':'flagg'}
# 添加模板过滤
@app.template_filter()
def fil(item):
    return item[0]

# 添加模板全局函数
@app.template_global()
def sayhi():
    return 'hi'
# 直接修改字典 模板全局变量
app.jinja_env.globals['glo']='glo321s'
全局变量
g的作用 用于提前获取变量存储为全局变量
方便多个视图函数使用
如每次请求前提前获取当前时间 视图函数中直接使用
点击查看代码
@app.before_request
def get_time():
    g.now=time.strftime('%H:%M:%S',time.localtime())

@app.route('/')
def index():
    now=time.strftime('%H:%M:%S',time.localtime())
    data={
        'now':g.now
    }
    session['log']=True
    print(request.cookies)
    return render_template('index.html',**data)
flash
网页提示横幅
原理:写入cookie中session字段,使用完清除
函数发布信息 从flask导入flash
flash('hi alert')
模板调用
点击查看代码
 {% for message in get_flashed_messages() %}
    <div class="alert">
        {{ message }}
    </div>
    {% endfor %}
    {% block content %}{% endblock %}
局部更新数据
函数中返回字符串
前端导入jquery
html
<button id="get">获取内容</button> <p id ='text'>para:</p>
js监听按钮 添加信息
点击查看代码
 $('#get').click(()=>{
            let item=$('#text')[0]
            $.ajax({
                url:'/text',
                type:'get',
                success:(data)=>{
                    // item.textContent=item.textContent+data+' <br>'
                    $('#text').append(data)

                }}
            )
        })
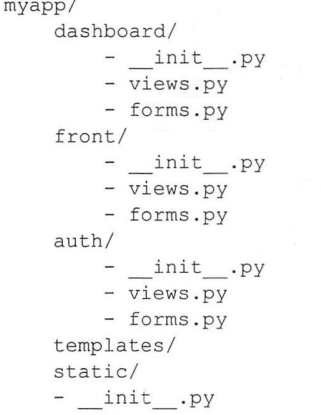
项目组织架构
功能架构:同一功能的放一起,适合功能间联系紧密
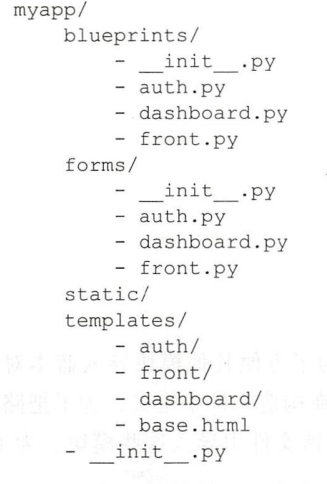
分区架构:不同用途分开放,适合彼此独立,比如登陆,管理两部分,
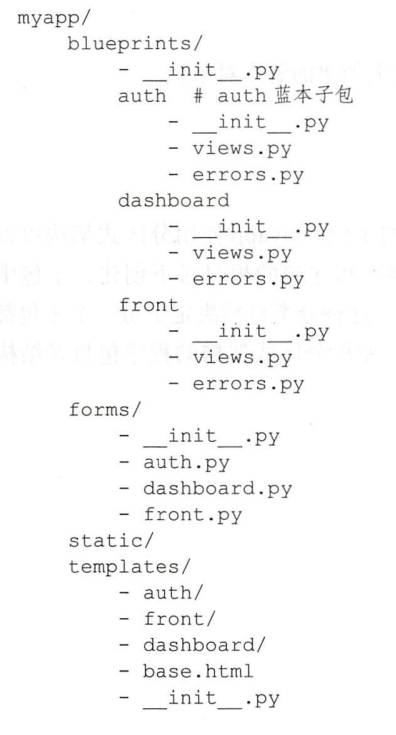
混合 如分区但使用同一个templates文件夹

 浙公网安备 33010602011771号