

实验五 单元测试
一、实验目的
1)掌握单元测试的方法
- 学习XUnit测试原理及框架;
3)掌握使用测试框架进行单元测试的方法和过程。
二、实验内容与要求
1、了解单元测试的原理与框架
1.1 单元测试原理
单元测试(unit testing),是指对软件中的最小可测试单元进行检查和验证。对于单元测试中单元的含义,一般来说,要根据实际情况去判定其具体含义,如C语言中单元指一个函数,Java里单元指一个类,图形化的软件中可以指一个窗口或一个菜单等。总的来说,单元就是人为规定的最小的被测功能模块。单元测试是在软件开发过程中要进行的最低级别的测试活动,软件的独立单元将在与程序的其他部分相隔离的情况下进行测试。单元测试是由程序员自己来完成,最终受益的也是程序员自己。可以这么说,程序员有责任编写功能代码,同时也就有责任为自己的代码编写单元测试。执行单元测试,就是为了证明这段代码的行为和我们期望的一致。
单元测试的内容包括
模块接口测试、局部数据结构测试、路径测试、错误处理测试、边界测试
(1)模块接口测试
模块接口测试是单元测试的基础。只有在数据能正确流入、流出模块的前提下,其他测试才有意义。模块接口测试也是集成测试的重点,这里进行的测试主要是为后面打好基础。测试接口正确与否应该考虑下列因素:
  输入的实际参数与形式参数的个数是否相同

  输入的实际参数与形式参数的属性是否匹配

  输入的实际参数与形式参数的量纲是否一致

  调用其他模块时所给实际参数的个数是否与被调模块的形参个数相同

  调用其他模块时所给实际参数的属性是否与被调模块的形参属性匹配

  调用其他模块时所给实际参数的量纲是否与被调模块的形参量纲一致

  调用预定义函数时所用参数的个数、属性和次序是否正确

  是否存在与当前入口点无关的参数引用

  是否修改了只读型参数

  对全程变量的定义各模块是否一致

  是否把某些约束作为参数传递

  如果模块功能包括外部输入输出,还应该考虑下列因素:

  文件属性是否正确;

  OPEN/CLOSE语句是否正确;

  格式说明与输入输出语句是否匹配;

  缓冲区大小与记录长度是否匹配;

  文件使用前是否已经打开;

  是否处理了文件尾;

  是否处理了输入/输出错误;

  输出信息中是否有文字性错误。

  局部数据结构测试;

  边界条件测试;

  模块中所有独立执行通路测试;
(2)局部数据结构测试
检查局部数据结构是为了保证临时存储在模块内的数据在程序执行过程中完整、正确,局部功能是整个功能运行的基础。重点是一些函数是否正确执行,内部是否运行正确。局部数据结构往往是错误的根源,应仔细设计测试用例,力求发现下面几类错误:
  -不合适或不相容的类型说明;

  -变量无初值;

  -变量初始化或省缺值有错;

  -不正确的变量名(拼错或不正确地截断);

  -出现上溢、下溢和地址异常。
(3)边界条件测试
边界条件测试是单元测试中最重要的一项任务。众所周知,软件经常在边界上失效,采用边界值分析技术,针对边界值及其左、右设计测试用例,很有可能发现新的错误。边界条件测试是一项基础测试,也是后面系统测试中的功能测试的重点,边界测试执行的较好,可以大大提高程序健壮性。
(4)独立路径测试
在模块中应对每一条独立执行路径进行测试,单元测试的基本任务是保证模块中每条语句至少执行一次。测试目的主要是为了发现因错误计算、不正确的比较和不适当的控制流造成的错误。具体做法就是程序员逐条调试语句。常见的错误包括:
  -误解或用错了算符优先级;

  -混合类型运算;

  -变量初值错;

  -精度不够;

  -表达式符号错。
(5)错误处理测试
检查模块的错误处理功能是否包含有错误或缺陷。例如,是否拒绝不合理的输入;出错的描述是否难以理解、是否对错误定位有误、是否出错原因报告有误、是否对错误条件的处理不正确;在对错误处理之前错误条件是否已经引起系统的干预等。
通常单元测试在编码阶段进行。在源程序代码编制完成,经过评审和验证,确认没有语法错误之后,就开始进行单元测试的测试用例设计。利用设计文档,设计可以验证程序功能、找出程序错误的多个测试用例。对于每一组输入,应有预期的正确结果。
1.2 测试框架
xUnit是各种代码驱动测试框架的统称,这些框架可以测试 软件的不同内容(单元),比如函数和类。xUnit框架的主要优点是,它提供了一个自动化测试的解决方案。可以避免多次编写重复的测试代码。
底层是xUnit的framwork,xUnit的类库,提供了对外的功能方法、工具类、api等
TestCase(具体的测试用例)去使用framwork
TestCase执行后会有TestResult
使用TestSuite控制TestCase的组合
TestRunner执行器,负责执行case
TestListener过程监听,监听case成功失败以及数据结果,输出到结果报告中
Unit测试框架包括四个要素:
(1)测试目标(对象)
  一组认定被测对象或被测程序单元测试成功的预定条件或预期结果的设定。Fixture就是被测试的目标,可以是一个函数、一组对象或一个对象。
  测试人员在测试前应了解被测试的对象的功能或行为。
(2)测试集
测试集是一组测试用例,这些测试用例要求有相同的测试Fixture,以保证这些测试不会出现管理上的混乱。
(3)测试执行
  单个单元测试的执行可以按下面的方式进行:
  第一步 编写 setUp() 函数,目的是:建立针对被测试单元的独立测试环境;举个例子,这可能包含创建临时或代理的数据库、目录,再或者启动一个服务器进程。
  第二步 编写所有测试用例的测试体或者测试程序;
  第三步 编写tearDown()函数,目的是:无论测试成功还是失败,都将环境进行清理,以免影响后续的测试;
(4)断言
断言实际上就是验证被测程序在测试中的行为或状态的一个函数或者宏。断言的失败会引发异常,终止测试的执行。
1.3 面向特定语言的,基于xUnit框架的自动化测试框架
  Junit  : 主要测试用Java语言编写的代码
  CPPunit:主要测试用C++语言编写的代码
  unittest , PyUnit:主要测试用python语言编写的代码
  MiniUnit:   主要用于测试C语言编写的代码
三、实验记录
1)源码
LifeGame.java:
import javax.swing.*;

import java.awt.*;
import java.awt.event.ActionEvent;
import java.awt.event.ActionListener;
import java.awt.event.MouseEvent;
import java.awt.event.MouseMotionListener;

public class LifeGame extends JFrame implements MouseMotionListener{
	private final World world;
	static JMenu location=new JMenu();
	public LifeGame(int rows,int columns)
	{
		world=new World(rows, columns);
		world.setBackground(Color.LIGHT_GRAY);
		new Thread(world).start();
		add(world);
	}
	public static void main(String[]args)
	{
		//绘制窗口
		LifeGame frame=new LifeGame(40, 50);

		frame.addMouseMotionListener(frame);
		JMenuBar menu=new JMenuBar();
		frame.setJMenuBar(menu);


		JMenu options =new JMenu("选项");
		menu.add(options);

		JMenuItem start=options.add("开始");
		start.addActionListener(frame.new StartActionListener());
		JMenuItem stop=options.add("清除");
		stop.addActionListener(frame.new StopActionListener());
		JMenuItem pause=options.add("停止");
		pause.addActionListener(frame.new PauseActionListener());
		JMenuItem doityourself=options.add("放置细胞");
		doityourself.addActionListener(frame.new DIYActionListener());
		frame.setLocationRelativeTo(null);
		frame.setDefaultCloseOperation(JFrame.EXIT_ON_CLOSE);
		frame.setSize(1007,859);
		frame.setTitle("生命游戏");
		frame.setVisible(true);
		frame.setResizable(false);
	}
	class StartActionListener implements ActionListener
	{
		public void actionPerformed(ActionEvent e)
		{
			world.setBackground(Color.gray);
			world.diy=false;
			world.clean=false;
			world.setShape();
		}
	}
	class StopActionListener implements ActionListener
	{
		public void actionPerformed(ActionEvent e)
		{
			world.setBackground(Color.LIGHT_GRAY);
			world.diy=false;
			world.clean=false;
			world.setStop();
		}
	}
	class PauseActionListener implements ActionListener
	{
		public void actionPerformed(ActionEvent e)
		{
			world.setBackground(Color.LIGHT_GRAY);
			world.diy=false;
			world.clean=false;
			world.setPause();
		}
	}
	class DIYActionListener implements ActionListener
	{
		public void actionPerformed(ActionEvent e)
		{
			world.setPause();
			world.diy=true;
			world.clean=false;
			world.setBackground(Color.orange);
		}
	}
	public void mouseDragged(MouseEvent e) {
		if(world.diy){
		int x=e.getX();
		int y=e.getY();
		World.pauseshape[(y-50)/20][x/20]=1;
		world.setDiy();
		}
	}
	public void mouseMoved(MouseEvent e) {
		if(world.clean){
		int x=e.getX();
		int y=e.getY();
		World.pauseshape[(y-50)/20][x/20]=0;
		world.setDiy();
		}
	}
}
World.java
import java.awt.*;
import java.awt.event.MouseEvent;
import java.awt.event.MouseMotionListener;
import java.util.Random;

import javax.swing.*;

public class World extends JPanel implements Runnable{
	private final int rows;
	private final int columns;
	JLabel  record;
	boolean diy=false;
	boolean clean=false;
	private int lnum;
	private static int shape[][]=new int [40][50];
	private static int zero[][]=new int [40][50];
	static  int pauseshape[][]=new int [40][50];
	private final CellStatus[][] generation1;
	private final CellStatus[][] generation2;
	private CellStatus[][] currentGeneration;
	private CellStatus[][] nextGeneration;
	private volatile boolean x = false;
	//初始化地图
	public World(int rows, int columns)
	{
		this.rows=rows;
		this.columns=columns;
		record = new JLabel();
		add(record);
		//细胞初始化
		generation1=new CellStatus[rows][columns];
		for(int i=0;i<rows;i++)
		{
			for(int j=0;j<columns;j++)
			{
				generation1[i][j]=CellStatus.Dead;
			}
		}
		generation2=new CellStatus[rows][columns];
		for(int i=0;i<rows;i++)
		{
			for(int j=0;j<columns;j++)
			{
				generation2[i][j]=CellStatus.Dead;
			}
		}
		currentGeneration=generation1;
		nextGeneration=generation2;
	}
	public void transfrom(CellStatus[][] generation, int pauseshape[][])
	{
		for(int i=0;i<rows;i++)
		{
			for(int j=0;j<columns;j++)
			{
				if(generation[i][j]==CellStatus.Active)
				{
					pauseshape[i][j]=1;
				}
				else if(generation[i][j]==CellStatus.Dead)
				{
					pauseshape[i][j]=0;
				}
			}
		}
	}
	//运行
	public void run()
	{
		while(true)
		{
			synchronized(this)
			{
				while(x)
				{

					try
					{
						this.wait();
					}catch(InterruptedException e)
					{
						e.printStackTrace();
					}
				}
				sleep(3);
				for(int i=0;i<rows;i++)
				{
					for(int j=0;j<columns;j++)
					{
						evolve(i,j);
					}
				}
				CellStatus[][]temp=null;
				temp=currentGeneration;
				currentGeneration=nextGeneration;
				nextGeneration=temp;
				for(int i=0;i<rows;i++)
				{
					for(int j=0;j<columns;j++)
					{
						nextGeneration[i][j]=CellStatus.Dead;
					}
				}
				transfrom(currentGeneration,pauseshape);
				repaint();
				updateNumber();
			}
		}
	}
	public void updateNumber()
	{
		String s = "现存细胞数目:"+lnum ;
		record.setText(s);
	}
	public void paintComponent(Graphics g)
	{
		lnum=0;
		super.paintComponent(g);
		for(int i=0;i<rows;i++)
		{
			for(int j=0;j<columns;j++)
			{
				if(currentGeneration[i][j]==CellStatus.Active)
				{
					g.fillRect(j*20, i*20, 20, 20);
					lnum++;
				}
				else
				{
					g.drawRect(j*20, i*20, 20, 20);
				}
			}
		}
	}
	public void setShape()
	{
		setShape(shape);
	}
	public void setZero()
	{
		for(int i=0;i<rows;i++)
		{
			for(int j=0;j<columns;j++)
			{
				zero[i][j]=0;
			}
		}
	}

	public void setStop()
	{
		setZero();
		shape=zero;
		setShape(shape);
		pauseshape=shape;
	}
	public void setPause()
	{
		shape=pauseshape;
		setShapetemp(pauseshape);
	}
	public void setDiy()
	{
		shape=pauseshape;
		setShapetemp(shape);
	}
	private void setShapetemp(int [][]shape)
	{
		x=true;
		int arrowsRows=shape.length;
		int arrowsColumns=shape[0].length;
		int minimumRows=(arrowsRows<rows)?arrowsRows:rows;
		int minimunColumns=(arrowsColumns<columns)?arrowsColumns:columns;
		synchronized(this)
		{
			for(int i=0;i<rows;i++)
			{
				for(int j=0;j<columns;j++)
				{
					currentGeneration[i][j]=CellStatus.Dead;
				}
			}
			for(int i=0;i<minimumRows;i++)
			{
				for(int j=0;j<minimunColumns;j++)
				{
					if(shape[i][j]==1)
					{
						currentGeneration[i][j]=CellStatus.Active;
					}
				}
			}
			repaint();
			updateNumber();
		}
	}
	private void setShape(int [][]shape)
	{
		x=true;
		int arrowsRows=shape.length;
		int arrowsColumns=shape[0].length;
		int minimumRows=(arrowsRows<rows)?arrowsRows:rows;
		int minimunColumns=(arrowsColumns<columns)?arrowsColumns:columns;
		synchronized(this)
		{
			for(int i=0;i<rows;i++)
			{
				for(int j=0;j<columns;j++)
				{
					currentGeneration[i][j]=CellStatus.Dead;
				}
			}
			for(int i=0;i<minimumRows;i++)
			{
				for(int j=0;j<minimunColumns;j++)
				{
					if(shape[i][j]==1)
					{
						currentGeneration[i][j]=CellStatus.Active;
					}
				}
			}
			x=false;
			this.notifyAll();
		}
	}
	//游戏逻辑
	public void evolve(int x,int y)
	{
		int activeSurroundingCell=0;
		if(isVaildCell(x-1,y-1)&&(currentGeneration[x-1][y-1]==CellStatus.Active))
			activeSurroundingCell++;
		if(isVaildCell(x,y-1)&&(currentGeneration[x][y-1]==CellStatus.Active))
			activeSurroundingCell++;
		if(isVaildCell(x+1,y-1)&&(currentGeneration[x+1][y-1]==CellStatus.Active))
			activeSurroundingCell++;
		if(isVaildCell(x+1,y)&&(currentGeneration[x+1][y]==CellStatus.Active))
			activeSurroundingCell++;
		if(isVaildCell(x+1,y+1)&&(currentGeneration[x+1][y+1]==CellStatus.Active))
			activeSurroundingCell++;
		if(isVaildCell(x,y+1)&&(currentGeneration[x][y+1]==CellStatus.Active))
			activeSurroundingCell++;
		if(isVaildCell(x-1,y+1)&&(currentGeneration[x-1][y+1]==CellStatus.Active))
			activeSurroundingCell++;
		if(isVaildCell(x-1,y)&&(currentGeneration[x-1][y]==CellStatus.Active))
			activeSurroundingCell++;
		if(activeSurroundingCell==3)
		{
			nextGeneration[x][y]=CellStatus.Active;
		}
		else if(activeSurroundingCell==2)
		{
			nextGeneration[x][y]=currentGeneration[x][y];
		}
		else
		{
			nextGeneration[x][y]=CellStatus.Dead;
		}
	}
	private boolean isVaildCell(int x,int y)
	{
		if((x>=0)&&(x<rows)&&(y>=0)&&(y<columns))
		{
			return true;
		}
		else
		{
			return false;
		}
	}
	private void sleep(int x)
	{
		try {
			Thread.sleep(150*x);
		} catch (InterruptedException e) {
				e.printStackTrace();
		}
	}
	static enum CellStatus
	{
		Active,
		Dead;
	}

}
2)测试用例设计
生命游戏:
游戏开始时, 每个细胞可以随机地(或给定地)被设定为“生”或“死”之一的某个状态, 然后,再根据如下生存定律计算下一代每个细胞的状态
每个细胞的状态由该细胞及周围 8 个细胞上一次的状态所决定;
如果一个细胞周围有 3 个细胞为生,则该细胞为生,即该细胞若原先为死则转为生,若原先为生则保持不变;
如果一个细胞周围有 2 个细胞为生,则该细胞的生死状态保持不变;
在其它情况下,该细胞为死,即该细胞若原先为生则转为死,若原先为死则保持不变。
若显示细胞数目输入数据修改,测试结果错误
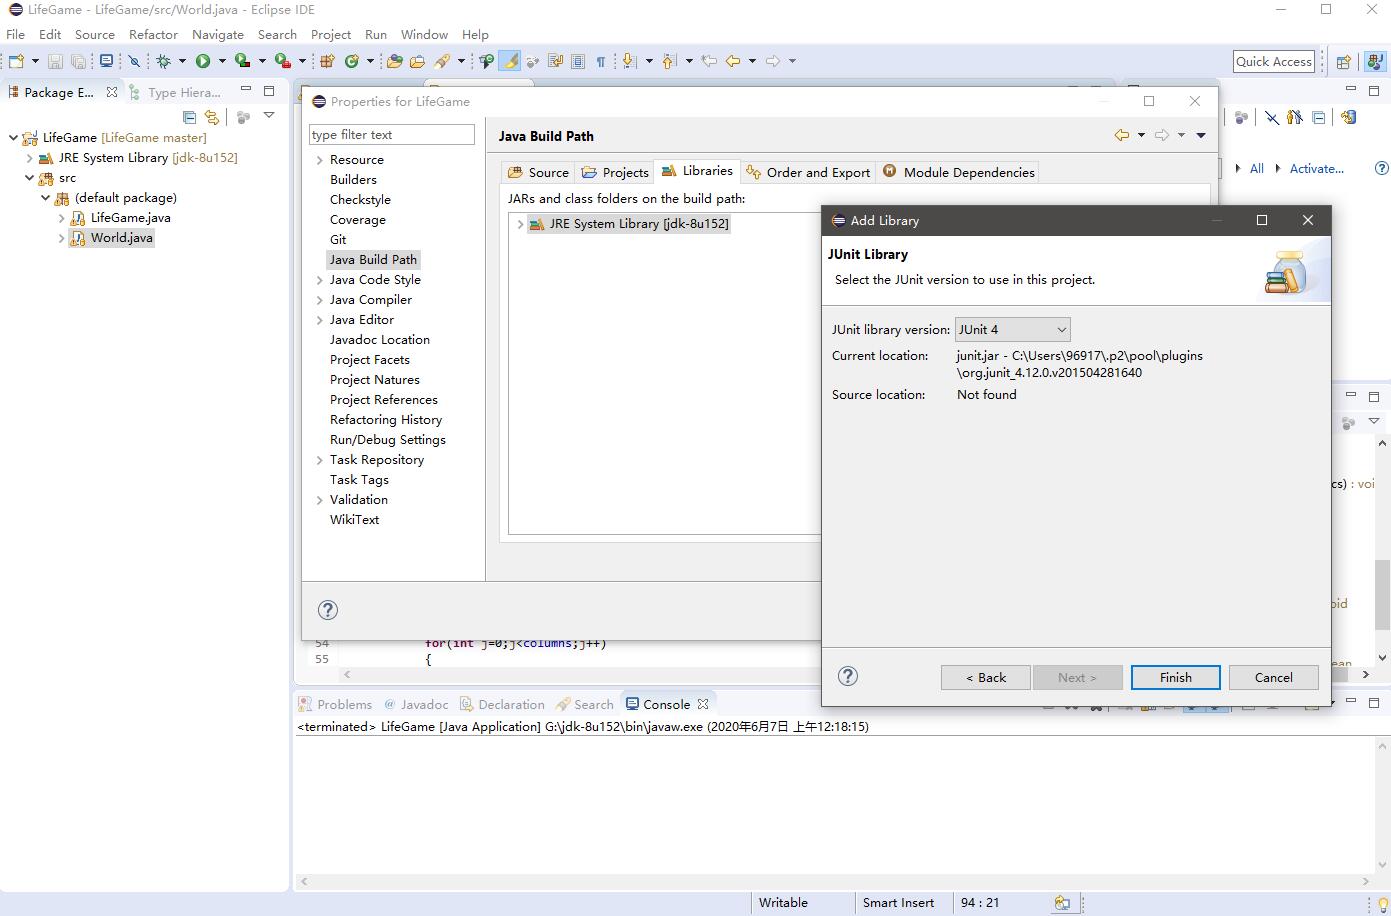
3)选择的测试框架介绍、安装过程
JUnit是一个开发源代码的Java测试框架,用于编写和运行可重复的测试。他是用于单元测试框架体系xUnit的一个实例(用于java语言).
Eclipse 集成了 JUnit,可以非常方便地编写 Test Case。Eclipse 自带了一个 JUnit 插件,不用安装就可以在项目中测试相关的类,并且可以调试测试用例和被测类。
安装junit:
初始化junit
使用junit
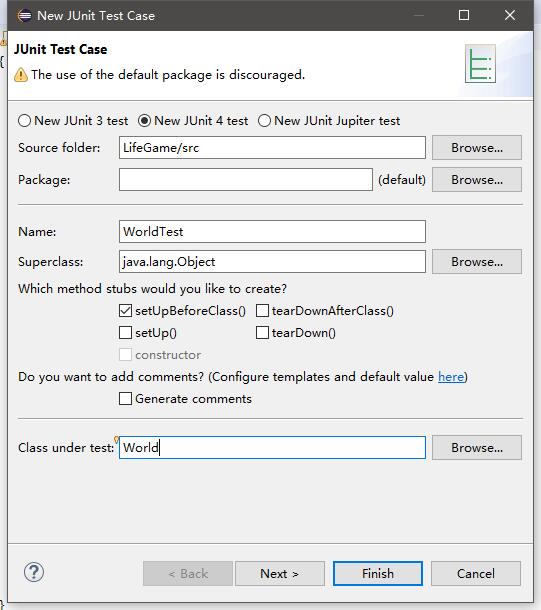
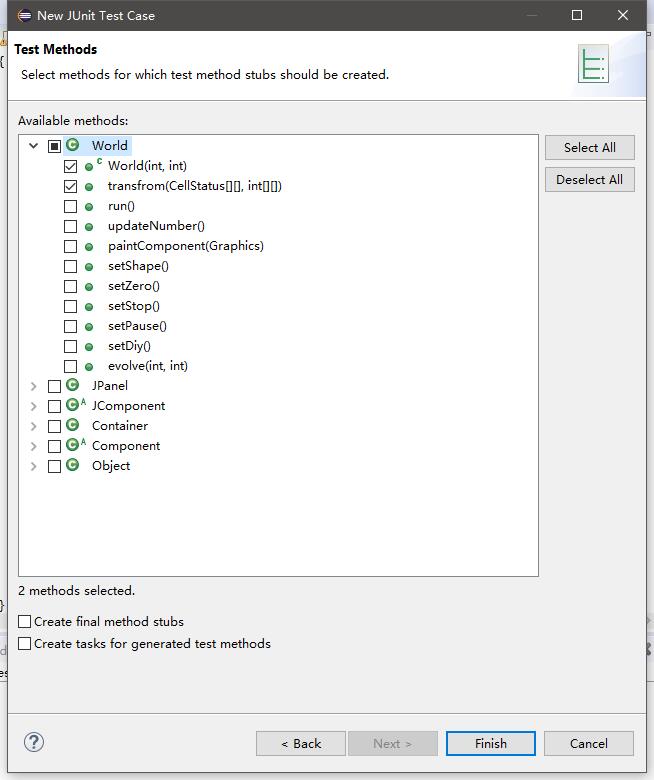
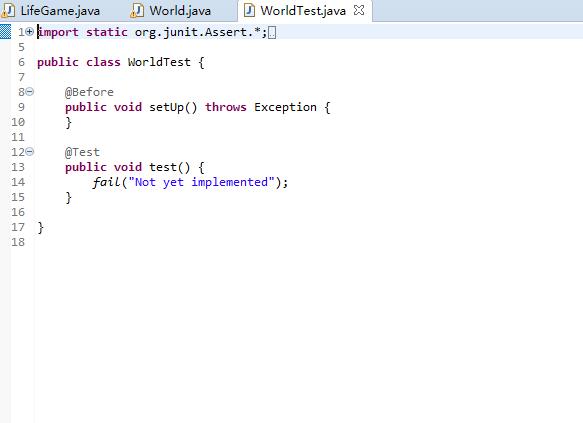
4)测试代码
import static org.junit.Assert.*;

import org.junit.BeforeClass;
import org.junit.Test;

public class WorldTest {
	private static World world;
	private static boolean x = false;
	@BeforeClass
	public static void setUpBeforeClass() throws Exception {
		world = new World(6,6);
	}

	@Test
	public void testRun() {
		for(int i=0;i<6.;i++)
		{
			for(int j=0;j<6;j++)
			{
				world.evolve(i,j);
			}
		}
	}

	@Test
	public void testSetZero() {
		world.setZero();
	}

	@Test
	public void testUpdateNumber()
	{
		String s;
		world.record.setText(s);
	}
}
5)测试结果与分析
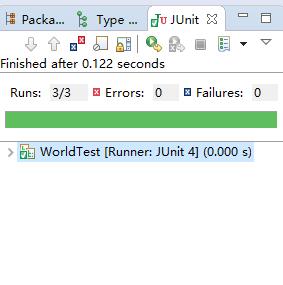
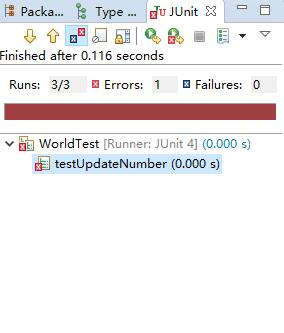
WorldTest
修改值,报错
思考题
比较以下二个工匠的做法,你认为哪种好?结合编码和单元测试,谈谈你的认识。
工匠一的做会保证和线比较很整齐;工匠二的做法是比较快速但无法保证整齐度。
从大规模工程来看工匠一的做法很好,能保证代码的规范性;对于小项目工匠二做法好,能用时短,所需修改不多。
小结
本次实验是对代码进行单元测试,熟悉掌握Java的JUni插件功能。代码的规范可以帮助我们更好更有效的去开发产品,因此通过学习单元测试有助于我们高效的审查代码,检测漏洞,提高开发的效率。

 浙公网安备 33010602011771号