IdentityServer4 (3) 授权码模式(Authorization Code)
写在前面
1、源码(.Net Core 2.2)
git地址:https://github.com/yizhaoxian/CoreIdentityServer4Demo.git
2、相关章节
2.1、《IdentityServer4 (1) 客户端授权模式(Client Credentials)》
2.2、《IdentityServer4 (2) 密码授权(Resource Owner Password)》
2.3、《IdentityServer4 (3) 授权码模式(Authorization Code)》
2.4、《IdentityServer4 (4) 静默刷新(Implicit)》
2.5、《IdentityServer4 (5) 混合模式(Hybrid)》
3、参考资料
IdentityServer4 中文文档 http://www.identityserver.com.cn/
IdentityServer4 英文文档 https://identityserver4.readthedocs.io/en/latest/
OpenID Connect 官网 https://openid.net/connect/
OpenID Connect 中文 https://www.cnblogs.com/linianhui/p/openid-connect-core.html
OpenID Connect和OAuth 2.0对比:https://www.jianshu.com/p/d453076e6433
Oauth 2.0 官网:https://oauth.net/2/
Oauth 2.0 授权框架:https://tools.ietf.org/html/rfc6749#section-4.2.1
4、流程图

1、访问客户端受保护的url
2、跳转到授权服务器认证
3、用户填写认证(账号密码)
4、认证成功,选择授权的scope
5、授权成功(点击同意授权),携带授权码code返回客户端
6、客户端通过后台通信请求AccessToken 和IdToken,如果设置了 OfflineAccess=true也会返回RefreshToken(可以刷新AccessToken)
整个访问流程建议使用fiddler 抓包查看,更好的了解
一、服务端
1、下载一个官方示例
地址:https://github.com/IdentityServer/IdentityServer4.Quickstart.UI
根据自己使用的Core 版本下载对应的,点击 tags 里找,我下载的是2.5,解压后如下图

2、新建一个 web 项目 .NetCore 2.2版本
把官网下载的文件添加到项目中,Quickstart 我换成了Controllers
3、添加配置类 (IdpConfig.cs)
参看 《IdentityServer4 (1) 客户端授权模式(Client Credentials)》里的,直接复制过来就可以了
4、添加客户端
IdpConfig.cs GetClients()
AllowedScopes 属性设置的值,必须在GetApiResources() GetApis() 里提前定义好,并且在 StartUp.cs 里已经注册
   new Client{
       ClientId="mvc client", //客户端Id
       ClientName="测试客户端", //客户端名称 随便写
       AllowedGrantTypes=GrantTypes.Code,//验证模式
       ClientSecrets=
       {
           new Secret("mvc secret".Sha256()) //客户端验证密钥
       },
       // 登陆以后 我们重定向的地址(客户端地址),
       // {客户端地址}/signin-oidc是系统默认的不用改,也可以改,这里就用默认的
       RedirectUris = { "http://localhost:5003/signin-oidc" },
       //注销重定向的url
       PostLogoutRedirectUris = { "http://localhost:5003/signout-callback-oidc" },
       //是否允许申请 Refresh Tokens
       //参考地址 https://identityserver4.readthedocs.io/en/latest/topics/refresh_tokens.html
       AllowOfflineAccess=true,
       //将用户claims 写人到IdToken,客户端可以直接访问
       AlwaysIncludeUserClaimsInIdToken=true,
       //客户端访问权限
       AllowedScopes =
       {
           "api1",
           IdentityServerConstants.StandardScopes.OpenId,
           IdentityServerConstants.StandardScopes.Email,
           IdentityServerConstants.StandardScopes.Address,
           IdentityServerConstants.StandardScopes.Phone,
           IdentityServerConstants.StandardScopes.Profile,
           IdentityServerConstants.StandardScopes.OfflineAccess
       }
   }
5、注册相关信息(StartUp.cs)
ConfigureServices() 注意这里我修改了路径,如果你使用的是 git 下载下来的不需要修改,我这里修改是我把 git 下载的改动了
    services.AddIdentityServer(options =>
    {
        //默认的登陆页面是/account/login
        options.UserInteraction.LoginUrl = "/login";
        //授权确认页面 默认/consent
        //options.UserInteraction.ConsentUrl = "";
    })
    .AddDeveloperSigningCredential()
    .AddInMemoryApiResources(IdpConfig.GetApis())
    .AddInMemoryClients(IdpConfig.GetClients())
    .AddTestUsers(TestUsers.Users)
    .AddInMemoryIdentityResources(IdpConfig.GetApiResources());
Configure()
   // 要写在 UseMvc()前面
   app.UseIdentityServer();
   app.UseMvcWithDefaultRoute();
二、客户端
1、添加认证相关信息(StartUp.cs)
ConfigureServices()
   //关闭了 JWT 身份信息类型映射
   //这样就允许 well-known 身份信息(比如,“sub” 和 “idp”)无干扰地流过。
   //这个身份信息类型映射的“清理”必须在调用 AddAuthentication()之前完成
   //区别可参考下面截图
   JwtSecurityTokenHandler.DefaultInboundClaimTypeMap.Clear();
   //添加认证信息
   services.AddAuthentication(options =>
   {
       options.DefaultScheme = CookieAuthenticationDefaults.AuthenticationScheme;
       options.DefaultChallengeScheme = OpenIdConnectDefaults.AuthenticationScheme;
   })
       .AddCookie(CookieAuthenticationDefaults.AuthenticationScheme)
       .AddOpenIdConnect(OpenIdConnectDefaults.AuthenticationScheme, options =>
       {
           options.SignInScheme = CookieAuthenticationDefaults.AuthenticationScheme;
           //认证服务器
           options.Authority = "http://localhost:5002";
           //去掉  https
           options.RequireHttpsMetadata = false;
           options.ClientId = "mvc client";
           options.ClientSecret = "mvc secret";
           //把 token 存储到 cookie
           options.SaveTokens = true;
           options.ResponseType = OpenIdConnectResponseType.Code;
           //添加申请 权限 ,这里的 scope 必须在授权服务端定义的客户端 AllowedScopes 里
           options.Scope.Clear();
           options.Scope.Add("api1");
           options.Scope.Add(OidcConstants.StandardScopes.OpenId);
           options.Scope.Add(OidcConstants.StandardScopes.Email);
           options.Scope.Add(OidcConstants.StandardScopes.Address);
           options.Scope.Add(OidcConstants.StandardScopes.Phone);
           options.Scope.Add(OidcConstants.StandardScopes.Profile);
           options.Scope.Add(OidcConstants.StandardScopes.OfflineAccess);

           options.Events = new OpenIdConnectEvents
           {
               OnAuthenticationFailed = context =>
               {
                   context.HandleResponse();
                   context.Response.WriteAsync("验证失败");
                   return Task.CompletedTask;
               }
           };
       });
Configure()
   //写在 UseMvc() 前面
   app.UseAuthentication();
   app.UseMvcWithDefaultRoute();
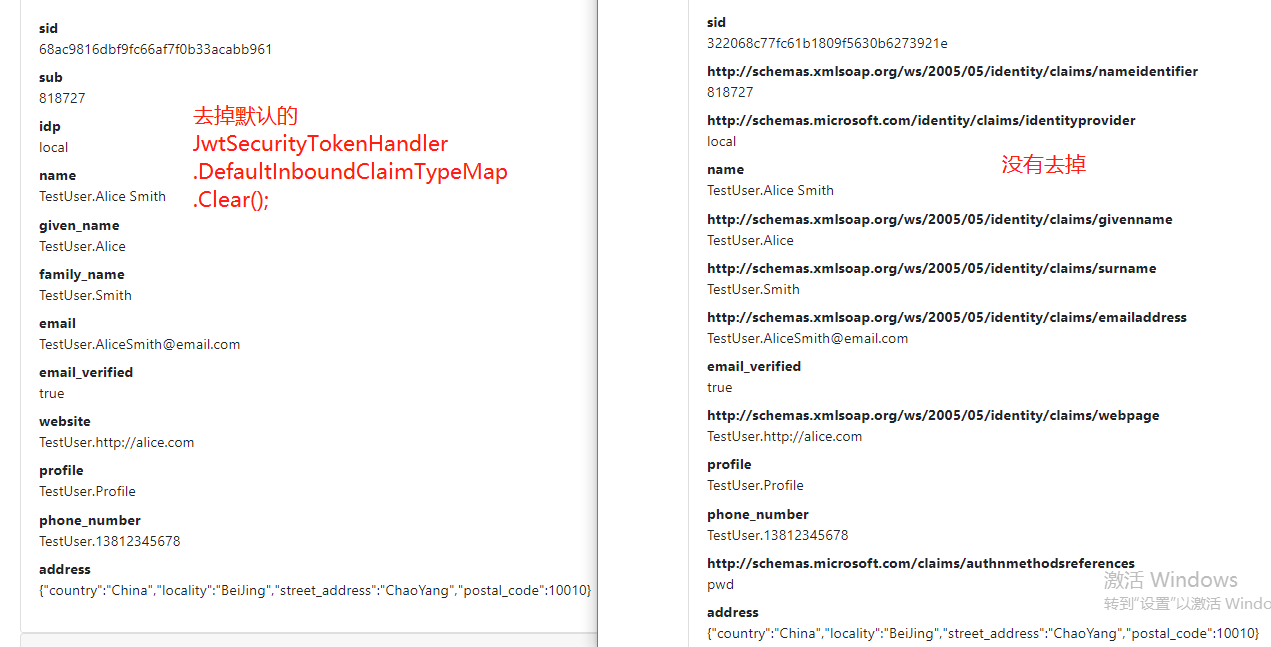
JwtSecurityTokenHandler.DefaultInboundClaimTypeMap.Clear(); 区别
2、添加测试Controller
    [Authorize]
    public class TestController : Controller
    {
        /// <summary>
        /// 测试从服务端认证
        /// </summary>
        /// <returns></returns>
        public async Task<IActionResult> Private()
        {
            var accessToken = await HttpContext.GetTokenAsync(OpenIdConnectParameterNames.AccessToken);
            var idToken = await HttpContext.GetTokenAsync(OpenIdConnectParameterNames.IdToken);

            var refreshToken = await HttpContext.GetTokenAsync(OpenIdConnectParameterNames.RefreshToken);
            var code = await HttpContext.GetTokenAsync(OpenIdConnectParameterNames.Code);

            var model = new HomeViewModel
            {
                Infos = new Dictionary<string, string>()
                {
                    {"AccessToken", accessToken },
                    {"IdToken", idToken },
                    {"RefreshToken", refreshToken },
                    {"Code", code } //code 是空 因为code 是一次性的
                }
            };
            return View(model);
        }

        /// <summary>
        /// 测试请求API资源(api1)
        /// </summary>
        /// <returns></returns>
        public async Task<IActionResult> SuiBian()
        {
            var accesstoken = await HttpContext.GetTokenAsync(OpenIdConnectParameterNames.AccessToken);
            if (string.IsNullOrEmpty(accesstoken))
            {
                return Json(new { msg = "accesstoken 获取失败" });
            }
            var client = new HttpClient();
            client.SetBearerToken(accesstoken);
            var httpResponse = await client.GetAsync("http://localhost:5001/api/suibian");
            var result = await httpResponse.Content.ReadAsStringAsync();
            if (!httpResponse.IsSuccessStatusCode)
            {
                return Json(new { msg = "请求 api1 失败。", error = result });
            }
            return Json(new
            {
                msg = "成功",
                data = JsonConvert.DeserializeObject(result)
            });
        }
    }
三、API资源
参考上一篇《IdentityServer4 (1) 客户端授权模式》
修改SuiBianController.Get()
   [HttpGet]
   public IActionResult Get()
   {
       return new JsonResult(from c in User.Claims select new { c.Type, c.Value });
   }
四、测试
1、端口说明
【客户端:5003】【 API :5001 】【 授权认证服务器:5002】,并确认3个端口可以正常访问
2、客户端访问
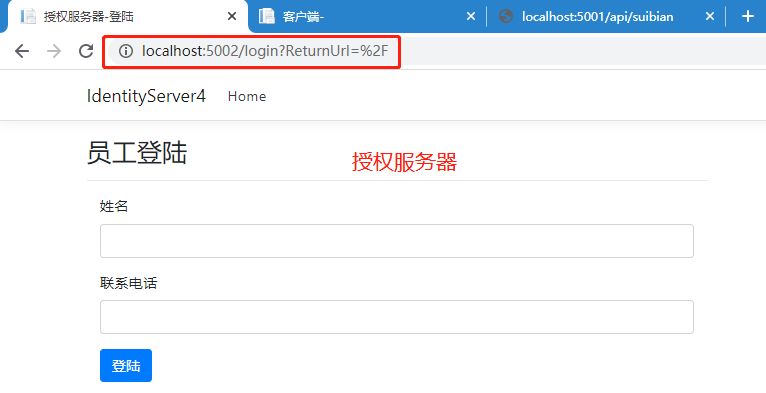
2.1 、输入地址:http://localhost:5003/test/private 查看是否可正常跳转到授权服务器,

2.2、正常跳转,输入账号(alice)密码(alice)并登陆。登陆成功,并显示可授权的信息
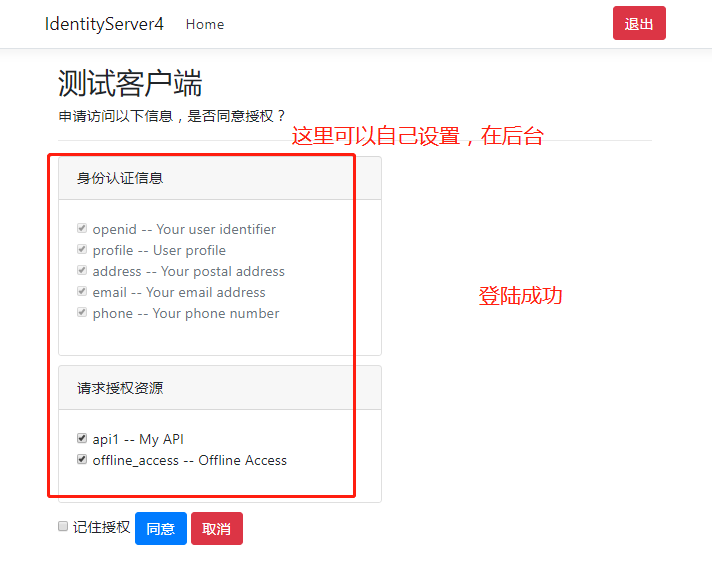
2.3、点击授权同意,返回相关授权信息,并展示在页面
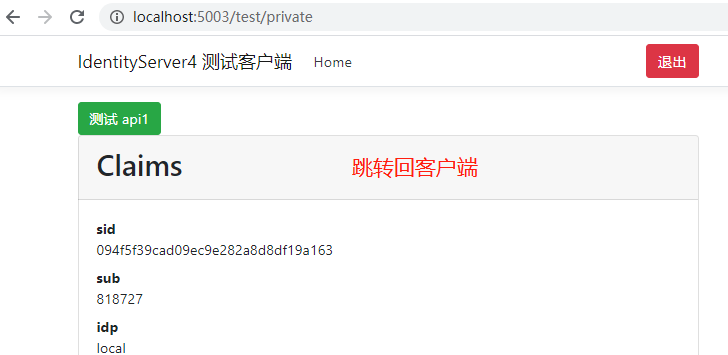
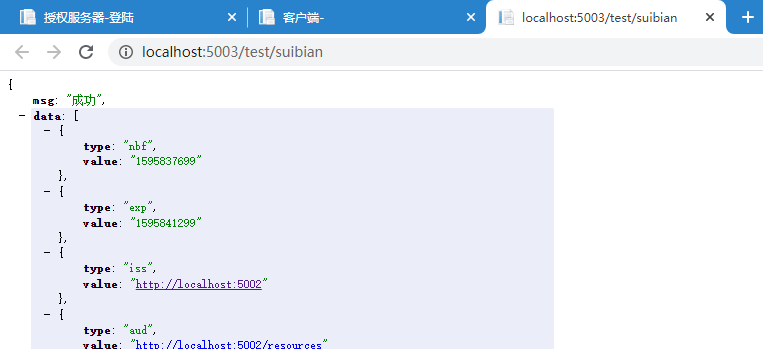
2.4 、输入地址 http://localhost:5003/test/suibian 访问 API 资源,正确返回

 浙公网安备 33010602011771号