CSS3总结三:文字(text)/字体、文本、文本装饰、多列
-
Text-Decoration
- text-shadow
- text-decoration
-
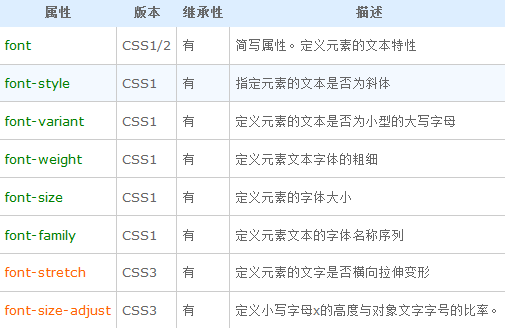
Font
- font
- font-face
-
Text
- 常用Text属性
-
Multi-column
- Multi-column
- Multi-column可以实现瀑布流布局吗?
- Multi-column实现小说翻页功能
一、Text-Decoration(文本样式)
1.1、text-shodow:文字阴影
文字阴影与元素阴影的语法基本一致,但是不能放大阴影。语法:text-shadow:length(水平偏移) length(垂直偏移) length(阴影模糊长度) color(阴影颜色);应用文字阴影设置一些示例样式:文字浮雕样式、文字镂刻样式、文字阴影投射、结合CSS3动画的一个小实验。
1 color: #ddd;
2 font-size: 30px;
3 font-weight: 400;
4 text-shadow: 1px 1px 1px #2b2b2b,-2px -2px 1px #fff;
text-shadow: -1px -1px 1px #2b2b2b;
text-shadow: -6px -6px 1px #5e5e5e,-1px -1px 1px #2b2b2b, 1px 1px 1px #ffa;
text-shadow与transition动画结合实现阴影投射变幻效果:

动画实现代码:


 1 *{
 2     margin: 0;
 3     padding: 0;
 4 }
 5 .root,
 6 body{
 7     width: 100%;
 8     background-color: #2b2b2b;
 9 }
10 div{
11     width: 300px;
12     height: 100px;
13     position: absolute;
14     top: calc(50% - 50px);
15     left: calc(50% - 150px);
16     background-color: #0ff;
17
18     color: #bbb;
19     font-size: 30px;
20     font-weight: 400;
21     text-align: center;
22     line-height: 100px;
23
24     text-shadow:1px 1px 1px #bbb,
25                 1px 1px 1px #bbb,
26                 1px 1px 1px #ffa;
27
28     transition: all 1s;
29 }
30 div:hover{
31     text-shadow: -6px -6px 1px #5e5e5e,
32                  -1px -1px 1px #2b2b2b,
33                  1px 1px 1px #ffa;
34 }
下面这个text-shadow+动画效果不想上传效果图,如果有看官感觉不适告诉我删除:

 1 div{
 2     width: 400px;
 3     height: 150px;
 4     position: absolute;
 5     top: calc(50% - 75px);
 6     left: calc(50% - 200px);
 7
 8     background-image: url('eye.jpeg');
 9     -webkit-background-clip: text;
10     -webkit-text-fill-color: transparent;
11
12     background-size: 400px 300px;
13     background-position: 0px -60px;
14
15
16     color: #bbb;
17     font-size: 100px;
18     font-weight: 700;
19     text-align: center;
20     line-height: 150px;
21
22     text-shadow: 0px 0px 1px      #8B2500;
23
24     transition: all 3s;
25 }
26 div:hover{
27     text-shadow: 0px 0px 100px      #000;
28 }
webkit一个特有的效果:
color:transparent;
font-family:simsun;
-webkit-text-stroke:1px red;
1.2、text-decoration:文字装饰样式(划线)
语法:(这个样式基本属于鸡肋,因为a标签天生自带这个属性,通常都会被取消默认样式,所以这个属性更多是用来取消的,还有就是一个中划线用来表示删除的作用了)
text-decoration:text-decoration-line || text-decoration-style || text-decoration-color
取消默认样式和中划线:
text-decoration:none;//取消文字装饰样式
text-decoration:line-through solid #bbb;//中划线
二、Font(字体样式)
2.1、font(字体)
字体样式基本上都是CSS2的属性,CSS3有两个添加属性font-stretch(字体宽度伸缩)、font-size-adjust(字体高度与字号比)。
2.2、@font-face:设置嵌入HTML文档的OpenType字体。
这个属性现在多被应用添加特殊符号,如果大范围使用特殊字体会有很大的性能损耗,英文文本字体应用性能不会有什么影响,但是对于多达几万字的汉字一个字体包几MB很常见,甚至多大几十MB,所以一般不会被应用。
在演示具体的@font-face的使用前,先来了解一下字体提示器format()。
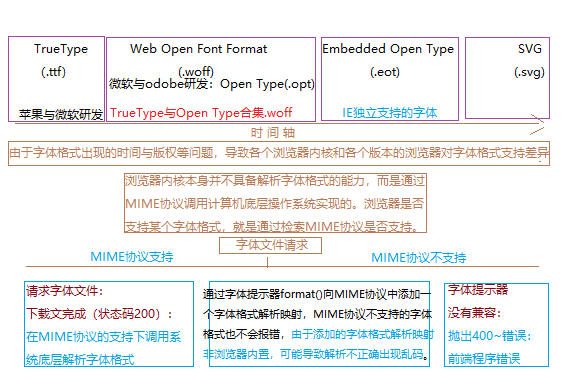
在CSS3手册中有当前主流浏览器的字体文件加载的兼容代码:
@font-face {
   font-family: 'diyfont';/* 定义字体名称,供使用到时引用 */
  src: url('diyfont.eot'); /* IE9+ */
  src: url('diyfont.eot?#iefix') format('embedded-opentype'), /* IE6-IE8 */
      url('diyfont.woff') format('woff'), /* chrome、firefox */
      url('diyfont.ttf') format('truetype'), /* chrome、firefox、opera、Safari, Android, iOS 4.2+*/
      url('diyfont.svg#fontname') format('svg'); /* iOS 4.1- */
}
diyfont表示自定义字体文件路径。然后再来看看手册中提供的特殊字体格式包的使用(富文本编辑器没法实现字体加载,只能提供截图):

//css @font-face{ font-family: 'iconfont'; src:url("http://at.alicdn.com/t/font_1397098551_95441.eot");/* 兼容IE */ src: url('http://at.alicdn.com/t/font_1397098551_95441.eot?#iefix') format("embedded-opentype"), url('http://at.alicdn.com/t/font_1397098552_0142624.woff') format("woff"), url('http://at.alicdn.com/t/font_1397098551_8732882.ttf') format("truetype"), url('http://at.alicdn.com/t/font_1397098552_0586202.svg#iconfont') format("scg"); } p{ font-family: 'iconfont'; } //html <p>㐳㐴㐵㐶㐷㐸㐹㐺㐻㐼㐽㐾㐿㑀㑁㑂㑃㑄㑅㑆㑇㑈㑉㑊㑋㑌㑍㑎㑏㑐㑑㑒㑓㑔㑕㑖㑗㑘㑙㑚㑛㑜㐲㐷㐸㐹㐺㐻㐼㐽㐾㐿㑀㑁㑂㑋㑌㑍㑎㑏㑐㑑㑒㑓㑔㑕㑖㑗㑘㑙㑚㑛㑜㑝㑞㑟㑡㑢㑣㑤㑥㑦㑧㓾㓿㔀㔁㔂㔃</p>
三、Text(文本)
1.1、常用Text属性:
| 属性 | 版本 | 继承 | 说明 |
| text-align | css1/css3 | 有 | 定义元素水平对齐方式 |
| line-height | css1 | 有 | 定义元素中行框的最小高度 |
| word-break | css3 | 有 | 元素文本(字)遇到边界如何换行(主要应用break-word指定英文单词以整个单词进行换行操作) |
| word-wrap/overflow-wrap | css3 | 有 | 元素文本遇到边界如何换行(同上) |
word-break:keep-all;不允许在文字间发生换行
word-break:break-all;允许在文字间发生换行(保留空格换行的编辑格式)
word-break:break-word;//英文单词按照整个单词进行换行显示
overflow-wrap/word-wrap:break-word;英文单词按照整个单词进行换行显示
white-space:nowrap;//禁止文本换行,超出溢出处理
三、Multi-column(多列)
1.1、Multi column(多列的属性及应用):
- columns:设置每列的宽度 设置列数;(同等与columns-width+columns-count)如果列数*列宽超过容器宽度,会默认自动按照列宽自适应列数。
- column-width:列宽。列数自适应。
- column-count:列数。列宽自适应。
- column-gap:定义间隙宽度,不能取负值。
- column-rule:边框宽度 边框样式 边框颜色。(用法与border一致)列于列之间的边框,同等于:<' column-rule-width '> || <' column-rule-style '> || <' column-rule-color '>。
- column-span:横跨所有列,不能被设置浮动和定位的块级元素。(多列容器的内部块级元素)
1.2、Multi column真的可以实现瀑布流吗?:
听说很多人认为column能做出瀑布流效果,实测如果要实现标准的瀑布流效果column是办不到的,除非严格设定容器宽高,子元素刚好填充每个位置。这种效果最多算是自动橱窗布局,毕竟瀑布流本身就是为了解决高度不一致的子元素排列布局,那下面就来具体解析一下column为什么不能实现标准的瀑布流:
结论来了:column(列)的结构添加方式并非遵循瀑布流的length(高度)最小列的原则,而是遵循最高高度为多数原则,这就是第九张图片添加进去改变了列原来的排列结构的原因。如果按照瀑布流最小高度原则,同高度放第一列的话,那么第一列就是最高列3张图片,但是其他三列都为两种图片的高度;所以就会从最后一列拿图片添加到第二列,这时候就是3,3,2,1的高度比例,3张图片的两列,其他两列,比例为1:1,还没有达到最高高度多数原则;这时候又从最后一列拿图片添加到第三列,最高多数原则比例为3:0,达到了最高多数原则。这就是column(列)不能实现瀑布流的原则,就算是橱窗布局都不建议使用,因为结构变化导致重排消耗性能远远大于传统的布局方式。
1.2、Multi column实现小说阅读翻页功能:
 1 <div class="wrapper">
 2     <div class="maskant"></div>
 3     <div class="reading">
 4                <!--这里给四个页面的文字测试-->
 5         </div>
 6 </div>
 7 <!--css-->
 8 *{
 9     margin: 0px;
10     padding: 0px;
11 }
12 .root,
13 body{
14     width: 100%;
15 }
16 .wrapper{
17     position: absolute;
18     top: calc(50% - 250px);
19     left: calc(50% - 150px);
20     width: 300px;
21     height: 500px;
22     border: 1px solid #888;
23     background-color: #ffa;
24
25     overflow: hidden;
26 }
27 .reading{
28     height: 500px;
29     padding-left: 0px;
30     margin-left: 0px;
31     column-width: 280px;
32     column-gap: 20px;
33
34
35 }
36 .maskant{
37     position: absolute;
38     width: 100%;
39     height: 100%;
40     /* background-color: red; */
41 }
  1 // 1.当鼠标按下reading时获取获取
  2 //      margin-left
  3 //      e.clientX e.clientY -- 获取鼠标的位置(相对于文档显示区域的位置)
  4 //      dom.offsetTop dom.offsetTop -- 相对父级的位置偏移量(通过wrapper获取到元素实际的文档可视位置)
  5 //      由于实际项目中都采用第三方库或者框架实现,这些库和框架中都包含获取dom位置的方法和属性,这里就不封装了
  6 // 2.当鼠标移动时,reading跟随鼠标移动左右移动
  7 //      在移动过程中元素的横向移动超过1/2时触发翻页
  8 //     如果横向移动没有超过1/2(鼠标抬起时被视为鼠标移动结束),判断鼠标是垂直移动还是横向移动(移动方向与垂直线的角度超过45°被视为横向移动)
  9 // 3.如果是横向移动则以鼠标的最后横向移动速度做减速运动,如果元素移动距离超过1/2,触发翻页,否则页面回弹到原来的位置。
 10
 11 // 需要的组件
 12 // --1:鼠标按一下时获取dom数据
 13 // --2:鼠标移动时实现元素拖拽功能(X轴)、计算元素移动速度、触发翻页功能
 14 // --3:鼠标抬起时实现元素滑缓冲运动、触发翻页功能
 15 // --4:回调函数:翻页功能、滑动缓冲运动、判断鼠标移动方向
 16
 17 //这里提供一个模拟的章节对象
 18 var article = {
 19     text:"",
 20     pageNum:4
 21 }
 22
 23
 24
 25 //----原生js实现----------------------------------------------------------------------------------------------------------------------------
 26
 27 var wrapperDom = getElementsByClass("wrapper")[0];//获取wrapper
 28 var readingDom = getElementsByClass("reading",wrapperDom)[0];//获取reading
 29
 30 var wrapperWidth = Number.parseInt(getStyle(wrapperDom,"width"));//获取wrapper的宽度
 31 var readMarLeft = Number.parseInt(getStyle(readingDom,"marginLeft"));//获取reading的左侧外边距
 32 var readMarTop = Number.parseInt(getStyle(readingDom,"marginTop"));//获取reading的上外边距
 33
 34 var wrapperCoorX = wrapperDom.offsetLeft;//wrapper的横坐标
 35 var wrapperCoorY = wrapperDom.offsetTop;//wrapper的纵坐标
 36
 37
 38 var pagination = 1;//初始化当前阅读章节的页码
 39
 40  // 测试
 41  // readingDom.onclick = function(){
 42  //     // readTurn(article,"left");//翻页切换实现--通过测试
 43  // }
 44
 45  //鼠标按下时获取鼠标的坐标
 46  // --注册鼠标移动事件:鼠标移动时reading跟随左右移动;并记录最后一次移动的速度,如果移动过程中reading移动距离超过1/2,直接触发翻页功能,并且取消鼠标移动事件,鼠标抬起事件不再注册
 47  // --注册鼠标抬起事件:鼠标抬起时,取消鼠标移动事件,接着取消鼠标抬起事件本身,然后根据最后一次移动速度触发reading滑动缓冲运动
 48 wrapperDom.onmousedown = function(e){//注册鼠标按下事件
 49     var event = e || window.event;
 50     // 获取鼠标按下时的坐标
 51     var disX = e.clientX;
 52     var disY = e.clientY;
 53     // 缓存鼠标每次移动定位前一次的位置
 54     var lastX = disX;
 55     var lastY = disY;
 56     // 缓存鼠标每次移动的速度 --初始速度为0
 57     var speedX = 0;
 58     var speedY = 0;
 59     // 缓存鼠标移动方向 ==> 横向 === ["left","right"] : 纵向 == ["top","bottom"]
 60     var mouseDirectionX = "";
 61     var mouseDirectionY = "";
 62     // 注册鼠标抬起事件
 63     wrapperDom.onmouseup = buffermove;
 64     // 注册鼠标移出事件
 65     wrapperDom.onmouseout = buffermove;
 66     // 缓存每次移动定位与初始点击位置的距离
 67     var x = 0;
 68     var y = 0;
 69
 70     //注册鼠标移动事件
 71     wrapperDom.onmousemove = function(e){
 72         // 记录每次移动定位与初始点击位置的距离
 73         x = Math.abs(e.clientX - disX);
 74         y = Math.abs(e.clientY - disY);
 75         //每次移动定位时刷新移动方向
 76         mouseDirectionX = e.clientX - lastX < 0 ? "left" : "right";
 77         mouseDirectionY = e.clientY - lastY < 0 ? "top" : "bottom";
 78         // console.log(x,y);
 79         // console.log(x,wrapperWidth/2);
 80         if( x/y > 1){    // 当x/y > 1时表示鼠标移动的方向是横向移动
 81             if(x < wrapperWidth/2){
 82                 // 鼠标横移范围小于宽度的1/2时触发跟随横向移动--并且记录每次移动的速度-->刷新下次移动前的位置记录
 83                 // 当鼠标为横向移动时readingDom实现拖拽运动 === 当鼠标向右移动时 : 当鼠标向左移动时
 84                 readingDom.style.marginLeft = e.clientX - disX > 0 ? (readMarLeft + x) + "px" : (readMarLeft - x) + "px";
 85                 // 计算移动速度 === 最新的移动定位 - 移动定位的上一次位置
 86                 speedX = e.clientX - lastX;
 87                 speedY = e.clientY - lastY;
 88                 // 刷新下次移动前的位置记录
 89                 lastX = e.clientX;
 90                 lastY = e.clientY;
 91             }else{
 92                 // 取消鼠标移动事件
 93                 wrapperDom.onmousemove = null;
 94                 // 取消鼠标抬起事件
 95                 wrapperDom.onmouseup = null;
 96                 // 取消鼠标移出事件
 97                 wrapperDom.onmouseout = null;
 98
 99                 // 触发翻页方法
100                 // 匀速运动
101                 // --用于翻页时采用最后检测的速度运输运动到下一页
102                 // --用于缓冲运动后移动距离还没有达到1/2距离的时候,采用匀速运动到页面最初的位置
103                 readTurn(article,mouseDirectionX);
104             }
105         }else{
106             // 当x/y < 1时表示鼠标移动的方向是纵向(这里暂时用不到纵向,保留给其他功能使用)
107         }
108     }
109     // 用于注册鼠标抬起事件和鼠标移出事件:
110     // 鼠标抬起或移出时,取消鼠标移动事件,取消鼠标抬起事件,取消鼠标移出事件
111     // 然后根据最后一次移动速度触发reading滑动缓冲运动
112     function buffermove(){
113         // 取消鼠标移动事件
114         wrapperDom.onmousemove = null;
115         // 取消鼠标抬起事件
116         wrapperDom.onmouseup = null;
117         // 取消鼠标移出事件
118         wrapperDom.onmouseout = null;
119         // 执行缓冲运动
120         // 滑动缓冲运动
121          inertia(readingDom,{x:Math.abs(speedX),y:0,time:300,directionX:mouseDirectionX,directionY:mouseDirectionY},correction);
122
123     }
124     //由于setInterval异步执行,所以滑动后的监测数据不能回传,只能采用回调函数的方式执行后面的动画效果
125     //滑动时监测reading移动距离是否超过1/2,如果超过触发翻页功能,如果滑动到最大距离时都没有超过1/2,reading弹回原来的位置
126     // 参数:数据类型--语法
127     // dom:dom对象--只支持dom节点
128     // formerObj:对象--鼠标移动结束时的DOM状态,
129     // ----------------intiTop,intiLeft表示鼠标的移动结束时的margin-top,margin-left的距离,
130     // ----------------directionX,directionY表示鼠标移动结束时的滑动方向(X横向,Y纵向),分别有值:[left,right],[top,bottom]
131     function correction(dom,formerObj,callback){
132         var berthTop = Number.parseInt(getStyle(dom,"marginTop"));//获取滑动后的元素外边距(上)
133         var berthLeft = Number.parseInt(getStyle(dom,"marginLeft"));//获取滑动后的元素外边距(左)
134         var totalX =Math.abs(berthLeft - readMarLeft);
135         var totalY =Math.abs(berthTop - readMarTop);
136         if(totalX > 0 && totalY == 0){
137             // 这里执行横向滑动后的操作--有两种情况
138             // 一种是滑动后的距离(包括鼠标的移动距离)超过宽度的一半即(x > wrapperWidth/2),执行翻页功能
139             // 一种是滑动后的距离(包括鼠标的移动距离)没有超过宽度的一半即(x < wrapperWidth/2)执行返回原来页面的功能
140             if(totalX > wrapperWidth/2){
141                 readTurn(article,formerObj.directionX);
142             }else if(totalX < wrapperWidth/2){
143                 startMove(readingDom,{"marginLeft":readMarLeft},300,"swing");
144             }
145
146         }else if(totalY > 0 && totalX == 0){
147             // 这里预留给纵向滑动回弹效果或者其他操作
148         }
149     }
150 }
151
152 // 滑动缓冲运动
153 // --参数:数据类型--语法
154 // dom:dom对象--只支持dom节点
155 // speedObj:对象--x,y属性表示横纵方向上的速度,time指定滑动的时间,directionX,Y属性表示运动方向(横向运动时y轴传入0,反正x为0)
156 // callback:函数--如果有回调函数执行回调函数(这里暂时用于调用滑动后的动画效果)
157 var inertia = function(dom,speedObj,callback){
158     var cTime = createTime();//运动开始执行的时间戳
159     var speedX = speedObj.x * 5;//x轴方向的运动速度
160     var intiTop = Number.parseInt(getStyle(readingDom,"marginTop"));//获取初始的margin-top
161     var intiLeft = Number.parseInt(getStyle(readingDom,"marginLeft"));//获取初始的margin-left
162     var speedY = speedObj.y;//y轴方向的运动速度
163     var speedTime = speedObj.time;//指定运动时间
164     var directionX = speedObj.directionX;//x轴的运动方向
165     var directionY = speedObj.directionY;//y轴的运动方向
166     var timer = setInterval(function(){
167         if(directionX == "left" && directionY == "top"){
168             dom.style.marginLeft = (Number.parseInt(getStyle(dom,"marginLeft")) - speedX ) + "px";
169             dom.style.marginTop = (Number.parseInt(getStyle(dom,"marginTop")) - speedY) + "px";
170             speedX = speedX * 0.7;
171             speedY = speedY * 0.7;
172         }else if(directionX == "left" && directionY == "bottom"){
173             dom.style.marginLeft = (Number.parseInt(getStyle(dom,"marginLeft")) - speedX ) + "px";
174             dom.style.marginTop = (Number.parseInt(getStyle(dom,"marginTop")) + speedY) + "px";
175             speedX = speedX * 0.7;
176             speedY = speedY * 0.7;
177         }else if(directionX == "right" && directionY == "top"){
178             dom.style.marginLeft = (Number.parseInt(getStyle(dom,"marginLeft")) + speedX) + "px";
179             dom.style.marginTop = (Number.parseInt(getStyle(dom,"marginTop")) - speedY) + "px";
180             speedX = speedX * 0.7;
181             speedY = speedY * 0.7;
182         }else if(directionX == "right" && directionY == "bottom"){
183             dom.style.marginLeft = (Number.parseInt(getStyle(dom,"marginLeft")) + speedX) + "px";
184             dom.style.marginTop = (Number.parseInt(getStyle(dom,"marginTop")) + speedY) + "px";
185             speedX = speedX * 0.7;
186             speedY = speedY * 0.7;
187         }
188         if((createTime() - cTime) >= speedTime){
189             clearInterval(timer);
190             return typeof callback == "function" ? callback(dom,{intiTop:intiTop,intiLeft:intiLeft,directionX:directionX,directionY:directionY}) : "";
191         }
192     },30);
193 }
194
195  //获取当前时间戳
196 var createTime = function(){
197     return (+new Date);
198 }
199
200 //由于column(多列)元素无法获取其准确的宽度,只能依靠文章的字节长度来计算得出文字的页数,这一操作一般在后台进行,所以翻页功能要依靠一个模拟的章节对象
201 //翻页功能
202 // --参数:数据类型--语法格式
203 // obj:对象--文章章节对象--后台数据提供(包括:文章内容,文章页数)
204 // direction:字符串--(参数:"left"或者"right")表示向左或者向右翻页
205 var readTurn = function(obj,direction){
206     if(pagination < obj.pageNum && direction === "left"){
207         readMarLeft -= wrapperWidth;
208         pagination ++;
209     }else if(pagination > 1 && direction === "right"){
210         readMarLeft += wrapperWidth;
211         pagination --;
212     }
213     // console.log(readMarLeft+"px");
214     // readingDom.style.marginLeft = readMarLeft + "px";//这里需要一个匀速运动执行翻页功能
215     // 使用动画函以匀速过渡到目标位置实现翻页功能
216     // startMove(运动体,目标位置,运动时间,运动行为,回调函数)
217     startMove(readingDom,{"marginLeft":readMarLeft},300,"swing");
218 }
219 // 获取DOM的样式值
220 // --参数:数据类型--语法格式
221 // --obj:DOM对象--纯DOM对象
222 // --attr:字符串--样式属性名称,带'-'中划线的省略中划线,采用大驼峰写法
223 function getStyle(obj,attr){
224     if(window.getComputedStyle){
225         return window.getComputedStyle(obj,false)[attr];//IE的方法
226     }else{
227         return obj.currentStyle[attr];//标准浏览器的方法
228     }
229 }
230 //通过class类名获取元素对象的兼容方法
231 // --参数:数据类型--语法格式
232 // --className:字符串--可以传入多个类名,以空格的方式间隔
233 // --context:对象--可选,默认document,可以指定DOM对象(这里只支持单个DOM对象,不支持DOM对象数组)
234 function getElementsByClass(className,context){
235     context = context || document;
236     var ary = [];//用来缓存匹配的元素对象
237     // 通过replace()去除字符串的前后空格,再通过split()以空格为间隔将字符串转换成数组
238     var classNameArry = className.replace(/(^ +| +$)/g,"").split(/ +/g);
239     // 获取指定上下文的所有元素标签
240     var nodeList = context.getElementsByTagName("*");
241     // 循环nodelist,获取匹配的元素DOM
242     for(var i = 0,len = nodeList.length; i < len; i++){
243         var curNode = nodeList[i];
244         var isOk = true;//假设元素是匹配的
245         // 循环类名数组,判断数组中的类名是否都能再元素的class属性上
246         for(var j = 0; j < classNameArry.length; j++){
247             var curName = classNameArry[j];
248             var reg = new RegExp("(^| +)" + curName + "( +|$)");
249             if(!reg.test(curNode.className)){
250                 isOk = false;
251                 break;
252             }
253         }
254         if(isOk){
255             ary.push(curNode);
256         }
257     }
258     return ary;
259 }
260
261
262
263 //运动方法startMove的参数:
264 //obj:运动物体;
265 //json:目标位置,最终样式值(键值对的形式合成的目标位置对象)
266 //speed:运动时间(指定运动的时间)
267 //callback:回调函数
268 function startMove(obj,json,speed,easing,callback){
269     //初始位置,移动距离,当前位置
270     var initialPlace = {};
271     //新的位置(每次运动的目标点)
272     var nowPlace;
273     //结束之前的定时器
274     clearInterval(obj.timer);
275     //获取当前时间戳
276     var createTime = function(){
277         return (+new Date);
278     }
279     //动画开始的时间戳
280     var startTime = createTime();
281     //初始位置对象
282     for(var attr in json){
283         if(attr == 'opacity'){
284             initialPlace[attr] = Math.round(parseFloat(getStyle(obj,attr))*100);
285         }else{
286             initialPlace[attr] = parseInt(getStyle(obj,attr));
287         }
288     }
289     //对象行为 -- 默认:swing(匀速)
290     if(!easing){
291         easing = easingObj.swing;
292     }else{
293         easing = easingObj[easing];
294     }
295     //定时器
296     obj.timer = setInterval(function(){
297         //每次变化的时间
298         //剩余时间 = Math.max(0,运动开始的时间 + 运动执行事件 - 当前时间) -- 当剩余时间为负数时,返回0
299         var remaining = Math.max(0, startTime + speed - createTime());
300         //剩余时间比 = 剩余时间 / 运动时间
301         var temp = remaining / speed || 0;
302         //当前时间比 = 1 - 剩余时间比 -- 即执行到某处时间节点
303         var percent = 1 - temp;
304         //循环运动到时间节点位置
305         for(var  attr in json){
306             nowPlace = (json[attr] - initialPlace[attr]) * easing(percent) + initialPlace[attr];
307             if(attr == 'opacity'){
308                 obj.style.opacity = nowPlace / 100;
309             }else{
310                 obj.style[attr] = nowPlace + 'px';
311             }
312         }
313         //当前时间与运动时间比为1:1时,说明到达运动终点了,结束定时器,并判断是否有回调函数
314         if(percent == 1){
315             clearInterval(obj.timer);
316             typeof callback == 'function' ? callback() : '';
317         }
318     },30);
319 }
320 // 定义一些运动行为对象
321 var easingObj ={
322     linear: function( p ) {
323         return p;
324     },
325     swing: function( p ) {
326         return 0.5 - Math.cos( p*Math.PI ) / 2;
327     },
328     background:function(k) {
329         if (k < (1 / 2.75)) {
330             return 7.5625 * k * k;
331         } else if (k < (2 / 2.75)) {
332             return 7.5625 * (k -= (1.5 / 2.75)) * k + 0.75;
333         } else if (k < (2.5 / 2.75)) {
334             return 7.5625 * (k -= (2.25 / 2.75)) * k + 0.9375;
335         } else {
336             return 7.5625 * (k -= (2.625 / 2.75)) * k + 0.984375;
337         }
338     }
339 }
 1 <div class="wrapper">
 2     <div class="maskant"></div>
 3     <ul class="reading">
 4         <li class="readingPage"><!--这里给一些文字填充页面--></li>
 5         <li class="readingPage"><!--这里给一些文字填充页面--></li>
 6         <li class="readingPage"><!--这里给一些文字填充页面--></li>
 7         <li class="readingPage"><!--这里给一些文字填充页面--></li>
 8     </ul>
 9 </div>
10 <!--css-->
11 *{
12     margin: 0px;
13     padding: 0px;
14     list-style-type: none;
15 }
16 .root,
17 body{
18     width: 100%;
19 }
20 .wrapper{
21     position: absolute;
22     top: calc(50% - 250px);
23     left: calc(50% - 150px);
24     width: 300px;
25     height: 500px;
26     border: 1px solid #888;
27     background-color: #ffa;
28
29     overflow: hidden;
30 }
31 .reading{
32     width: 1200px;
33     height: 500px;
34     padding-left: 0px;
35     margin-left: 0px;
36 }
37 .reaging::after{
38     clear: both;
39     content: "";
40     display: block;
41 }
42 .readingPage{
43     float: left;
44     width: 300px;
45     height: 500px;
46 }
47 .readingPage img{
48     width: 100%;
49     height: 100%;
50 }
51 .maskant{
52     position: absolute;
53     width: 100%;
54     height: 100%;
55     /* background-color: red; */
56 }
57 /* .reading:hover{
58     margin-left: -300px;
59 } */
代码虽然没有优化,但是该做的兼容都做了,只是在js的变量和参数方面和交互设计上还可以进一步优化。

 浙公网安备 33010602011771号