

002 从配置文件中读取值并传到页面中显示(Springboot)
01 导入freemarker模板
        <dependency>
            <groupId>org.springframework.boot</groupId>
            <artifactId>spring-boot-starter-freemarker</artifactId>
        </dependency>
02 编写对应的配置文件(site.properties)
#网站基础信息配置
yuanlrc.site.name=\u733f\u6765\u5165\u6b64
yuanlrc.site.url=https://yuanlrc.com
03 编写SiteConfig
package com.yuanrc.example.config;

import org.springframework.beans.factory.annotation.Value;
import org.springframework.context.annotation.PropertySource;
import org.springframework.stereotype.Component;

@Component
@PropertySource(value = "classpath:site.properties")
public class SiteConfig {

    @Value("${yuanlrc.site.name}")
    private String siteName;

    @Value("${yuanlrc.site.url}")
    private String siteUrl;

    public String getSiteName() {
        return siteName;
    }

    public void setSiteName(String siteName) {
        this.siteName = siteName;
    }

    public String getSiteUrl() {
        return siteUrl;
    }
}
04 编写控制层(SystemController)
package com.yuanrc.example.controller;

import com.yuanrc.example.config.SiteConfig;
import org.springframework.beans.factory.annotation.Autowired;
import org.springframework.stereotype.Controller;
import org.springframework.ui.Model;
import org.springframework.web.bind.annotation.RequestMapping;

@RequestMapping("/system")
@Controller
public class SystemController {
    @Autowired
       private SiteConfig siteConfig;

    @RequestMapping(value = "/index")
    public String index(String name, Model model){
        model.addAttribute("name",siteConfig.getSiteName());
        model.addAttribute("url",siteConfig.getSiteUrl());
        return "index";
    }
}
05 编写相应的显示页面
登录成功
<hr/>
网站名:${name};  网址:${url}
<hr/>
其中文件的对应关系如下
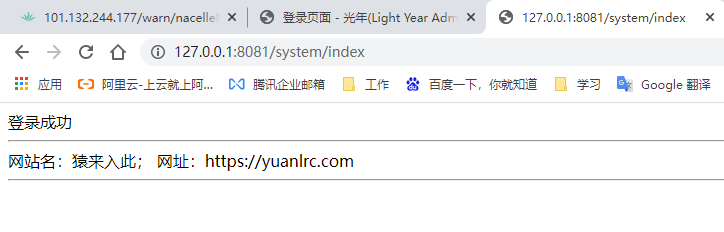
启动ExampleApplication,浏览器显示
注意事项:
1)必须导入freemarker模板,否则报错(报404错误,找不到页面)
2)不能忽略@PropertySource(value = "classpath:site.properties")
3)使用的springboot的版本是2.6.3

 浙公网安备 33010602011771号