vue操作dom元素的三种方法介绍和分析
vue操作dom元素的三种方法介绍和分析
相信大家在做项目的时候,肯定会遇到这样的问题:我点击新增按钮,需要弹出个弹框,然后我点击对应的关闭按钮,关闭弹框,但是新增按钮和关闭按钮操作的是另一个元素,所以需要获取dom元素进行操控,那么在vue中怎么操作dom呢?
以下是常用的三种方法:
1、jQuery操作dom(推荐指数:★☆☆☆☆):
只要拿jQuery的选择器,选中相应的dom进行操作就可以了,但是大家都知道jQuery获取元素是查找页面所有,相当于“循环”所有元素直至找到需要的dom,但是vue是单页面的,jQuery获取dom并不只是获取vue当前页面,而是从根路由开始查找所有,当其他页面出现相同的元素,也会被获取到,而且jQuery操作的dom,如果是根据动态获取数据渲染的,那么写在mounted里的操作方法将会失效,必须放到updated里,这样会导致有些操作被执行多遍,所以还是不建议在vue中使用jQuery。
2、原生js操作dom(推荐指数:★★★★☆):
原生js获取dom就很简单了,例如:根据id、class、当前元素的上一个元素......
3、vue官方方法:ref(推荐指数:★★★★★):
vue中的ref是把当前dom元素 “ 抽离出来 ” ,只要通过 this.$refs就可以获取到(注意this指向),此方法尤其适用于父元素需要操作子组件的dom元素,这也是子传父传递数据的一种方法
下面让我来看个案例:
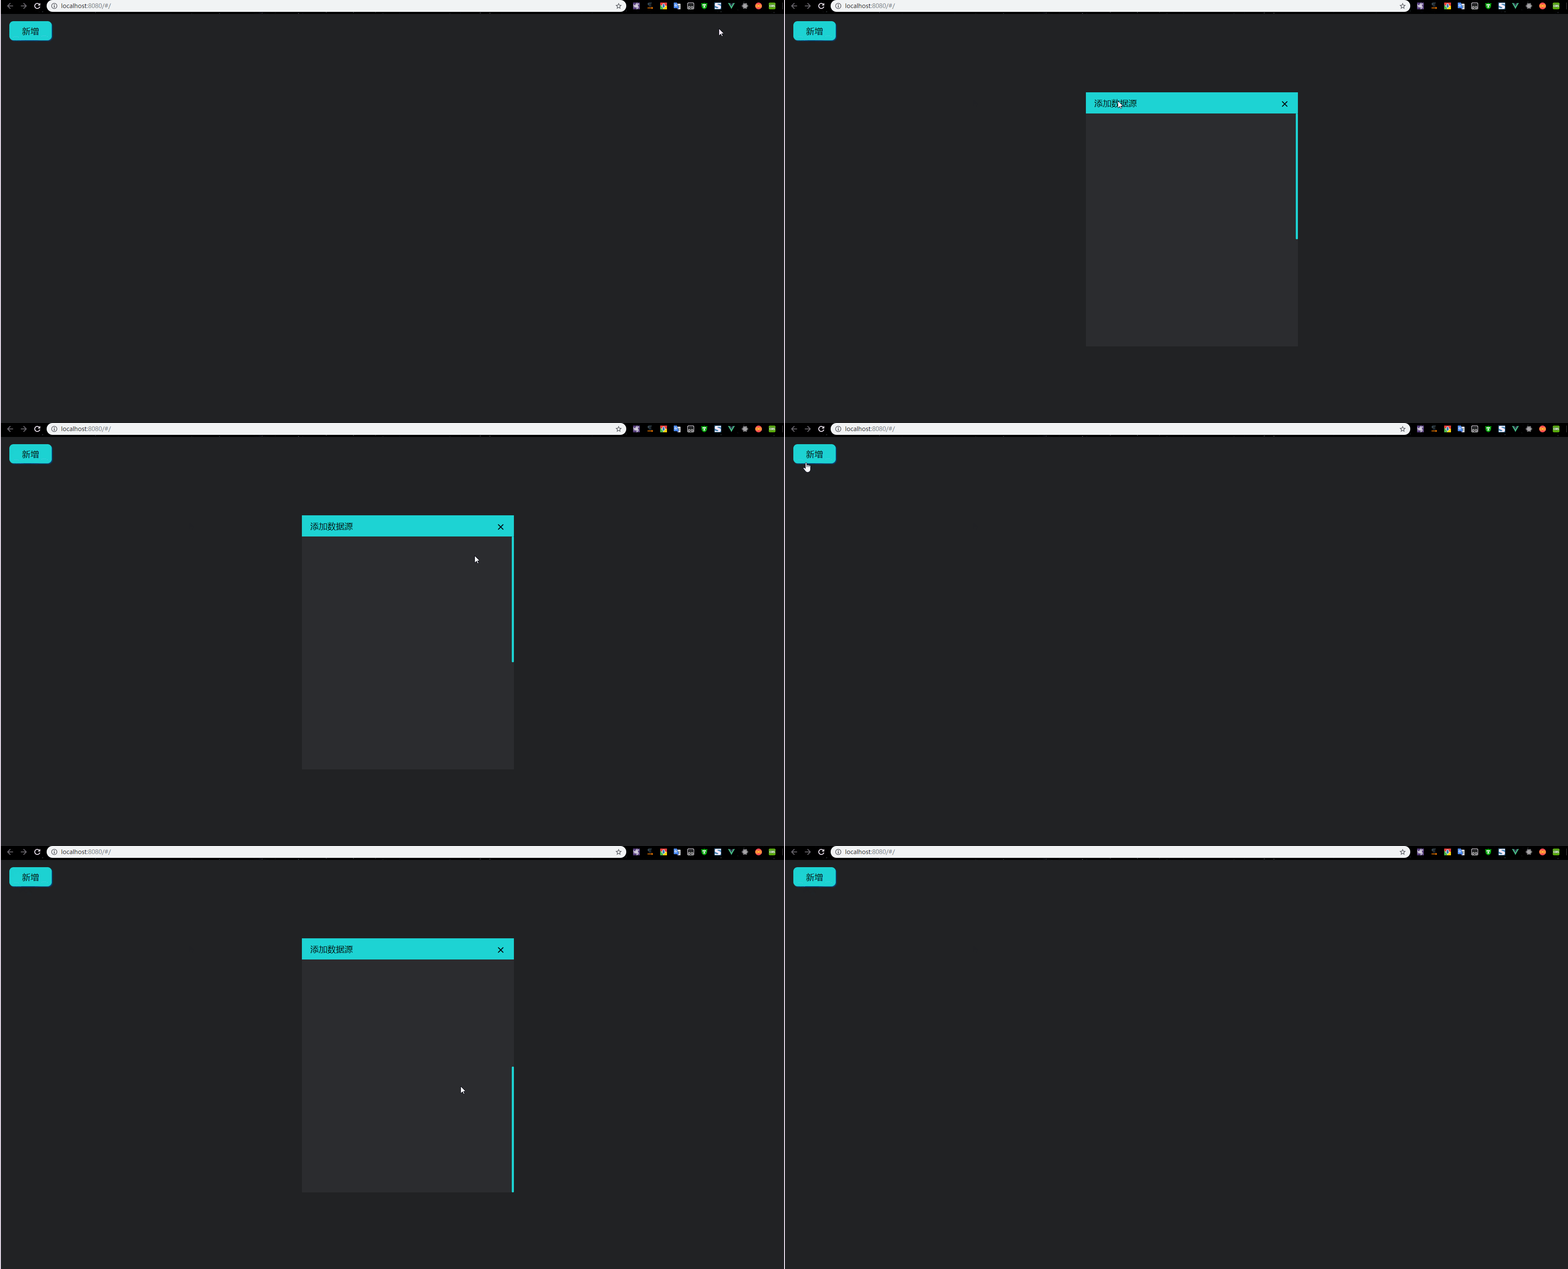
设置了一个button按钮,通过点击事件,然后弹出 新增的弹框 , 然后点击 “ × ”的button按钮,关闭弹框,此时需要操作弹框的dom元素,通过ref定义一个名字, 然后在方法中通过 this.$refs.名字 获取对应的dom
-
<template>
-
<div class="index-box">
-
<!--新增按钮-->
-
<input type="button" id="DbManagement-addBtn" @click="showAddAlert" value="新增">
-
<!--新增数据源弹框-->
-
<div class="addDbSource-alert" ref="addAlert">
-
<div class="addAlert-top">
-
添加数据源
-
<input type="button" value="×" class="addAlert-close" @click="closeAddAlert">
-
</div>
-
<div class="addAlert-content">
-
<div style="height: 1000px;"></div>
-
</div>
-
</div>
-
</div>
-
</template>
-
-
<script>
-
export default {
-
name: "Index",
-
data(){
-
return {
-
-
}
-
},
-
methods:{
-
// 点击新增按钮,弹出新增数据源的弹框
-
showAddAlert(){
-
this.$refs.addAlert.style.display = "block";
-
},
-
// 点击 × 关闭新增数据源的弹框
-
closeAddAlert(){
-
this.$refs.addAlert.style.display = "none";
-
},
-
},
-
created(){
-
-
}
-
}
-
</script>
-
-
<style scoped>
-
/* 容器 */
-
.index-box{
-
width: 100%;
-
height: 100%;
-
background: #212224;
-
display: flex;
-
}
-
/* 添加数据源按钮 */
-
#DbManagement-addBtn {
-
width: 100px;
-
height: 45px;
-
border: none;
-
border-radius: 10px;
-
background: rgba(29, 211, 211, 1);
-
box-shadow: 2px 2px 1px #014378;
-
margin-left: 20px;
-
margin-top: 17px;
-
cursor: pointer;
-
font-size: 20px;
-
}
-
/*新增数据源弹框*/
-
.addDbSource-alert{
-
width: 500px;
-
height: 600px;
-
background: #2b2c2f;
-
position: fixed;
-
left: calc(50% - 250px);
-
top: calc(50% - 300px);
-
display: none;
-
}
-
/*新增弹框头部*/
-
.addAlert-top{
-
width: 100%;
-
height: 50px;
-
background: #1dd3d3;
-
line-height: 50px;
-
font-size: 20px;
-
box-sizing: border-box;
-
padding-left: 20px;
-
}
-
/*新增弹框关闭*/
-
.addAlert-close{
-
background: #1dd3d3;
-
border: none;
-
font-size: 30px;
-
cursor: pointer;
-
float: right;
-
margin-right: 20px;
-
margin-top: 5px;
-
}
-
/*新增弹框内容部分*/
-
.addAlert-content{
-
width: 100%;
-
height: 550px;
-
overflow-x: hidden;
-
overflow-y: auto;
-
box-sizing: border-box;
-
padding: 0px 30px 20px;
-
}
-
/* 滚动条效果 */
-
/* 设置滚动条的样式 */
-
.addAlert-content::-webkit-scrollbar {
-
width: 5px;
-
}
-
/* 滚动槽 */
-
.addAlert-content::-webkit-scrollbar-track {
-
/* -webkit-box-shadow: inset 0 0 6px rgba(40, 42, 44, 1);
-
border-radius: 10px; */
-
}
-
/* 滚动条滑块 */
-
.addAlert-content::-webkit-scrollbar-thumb {
-
border-radius: 10px;
-
background: rgba(29, 211, 211, 1);
-
/* -webkit-box-shadow: inset 0 0 6px rgba(29, 211, 211, 1); */
-
}
-
.addAlert-content::-webkit-scrollbar-thumb:window-inactive {
-
background: rgba(29, 211, 211, 1);
-
}
-
</style>
效果图:

以上就是vue中操作dom的方法
如有问题,请指出,接受批评。


 浙公网安备 33010602011771号