MVC 中Simditor上传本地图片
1.引用样式和js文件
<link href="~/Content/scripts/plugins/simditor/css/simditor.css" rel="stylesheet" />

<script src="~/Content/scripts/plugins/simditor/js/simditor.js"></script>
2.初始化Simditor
 var editor = null;
    $(function () {
        //可以参考 http://www.jcodecraeer.com/a/javascript/2015/0201/2393.html
        editor = new Simditor({
            textarea: $('#NewsContent'),
            placeholder: '这里输入公告内容...',
            toolbar: ['title', 'bold', 'italic', 'underline', 'strikethrough', 'color', '|', 'ol', 'ul', 'blockquote', 'code', 'table', '|', 'link', 'image', 'hr', '|', 'indent', 'outdent'],
            upload: {
                url: '/PublicInfoManage/Notice/SavePic', //文件上传的接口地址
                params: null, //键值对,指定文件上传接口的额外参数,上传的时候随文件一起提交
                fileKey: 'fileDataFileName', //服务器端获取文件数据的参数名
                connectionCount: 3,
                leaveConfirm: '正在上传文件'
            }
        });
    })
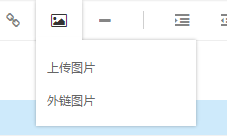
upload设置好就会出现下图中的选项
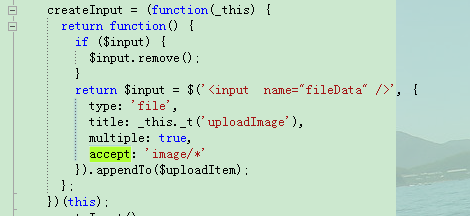
实现功能之前需要修改一下引用的js文件,使用查看浏览器的审核元素功能查看,发现input按钮没有name属性

3.打开Simditor.js文件搜索accept属性,然后添加“name=“fileData”属性,共有两处需要添加,如下图

4.编写后台处理图片代码
 /// <summary>
        /// 上传图片
        /// </summary>
        /// <returns></returns>
        public ActionResult SavePic()
        {
            HttpPostedFileBase file = Request.Files["fileDataFileName"];
            if (file != null)
            {
                string strPath = HttpContext.Server.MapPath("/Content/Upload/");
                if (!Directory.Exists(strPath))
                {
                    Directory.CreateDirectory(strPath);
                }
                string filePath = Path.Combine(strPath, Path.GetFileName(file.FileName));
                file.SaveAs(filePath);
                return Success("上传成功!");
            }
            else
            {
                return Success("上传失败!");
            }

        }
参考文章 http://www.jcodecraeer.com/a/javascript/2015/0201/2393.html
posted on 2016-12-05 17:32 lovezj9012 阅读(4284) 评论(0) 收藏 举报


 浙公网安备 33010602011771号