

Spring boot 学习(一) thymeleaf使用
<dependency>
            <groupId>org.springframework.boot</groupId>
            <artifactId>spring-boot-starter-thymeleaf</artifactId>
</dependency>
引入thyme leaf starter
springboot已经自动配置好了
@Configuration(proxyBeanMethods = false)
@EnableConfigurationProperties(ThymeleafProperties.class)
@ConditionalOnClass({ TemplateMode.class, SpringTemplateEngine.class })
@AutoConfigureAfter({ WebMvcAutoConfiguration.class, WebFluxAutoConfiguration.class })
public class ThymeleafAutoConfiguration {}
自动配好了thymeleaf
- 所有的值都自动配在了

- 配置好了模板引擎

-
配置好了

-
接下来、只需开发页面就行
- 在thymeleaf中配置了
@ConfigurationProperties(prefix = "spring.thymeleaf")
public class ThymeleafProperties {

    private static final Charset DEFAULT_ENCODING = StandardCharsets.UTF_8;

    public static final String DEFAULT_PREFIX = "classpath:/templates/";

    public static final String DEFAULT_SUFFIX = ".html";
使用时,需要给html的头文件添加,就会有th的提示内容
xmlns:th="http://www.thymeleaf.org"
package com.sp.Controller;


import org.springframework.stereotype.Controller;
import org.springframework.ui.Model;
import org.springframework.web.bind.annotation.GetMapping;

@Controller
public class ThymeleafController {

    @GetMapping("/thymeleaf")
    public String thymeleaf(Model model) {
//         model中放的数据会自动放入请求域中,类似于调用了request.setAttribute()
        model.addAttribute("msg","你好!!!!");
        model.addAttribute("link","http://www.baidu.com");  //link,值为http://www.baidu.com
return "successful"; } } //返回到successful.html页面
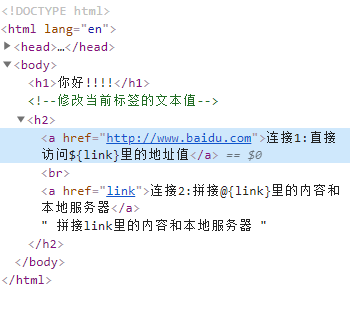
关于@{link} 和${link}
<!DOCTYPE html>
<html lang="en" xmlns:th="http://www.thymeleaf.org">
<head>
    <meta charset="UTF-8">
    <title>Title</title>
</head>
<body>
<h1 th:text="${msg}">aaaaaaaaaaaaaaaaaaaaaaaa</h1>
<!--修改当前标签的文本值-->
<h2>
    <a href="" th:href="${link}">连接1:直接访问${link}里的地址值访问连接为:www.baidu.com</a><br>
    <a href="" th:href="@{link}">连接2:拼接@{link}里的内容和本地服务器访问连接为:localhost:8080/world/link</a>

</h2>
</body>
</html>
因为加了前缀,所以访问时需要加上/world 在yaml中添加了配置信息
server:
  servlet:
    context-path: /world
#      设置服务器访问路径


行内写法 [[${session.user.name}]]

 浙公网安备 33010602011771号