DBA Elasticsearch 集群相关
集群介绍
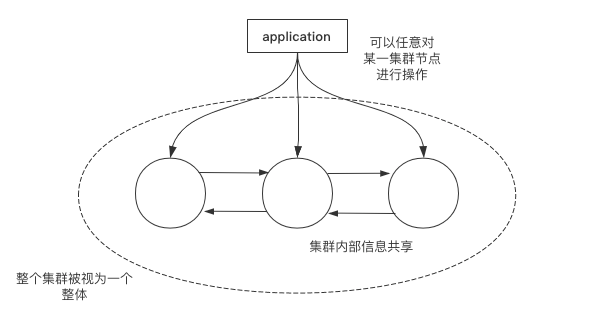
Elasticsearch的集群可以横向扩展为成百上千的服务器节点,可同时处理PB级的数据。
并且Elasticsearch天生支持分布式,在设计之初就屏蔽了分布式的复杂性,因此对分布式集群搭建等操作十分简洁。
Elasticsearch集群中各个节点的信息都是相互共享且透明的,这意味着用户可以登录任意一个Elasticsearch集群节点进行操作,它对外是透明的,另外,Elasticsearch集群自带高可用功能。
集群规划
以下是集群的规划,3台Elasticsearch服务器,在同一局域网内。
| 作用 | IP地址 | 服务端口 | 操作系统 | 配置 |
|---|---|---|---|---|
| MASTER | 192.168.0.110 | 9200 | Centos7.3 基础设施服务器 | 2颗CPU 2G内存 20G硬盘 |
| WORK | 192.168.0.120 | 9200 | Centos7.3 基础设施服务器 | 2颗CPU 2G内存 20G硬盘 |
| WORK | 192.168.0.130 | 9200 | Centos7.3 基础设施服务器 | 2颗CPU 2G内存 20G硬盘 |
在每个节点hosts文件中加入以下内容;
$ vim /etc/hosts

192.168.0.110 node1
192.168.0.120 node2
192.168.0.130 node3
软件安装
所有Elasticsearch服务实例均采用rpm进行安装。
1)安装Java环境,最少要求1.8:
$ yum install -y java-1.8.0-openjdk.x86_64
2)下载安装软件,如果速度慢可以在其他浏览器上进行下载后通过scp传输:
$ cd ~
$ wget https://artifacts.elastic.co/downloads/elasticsearch/elasticsearch-7.6.1-x86_64.rpm
3)进行安装:
$ rpm -ivh elasticsearch-7.6.1-x86_64.rpm
4)重新加载sys项目:
$ systemctl daemon-reload
5)配置开机启动:
$ systemctl enable elasticsearch.service
配置文件
Elasticsearch的集群搭建只需要节点之前相互能够进行通信,并且集群名称相同即可。
可谓是最简单的集群搭建方式,这里为了简单没有开启内存限制,若想开启内存限制功能则参照Elasticsearch系列第一篇文章。
首先是node1的配置文件:
$ cat /etc/elasticsearch/elasticsearch.yml | grep -v ^#

# 集群名称:3个节点必须统一
cluster.name: my-application

# 该服务在节点中的名称:3个节点必须不一致
node.name: elk-75

# 数据与日志存储目录
path.data: /var/lib/elasticsearch
path.logs: /var/log/elasticsearch

# 节点身份:仅node1设置
node.master: true

# 允许访问的地址:3个节点必须不一致
network.host: 192.168.0.110, 127.0.0.1
http.port: 9200

# 能够发现的集群中其他节点
discovery.seed_hosts: ["192.168.0.110", "192.168.0.120", "192.168.0.130"]

# 能够成为master的节点:
cluster.initial_master_nodes: ["elk-75", "elk-76"]

# 避免大量删除索引,_all为不生效
action.destructive_requires_name: true

# 允许跨域
http.cors.enabled: true
http.cors.allow-origin: "*"
接下来依次启动Elasticsearch服务:
$ systemctl restart elasticsearch
查看日志,由于集群名为my-application,故日志文件名也是my-application:
$ tail -f /var/log/elasticsearch/my-application.log
集群测试
查看集群信息:
curl -XGET 'http://localhost:9200/_cluster/health?pretty'

# status 字段是我们最关心的。
# green 所有的主分片和副本分片都正常运行。
# yellow 所有的主分片都正常运行,但不是所有的副本分片都正常运行。
# red 有主分片没能正常运行。
查看系统检索信息:
curl -XGET 'http://localhost:9200/_cluster/stats?human&pretty'
查看集群设置:
curl -XGET 'http://localhost:9200/_cluster/settings?include_defaults=true&human&pretty'
查看节点状态:
curl -XGET 'http://localhost:9200/_nodes/procese?human&pretty'
curl -XGET ' http://localhost:9200/_nodes/_all/info/jvm ,process?human&pretty'
curl -XGET 'http://localhost:9200/_cat/nodes?human&pretty'
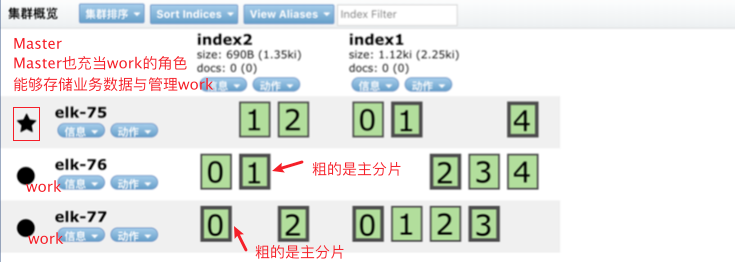
复制分片
默认Elasticsearch中每个索引都会创建5分片1副本的配置。
可以手动配置分片数与副本数:
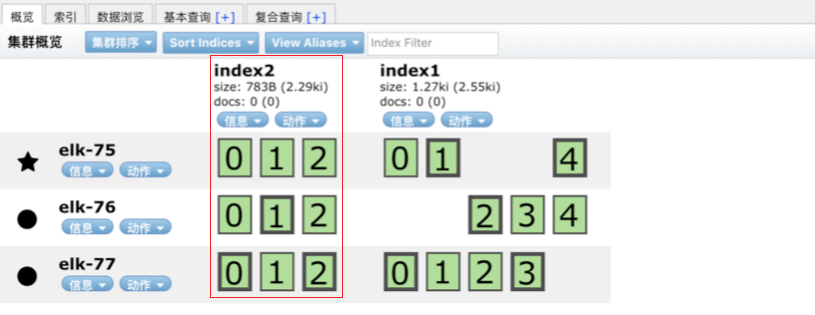
curl -XPUT 'localhost:9200/index2?pretty' -H 'Content-Type: application/json' -d' {
    "settings" : {
        "number_of_shards" : 3,
        "number_of_replicas" : 1
    }
}'
上图的index2最多可可支持1节点崩溃,1节点崩溃并不影响其他节点的正常业务。
索引的分片数一旦确定后将不能更改,但是可以更改副本数:
curl -XPUT 'localhost:9200/index2/_settings?pretty' -H 'Content-Type: application/json' -d' {
    "settings" : {
    "number_of_replicas" : 2
    }
}’

 浙公网安备 33010602011771号