[Mybatis]用AOP和mybatis来实现一下mysql读写分离
小记
看了看博客园发现有一阵子没写东西了,今天写点最近折腾的东西吧,由于工作的原因,平时就Springboot的技术栈用得不多,甚至现在对springboot的使用还不如我以前在学校的时候懂得多,没办法,工作里的东西是首要的,我也在努力摆脱这种困境,平时积累点知识,防止和外面脱节。这是作为一个打工人和程序员应该有的意识。
搭一个简单的mysql主从集群(1主2从)
原本想用virtualbox来自己开三台虚拟机来弄的,但是virtualbox我也使得不怎么溜,固定ip的问题解决了但是各个虚拟机之间的通信依旧有问题,与其在这里浪费时间我还不如在一台机器上模拟,于是我在我上学的时候用的阿里云服务器上用docker搭建了一个简单的mysql集群,集群搭建就不细说了,三个节点对应三个docker容器,对应服务器的三个不同的端口,用来模拟集群。
集群搭建完,数据源的配置文件就可以写出来了。
spring:
  datasource:
    master:
      pool-name: master
      driver-class-name: com.mysql.jdbc.Driver
      url: jdbc:mysql://aliyunserver:33307/test?useUnicode=true&characterEncoding=utf-8&useSSL=false
      username: root
      password: 123456
      maximum-pool-size: 10
      minimum-idle: 5
    slave1:
      pool-name: slave1
      driver-class-name: com.mysql.jdbc.Driver
      url: jdbc:mysql://aliyunserver:33308/test?useUnicode=true&characterEncoding=utf-8&useSSL=false
      username: root
      password: 123456
      maximum-pool-size: 10
      minimum-idle: 5
    slave2:
      pool-name: slave2
      driver-class-name: com.mysql.jdbc.Driver
      url: jdbc:mysql://aliyunserver:33309/test?useUnicode=true&characterEncoding=utf-8&useSSL=false
      username: root
      password: 123456
      maximum-pool-size: 10
      minimum-idle: 5
  application:
    name: mysql-test
server:
  port: 8080
mybatis:
  config-location: mybatis.xml
  mapper-locations: mapper/*.xml
配置数据源
有了数据源,那么就来配置数据源,这里需要配置三个数据源,分别是主节点,从节点1,从节点2,这里暂且不讨论有一个节点挂了的情况。这三个节点由一个方法来进行管理,也就是下面的dynamicDataSource();
@Configuration
public class DataSourceConfig {

    /**
     * 主库
     * */
    @Bean("master")
    @ConfigurationProperties(prefix = "spring.datasource.master")
    public DataSource master(){
        return DruidDataSourceBuilder.create().build();
    }
    /**
     * 从库1
     * */
    @Bean("slave1")
    @ConfigurationProperties(prefix = "spring.datasource.slave1")
    public DataSource slave1(){
        return DruidDataSourceBuilder.create().build();
    }

    @Bean("slave2")
    @ConfigurationProperties(prefix = "spring.datasource.slave2")
    public DataSource slave2(){
        return DruidDataSourceBuilder.create().build();
    }

    /**
     * 实例化数据源路由
     * */
    @Bean(name = "dynamicDatasource")
    public DataSourceRouter dynamicDataBase(@Qualifier("master")DataSource master,
                                            @Qualifier("slave1")DataSource slave1,
                                            @Qualifier("slave2")DataSource slave2){
        DataSourceRouter dynamicDataBase = new DataSourceRouter();
        Map<Object,Object> targetDataSources = new HashMap<Object, Object>(3);
        targetDataSources.put(DBType.MASTER,master());
        targetDataSources.put(DBType.SLAVE1,slave1());
        targetDataSources.put(DBType.SLAVE2,slave2());
        dynamicDataBase.setTargetDataSources(targetDataSources);
        //设置默认
        dynamicDataBase.setDefaultTargetDataSource(master());
        return dynamicDataBase;
    }
}
然后还有和mybatis相关的配置,一并加上。
@Configuration
@EnableTransactionManagement
public class MybatisConfig {

    @Resource(name = "dynamicDatasource")
    private DataSource dynamicDatasource;


    @Bean
    public SqlSessionFactory sqlSessionFactory() throws Exception{
        SqlSessionFactoryBean bean = new SqlSessionFactoryBean();
        bean.setDataSource(dynamicDatasource);
        bean.setMapperLocations(new PathMatchingResourcePatternResolver().getResources("classpath:mapper/*.xml"));
        return bean.getObject();
    }

    @Bean
    public PlatformTransactionManager platformTransactionManager(){
        return new DataSourceTransactionManager(dynamicDatasource);
    }
}
DBType是一个枚举类,用来区分主从。
public enum DBType {
    /**
     * 主库
     * */
    MASTER,
    /**
     * 从库1
     * */
    SLAVE1,
    /**
     * 从库2
     * */
    SLAVE2
}
DataSourceRouter用来路由数据源的,在写它之前还需要写一个动态获取数据源的类,这个类里面一般可以设置一定的策略,比如在读的时候设置轮询来平均对每个从库的读取压力。例如我这里两个从库那我设置对2取模来轮询切换数据源,但是我这里有弊端,那就是我这里不能动态地调整,比如增加一个数据源我就要改动代码,当然现在业界有解决办法,这里暂时不谈。
public class DataSourceContextHolder {

    /**
     * 两种操作数据库的方式
     * */
    public static final String MASTER = "write";

    public static final String SLAVE = "read";

    private static final ThreadLocal<DBType> context = new ThreadLocal<>();

    /**
     * 计数器,用来对2取模决定用哪个从库
     * */
    private static final AtomicInteger counter = new AtomicInteger(-1);

    public static void set(DBType dbType){
        if(dbType==null||StringUtils.isEmpty(dbType)){
            throw new NullPointerException("DataSourceType 为空");
        }
        context.set(dbType);
    }

    public static DBType get(){
        return context.get();
    }

    /**
     * 切换到主数据源
     * */
    public static void setMaster(){
        set(DBType.MASTER);
    }

    /**
     * 切换到从节点数据源
     * */
    public static void setSlave(){
        int index = counter.getAndIncrement() % 2;
        if (index == 0){
            set(DBType.SLAVE1);
        }else {
            set(DBType.SLAVE2);
        }
    }
    /**
     * 移除
     * */
    public static void clear(){
        context.remove();
    }
}
然后再到数据源路由
public class DataSourceRouter extends AbstractRoutingDataSource {

    @Override
    protected Object determineCurrentLookupKey() {
        return DataSourceContextHolder.get();
    }
}
用AOP来实现动态切换数据源
数据源的部分到上面为止就搞定了,那么现在的问题是,我们需要怎么来切换数据源,总不可能在每个读的方法里都挨个调切换的方法,那么这时候AOP就排上用场了,我们知道切换数据源是根据这个操作是读还是写来的,那么自然对应到业务里就是是否涉及到操作数据了,而业务自然就是在Service层来开刀了。
- 定义读操作和写操作的注解
@Inherited
@Retention(RetentionPolicy.RUNTIME)
@Target(ElementType.METHOD)
public @interface Master {
}

@Inherited
@Retention(RetentionPolicy.RUNTIME)
@Target(ElementType.METHOD)
public @interface Slave {
}
有了这两个注解,就能在Service层对应的方法上来标记这个方法是读还是写了。然后就是切面了。
@Slf4j
@Aspect
@Component
public class DataSourceAspect {

    @Pointcut("@annotation(com.example.mysql.annotation.Slave) && execution(* com.example.mysql.service.impl..*.*(..))")
    public void readPointcut(){}

    @Pointcut("@annotation(com.example.mysql.annotation.Master) && execution(* com.example.mysql.service.impl..*.*(..))")
    public void writePointcut(){}

    @Before("readPointcut()")
    public void readBefore(JoinPoint joinPoint){
        DataSourceContextHolder.setSlave();
        String className = joinPoint.getTarget().getClass().getName();
        String methodName = joinPoint.getSignature().getName();
        log.info("{}-{} use slave datasource",className,methodName);
        DataSourceContextHolder.clear();

    }

    @After("readPointcut()")
    public void readAfter(JoinPoint joinPoint){
        DataSourceContextHolder.setMaster();
        String className = joinPoint.getTarget().getClass().getName();
        String methodName = joinPoint.getSignature().getName();
        log.info("after read,{}-{} switch to master datasource",className,methodName);
        DataSourceContextHolder.clear();
    }

    @Before("writePointcut()")
    public void writeBefore(JoinPoint joinPoint){
        DataSourceContextHolder.setMaster();
        String className = joinPoint.getTarget().getClass().getName();
        String methodName = joinPoint.getSignature().getName();
        log.info("{}-{} use master datasource",className,methodName);
        DataSourceContextHolder.clear();
    }
}
测试
我的测试比较简单,一个用户表里有id和username两个字段,一个读操作和写操作。
public interface UserDao {

    /**
     * 获取用户名
     * */
    String getUserName(int id);

    /**
     * 添加用户
     * */
    void addUser(User user);
}
<?xml version="1.0" encoding="UTF-8"?>
<!DOCTYPE mapper PUBLIC "-//mybatis.org//DTD Mapper 3.0//EN" "http://mybatis.org/dtd/mybatis-3-mapper.dtd">
<mapper namespace="com.example.mysql.dao.UserDao">
    <select id="getUserName" parameterType="java.lang.Integer" resultType="java.lang.String">
    select username from user where id = #{id}
  </select>

    <insert id="addUser" parameterType="com.example.mysql.model.User">
        insert into user(id,username) values(#{id},#{username})
    </insert>
</mapper>
然后在Service层里来调用,顺便设置对应的注解。
public interface UserService {

    String getUserName(int userId);

    boolean addUser(User user);
}


@Service
@Slf4j
public class UserServiceImpl implements UserService {

    @Autowired
    private UserDao userDao;

    @Slave
    @Override
    public String getUserName(int userId) {
        return userDao.getUserName(userId);
    }

    @Master
    @Override
    public boolean addUser(User user) {
        try {
            userDao.addUser(user);
            return true;
        }catch (Exception e){
            log.error(e.getMessage());
            return false;
        }
    }
}
Controller层我就不写了,我预先在表里加了三条数据,分别是:
id	username
1	thyin
2	xxx
3	yyy
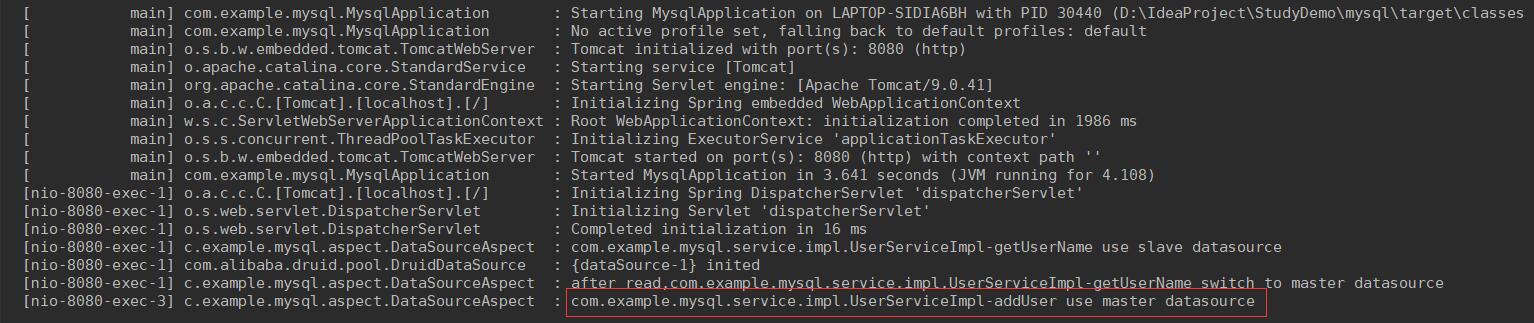
然后调用一下getUserName的接口,http://localhost:8080/user/api/getUserName/1,通过日志可以看到使用的从库的数据源:

然后测试一下写的接口,http://localhost:8080/user/api/addUser?id=6&username=iqy,再看日志。
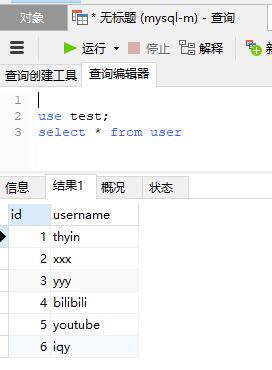
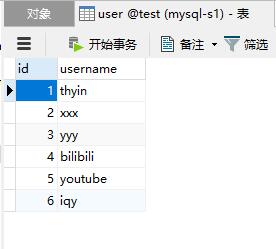
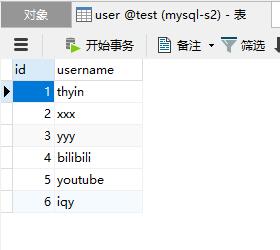
再检查主库是否有记录,并检查从库是否同步。
主库:
从库1:
从库2:
ok。
总结
这里我只是简单暴力地做了一个读写分离的,但实际工作中这个肯定不够,后面我会整理一下mycat的使用,以及分表分库的知识,再接再厉。

 浙公网安备 33010602011771号