
Vue学习笔记52--全局事件总线
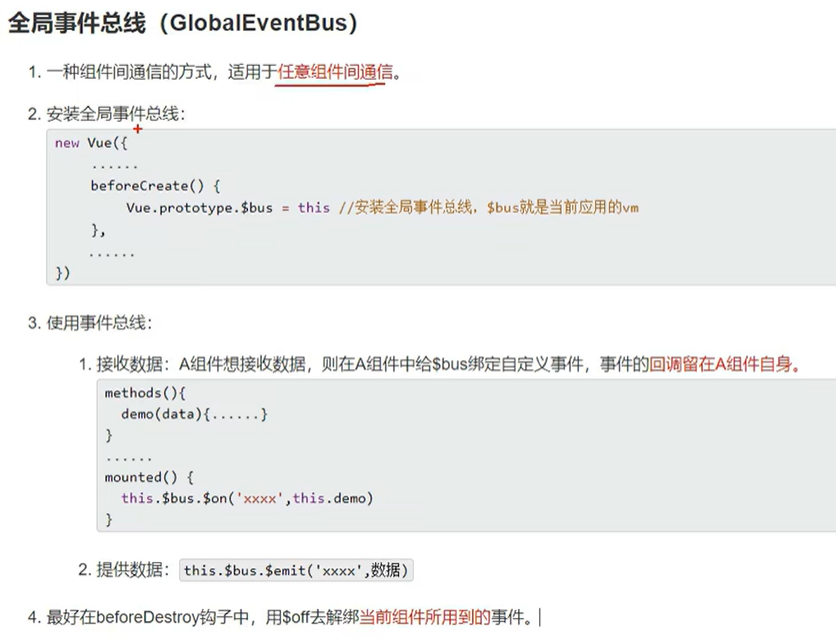
Vue全局事件总线:一种组件之间通信的方式,适用于任意组件之间通信。
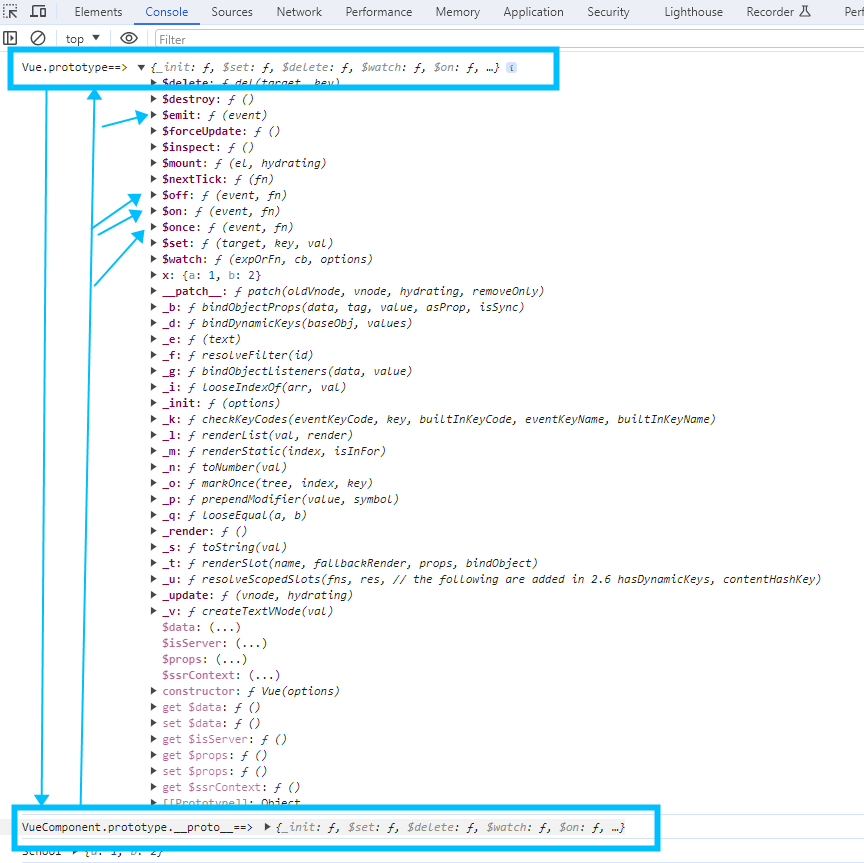
1.所有组件,即VueComponent所有的组件实例对象vc
2.每次使用VueComponent都是new一个新的vc
3.Vue.prototype=VueComponent.prototype.__proto__(可以让组件实例对象vc访问到Vue原型上的属性、方法)
4.$emit、$on、$off——都在Vue的原型对象上(Vue.prototype=VueComponent.prototype.__proto__),如下所示:
console.log('Vue.prototype==>', Vue.prototype)
console.log('VueComponent.prototype.__proto__==>', Vue.prototype)
5.-------------------全局事件总线的应用-------------------
第一步:安装全局事件总线 ==>Vue.prototype.$bus = this
第二步:绑定事件 $on ==>this.$bus.$on('hello', (data) => { console.log('我是School组件,收到了数据==>', data) })
第三步:触发事件 $emit ==>this.$bus.$emit('hello', this.name)
第四步:销毁时间 $off ==> beforeDestroy () { this.$bus.off('hello') },
总结:
1.安装总线在入口
2.绑定事件在需要(那个组件需要数据)
3.触发销毁(事件)在发送(发送数据的组件)
-------------------不建议使用方式了解-------------------
第一步:
可在入口文件main.js中定义全局事件总结,如下所示:
Vue.prototype.x = { a: 1, b: 2 }
// 不建议使用
Window.y = { a: 1, b: 2, c: 3 }
第二步:
在组件中使用,eg:
-------------------常规使用方式(全局事件总线的应用)-------------------
总结:
1.安装总线在入口
2.绑定事件在需要(那个组件需要数据)
3.触发销毁(事件)在发送(发送数据的组件)
操作步骤如下所示(示例一):
第一步:安装全局事件总线 ==>Vue.prototype.$bus = this
main.js:安装总线在入口
// 引入Vue
import Vue from 'vue'
// 引入App
import App from './App.vue'
// 配置提示
Vue.config.productionTip = false

console.log('Vue.prototype==>', Vue.prototype)
console.log('VueComponent.prototype.__proto__==>', Vue.prototype)

// 方式一:
Vue.prototype.x = { a: 1, b: 2 }
// 方式二:不建议使用
Window.y = { a: 1, b: 2, c: 3 }
// 方式三:mydata名词随意
// const Demo = Vue.extend({})
// const d = new Demo()//vc
// Vue.prototype.mydata = d


new Vue({
  render: h => h(App),
  // 方式四,效果等价于方式三
  beforeCreate () {
    // 安装全局事件总线
    // Vue.prototype.mydata = this
    Vue.prototype.$bus = this
  }
}).$mount('#app')
第二步:绑定事件 $on ==>this.$bus.$on('hello', (data) => { console.log('我是School组件,收到了数据==>', data) })
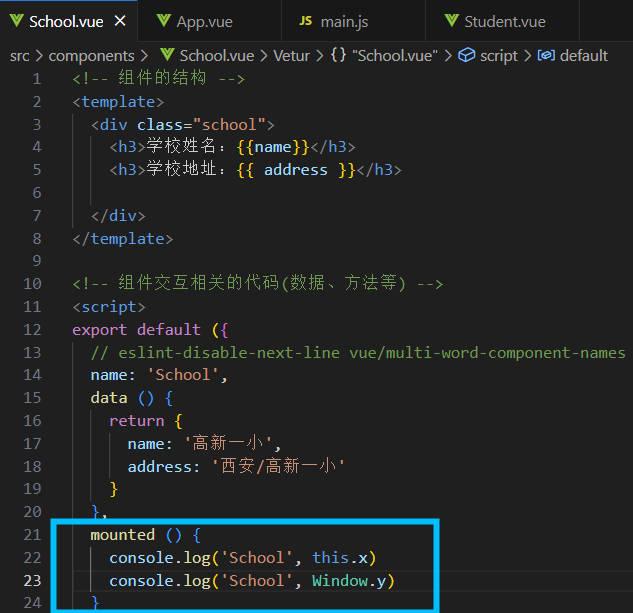
School.vue:绑定事件在需要(那个组件需要数据)
<!-- 组件的结构 -->
<template>
  <div class="school">
    <h3>学校姓名:{{name}}</h3>
    <h3>学校地址:{{ address }}</h3>

  </div>
</template>

<!-- 组件交互相关的代码(数据、方法等) -->
<script>
export default ({
  // eslint-disable-next-line vue/multi-word-component-names
  name: 'School',
  data () {
    return {
      name: '高新一小',
      address: '西安/高新一小'
    }
  },
  mounted () {
    // console.log('School', this.x)
    // console.log('School', Window.y)

    //绑定hello事件
    this.$bus.$on('hello', (data) => {
      console.log('我是School组件,收到了数据==>', data)
    })
  }


})
</script>

<!-- 组件的样式 scoped局部样式,否则多个vue组件中同名会导致样式覆盖(将使用最后一个引入的组件样式)-->
<style scoped>
.school {
  background-color: burlywood;
}
</style>
第三步:触发事件 $emit ==>this.$bus.$emit('hello', this.name)
Student.vue:触发销毁(事件)在发送(发送数据的组件)
<!-- 组件的结构 -->
<template>
  <div class="student">
    <h3>学生姓名:{{name}}</h3>
    <h3>学生性别:{{ sex }}</h3>
    <button @click="sendStudentName">把学生姓名给School组件</button>
  </div>
</template>

<!-- 组件交互相关的代码(数据、方法等) -->
<script>
export default ({
  // eslint-disable-next-line vue/multi-word-component-names
  name: 'Student',
  data () {
    return {
      msg: '我正在学习 Vue',
      name: '心仪',
      sex: '女',
    }
  },
  methods: {
    sendStudentName () {
      // 触发hello事件  提供数据
      this.$bus.$emit('hello', this.name)
    }
  },
  mounted () {
    // console.log('Student', Window.y)

    // 触发hello事件
    // this.$bus.$emit('hello', this.name)
  },
  beforeDestroy () {
    this.$bus.off('hello')
  },

})
</script>

<!-- 组件的默认样式 css写法 -->
<!-- <style scoped>
.demo {
  background-color: cadetblue;
}
</style> -->

<style lang="less" scoped>
.student {
  background-color: cadetblue;
  .myfontsize {
    font-size: 40px;
  }
}
</style>
第四步:销毁时间 $off ==> beforeDestroy () { this.$bus.off('hello') },
Student.vue:触发销毁(事件)在发送(发送数据的组件)
总结:
博客内容主要用于日常学习记录,内容比较随意,如有问题,还需谅解!!!

 浙公网安备 33010602011771号