
整合ant.design+SpringBoot的架构设计
2023-07-18 14:31 雄风狂飙 阅读(714) 评论(0) 收藏 举报- 1.前后端分离的实现
- 1.1实现过程
后端通过传递给前端sessionid的方式,由于本人项目应用相对较窄,因此,实现也简单粗暴。由后端在前端调用的时候生成sessionid,并与校验的用户信息映射之后,在后端存储到内存中,即使用一个静态变量来存储。然后把对应的sessionId传给前端,在前端则存储到localStorage中,由前端每次调用的时候放到前端请求的header中,然后后端每次校验的时候增加一个filter,这个filter位于用户密码认证的前面,因此,每次先根据sessionid去查找是否已经做过认证,如果已经认证过,就直接放行,否则就需要用户登录。
图1是前端登录,后端认证并存储session,并给前端返回的过程。
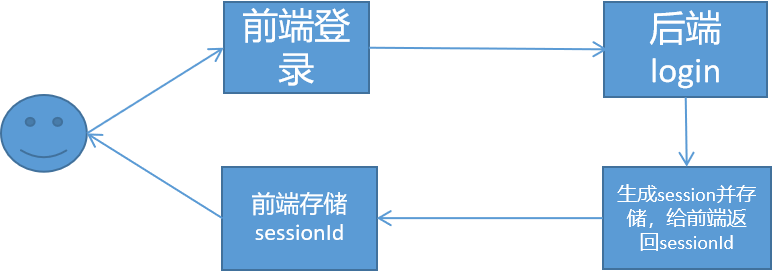
图1 前端登录过程
在完成了第一次认证之后,第二次再进行网页访问的时候,前端需要把sessionId从网页的localStorage中取出,然后传递给后台。后台获取之后,需要增加一个filter来进行认证,这个filter必须位于用户认证
UsernamePasswordAuthenticationFilter之前。图2是完成认证之后,前端调用后端的过程。
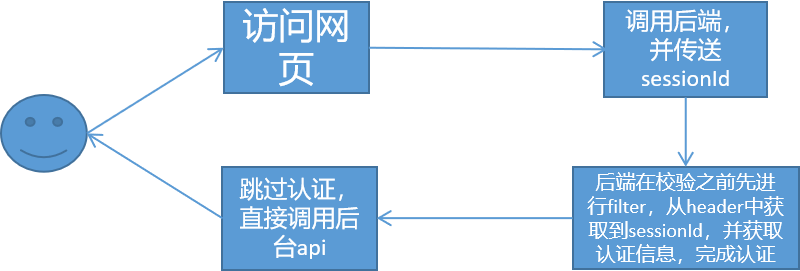
图2 认证后访问网页的过程
- 1.2实现细节
1.2.1登录实现细节
前端登录之后,把返回的sessionId存储。代码在src->services->api. ts
export async function login(body: API.LoginParams, options?: { [key: string]: any }) {
  let data = request<API.LoginResult>('/api/login/account', {
    method: 'POST',
    headers: {
      'Content-Type': 'application/json',
    },
    data: body,
    ...(options || {}),
  });
  data
    .then((response) => {
      // 请求成功后的回调函数
      // 处理返回的数据 response
      let sessionId = response['sessionId'];
      localStorage.setItem('sessionId', sessionId);
    })
    .catch((error) => {
      // 请求失败后的回调函数
      // 处理错误 error
      console.log('Request failed:', error);
    });

  return data;
}
后端的认证过程代码如下所示,具体的文件位置随意,这个就是一个api而已。
@PostMapping("/login/account")
    @ResponseBody
    String account(HttpServletRequest request, Model model) throws Exception {

        BufferedReader reader = request.getReader();
        StringBuilder payload = new StringBuilder();
        String line;
        while ((line = reader.readLine()) != null) {
            payload.append(line);
        }
        reader.close();
        ObjectMapper objectMapper = new ObjectMapper();
        Map<String, Object> payloadMap = objectMapper.readValue(payload.toString(), Map.class);// 示例:输出转换后的 Map 对象
        System.out.println(payloadMap);

        String username = payloadMap.get("username").toString();
        String password = payloadMap.get("password").toString();
        //boolean autoLogin = (Boolean)payloadMap.get("autoLogin");
        String type = request.getParameter("type");

        UsernamePasswordAuthenticationToken authenticationToken = new UsernamePasswordAuthenticationToken(username, password);
        AuthenticationDetailsSource<HttpServletRequest, ?> authenticationDetailsSource = new WebAuthenticationDetailsSource();
        authenticationToken.setDetails(authenticationDetailsSource.buildDetails(request));

        AuthenticationConfiguration authenticationConfiguration = applicationContext.getBean(AuthenticationConfiguration.class);
        DaoAuthenticationProvider authenticationProvider = new DaoAuthenticationProvider();

        authenticationProvider.setPasswordEncoder(new PasswordEncoder() {
            @Override
            public String encode(CharSequence charSequence) {
                return DigestUtils.md5DigestAsHex(charSequence.toString().getBytes()) ;
            }
            @Override
            public boolean matches(CharSequence charSequence, String s) {
                return DigestUtils.md5DigestAsHex(charSequence.toString().getBytes()).equals(s);
            }
        }); // 添加密码编码器
        authenticationProvider.setUserDetailsService(new UserInfoService()); // 设置用户详情服务
        AuthenticationManager authenticationManager = new ProviderManager(Arrays.asList(authenticationProvider)); // 使用ProviderManager作为AuthenticationManager的实现
        Authentication authentication = authenticationManager.authenticate(authenticationToken);
        SecurityContextHolder.getContext().setAuthentication(authentication);

        //return SecurityContextHolder.getContext().getAuthentication().getPrincipal().toString();
        UserInfo userInfo = (UserInfo) SecurityContextHolder.getContext().getAuthentication().getPrincipal();
        String sessionId = UUIDutil.gen();
        putSessionInfo(sessionId,authentication);

        JSONObject result = new JSONObject();
        result.put("type","account");
        result.put("currentAuthority","admin");
        result.put("sessionId",sessionId);
        if( userInfo != null && userInfo.getUserId() != 0 ){
            result.put("status","ok");
        }else{
            result.put("status","fail");
        }
        return result.toJSONString();
    }
1.2.2二次调用接口的实现过程
首先,前端需要把存储的sessionId获取,然后发送给后台,这里以获取用户的函数currentUser为例,对应代码在src->services->api. ts
export async function currentUser(options?: { [key: string]: any }) {
  let sessionIdStr = localStorage.getItem('sessionId') || '123456';
  return request<{
    data: API.CurrentUser;
  }>('/api/currentUser', {
    method: 'GET',
    headers: {
      sessionId: sessionIdStr, // 将参数放入请求头
    },
    ...(options || {}),
  });
}
在后端,首先要在系统进行验证之前要增加一个过滤器,这个过滤器获取前端传进来的sessionId,然后根据这个sessionId再从后端的静态变量中获取存储到的认证信息,获取之后,直接完成认证过程,无须再次进行认证。
package com.compete.controller.base;

import com.compete.controller.antdesign.AntdesignApiController;
import com.compete.model.authority.UserInfo;
import org.springframework.security.core.Authentication;
import org.springframework.security.core.context.SecurityContextHolder;
import org.springframework.stereotype.Service;
import org.springframework.web.filter.OncePerRequestFilter;

import javax.servlet.FilterChain;
import javax.servlet.ServletException;
import javax.servlet.http.HttpServletRequest;
import javax.servlet.http.HttpServletResponse;
import java.io.IOException;

@Service
public class TokenAuthenticationFilter extends OncePerRequestFilter {

    @Override
    protected void doFilterInternal(HttpServletRequest request, HttpServletResponse response, FilterChain filterChain) throws ServletException, IOException {
        String token = extractTokenFromRequest(request);

        if (token != null && isValidToken(token)) {
            // 根据token验证通过的结果,创建认证对象
            Authentication authentication = createAuthentication(token);
            // 将认证对象绑定到安全上下文中
            SecurityContextHolder.getContext().setAuthentication(authentication);
        }

        filterChain.doFilter(request, response);
    }

    private String extractTokenFromRequest(HttpServletRequest request) {
        // 从请求中提取身份验证令牌
        // 例如,从请求头、请求参数或Cookie中获取令牌
        // 返回令牌字符串
        return request.getHeader("sessionId");
    }

    private boolean isValidToken(String token) {
        // 验证令牌的有效性,例如检查签名、过期时间等
        // 返回验证结果
        Authentication authentication = AntdesignApiController.getUserInfoBySessionId(token);
        return authentication != null ;

    }

    private Authentication createAuthentication(String token) {
        // 根据令牌创建认证对象,例如构建一个具有用户信息的自定义认证对象
        // 返回认证对象
        return  AntdesignApiController.getUserInfoBySessionId(token);

    }
}
当然,这个过滤器需要放置在用户认证UsernamePasswordAuthenticationFilter之前,对应代码在后端的SecurityConfig.java中
@Override
    protected void configure(HttpSecurity http) throws Exception {

        http.authorizeRequests()
                .antMatchers("/api/login/account").permitAll()
                .anyRequest().authenticated()
                .and()
                .rememberMe().tokenValiditySeconds(2419200).key("antdesign").and() .sessionManagement()
.sessionCreationPolicy(SessionCreationPolicy.STATELESS)
                .and() .csrf().disable();

        //把新增加的过滤器放到 用户名密码认证器的前面
        http.addFilterBefore(tokenAuthenticationFilter, UsernamePasswordAuthenticationFilter.class);


    }
- 1.3服务代理
由于antdesign本身有自己的mock接口,因此,在开发的过程中,会将api转到自己的mock接口中去,为了实现把前端的接口转移到后端,又避免跨域的问题,可以设置代理。
在config->config.tx下面设置proxy代理。
 proxy: {
    '/api/': { target: 'http://localhost:8081', changeOrigin: true },
  },
同时,将antdesign的mock在链接后台的时候需要关闭,关闭的设置是在vscode中进行配置的,我使用的是VsCode开发的,对应代码如下。
{
  // Use IntelliSense to learn about possible attributes.
  // Hover to view descriptions of existing attributes.
  // For more information, visit: https://go.microsoft.com/fwlink/?linkid=830387
  "version": "0.2.0",
  "configurations": [
    {
      "env": {
        "NODE_OPTIONS": "--openssl-legacy-provider"
      },
      "command": " npm run start:no-mock",
      //"command": " npm run start",
      "name": "runNpm",
      "request": "launch",
      "type": "node-terminal"
    },
    {
      "type": "node",
      "request": "launch",
      "name": "Launch Program",
      "skipFiles": ["<node_internals>/**"],
      "runtimeArgs": ["-r", "ts-node/register", "-r", "source-map-support/register"],
      "program": "${workspaceFolder}\\src\\pages\\Welcome.tsx",
      "preLaunchTask": "tsc: build - tsconfig.json",
      "outFiles": ["${workspaceFolder}/build/dist/**/*.js"]
    }
  ]
}
其中,"command": " npm run start:no-mock",是指无须启动mock,否则,启动mock的指令是"command": " npm run start"。
- 2.界面修改和调整
2.1登录界面调整
登录界面之前是antdesign定制的,有很多内容不适合别的网站,因此需要处理。包括其他登录方式中的,支付宝登录,微信登录等,登录表单调整,对应的代码在src->pages->user->index.tsx->Login如下所示。
<div className={styles.content}>
        <LoginForm
          logo={<img alt="logo" src="/logo.svg" />}
          title="自研设计开发平台,powered By Ant Design"
          subTitle="欢迎登陆XX平台"
          initialValues={{
            autoLogin: true,
          }}
          /* actions={[
            <FormattedMessage key="loginWith" id="pages.login.loginWith" />,
            <AlipayCircleOutlined key="AlipayCircleOutlined" className={styles.icon} />,
            <TaobaoCircleOutlined key="TaobaoCircleOutlined" className={styles.icon} />,
            <WeiboCircleOutlined key="WeiboCircleOutlined" className={styles.icon} />,
          ]} */
          onFinish={async (values) => {
            await handleSubmit(values as API.LoginParams);
          }}
        >
          <Tabs activeKey={type} onChange={setType}>
            <Tabs.TabPane
              key="account"
              tab={intl.formatMessage({
                id: 'pages.login.accountLogin.tab',
                defaultMessage: '账户密码登录',
              })}
            />
            {/* <Tabs.TabPane
              key="mobile"
              tab={intl.formatMessage({
                id: 'pages.login.phoneLogin.tab',
                defaultMessage: '手机号登录',
              })}
            /> */}
          </Tabs>

          {status === 'error' && loginType === 'account' && (
            <LoginMessage
              content={intl.formatMessage({
                id: 'pages.login.accountLogin.errorMessage',
                defaultMessage: '账户或密码错误(admin/ant.design)',
              })}
            />
          )}
          {type === 'account' && (
            <>
              <ProFormText
                name="username"
                fieldProps={{
                  size: 'large',
                  prefix: <UserOutlined className={styles.prefixIcon} />,
                }}
                placeholder="请输入用户名"
                rules={[
                  {
                    required: true,
                    message: (
                      <FormattedMessage
                        id="pages.login.username.required"
                        defaultMessage="请输入用户名!"
                      />
                    ),
                  },
                ]}
              />
              <ProFormText.Password
                name="password"
                fieldProps={{
                  size: 'large',
                  prefix: <LockOutlined className={styles.prefixIcon} />,
                }}
                placeholder="请输入密码"
                rules={[
                  {
                    required: true,
                    message: (
                      <FormattedMessage
                        id="pages.login.password.required"
                        defaultMessage="请输入密码!"
                      />
                    ),
                  },
                ]}
              />
            </>
          )}

          {status === 'error' && loginType === 'mobile' && <LoginMessage content="验证码错误" />}
          {type === 'mobile' && (
            <>
              <ProFormText
                fieldProps={{
                  size: 'large',
                  prefix: <MobileOutlined className={styles.prefixIcon} />,
                }}
                name="mobile"
                placeholder={intl.formatMessage({
                  id: 'pages.login.phoneNumber.placeholder',
                  defaultMessage: '手机号',
                })}
                rules={[
                  {
                    required: true,
                    message: (
                      <FormattedMessage
                        id="pages.login.phoneNumber.required"
                        defaultMessage="请输入手机号!"
                      />
                    ),
                  },
                  {
                    pattern: /^1\d{10}$/,
                    message: (
                      <FormattedMessage
                        id="pages.login.phoneNumber.invalid"
                        defaultMessage="手机号格式错误!"
                      />
                    ),
                  },
                ]}
              />
              <ProFormCaptcha
                fieldProps={{
                  size: 'large',
                  prefix: <LockOutlined className={styles.prefixIcon} />,
                }}
                captchaProps={{
                  size: 'large',
                }}
                placeholder={intl.formatMessage({
                  id: 'pages.login.captcha.placeholder',
                  defaultMessage: '请输入验证码',
                })}
                captchaTextRender={(timing, count) => {
                  if (timing) {
                    return `${count} ${intl.formatMessage({
                      id: 'pages.getCaptchaSecondText',
                      defaultMessage: '获取验证码',
                    })}`;
                  }
                  return intl.formatMessage({
                    id: 'pages.login.phoneLogin.getVerificationCode',
                    defaultMessage: '获取验证码',
                  });
                }}
                name="captcha"
                rules={[
                  {
                    required: true,
                    message: (
                      <FormattedMessage
                        id="pages.login.captcha.required"
                        defaultMessage="请输入验证码!"
                      />
                    ),
                  },
                ]}
                onGetCaptcha={async (phone) => {
                  const result = await getFakeCaptcha({
                    phone,
                  });
                  if (result === false) {
                    return;
                  }
                  message.success('获取验证码成功!验证码为:1234');
                }}
              />
            </>
          )}
          <div
            style={{
              marginBottom: 24,
            }}
          >
            {/* <ProFormCheckbox noStyle name="autoLogin">
              <FormattedMessage id="pages.login.rememberMe" defaultMessage="自动登录" />
            </ProFormCheckbox> */}
            <a
              style={{
                float: 'right',
              }}
            >
              <FormattedMessage id="pages.login.forgotPassword" defaultMessage="忘记密码" />
            </a>
          </div>
        </LoginForm>
      </div>
除了登录框之外,登录界面的最下方有相关的版权信息,版权信息的调整代码在src->componentts->Footer->index.tsx
const Footer: React.FC = () => {
  const intl = useIntl();
  const defaultMessage = intl.formatMessage({
    id: 'app.copyright.produced.bs',
    defaultMessage: '京[字001号] XX委员会',
  });

  const currentYear = new Date().getFullYear();

  return (
    <DefaultFooter
      copyright={`${currentYear} ${defaultMessage}`}
      links={[
        {
          key: 'Ant Design Pro',
          title: '技术支持-antd pro',
          href: 'https://pro.ant.design',
          blankTarget: true,
        },
        {
          key: 'github',
          title: <GithubOutlined />,
          href: 'https://github.com/ant-design/ant-design-pro',
          blankTarget: true,
        },
        {
          key: 'Ant Design',
          title: '技术支持antd',
          href: 'https://ant.design',
          blankTarget: true,
        },
      ]}
    />
  );
};
- 2.2框架内容调整
整个框架中需要把一些不用的和不合适的去掉。整个框架的入口在app.tsx中,位于src->app.tsx.
- 2.2.1左侧栏
首先需要把原来antdesign的左侧栏的下方的链接去掉,就是openAPI的文档,对应的代码位于src->app.tsx->layout->waterMarkProps
//发布的时候,要把这个设置成false,否则会显示一些antdesign的网站链接
const isDev = false; /* = process.env.NODE_ENV === 'development'; */
把isDev设置为false即可,也可以通过环境变量调整的方式来修改,但是如果需要,可以直接设置为false。
- 2.2.2顶栏
src->components->RightContent->index.tsx
<Space className={className}>
      {/* <HeaderSearch
        className={`${styles.action} ${styles.search}`}
        placeholder="站内搜索"
        defaultValue="umi ui"
        options={[
          { label: <a href="https://umijs.org/zh/guide/umi-ui.html">umi ui</a>, value: 'umi ui' },
          {
            label: <a href="next.ant.design">Ant Design</a>,
            value: 'Ant Design',
          },
          {
            label: <a href="https://protable.ant.design/">Pro Table</a>,
            value: 'Pro Table',
          },
          {
            label: <a href="https://prolayout.ant.design/">Pro Layout</a>,
            value: 'Pro Layout',
          },
        ]}
        // onSearch={value => {
        //   console.log('input', value);
        // }}
      /> */}
      {/* <span
        className={styles.action}
        onClick={() => {
          window.open('https://pro.ant.design/docs/getting-started');
        }}
      >
        <QuestionCircleOutlined />
      </span> */}
      <Avatar />
      {/* <SelectLang className={styles.action} /> */}
    </Space>
- 2.2.3网站title
网站title的调整需要修改配置文件,在src->.umi->plugin-layout->layout.tsx->default->userConfig
  const userConfig = {
    ...{'name':'ant-design-pro','theme':'PRO','locale':true,'showBreadcrumb':true,'siderWidth':208,'navTheme':'dark','primaryColor':'#13C2C2','layout':'side','contentWidth':'Fluid','fixedHeader':false,'fixSiderbar':true,'pwa':false,'logo':'logo.svg','headerHeight':48,'splitMenus':false,'title':'智慧舱软件'},
    ...runtimeConfig || {}
  };
这样,网站的title就会展示为智慧舱软件了。

3.添加动态菜单
3.1添加动态菜单
在src->app.tsx中的layout下面新增menu。对应代码如下所示
menu: {
      // 每当 initialState?.currentUser?.userid 发生修改时重新执行 request
      params: {
        userId: initialState?.currentUser?.userid,
      },
      request: async (params, defaultMenuData) => {
        // initialState.currentUser 中包含了所有用户信息
        console.log(`defaultMenuData=>${defaultMenuData}`);
        console.log(`defaultMenuData-typeof=>${typeof defaultMenuData}`);

        const userId = initialState?.currentUser?.userid;
        const menuData = await fetchMenuData(userId, defaultMenuData);
        console.log(`menuData=>${menuData}`);

        return menuData;
      },
    },
而fetchMenuData的代码如下所示。
const fetchMenuData = async (
  userId: string | undefined,
  defaultMenuData: any[],
): Promise<any[]> => {
  const userMenus = await request<any[]>('/api/login/usermenu', {
    method: 'POST',
    headers: {
      'Content-Type': 'application/json',
    },
    data: { userId: userId },
  });

  const dd = userMenus['data'];

  for (const d of dd) {
    const parentMenuData = d['menu'];
    const childMenuData = d['childMenu'];
    const childrenMenus = [];
    for (const cc of childMenuData) {
      const childrenMenu = {
        path: cc['menuUrl'],
        name: cc['menuTitle'],
      };
      childrenMenus.push(childrenMenu);
    }
    const menu = {
      path: parentMenuData['menuUrl'],
      name: parentMenuData['menuTitle'],
      children: childrenMenus,
    };
    defaultMenuData.push(menu);
  }


  return defaultMenuData;
};
后端的返回结果的数据结构如下所示。
后端返回的数据结果
List<MenuExt>
其中,MenuExt的结构如下:
public class MenuExt {
    private Menu menu;
    private List<Menu> childMenu;
}
而Menu的结构如下:
public class Menu implements Serializable {
    private Integer menuId;
    private Integer parentMenuId;
    private String menuTitle;
    private String menuUrl;
    private String menuValid;
    private String menuDesc;
    private String menuIcon;
    private String menuRemark;
    private String rsrv;
    private Integer menuRight;
}

 浙公网安备 33010602011771号