

Nextcloud首次通过AIO安装时,出现nextcloud Login is invalid because files already exist for this user和Installation of Nextcloud failed!和 The initial Nextcloud installation failed. 错误的解决方法
环境:
nextcloud 30.0.5版本
安装方式:https://github.com/nextcloud/all-in-one/tree/main/manual-install
nextcloud-aio-nextcloud-1  | User required to trust additional CA certificates, running 'update-ca-certificates.'
nextcloud-aio-nextcloud-1  | + '[' -f /dev-dri-group-was-added ']'
nextcloud-aio-nextcloud-1  | ++ find /dev -maxdepth 1 -mindepth 1 -name dri
nextcloud-aio-nextcloud-1  | + '[' -n '' ']'
nextcloud-aio-nextcloud-1  | + set +x
nextcloud-aio-nextcloud-1  | Enabling Imagick...
nextcloud-aio-nextcloud-1  | WARNING: opening from cache https://dl-cdn.alpinelinux.org/alpine/v3.21/main: No such file or directory
nextcloud-aio-nextcloud-1  | WARNING: opening from cache https://dl-cdn.alpinelinux.org/alpine/v3.21/community: No such file or directory
nextcloud-aio-nextcloud-1  | Connection to nextcloud-aio-redis (172.18.0.4) 6379 port [tcp/redis] succeeded!
nextcloud-aio-nextcloud-1  | Initializing nextcloud 30.0.5.1 ...
nextcloud-aio-nextcloud-1  | Initializing finished
nextcloud-aio-nextcloud-1  | New Nextcloud instance.
nextcloud-aio-nextcloud-1  | Installing with pgsql database
nextcloud-aio-nextcloud-1  | Starting Nextcloud installation...
nextcloud-aio-nextcloud-1  | Login is invalid because files already exist for this user
nextcloud-aio-nextcloud-1  | Installation of Nextcloud failed!
如果出现Login is invalid because files already exist for this user导致的安装失败,则这里进行以下几步检查。
这里假设nextcloud_aio_nextcloud_data卷指向 /a/b/c 目录。
第一步
检查nextcloud_aio_nextcloud_data卷所指向的物理机的目录路径是否都有权限。
举例说明:假设你的卷挂载宿主机的/a/b/c目录,这需要确保/a/b/c目录都有查看的权限,最后一个目录需要有写入的权限,因为最后一个目录是容器最终要写入的目录。
这就要使用命令chmod -R 755 /a chmod -R 755 /a/b,让a和b目录具备r-x权限,也就是在这个目录下只能查看不能新建内容。
最后一级目录/c,由于是需要容器写入的数据目录,所以给775(rwxrwxr-x)权限即可。
这里需要注意,如果你挂载的宿主机目录在/home目录下,则需要检查/home下的目录是否有权限查看。
第二步
检查数据目录的所有组是不是tape,如果不是,则进行设置,要使用的名称是chown -R 33:tape /a/b/c。
tape是nextcloud创建出的组,33是docker nextcloud容器里的UID值,这里也设置上吧(虽然宿主机没有UID=33这个用户)。
第三步
看看你Installation of Nextcloud failed!失败是由于什么引起,这就要看日志的开头来看起了。
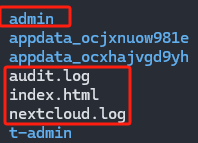
我这边是由于Login is invalid because files already exist for this user错误引起的,这意思就是用户已存在,如果你是新安装的话,检查你的数据目录/a/b/c下是否存在admin目录,进行更名为其他的名称,
使用命令mv admin t-admin来更改这个目录的名称.
最后
-
删除数据目录中的install.failed文件。最好其他随安装时一并出现的文件也删除。怎么分辨呢?你的数据目录只有你之前创建的用户名数据目录,所以除此之外的文件进行删除就行了。
-
删除nextcloud_aio_nextcloud卷,来重新安装nextcloud,执行命令:
docker volume rm nextcloud_aio_nextcloud。 -
删除/mnt/ncdata目录,删除之前确认下有没有重要的数据(因为我这里是空的目录,所以我就直接删除了,实际删不删除影响不大,毕竟空目录),使用命令
rm -rf /mnt/ncdata。 -
重新执行你的docker容器进行安装吧,这样应该就没有其他问题了,记得查看日志,看看有没有出现其他错误。
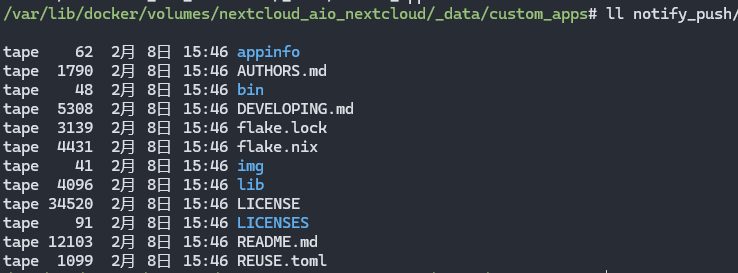
需要注意nextcloud容器的日志信息,因为我这边就遇到了nextcloud/aio-nextcloud容器会下载nextcloud/aio-notify-push容器的二进制文件,但是这些文件都在github上,网络受限导致下载失败,
下载失败后,在/var/lib/docker/volumes/nextcloud_aio_nextcloud/_data/custom_apps目录下不存在notify_push目录或者notify_push目录里的二进制文件不存在。
既然二进制文件不存在,就会导致nextcloud/aio-notify-push容器不断的重启,所以要完整的看nextcloud/aio-nextcloud日志的信息。
我这边的解决方法就是挂上代理了,无奈。Linux上通过Docker安装https://github.com/XTLS/Xray-core代理,然后配置个节点进行临时的初始化nextcloud使用。
有关Nextcloud AIO - notify_push binary was not found.的问题,原因就是下载github中的资源失败导致的。
这个下载失败的日志会在nextcloud/aio-nextcloud容器里进行展示出来,查看日志命令docker compose logs -f nextcloud-aio-nextcloud。
其他参考
- Prevent creating users with existing files
- Error: Username is invalid because files already exist for this use
- “Username is invalid because files already exist for this user” during fresh install
- Reinstall using existing data-dir and user names
- “The username is already being used” after reinstalling Nextcloud version 20.0.7.1
- Cannot create user when data files already exist for it
- 出现"Login is invalid because files already exist for this user"错误的源代码位置
- The initial Nextcloud installation failed. Nextcloid AIO startup loop
- Nextcloud AIO installation stuck on "starting container"
- 安装AIO出现auth.docker.io的请求超时问题
- 有关通知失效Notify-push - Invalid credentials in Nextcloud AIO
专门寻找nextcloud问题的地方
- https://help.nextcloud.com/
- https://github.com/nextcloud/server/issues
- https://github.com/nextcloud/all-in-one/issues

 浙公网安备 33010602011771号