Visual Studio Code 构建 C/C++ 开发环境
Visual Studio Code 构建 C/C++ 开发环境
1. 安装 MinGW Distro / MinGW / GNU GCC 中的任何一款 (其各类安装文件分类为:x86_64 为64位版,i686 为32位版。win32 为Windows版,posix 为Windows+Linux版。sjlj 为传统稳定版,seh 为高速版。所以,一般下载 x86_64-posix-seh 文件即可),( Windows 下的 VS Code 暂不支持 CLang )。
2. 安装 VS Code
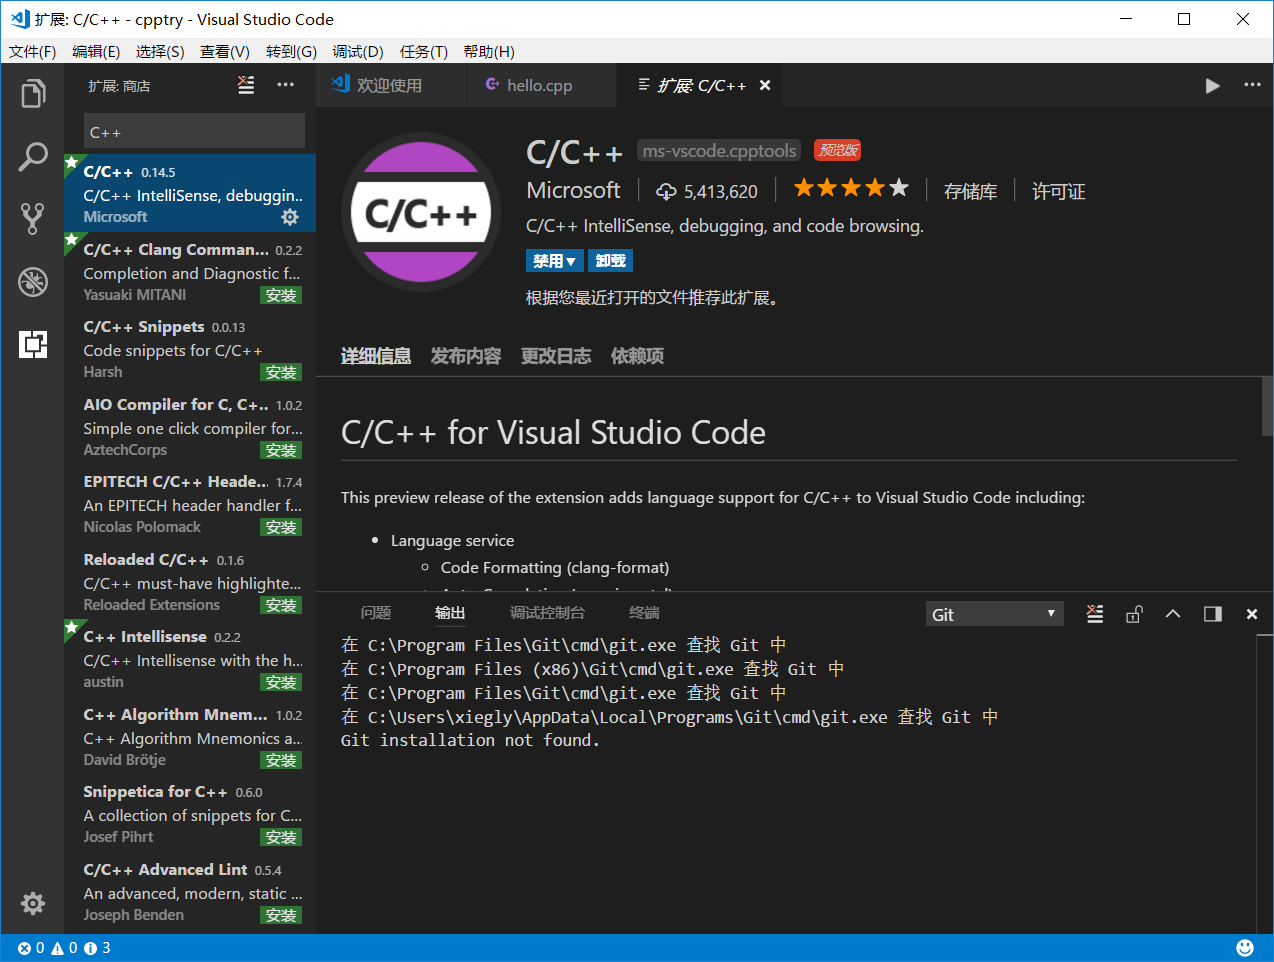
3. Ctrl + Shift + X 安装 C/C++ (cpptools) 插件
4. Ctrl + Shift + X 安装 Code Runner 插件

5. 重启 VS Code,让安装的插件生效
6. 在操作系统中新建一个工程目录,如 “cppProject”,然后启动 VS Code,打开这个空目录
7. 用 VS Code 在 cppProject 目录新建一个源文件 hello.cpp
8. 添加头文件索引路径
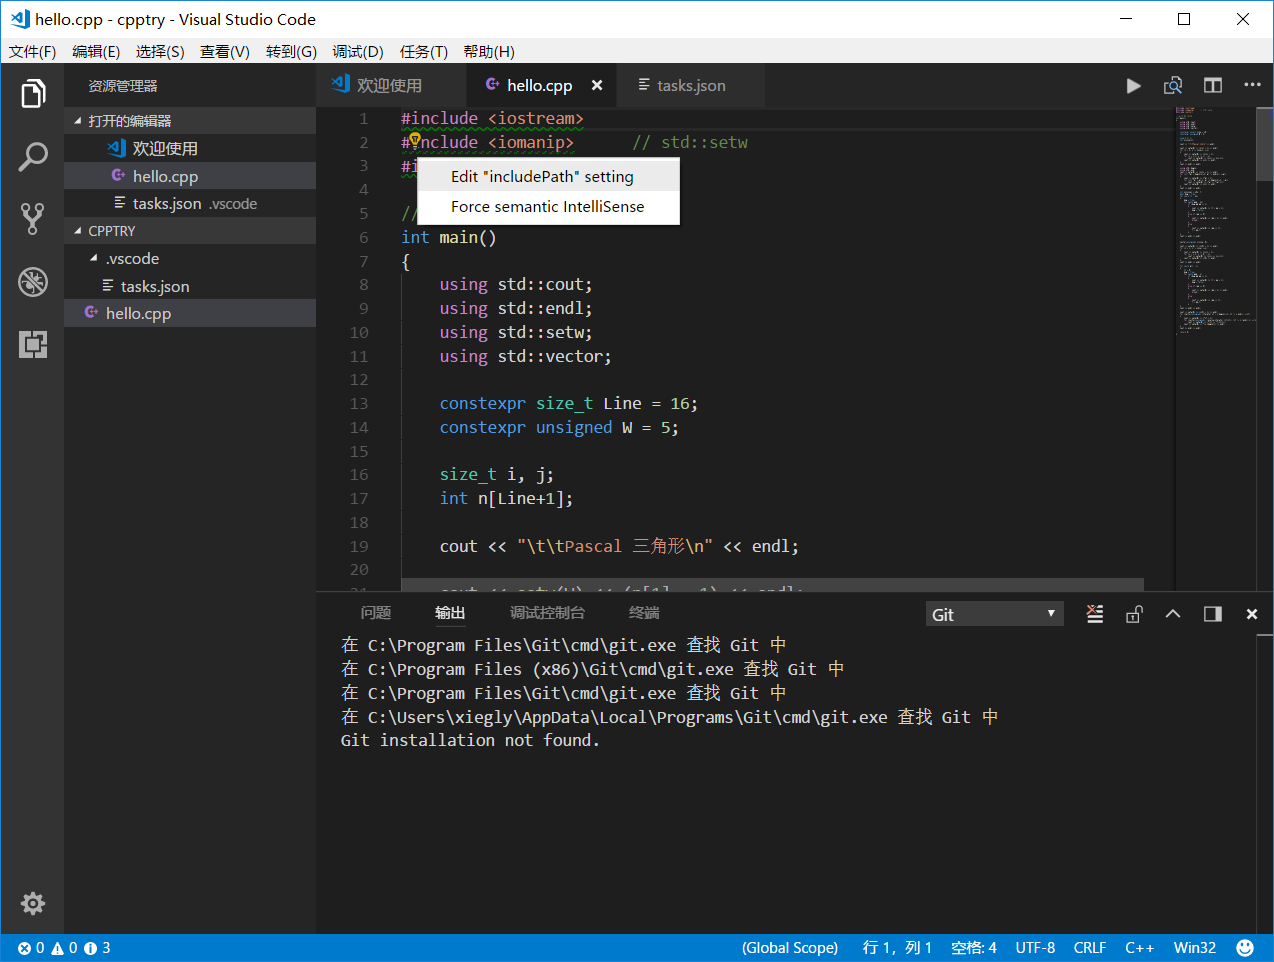
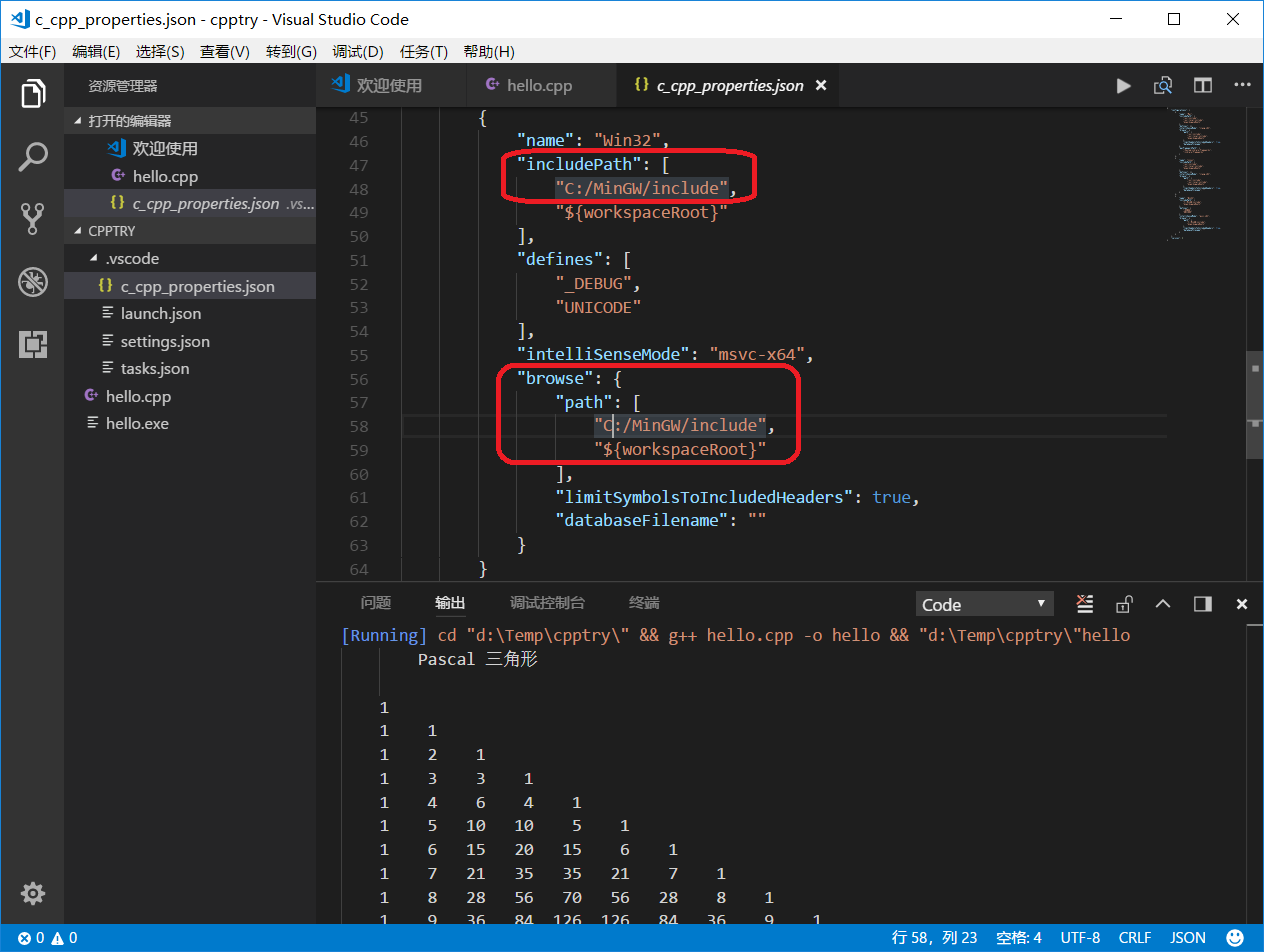
在 hello.cpp 中,你会发现 include 头文件那一行下面有绿色的波浪线,代表 VS Code 的 C/C++ 插件找不到头文件的相应路径。 将鼠标移到这一行点击,会出现一个提示的黄色小灯泡符号,点击它,然后点击“Edit "includePath" setting”按钮, 将生成并打开 c_cpp_properties.json 文件,编辑这个json文件,添加 C/C++ 头文件的路径进去。 这里 MinGW 的头文件路径为: “C:/MinGW/include/*”,将它添加到“includePath”和"browse/path"变量中。
{
    "configurations": [
        {
            "name": "Mac",
            "includePath": [
                "/usr/include",
                "/usr/local/include",
                "${workspaceRoot}"
            ],
            "defines": [],
            "intelliSenseMode": "clang-x64",
            "browse": {
                "path": [
                    "/usr/include",
                    "/usr/local/include",
                    "${workspaceRoot}"
                ],
                "limitSymbolsToIncludedHeaders": true,
                "databaseFilename": ""
            },
            "macFrameworkPath": [
                "/System/Library/Frameworks",
                "/Library/Frameworks"
            ]
        },
        {
            "name": "Linux",
            "includePath": [
                "/usr/include",
                "/usr/local/include",
                "${workspaceRoot}"
            ],
            "defines": [],
            "intelliSenseMode": "clang-x64",
            "browse": {
                "path": [
                    "/usr/include",
                    "/usr/local/include",
                    "${workspaceRoot}"
                ],
                "limitSymbolsToIncludedHeaders": true,
                "databaseFilename": ""
            }
        },
        {
            "name": "Win32",
            "includePath": [
                "C:/MinGW/include",
                "${workspaceRoot}"
            ],
            "defines": [
                "_DEBUG",
                "UNICODE"
            ],
            "intelliSenseMode": "msvc-x64",
            "browse": {
                "path": [
                    "C:/MinGW/include",
                    "${workspaceRoot}"
                ],
                "limitSymbolsToIncludedHeaders": true,
                "databaseFilename": ""
            }
        }
    ],
    "version": 3
}
另外在 tasks.json 中的 "tasks/args" 中加入 "--target=x86_64-w64-mingw"。
9. 设置编译环境 (安装了 Code Runner插件 的话,这个设置就不再起作用)
在 VS Code 中点击 hello.cpp 回到 hello.cpp 文件,调用快捷键 Ctrl+Shift+B 构建可执行文件。 此时 VS Code 会报错,在 VS Code 的顶栏显示“No task runner configured”,你只需要点击右边的蓝色按钮“Configure task runner”来生成编辑 tasks.json 即可。 选择后会创建并打开一个 tasks.json 的配置文件, 修改其中的 command 和 args 变量并保存:
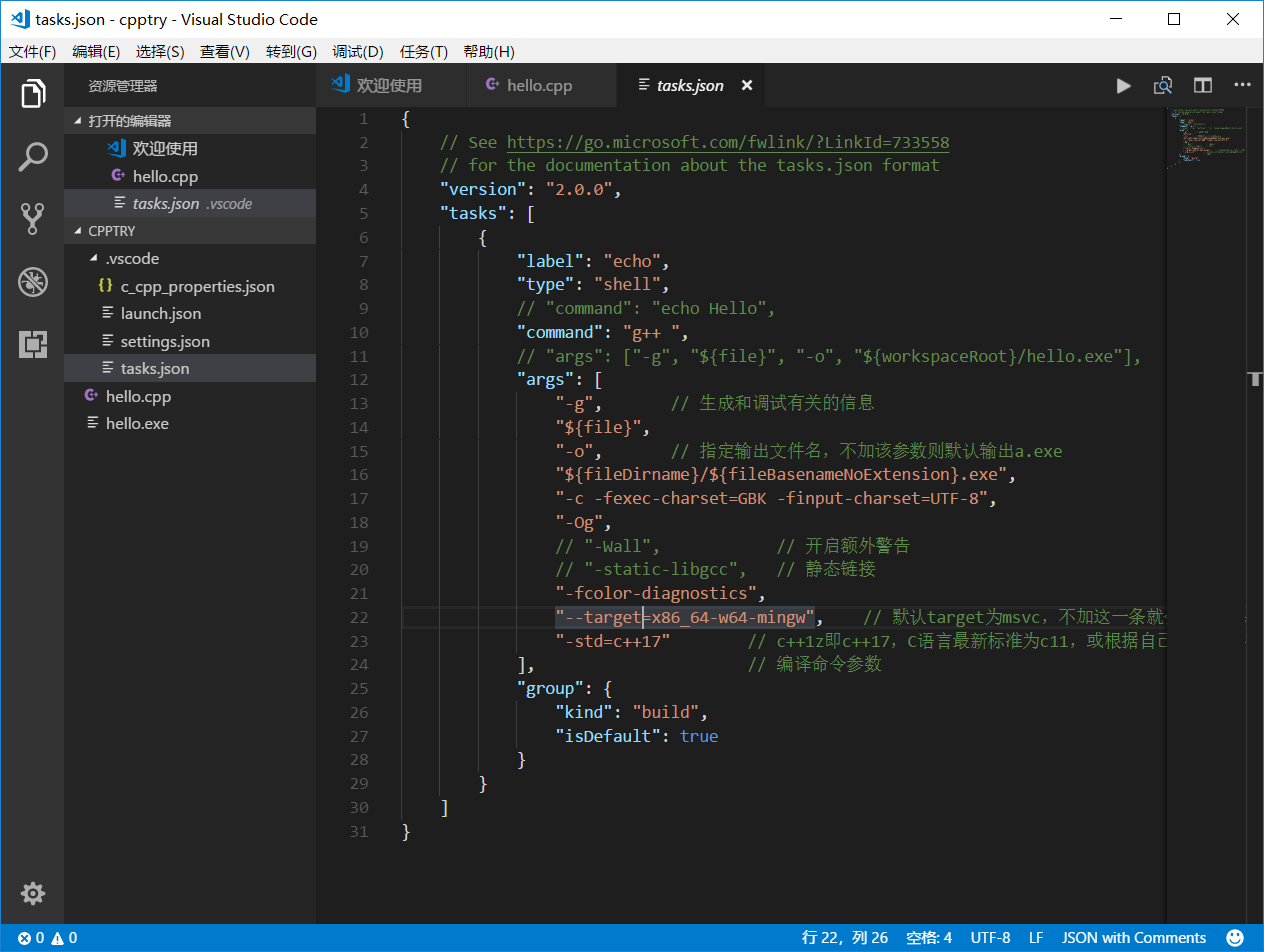
"command": "g++ "
"args": [ "-g", "${file}", "-o", "${fileDirname}/${fileBasenameNoExtension}.exe", "--target=x86_64-w64-mingw", "-std=c++17" ]
{
    // See https://go.microsoft.com/fwlink/?LinkId=733558
    // for the documentation about the tasks.json format
    "version": "2.0.0",
    "tasks": [
        {
            "label": "echo",
            "type": "shell",
            // "command": "echo Hello",
            "command": "g++ ",          // 如果用MinGW,编译C用gcc,编译c++用g++。如果用CLang,编译"clang++", //
            // "args": ["-g", "${file}", "-o", "${workspaceRoot}/hello.exe"],
            "args": [
                "-g",                   // 生成和调试有关的信息
                "${file}",
                "-o",                   // 指定输出文件名,不加该参数则默认输出a.exe
                "${fileDirname}/${fileBasenameNoExtension}.exe",
                "-c -fexec-charset=GBK -finput-charset=UTF-8",
                "-Og",
                // "-Wall",            // 开启额外警告
                // "-static-libgcc",   // 静态链接
                "-fcolor-diagnostics",
                "--target=x86_64-w64-mingw",    // 默认target为msvc,不加这一条就会找不到头文件
                "-std=c++17"            // c++1z即c++17,C++语言最新标准为c17
            ],                          // 编译命令参数
            "group": {
                "kind": "build",
                "isDefault": true       // 设为false可做到一个tasks.json配置多个编译指令,需要自己修改本文件
            }
        }
    ]
}
10. 设置编译等环境
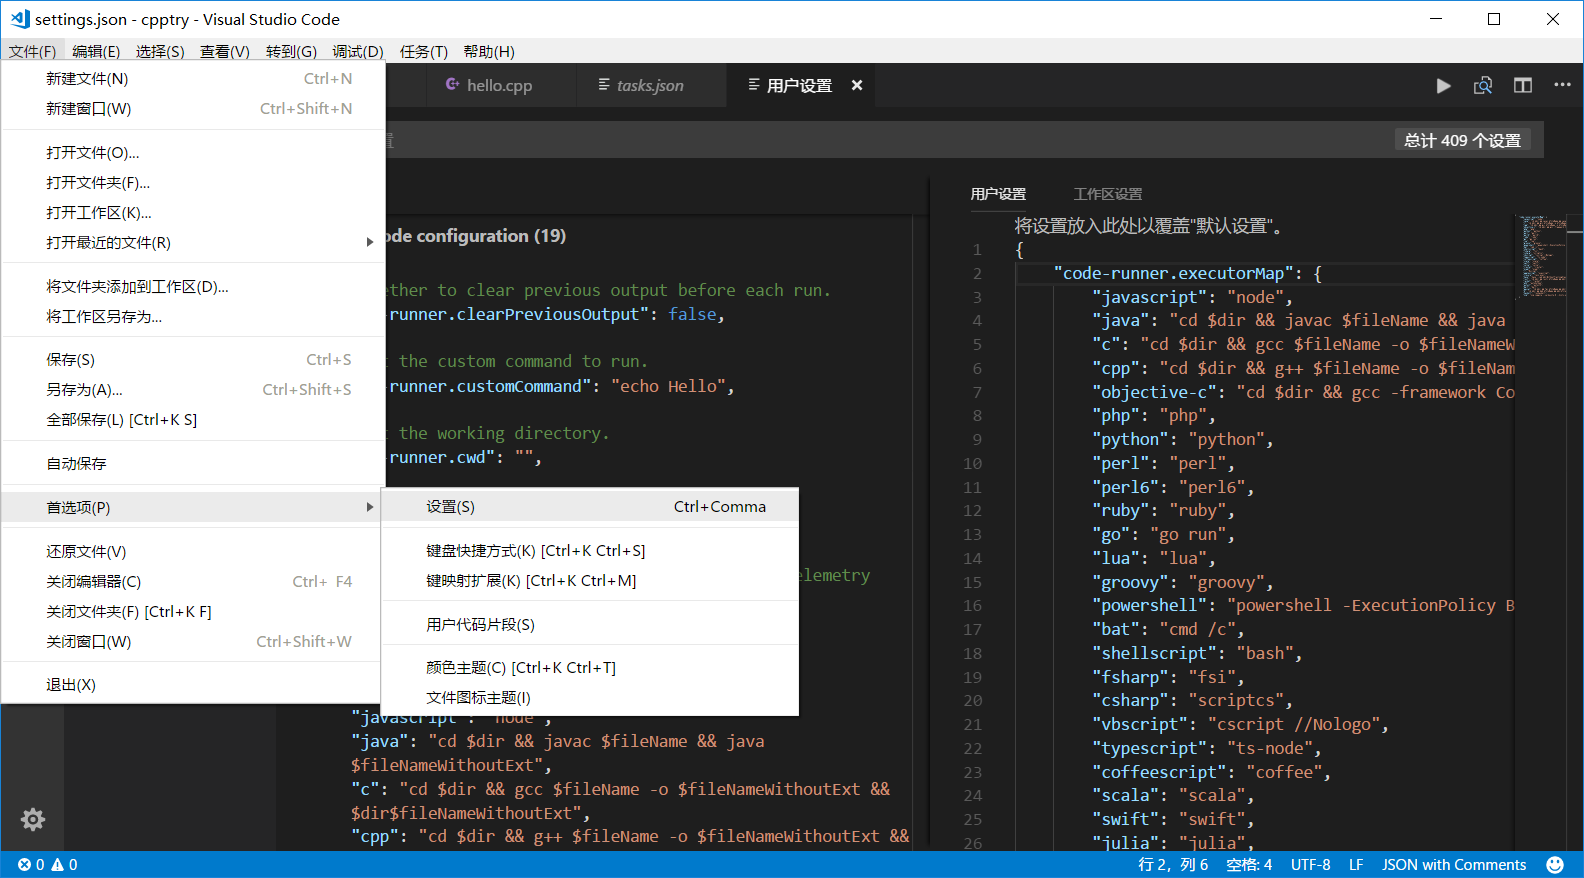
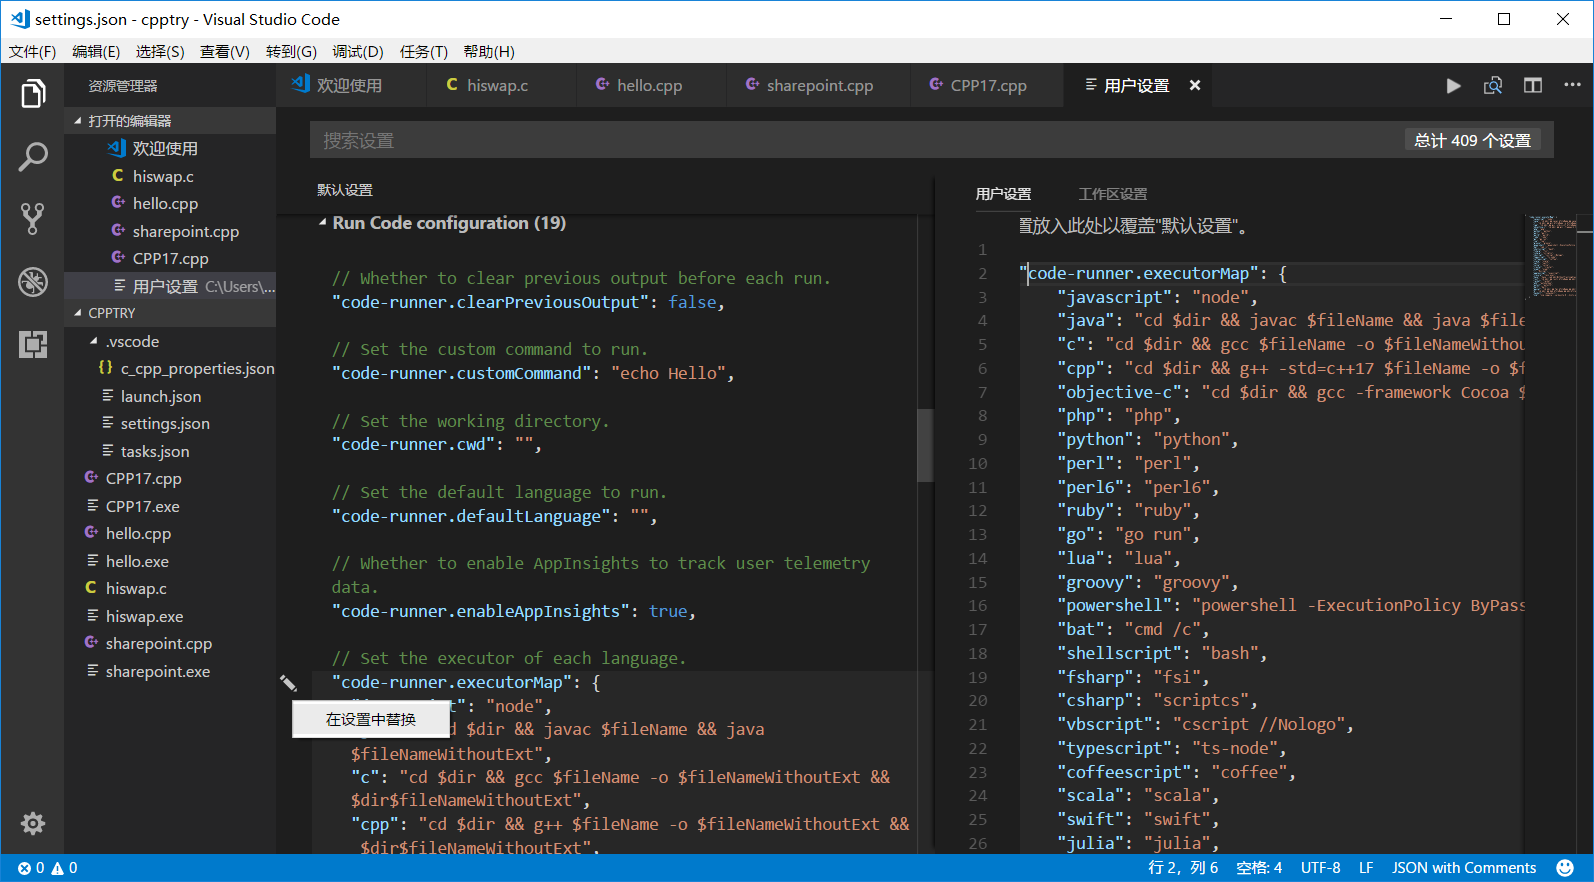
点击“文件/首选项/设置”菜单,修改 settings.json 配置文件, 在左侧的“默认设置”下找到“Run Code configuration”下的 "code-runner.executorMap" ,点击其左侧的“笔”图标,选择“在设置中替换”,将内容复制到右侧的“用户设置”中,修改其中的 "c" / "cpp" 项,使其支持 中文 和 C++17 标准。
11. 增加对 C++17 标准的支持
GNU GCC 7.2 直接支持 C++11 / C++14 标准,无需进行任何修改。如果需要支持 C++17 标准的话,则需要修改“用户设置”中的 "c" / "cpp" 项,加入“-std=c++17”。
"cpp": "cd $dir && g++ -std=c++17 $fileName -o $fileNameWithoutExt && $dir$fileNameWithoutExt"
{
    "code-runner.executorMap": {
        "javascript": "node",
        "java": "cd $dir && javac $fileName && java $fileNameWithoutExt",
        "c": "cd $dir && gcc $fileName -o $fileNameWithoutExt && $dir$fileNameWithoutExt",
        "cpp": "cd $dir && g++ -std=c++17 $fileName -o $fileNameWithoutExt && $dir$fileNameWithoutExt",
        "objective-c": "cd $dir && gcc -framework Cocoa $fileName -o $fileNameWithoutExt && $dir$fileNameWithoutExt",
        "php": "php",
        "python": "python",
        "perl": "perl",
        "perl6": "perl6",
        "ruby": "ruby",
        "go": "go run",
        "lua": "lua",
        "groovy": "groovy",
        "powershell": "powershell -ExecutionPolicy ByPass -File",
        "bat": "cmd /c",
        "shellscript": "bash",
        "fsharp": "fsi",
        "csharp": "scriptcs",
        "vbscript": "cscript //Nologo",
        "typescript": "ts-node",
        "coffeescript": "coffee",
        "scala": "scala",
        "swift": "swift",
        "julia": "julia",
        "crystal": "crystal",
        "ocaml": "ocaml",
        "r": "Rscript",
        "applescript": "osascript",
        "clojure": "lein exec",
        "haxe": "haxe --cwd $dirWithoutTrailingSlash --run $fileNameWithoutExt",
        "rust": "cd $dir && rustc $fileName && $dir$fileNameWithoutExt",
        "racket": "racket",
        "ahk": "autohotkey",
        "autoit": "autoit3",
        "dart": "dart",
        "pascal": "cd $dir && fpc $fileName && $dir$fileNameWithoutExt",
        "d": "cd $dir && dmd $fileName && $dir$fileNameWithoutExt",
        "haskell": "runhaskell",
        "nim": "nim compile --verbosity:0 --hints:off --run"
    }
}
12. 对 中文汉字 的支持
VS Code 默认使用 UTF-8 编辑源程序并编译成 UTF-8 的程序,因此,在 VS Code 中编辑编译的程序在 VS Code 中运行不会出现乱码。
但是,Windows 下的 命令提示符 和 PowerShell 的代码页默认为 GBK ,因此在它们窗口下直接运行程序,其中的中文汉字会变成乱码。解决方法有两种:
方法一,在窗口下运行以下命令,修改运行窗口的代码页
chcp 65001 # 就是换成UTF-8代码页,然后再运行程序
chcp 936 # 可以换回默认的GBK,
chcp 437 #是美国英语
方法二,修改程序的编码
打开源程序窗口,点击窗口右下角的编码,例如“UTF-8”,选择“通过编码重新打开”下的“Chinese (GBK)”,将编码变成 GBK ,即可以修改源程序的编码。
再在11步中的“用户设置”中的 "c" / "cpp" 项,加入“-fexec-charset=GBK”,编译后程序为 GBK 编码,它可以在默认的 命令提示符 窗口运行,但是在 VS Code 里面运行会出现乱码。
"cpp": "cd $dir && g++ -fexec-charset=GBK -std=c++17 $fileName -o $fileNameWithoutExt && $dir$fileNameWithoutExt"
13. 设置运行环境
打开 launch.json 的配置文件, 修改其中的 program 和 miDebuggerPath 变量并保存:
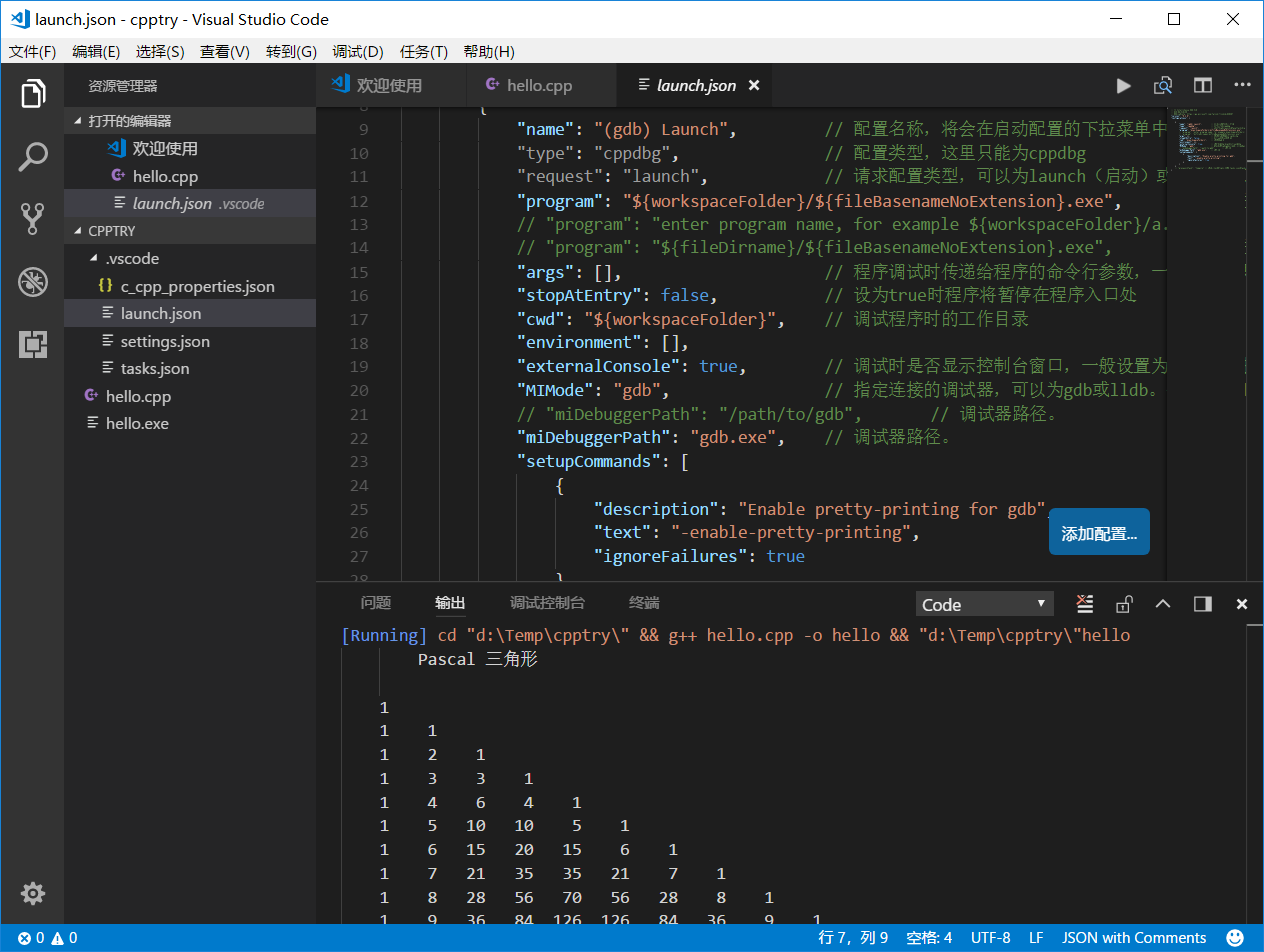
"program": "${workspaceFolder}/${fileBasenameNoExtension}.exe"
"miDebuggerPath": "gdb.exe"
{
    // 使用 IntelliSense 了解相关属性。
    // 悬停以查看现有属性的描述。
    // 欲了解更多信息,请访问: https://go.microsoft.com/fwlink/?linkid=830387
    "version": "0.2.0",
    "configurations": [

        {
            "name": "(gdb) Launch",         // 配置名称,将会在启动配置的下拉菜单中显示
            "type": "cppdbg",               // 配置类型,这里只能为cppdbg
            "request": "launch",            // 请求配置类型,可以为launch(启动)或attach(附加)
            "program": "${workspaceFolder}/${fileBasenameNoExtension}.exe",     // 将要进行调试的程序的路径
            // "program": "enter program name, for example ${workspaceFolder}/a.exe",
            // "program": "${fileDirname}/${fileBasenameNoExtension}.exe",      // 将要进行调试的程序的路径
            "args": [],                     // 程序调试时传递给程序的命令行参数,一般设为空即可
            "stopAtEntry": false,           // 设为true时程序将暂停在程序入口处
            "cwd": "${workspaceFolder}",    // 调试程序时的工作目录
            "environment": [],
            "externalConsole": true,        // 调试时是否显示控制台窗口,一般设置为true显示控制台
            "MIMode": "gdb",                // 指定连接的调试器,可以为gdb或lldb。但目前lldb在windows下没有预编译好的版本。
            // "miDebuggerPath": "/path/to/gdb",       // 调试器路径。
            "miDebuggerPath": "gdb.exe",    // 调试器路径。
            "setupCommands": [
                {
                    "description": "Enable pretty-printing for gdb",
                    "text": "-enable-pretty-printing",
                    "ignoreFailures": true
                }
            ]
        }
        // "preLaunchTask": "Compile" // 调试会话开始前执行的任务,一般为编译程序。与tasks.json的taskName相对应
    ]
}
14. 点击右上角的 三角 图标,运行程序
15.测试代码
C语言测试代码:
#include <stdio.h>

void swap(int* pa, int* pb) {
    *pa = *pa ^ *pb;
    *pb = *pa ^ *pb;
    *pa = *pa ^ *pb;
}

int main()
{
    int a = 5, b = 8;
    printf("交换前:\ta = %d, b = %d\n", a, b);
    swap(&a, &b);
    printf("交换后:\ta = %d, b = %d\n", a, b);
    return 0;
}
C++11语言测试代码:
#include <iostream>
#include <iomanip>      // std::setw
#include <vector>

// 一维数组 输出 杨辉三角形
int main()
{
    using std::cout;
    using std::endl;
    using std::setw;
    using std::vector;

    constexpr size_t Line = 16;
    constexpr unsigned W = 5;

    size_t i, j;
    int n[Line+1];

    cout << "\t\tPascal 三角形\n" << endl;

    cout << setw(W) << (n[1] = 1) << endl;
    for (i = 2; i != Line+1; ++i)
    {
        cout << setw(W) << (n[i] = 1);
        for (j = i-1; j != 1; --j)
            cout << setw(W) << (n[j] += n[j-1]);
        cout << setw(W) << n[1] << endl;
    }
    cout << endl << endl;

    using std::begin;
    using std::end;
    cout << setw(W) << (n[1] = 1) << endl;
    for (int *pl = begin(n)+2; pl != end(n); ++pl)
    {
        cout << setw(W) << (*pl = 1);
        for (int *pr = pl-1; pr != begin(n)+1; --pr)
            cout << setw(W) << (*pr += *(pr-1));
        cout << setw(W) << n[1] << endl;
    }
    cout << endl << endl;

    int nn[Line] = {0}, t;
    bool beg = true;
    for (auto ll : nn)
    {
        beg = true;
        for (auto &mm : nn)
            if (beg && mm == 1)
            {
                cout << setw(W) << (t = mm = 1);
                beg = false;
            }
            else if (mm == 0)
            {
                cout << setw(W) << (mm = 1) << endl;
                break;
            }
            else
            {
                cout << setw(W) << (mm += t);
                t = mm-t;
            }
    }
    cout << endl << endl;


    vector<unsigned> v(Line, 0);

    cout << setw(W) << (v[0] = 1) << endl;
    for (i = 1; i != Line; ++i)
    {
        cout << setw(W) << (v[i] = 1);
        for (j = i-1; j != 0; --j)
            cout << setw(W) << (v[j] += v[j-1]);
        cout << setw(W) << v[0] << endl;
    }
    cout << endl << endl;

    for (auto &ll : v)
    {
        ll = 0;
        beg = true;
        for (auto &mm : v)
            if (beg && mm == 1)
            {
                cout << setw(W) << (t = mm = 1);
                beg = false;
            }
            else if (mm == 0)
            {
                cout << setw(W) << (mm = 1) << endl;
                break;
            }
            else
            {
                cout << setw(W) << (mm += t);
                t = mm-t;
            }
    }
    cout << endl << endl;

    cout << setw(W) << (v[0] = 1) << endl;
    for (vector<unsigned>::iterator it = v.begin()+1; it != v.end(); ++it)
    {
        cout << setw(W) << (*it = 1);
        for (vector<unsigned>::reverse_iterator rit(it); rit != v.rend()-1; ++rit)
            cout << setw(W) << (*rit += *(rit+1));
        cout << setw(W) << *(v.cbegin()) << endl;
    }
    cout << endl << endl;

    return 0;
}
C++11语言shared_ptr测试代码:
#include <iostream>
#include <memory> // for std::shared_ptr

class Resource
{
public:
    Resource() { std::cout << "Resource acquired\n"; }
    ~Resource() { std::cout << "Resource destroyed\n"; }
};

int main()
{
    // allocate a Resource object and have it owned by std::shared_ptr
    Resource *res = new Resource;
    std::shared_ptr<Resource> ptr1(res);
    {
        std::shared_ptr<Resource> ptr2(ptr1); // use copy initialization to make another std::shared_ptr pointing to the same thing
        // std::shared_ptr<Resource> ptr2(res); // create ptr2 directly from res (instead of ptr1)

        std::cout << "Killing one shared pointer\n";
    } // ptr2 goes out of scope here, but nothing happens

    std::cout << "Killing another shared pointer\n";

    return 0;
} // ptr1 goes out of scope here, and the allocated Resource is destroyed
C++17语言测试代码:
// 引用自: http://www.bfilipek.com/2017/09/cpp17-details-utils.html
#include <string>
#include <iostream>
#include <any>
#include <map>

int main()
{
    auto a = std::any(12);

    // set any value:
    a = std::string("你好!");
    a = 16;
    // reading a value:

    // we can read it as int
    std::cout << std::any_cast<int>(a) << '\n';

    // but not as string:
    try
    {
        std::cout << std::any_cast<std::string>(a) << '\n';
    }
    catch(const std::bad_any_cast& e)
    {
        std::cout << e.what() << '\n';
    }

    // reset and check if it contains any value:
    a.reset();
    if (!a.has_value())
    {
        std::cout << "a 是空的!" << "\n";
    }

    // you can use it in a container:
    std::map<std::string, std::any> m;
    m["integer"] = 10;
    m["string"] = std::string("你好,亲");
    m["float"] = 1.0f;

    for (auto &[key, val] : m)
    {
        if (val.type() == typeid(int))
            std::cout << "int: " << std::any_cast<int>(val) << "\n";
        else if (val.type() == typeid(std::string))
            std::cout << "string: " << std::any_cast<std::string>(val) << "\n";
        else if (val.type() == typeid(float))
            std::cout << "float: " << std::any_cast<float>(val) << "\n";
    }
}
参考文献:
https://code.visualstudio.com/docs/languages/cpp
https://blogs.msdn.microsoft.com/c/2016/04/18/visual-studio-code的cc扩展功能/


 浙公网安备 33010602011771号