


【TensorFlow】获取object detection API训练模型的输出坐标
如下图,谷歌开源的object detection API提供了五种网络结构的fine-tuning训练权重,方便我们针对目标检测的需求进行模型训练,本文详细介绍下导出训练模型后,如何获得目标检测框的坐标。如果对使用object detection API训练模型的过程不了解,可以参考博文:https://www.cnblogs.com/White-xzx/p/9503203.html

新建一个测试文件object_detection_test.py,该脚本读取我们已经训练好的模型文件和测试图片,进行测试,代码如下,
  1 import numpy as np
  2 import os
  3 import six.moves.urllib as urllib
  4 import sys
  5 import tarfile
  6 import tensorflow as tf
  7 import zipfile
  8
  9 from collections import defaultdict
 10 from io import StringIO
 11 from matplotlib import pyplot as plt
 12 from PIL import Image
 13
 14 ## This is needed to display the images.
 15 #%matplotlib inline
 16
 17 # This is needed since the notebook is stored in the object_detection folder.
 18 sys.path.append("..")
 19
 20 from utils import label_map_util
 21
 22 from utils import visualization_utils as vis_util
 23 # What model to download.
 24 #MODEL_NAME = 'ssd_mobilenet_v1_coco_2017_11_17'
 25 #MODEL_FILE = MODEL_NAME + '.tar.gz'
 26 #DOWNLOAD_BASE = #'http://download.tensorflow.org/models/object_detection/'
 27 MODEL_NAME = 'data'  # 训练过程中保存模型文件的文件夹路径
 28
 29 # Path to frozen detection graph. This is the actual model that is used for the object detection.
 30 PATH_TO_CKPT = MODEL_NAME + '/frozen_inference_graph.pb' # 训练完成导出的pb模型文件
 31
 32 # List of the strings that is used to add correct label for each box.
 33 PATH_TO_LABELS = 'E:/TensorFlow/Box-object-detection/data/label_map.pbtxt' # label_map.pbtxt文件
 34
 35 NUM_CLASSES = 2   # 类别总数
 36
 37 #Load a (frozen) Tensorflow model into memory. 加载模型
 38 detection_graph = tf.Graph()
 39 with detection_graph.as_default():
 40   od_graph_def = tf.GraphDef()
 41   with tf.gfile.GFile(PATH_TO_CKPT, 'rb') as fid:
 42     serialized_graph = fid.read()
 43     od_graph_def.ParseFromString(serialized_graph)
 44     tf.import_graph_def(od_graph_def, name='')
 45 #Loading label map 加载label_map
 46 label_map = label_map_util.load_labelmap(PATH_TO_LABELS)
 47 categories = label_map_util.convert_label_map_to_categories(label_map, max_num_classes=NUM_CLASSES, use_display_name=True)
 48 category_index = label_map_util.create_category_index(categories)
 49 #Helper code
 50 def load_image_into_numpy_array(image):
 51   (im_width, im_height) = image.size
 52   return np.array(image.getdata()).reshape(
 53       (im_height, im_width, 3)).astype(np.uint8)
 54
 55 # For the sake of simplicity we will use only 2 images:
 56 # image1.jpg
 57 # image2.jpg
 58 # If you want to test the code with your images, just add path to the images to the TEST_IMAGE_PATHS.
 59 PATH_TO_TEST_IMAGES_DIR = 'test_images'   # 测试图片的路径
 60 #TEST_IMAGE_PATHS = [ os.path.join(PATH_TO_TEST_IMAGES_DIR, 'image{}.jpg'.format(i)) for i in range(1, 3) ]
 61 TEST_IMAGE = sys.argv[1]
 62 print("the test image is:", TEST_IMAGE)
 63
 64 # Size, in inches, of the output images.
 65 IMAGE_SIZE = (12, 8)
 66 with detection_graph.as_default():
 67   with tf.Session(graph=detection_graph) as sess:
 68     #for image_path in TEST_IMAGE_PATHS:
 69     image = Image.open(TEST_IMAGE)  # 打开图片
 70     # the array based representation of the image will be used later in order to prepare the
 71     # result image with boxes and labels on it.
 72     image_np = load_image_into_numpy_array(image)
 73     # Expand dimensions since the model expects images to have shape: [1, None, None, 3]
 74     image_np_expanded = np.expand_dims(image_np, axis=0)
 75     image_tensor = detection_graph.get_tensor_by_name('image_tensor:0')   # 获取图片张量
 76     # Each box represents a part of the image where a particular object was detected.
 77     boxes = detection_graph.get_tensor_by_name('detection_boxes:0')   # 获取检测框张量
 78     # Each score represent how level of confidence for each of the objects.
 79     # Score is shown on the result image, together with the class label.
 80     scores = detection_graph.get_tensor_by_name('detection_scores:0')   # 获取每个检测框的分数,即概率
 81     classes = detection_graph.get_tensor_by_name('detection_classes:0')  # 获取类别名称id,与label_map中的ID对应
 82     num_detections = detection_graph.get_tensor_by_name('num_detections:0')  # 获取检测总数
 83     # Actual detection.
 84     (boxes, scores, classes, num_detections) = sess.run(
 85         [boxes, scores, classes, num_detections],
 86         feed_dict={image_tensor: image_np_expanded})
 87     # Visualization of the results of a detection.结果可视化
 88     vis_util.visualize_boxes_and_labels_on_image_array(
 89         image_np,
 90         np.squeeze(boxes),
 91         np.squeeze(classes).astype(np.int32),
 92         np.squeeze(scores),
 93         category_index,
 94         use_normalized_coordinates=True,
 95         line_thickness=8)
 96
 97     print(boxes) # 打印检测框坐标
 98     print(scores)   #打印每个检测框的概率
 99     print(classes)   # 打印检测框对应的类别
100     print(category_index)  # 打印类别的索引,其是一个嵌套的字典
101
102     final_score = np.squeeze(scores)
103     count = 0
104     for i in range(100):
105         if scores is None or final_score[i] > 0.5: # 显示大于50%概率的检测框
106             count = count + 1
107     print("the count of objects is: ", count )
108
109     plt.figure(figsize=IMAGE_SIZE)
110     plt.imshow(image_np)
111     plt.show()
打开cmd,输入如下命令,
python object_detection_test.py ./test_images/2.png
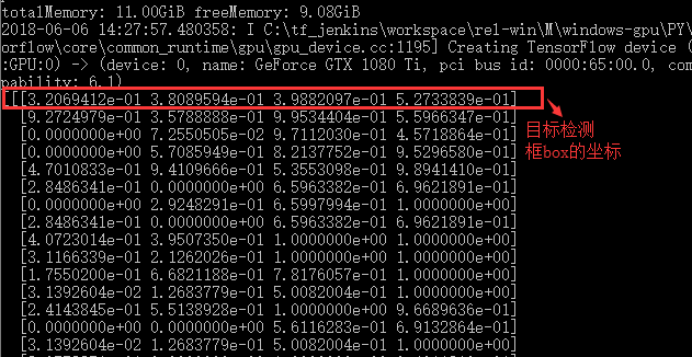
运行结果如下,

目标检测框box的坐标,此处的坐标是坐标除以相应图片的长宽所得到的小数,排列顺序为[ymin , xmin , ymax , xmax],即box检测框左上角和右下角的坐标,
同时显示的是目标检测框box的概率:
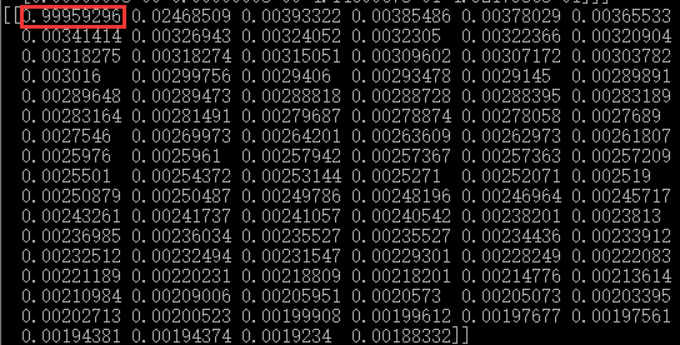
Box的标签索引和每个索引所代表的标签,如第一个box的索引为1,1的标签名为“box”,即检测框里的是“箱子”

检测图:
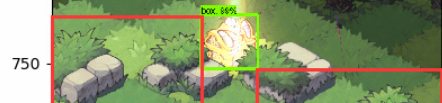
因为源码中将坐标与图片的长宽相除,所以显示的是小数,为了得到准确的坐标,只要乘上相应的长宽数值就可以得到坐标了,上图的检测图坐标由计算可得
[ymin , xmin , ymax , xmax] = [ 614.4 , 410.4 , 764.16 , 569.16 ],即在y轴的坐标和使用pyplot显示的坐标相近(图中红线标出)。
接下来,我们只要将上面的测试代码稍加修改即可得到我们想要的坐标,比如获得每个检测物体的中心坐标,代码如下:
  1 import numpy as np
  2 import os
  3 import six.moves.urllib as urllib
  4 import sys
  5 import tarfile
  6 import tensorflow as tf
  7 import zipfile
  8 import time
  9
 10 from collections import defaultdict
 11 from io import StringIO
 12 from matplotlib import pyplot as plt
 13 #plt.switch_backend('Agg')
 14 from PIL import Image
 15
 16 ## This is needed to display the images.
 17 #%matplotlib inline
 18
 19 # This is needed since the notebook is stored in the object_detection folder.
 20 sys.path.append("..")
 21
 22 from utils import label_map_util
 23
 24 from utils import visualization_utils as vis_util
 25 # What model to download.
 26 #MODEL_NAME = 'ssd_mobilenet_v1_coco_2017_11_17'
 27 #MODEL_FILE = MODEL_NAME + '.tar.gz'
 28 #DOWNLOAD_BASE = #'http://download.tensorflow.org/models/object_detection/'
 29 MODEL_NAME = 'E:/Project/object-detection-Game-2018-5-31/data-20180607'  # model.ckpt路径,包括frozen_inference_graph.pb文件
 30
 31 # Path to frozen detection graph. This is the actual model that is used for the object detection.
 32 PATH_TO_CKPT = MODEL_NAME + '/frozen_inference_graph.pb'
 33
 34 # List of the strings that is used to add correct label for each box.
 35 PATH_TO_LABELS = MODEL_NAME+'/label_map.pbtxt'
 36 #E:/Project/object-detection-Game-2018-5-31
 37
 38 NUM_CLASSES = 6
 39 start = time.time()
 40 #Load a (frozen) Tensorflow model into memory.
 41 detection_graph = tf.Graph()
 42 with detection_graph.as_default():
 43   od_graph_def = tf.GraphDef()
 44   #loading ckpt file to graph
 45   with tf.gfile.GFile(PATH_TO_CKPT, 'rb') as fid:
 46     serialized_graph = fid.read()
 47     od_graph_def.ParseFromString(serialized_graph)
 48     tf.import_graph_def(od_graph_def, name='')
 49 #Loading label map
 50 label_map = label_map_util.load_labelmap(PATH_TO_LABELS)
 51 categories = label_map_util.convert_label_map_to_categories(label_map, max_num_classes=NUM_CLASSES, use_display_name=True)
 52 category_index = label_map_util.create_category_index(categories)
 53 #Helper code
 54 def load_image_into_numpy_array(image):
 55   (im_width, im_height) = image.size
 56   return np.array(image.getdata()).reshape(
 57       (im_height, im_width, 3)).astype(np.uint8)
 58
 59
 60 # If you want to test the code with your images, just add path to the images to the TEST_IMAGE_PATHS.
 61 #PATH_TO_TEST_IMAGES_DIR = 'test_images'
 62 #TEST_IMAGE_PATHS = [ os.path.join(PATH_TO_TEST_IMAGES_DIR, 'image{}.jpg'.format(i)) for i in range(1, 3) ]
 63 TEST_IMAGE = sys.argv[1]
 64 print("the test image is:", TEST_IMAGE)
 65
 66 # Size, in inches, of the output images.
 67 IMAGE_SIZE = (12, 8)
 68 with detection_graph.as_default():
 69   with tf.Session(graph=detection_graph) as sess:
 70     # Definite input and output Tensors for detection_graph
 71     image_tensor = detection_graph.get_tensor_by_name('image_tensor:0')
 72     # Each box represents a part of the image where a particular object was detected.
 73     detection_boxes = detection_graph.get_tensor_by_name('detection_boxes:0')
 74     # Each score represent how level of confidence for each of the objects.
 75     # Score is shown on the result image, together with the class label.
 76     detection_scores = detection_graph.get_tensor_by_name('detection_scores:0')
 77     detection_classes = detection_graph.get_tensor_by_name('detection_classes:0')
 78     num_detections = detection_graph.get_tensor_by_name('num_detections:0')
 79     #for image_path in TEST_IMAGE_PATHS:
 80     image = Image.open(TEST_IMAGE)
 81     # the array based representation of the image will be used later in order to prepare the
 82     # result image with boxes and labels on it.
 83     image_np = load_image_into_numpy_array(image)
 84     # Expand dimensions since the model expects images to have shape: [1, None, None, 3]
 85     image_np_expanded = np.expand_dims(image_np, axis=0)
 86     image_tensor = detection_graph.get_tensor_by_name('image_tensor:0')
 87     # Each box represents a part of the image where a particular object was detected.
 88     boxes = detection_graph.get_tensor_by_name('detection_boxes:0')
 89     # Each score represent how level of confidence for each of the objects.
 90     # Score is shown on the result image, together with the class label.
 91     scores = detection_graph.get_tensor_by_name('detection_scores:0')
 92     classes = detection_graph.get_tensor_by_name('detection_classes:0')
 93     num_detections = detection_graph.get_tensor_by_name('num_detections:0')
 94     # Actual detection.
 95     (boxes, scores, classes, num_detections) = sess.run(
 96         [boxes, scores, classes, num_detections],
 97         feed_dict={image_tensor: image_np_expanded})
 98     # Visualization of the results of a detection.
 99     vis_util.visualize_boxes_and_labels_on_image_array(
100         image_np,
101         np.squeeze(boxes),
102         np.squeeze(classes).astype(np.int32),
103         np.squeeze(scores),
104         category_index,
105         use_normalized_coordinates=True,
106         line_thickness=8)
107
108     #print(boxes)
109     # for i in range(len(scores[0])):
110     #     if scores[0][i]>0.5:
111     #         print(scores[0][i])
112     #print(scores)
113     #print(classes)
114     #print(category_index)
115     final_score = np.squeeze(scores)
116     count = 0
117     for i in range(100):
118         if scores is None or final_score[i] > 0.5:
119             count = count + 1
120     print()
121     print("the count of objects is: ", count )
122     (im_width, im_height) = image.size
123     for i in range(count):
124         #print(boxes[0][i])
125         y_min = boxes[0][i][0]*im_height
126         x_min = boxes[0][i][1]*im_width
127         y_max = boxes[0][i][2]*im_height
128         x_max = boxes[0][i][3]*im_width
129         print("object{0}: {1}".format(i,category_index[classes[0][i]]['name']),
130                          ',Center_X:',int((x_min+x_max)/2),',Center_Y:',int((y_min+y_max)/2))
131         #print(x_min,y_min,x_max,y_max)
132     end = time.time()
133     seconds = end - start
134     print("Time taken : {0} seconds".format(seconds))
135
136     # plt.figure(figsize=IMAGE_SIZE)
137     # plt.imshow(image_np)
138     # plt.show()
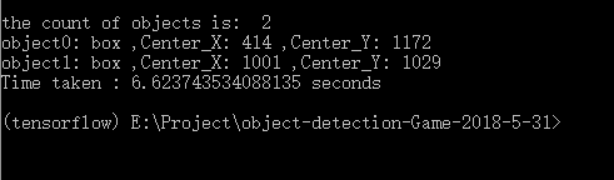
运行结果如下,

 浙公网安备 33010602011771号