
【TensorFlow】基于ssd_mobilenet模型实现目标检测
最近工作的项目使用了TensorFlow中的目标检测技术,通过训练自己的样本集得到模型来识别游戏中的物体,在这里总结下。
本文介绍在Windows系统下,使用TensorFlow的object detection API来训练自己的数据集,所用的模型为ssd_mobilenet,当然也可以使用其他模型,包括ssd_inception、faster_rcnn、rfcnn_resnet等,其中,ssd模型在各种模型中性能最好,所以便采用它来进行训练。
配置环境
1. 在GitHub上下载所需的models文件,地址:https://github.com/tensorflow/models
2. 安装pillow、Jupyter、matplotlib、lxml,打开anaconda prompt输入以下命令,并安装成功
pip install pillow
pip install jupyter
pip install matplotlib
pip install lxml
3. 编译protobuf,object detection API是使用protobuf来训练模型和配置参数的,所以得先编译protobuf,下载地址:https://github.com/google/protobuf/releases,具体配置过程可参考:https://blog.csdn.net/dy_guox/article/details/79081499 。
制作自己的样本集
1. 下载labelImg,并标注自己收集的图片样本,标注的标签自动保存为xml格式,
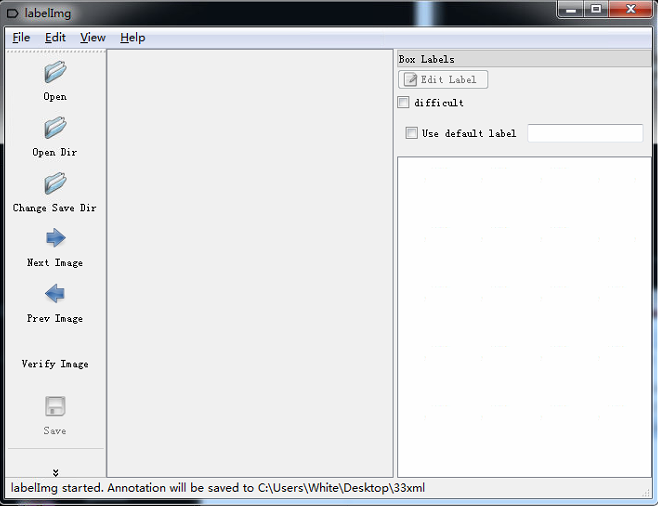
<annotation>
    <folder>images1</folder>
    <filename>0.png</filename>
    <path>C:\Users\White\Desktop\images1\0.png</path>
    <source>
        <database>Unknown</database>
    </source>
    <size>
        <width>1080</width>
        <height>1920</height>
        <depth>3</depth>
    </size>
    <segmented>0</segmented>
    <object>
        <name>box</name>
        <pose>Unspecified</pose>
        <truncated>0</truncated>
        <difficult>0</difficult>
        <bndbox>
            <xmin>345</xmin>
            <ymin>673</ymin>
            <xmax>475</xmax>
            <ymax>825</ymax>
        </bndbox>
    </object>
    <object>
        <name>box</name>
        <pose>Unspecified</pose>
        <truncated>0</truncated>
        <difficult>0</difficult>
        <bndbox>
            <xmin>609</xmin>
            <ymin>1095</ymin>
            <xmax>759</xmax>
            <ymax>1253</ymax>
        </bndbox>
    </object>
</annotation>
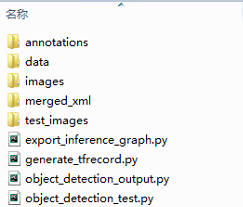
2. 在工程文件夹下新建以下目录,并将所有的样本图片放入images文件夹,将标注保存的xml文件保存到merged_xml文件夹,
将样本数据转换为TFRecord格式
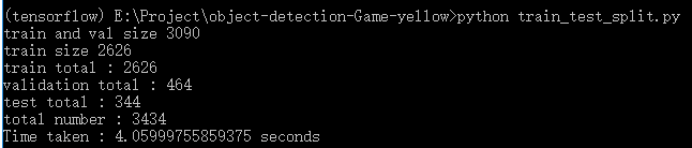
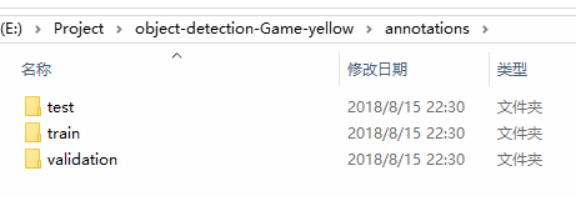
1. 新建train_test_split.py把xml数据集分为了train 、test、 validation三部分,并存储在annotations文件夹中,train为训练集占76.5%,test为测试集10%,validation为验证集13.5%,train_test_split.py代码如下:
import os
import random
import time
import shutil

xmlfilepath=r'merged_xml'
saveBasePath=r"./annotations"

trainval_percent=0.9
train_percent=0.85
total_xml = os.listdir(xmlfilepath)
num=len(total_xml)
list=range(num)
tv=int(num*trainval_percent)
tr=int(tv*train_percent)
trainval= random.sample(list,tv)
train=random.sample(trainval,tr)
print("train and val size",tv)
print("train size",tr)
# print(total_xml[1])
start = time.time()
# print(trainval)
# print(train)
test_num=0
val_num=0
train_num=0
# for directory in ['train','test',"val"]:
#         xml_path = os.path.join(os.getcwd(), 'annotations/{}'.format(directory))
#         if(not os.path.exists(xml_path)):
#             os.mkdir(xml_path)
#         # shutil.copyfile(filePath, newfile)
#         print(xml_path)
for i  in list:
    name=total_xml[i]
            # print(i)
    if i in trainval:  #train and val set
    # ftrainval.write(name)
        if i in train:
            # ftrain.write(name)
            # print("train")
            # print(name)
            # print("train: "+name+" "+str(train_num))
            directory="train"
            train_num+=1
            xml_path = os.path.join(os.getcwd(), 'annotations/{}'.format(directory))
            if(not os.path.exists(xml_path)):
                os.mkdir(xml_path)
            filePath=os.path.join(xmlfilepath,name)
            newfile=os.path.join(saveBasePath,os.path.join(directory,name))
            shutil.copyfile(filePath, newfile)

        else:
            # fval.write(name)
            # print("val")
            # print("val: "+name+" "+str(val_num))
            directory="validation"
            xml_path = os.path.join(os.getcwd(), 'annotations/{}'.format(directory))
            if(not os.path.exists(xml_path)):
                os.mkdir(xml_path)
            val_num+=1
            filePath=os.path.join(xmlfilepath,name)
            newfile=os.path.join(saveBasePath,os.path.join(directory,name))
            shutil.copyfile(filePath, newfile)
            # print(name)
    else:  #test set
        # ftest.write(name)
        # print("test")
        # print("test: "+name+" "+str(test_num))
        directory="test"
        xml_path = os.path.join(os.getcwd(), 'annotations/{}'.format(directory))
        if(not os.path.exists(xml_path)):
            os.mkdir(xml_path)
        test_num+=1
        filePath=os.path.join(xmlfilepath,name)
        newfile=os.path.join(saveBasePath,os.path.join(directory,name))
        shutil.copyfile(filePath, newfile)
            # print(name)

# End time
end = time.time()
seconds=end-start
print("train total : "+str(train_num))
print("validation total : "+str(val_num))
print("test total : "+str(test_num))
total_num=train_num+val_num+test_num
print("total number : "+str(total_num))
print( "Time taken : {0} seconds".format(seconds))
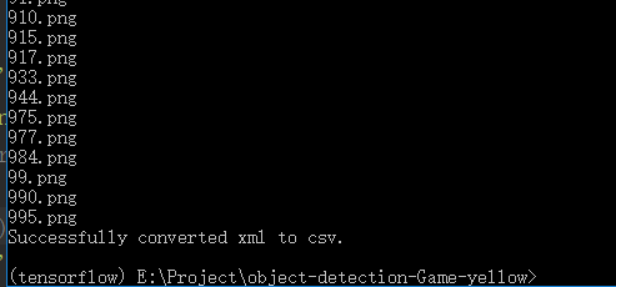
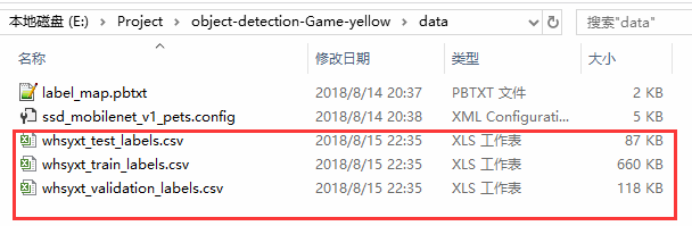
2. 把xml转换成csv文件,新建xml_to_csv.py,,运行代码前,需要建一个data目录,用来放生成的csv文件,结果和代码如下:
import os
import glob
import pandas as pd
import xml.etree.ElementTree as ET


def xml_to_csv(path):
    xml_list = []
    for xml_file in glob.glob(path + '/*.xml'):
        tree = ET.parse(xml_file)
        root = tree.getroot()
        # print(root)
        print(root.find('filename').text)
        for member in root.findall('object'):
            value = (root.find('filename').text,
                     int(root.find('size')[0].text),   #width
                     int(root.find('size')[1].text),   #height
                     member[0].text,
                     int(member[4][0].text),
                     int(float(member[4][1].text)),
                     int(member[4][2].text),
                     int(member[4][3].text)
                     )
            xml_list.append(value)
    column_name = ['filename', 'width', 'height', 'class', 'xmin', 'ymin', 'xmax', 'ymax']
    xml_df = pd.DataFrame(xml_list, columns=column_name)
    return xml_df


def main():
    for directory in ['train','test','validation']:
        xml_path = os.path.join(os.getcwd(), 'annotations/{}'.format(directory))
    # image_path = os.path.join(os.getcwd(), 'merged_xml')
        xml_df = xml_to_csv(xml_path)
        # xml_df.to_csv('whsyxt.csv', index=None)
        xml_df.to_csv('data/whsyxt_{}_labels.csv'.format(directory), index=None)
        print('Successfully converted xml to csv.')


main()
运行结果如下:
在data文件夹下生成的csv文件:
3. 生成tfrecords文件,python文件名为generate_tfrecord.py,代码如下:
  1 from __future__ import division
  2 from __future__ import print_function
  3 from __future__ import absolute_import
  4
  5 import os
  6 import io
  7 import pandas as pd
  8 import tensorflow as tf
  9
 10 from PIL import Image
 11 from object_detection.utils import dataset_util
 12 from collections import namedtuple, OrderedDict
 13
 14 flags = tf.app.flags
 15 flags.DEFINE_string('csv_input', '', 'Path to the CSV input')
 16 flags.DEFINE_string('output_path', '', 'Path to output TFRecord')
 17 FLAGS = flags.FLAGS
 18 # TO-DO replace this with label map
 19 def class_text_to_int(row_label,filename):
 20     if row_label == 'person':
 21         return 1
 22     elif row_label == 'investigator':
 23         return 2
 24     elif row_label == 'collector':
 25         return 3
 26     elif row_label == 'wolf':
 27         return 4
 28     elif row_label == 'skull':
 29         return 5
 30     elif row_label == 'inferno':
 31         return 6
 32     elif row_label == 'stone_blame':
 33         return 7
 34     elif row_label == 'green_jelly':
 35         return 8
 36     elif row_label == 'blue_jelly':
 37         return 9
 38     elif row_label == 'box':
 39         return 10
 40     elif row_label == 'golden_box':
 41         return 11
 42     elif row_label == 'silver_box':
 43         return 12
 44     elif row_label == 'jar':
 45         return 13
 46     elif row_label == 'purple_jar':
 47         return 14
 48     elif row_label == 'purple_weapon':
 49         return 15
 50     elif row_label == 'blue_weapon':
 51         return 16
 52     elif row_label == 'blue_shoe':
 53         return 17
 54     elif row_label == 'blue_barde':
 55         return 18
 56     elif row_label == 'blue_ring':
 57         return 19
 58     elif row_label == 'badge':
 59         return 20
 60     elif row_label == 'dragon_stone':
 61         return 21
 62     elif row_label == 'lawn':
 63         return 22
 64     elif row_label == 'mine':
 65         return 23
 66     elif row_label == 'portal':
 67         return 24
 68     elif row_label == 'tower':
 69         return 25
 70     elif row_label == 'hero_stone':
 71         return 26
 72     elif row_label == 'oracle_stone':
 73         return 27
 74     elif row_label == 'arena':
 75         return 28
 76     elif row_label == 'gold_ore':
 77         return 29
 78     elif row_label == 'relic':
 79         return 30
 80     elif row_label == 'ancient':
 81         return 31
 82     elif row_label == 'house':
 83         return 32
 84     else:
 85         print("------------------nonetype:", filename)
 86         None
 87
 88 def split(df, group):
 89     data = namedtuple('data', ['filename', 'object'])
 90     gb = df.groupby(group)
 91     return [data(filename, gb.get_group(x)) for filename, x in zip(gb.groups.keys(), gb.groups)]
 92
 93
 94 def create_tf_example(group, path):
 95     with tf.gfile.GFile(os.path.join(path, '{}'.format(group.filename)), 'rb') as fid:
 96         encoded_jpg = fid.read()
 97     encoded_jpg_io = io.BytesIO(encoded_jpg)
 98     image = Image.open(encoded_jpg_io)
 99     width, height = image.size
100
101     filename = group.filename.encode('utf8')
102     image_format = b'png'
103     xmins = []
104     xmaxs = []
105     ymins = []
106     ymaxs = []
107     classes_text = []
108     classes = []
109
110     for index, row in group.object.iterrows():
111         xmins.append(row['xmin'] / width)
112         xmaxs.append(row['xmax'] / width)
113         ymins.append(row['ymin'] / height)
114         ymaxs.append(row['ymax'] / height)
115         classes_text.append(row['class'].encode('utf8'))
116         classes.append(class_text_to_int(row['class'], group.filename))
117
118     tf_example = tf.train.Example(features=tf.train.Features(feature={
119         'image/height': dataset_util.int64_feature(height),
120         'image/width': dataset_util.int64_feature(width),
121         'image/filename': dataset_util.bytes_feature(filename),
122         'image/source_id': dataset_util.bytes_feature(filename),
123         'image/encoded': dataset_util.bytes_feature(encoded_jpg),
124         'image/format': dataset_util.bytes_feature(image_format),
125         'image/object/bbox/xmin': dataset_util.float_list_feature(xmins),
126         'image/object/bbox/xmax': dataset_util.float_list_feature(xmaxs),
127         'image/object/bbox/ymin': dataset_util.float_list_feature(ymins),
128         'image/object/bbox/ymax': dataset_util.float_list_feature(ymaxs),
129         'image/object/class/text': dataset_util.bytes_list_feature(classes_text),
130         'image/object/class/label': dataset_util.int64_list_feature(classes),
131     }))
132     return tf_example
133
134
135 def main(_):
136     writer = tf.python_io.TFRecordWriter(FLAGS.output_path)
137     path = os.path.join(os.getcwd(), 'images')
138     examples = pd.read_csv(FLAGS.csv_input)
139     grouped = split(examples, 'filename')
140     num=0
141     for group in grouped:
142         num+=1
143         tf_example = create_tf_example(group, path)
144         writer.write(tf_example.SerializeToString())
145         if(num%100==0):  #每完成100个转换,打印一次
146             print(num)
147
148     writer.close()
149     output_path = os.path.join(os.getcwd(), FLAGS.output_path)
150     print('Successfully created the TFRecords: {}'.format(output_path))
151
152
153 if __name__ == '__main__':
154     tf.app.run()
其中,20~83行应改成在样本集中标注的类别,我这里总共有32个类别,字符串row_label应与labelImg中标注的名称相同。
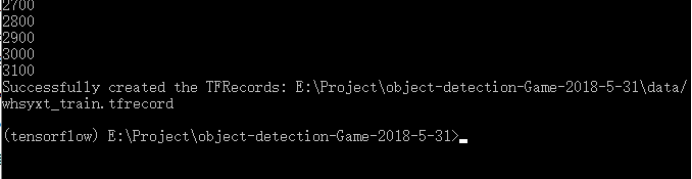
现将训练集转换为tfrecord格式,输入如下命令:
python generate_tfrecord.py --csv_input=data/whsyxt_train_labels.csv --output_path=data/whsyxt_train.tfrecord

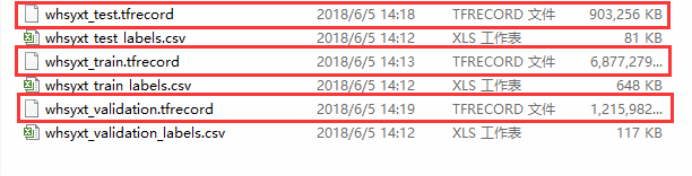
类似的,我们可以输入如下命令,将验证集和测试集也转换为tfrecord格式,
python generate_tfrecord.py --csv_input=data/whsyxt_validation_labels.csv --output_path=data/whsyxt_validation.tfrecord
python generate_tfrecord.py --csv_input=data/whsyxt_test_labels.csv --output_path=data/whsyxt_test.tfrecord
都执行成功后,获得如下文件,
训练
1. 在工程文件夹data目录下创建标签分类的配置文件(label_map.pbtxt),需要检测几种目标,将创建几个id,代码如下:
item {
  id: 1 # id从1开始编号
  name: 'person'
}
item {
  id: 2
  name: 'investigator'
}
item {
  id: 3
  name: 'collector'
}
item {
  id: 4
  name: 'wolf'
}
item {
  id: 5
  name: 'skull'
}
item {
  id: 6
  name: 'inferno'
}
item {
  id: 7
  name: 'stone_blame'
}
item {
  id: 8
  name: 'green_jelly'
}
item {
  id: 9
  name: 'blue_jelly'
}
item {
  id: 10
  name: 'box'
}
item {
  id: 11
  name: 'golden_box'
}
item {
  id: 12
  name: 'silver_box'
}
item {
  id: 13
  name: 'jar'
}
item {
  id: 14
  name: 'purple_jar'
}
item {
  id: 15
  name: 'purple_weapon'
}
item {
  id: 16
  name: 'blue_weapon'
}
item {
  id: 17
  name: 'blue_shoe'
}
item {
  id: 18
  name: 'blue_barde'
}
item {
  id: 19
  name: 'blue_ring'
}
item {
  id: 20
  name: 'badge'
}
item {
  id: 21
  name: 'dragon_stone'
}
item {
  id: 22
  name: 'lawn'
}
item {
  id: 23
  name: 'mine'
}
item {
  id: 24
  name: 'portal'
}
item {
  id: 25
  name: 'tower'
}
item {
  id: 26
  name: 'hero_stone'
}
item {
  id: 27
  name: 'oracle_stone'
}
item {
  id: 28
  name: 'arena'
}
item {
  id: 29
  name: 'gold_ore'
}
item {
  id: 30
  name: 'relic'
}
item {
  id: 31
  name: 'ancient'
}
item {
  id: 32
  name: 'house'
}
2. 配置管道配置文件,找到 models\research\object_detection\samples\configs\ssd_inception_v2_pets.config文件,复制到data文件夹下,修改之后代码如下:
  1 # SSD with Mobilenet v1, configured for Oxford-IIIT Pets Dataset.
  2 # Users should configure the fine_tune_checkpoint field in the train config as
  3 # well as the label_map_path and input_path fields in the train_input_reader and
  4 # eval_input_reader. Search for "PATH_TO_BE_CONFIGURED" to find the fields that
  5 # should be configured.
  6
  7 model {
  8   ssd {
  9     num_classes: 32
 10     box_coder {
 11       faster_rcnn_box_coder {
 12         y_scale: 10.0
 13         x_scale: 10.0
 14         height_scale: 5.0
 15         width_scale: 5.0
 16       }
 17     }
 18     matcher {
 19       argmax_matcher {
 20         matched_threshold: 0.45
 21         unmatched_threshold: 0.35
 22         ignore_thresholds: false
 23         negatives_lower_than_unmatched: true
 24         force_match_for_each_row: true
 25       }
 26     }
 27     similarity_calculator {
 28       iou_similarity {
 29       }
 30     }
 31     anchor_generator {
 32       ssd_anchor_generator {
 33         num_layers: 6
 34         min_scale: 0.2
 35         max_scale: 0.95
 36         aspect_ratios: 1.0
 37         aspect_ratios: 2.0
 38         aspect_ratios: 0.5
 39         aspect_ratios: 3.0
 40         aspect_ratios: 0.3333
 41       }
 42     }
 43     image_resizer {
 44       fixed_shape_resizer {
 45         height: 300
 46         width: 300
 47       }
 48     }
 49     box_predictor {
 50       convolutional_box_predictor {
 51         min_depth: 0
 52         max_depth: 0
 53         num_layers_before_predictor: 0
 54         use_dropout: false
 55         dropout_keep_probability: 0.8
 56         kernel_size: 1
 57         box_code_size: 4
 58         apply_sigmoid_to_scores: false
 59         conv_hyperparams {
 60           activation: RELU_6,
 61           regularizer {
 62             l2_regularizer {
 63               weight: 0.00004
 64             }
 65           }
 66           initializer {
 67             truncated_normal_initializer {
 68               stddev: 0.03
 69               mean: 0.0
 70             }
 71           }
 72           batch_norm {
 73             train: true,
 74             scale: true,
 75             center: true,
 76             decay: 0.9997,
 77             epsilon: 0.001,
 78           }
 79         }
 80       }
 81     }
 82     feature_extractor {
 83       type: 'ssd_mobilenet_v1'
 84       min_depth: 16
 85       depth_multiplier: 1.0
 86       conv_hyperparams {
 87         activation: RELU_6,
 88         regularizer {
 89           l2_regularizer {
 90             weight: 0.00004
 91           }
 92         }
 93         initializer {
 94           truncated_normal_initializer {
 95             stddev: 0.03
 96             mean: 0.0
 97           }
 98         }
 99         batch_norm {
100           train: true,
101           scale: true,
102           center: true,
103           decay: 0.9997,
104           epsilon: 0.001,
105         }
106       }
107     }
108     loss {
109       classification_loss {
110         weighted_sigmoid {
111         }
112       }
113       localization_loss {
114         weighted_smooth_l1 {
115         }
116       }
117       hard_example_miner {
118         num_hard_examples: 3000
119         iou_threshold: 0.99
120         loss_type: CLASSIFICATION
121         max_negatives_per_positive: 3
122         min_negatives_per_image: 0
123       }
124       classification_weight: 1.0
125       localization_weight: 1.0
126     }
127     normalize_loss_by_num_matches: true
128     post_processing {
129       batch_non_max_suppression {
130         score_threshold: 1e-8
131         iou_threshold: 0.6
132         max_detections_per_class: 100
133         max_total_detections: 100
134       }
135       score_converter: SIGMOID
136     }
137   }
138 }
139
140 train_config: {
141   batch_size: 24
142   optimizer {
143     rms_prop_optimizer: {
144       learning_rate: {
145         exponential_decay_learning_rate {
146           initial_learning_rate: 0.004
147           decay_steps: 1000
148           decay_factor: 0.95
149         }
150       }
151       momentum_optimizer_value: 0.9
152       decay: 0.9
153       epsilon: 1.0
154     }
155   }
156   #fine_tune_checkpoint: "PATH_TO_BE_CONFIGURED/model.ckpt"
157   from_detection_checkpoint: false
158   # Note: The below line limits the training process to 200K steps, which we
159   # empirically found to be sufficient enough to train the pets dataset. This
160   # effectively bypasses the learning rate schedule (the learning rate will
161   # never decay). Remove the below line to train indefinitely.
162   num_steps: 40000
163   data_augmentation_options {
164     random_horizontal_flip {
165     }
166   }
167   data_augmentation_options {
168     ssd_random_crop {
169     }
170   }
171 }
172
173 train_input_reader: {
174   tf_record_input_reader {
175     input_path: "E:/Project/object-detection-Game-yellow/data/whsyxt_train.tfrecord"
176   }
177   label_map_path: "E:/Project/object-detection-Game-yellow/data/label_map.pbtxt"
178 }
179
180 eval_config: {
181   num_examples: 2000
182   # Note: The below line limits the evaluation process to 10 evaluations.
183   # Remove the below line to evaluate indefinitely.
184   max_evals: 10
185 }
186
187 eval_input_reader: {
188   tf_record_input_reader {
189     input_path: "E:/Project/object-detection-Game-yellow/data/whsyxt_validation.tfrecord"
190   }
191   label_map_path: "E:/Project/object-detection-Game-yellow/data/label_map.pbtxt"
192   shuffle: false
193   num_readers: 1
194 }
这里需要修改的几处有:第9行,改为自己标注的总类别数;第175行,改为训练集tfrecord文件的路径;第177行和191行,改为自己label_map的路径;第189行,改为验证集tfrecord文件的路径。
我们可以在这个管道文件中设置网络的各种学习参数,如:第141行设置批次大小,第145~148行设置学习率和退化率,第162行设置训练的总步数等等。
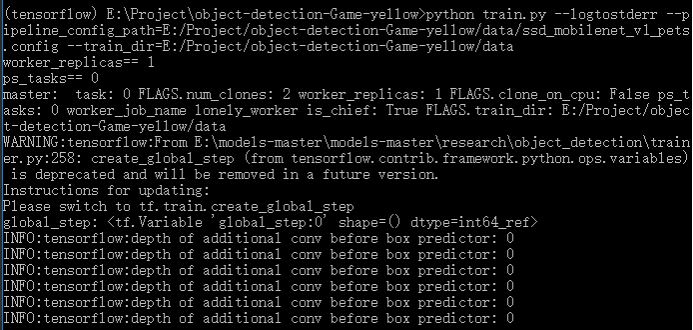
3. 开始训练,将object_detection\train.py文件复制到工程目录下进行训练即可,命令如下:
python train.py --logtostderr --pipeline_config_path=E:/Project/object-detection-Game-yellow/data/ssd_mobilenet_v1_pets.config --train_dir=E:/Project/object-detection-Game-yellow/data
无错误则开始训练,等待训练结束,如下:
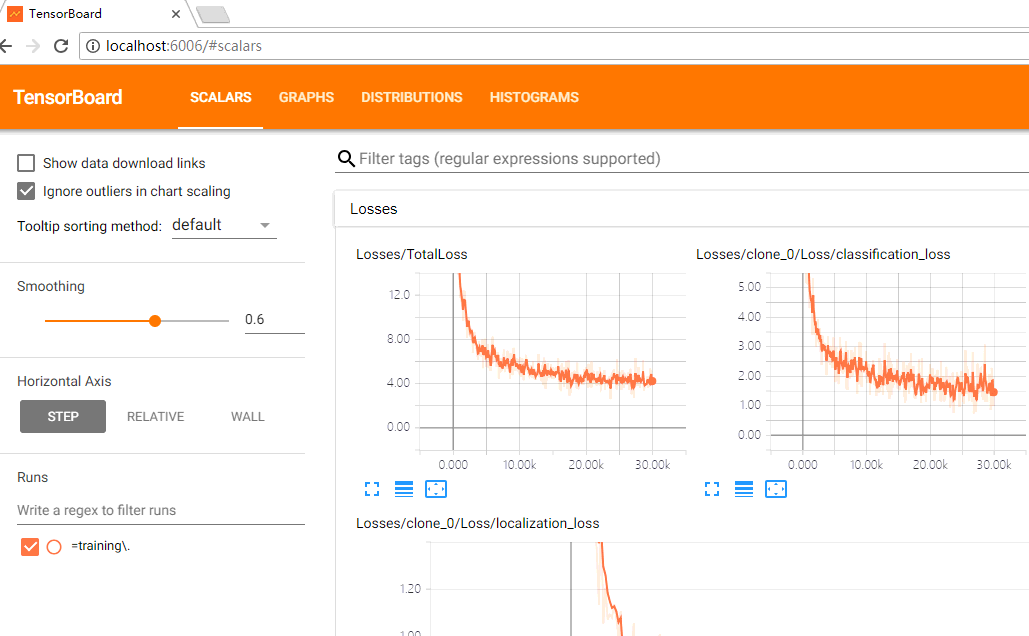
使用TensorBoard进行监测
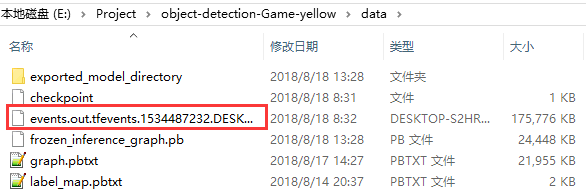
1.在输入训练的命令后,data文件夹下会生成如下文件,该文件存放训练过程中的中间数据,并可以用图形化的方式展现出来。
2. 新打开一个命令提示符窗口,首先激活TensorFlow,然后输入如下命令:
tensorboard --logdir==training:your_log_dir --host=127.0.0.1
其中,your_log_dir为工程目录中存放训练结果的文件夹目录,把目录地址拷贝出来将其替代。
3.打开浏览器,在地址栏输入:localhost:6006,即可显示tensorboard:
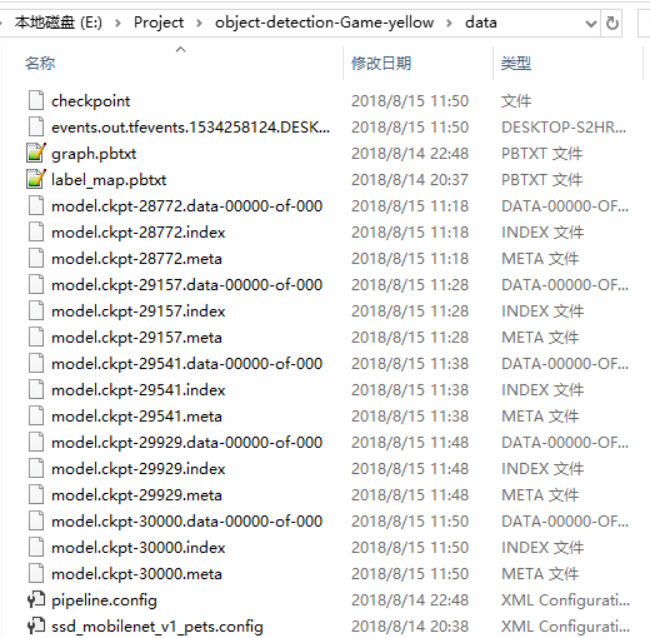
导出训练结果
1.训练过程中将在training目录下生成一堆model.ckpt-*的文件,如下:
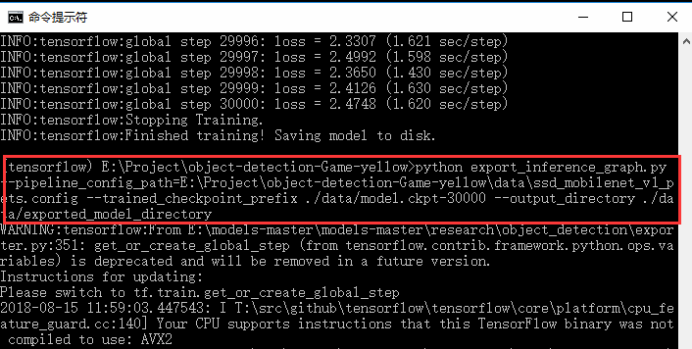
选择相应步数的模型,使用export_inference_graph.py(其在object detection目录下)导出pb文件,命令如下:
python export_inference_graph.py --pipeline_config_path=E:\Project\object-detection-Game-yellow\data\ssd_mobilenet_v1_pets.config --trained_checkpoint_prefix ./data/model.ckpt-30000 --output_directory ./data/exported_model_directory
运行命令后,会在工程的data目录下生成名为exported_model_directory文件夹,如下:
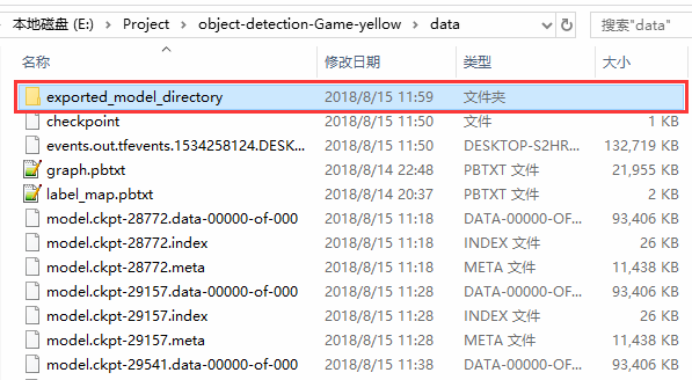
文件夹内容如下:

其中,frozen_inference_graph.pb就是我们以后将要使用的模型结果。
获取测试图片
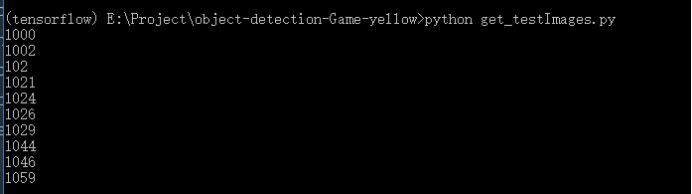
1. 新建test_images文件夹和get_testImages.py文件,并加入以下代码,如下:
 1 from PIL import Image
 2 import os.path
 3 import glob
 4
 5 annotations_test_dir = "E:\\Project\\object-detection-Game-yellow\\annotations\\test\\"
 6 Images_dir = "E:\\Project\\object-detection-Game-yellow\\Images"
 7 test_images_dir = "E:\\Project\\object-detection-Game-yellow\\test_images"
 8 i = 0
 9 for xmlfile in os.listdir(annotations_test_dir):
10     (filepath, tempfilename) = os.path.split(xmlfile)
11     (shotname, extension) = os.path.splitext(tempfilename)
12     xmlname = shotname
13     for pngfile in os.listdir(Images_dir):
14         (filepath, tempfilename) = os.path.split(pngfile)
15         (pngname, extension) = os.path.splitext(tempfilename)
16         if pngname == xmlname:
17              img = Image.open(Images_dir+"\\" + pngname + ".png")
18              img.save(os.path.join(test_images_dir, os.path.basename(pngfile)))
19              print(pngname)
20              i += 1
21 print(i)
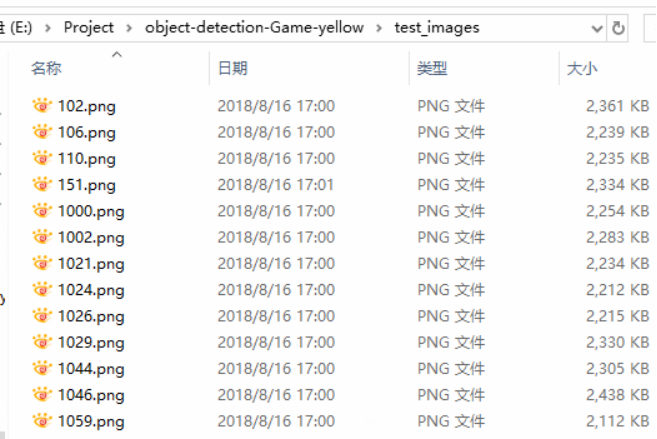
第5、6、7行,分别是annotations\test文件夹路径、Images文件夹路径和test_images文件夹路径,运行python文件,获取测试图片并存储到test_images文件夹目录下。
批量保存测试结果
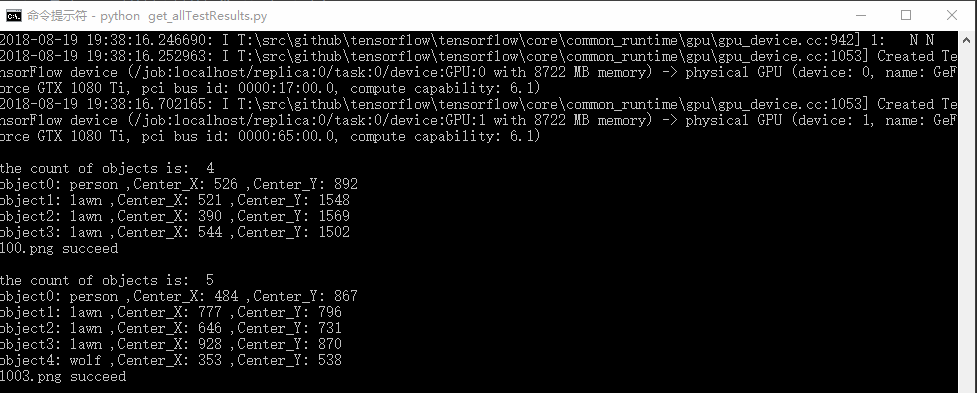
1. 在工程目录下新建results文件夹和get_allTestResults.py文件并加入如下代码,我们将使用前面训练出的模型批量测试test_images文件夹中的图片并保存到results文件夹中,
  1 # -*- coding: utf-8 -*-
  2 import os
  3 from PIL import Image
  4 import time
  5 import tensorflow as tf
  6 from PIL import Image
  7 import numpy as np
  8 import os
  9 import six.moves.urllib as urllib
 10 import sys
 11 import tarfile
 12 import zipfile
 13 import time
 14
 15 from collections import defaultdict
 16 from io import StringIO
 17 from matplotlib import pyplot as plt
 18 # plt.switch_backend('Agg')
 19 from utils import label_map_util
 20
 21 from utils import visualization_utils as vis_util
 22
 23 PATH_TO_TEST_IMAGES = "E:\\Project\\object-detection-Game-yellow\\test_images\\"
 24 MODEL_NAME = 'E:/Project/object-detection-Game-yellow/data'
 25 PATH_TO_CKPT = MODEL_NAME + '/frozen_inference_graph.pb'
 26 PATH_TO_LABELS = MODEL_NAME+'/label_map.pbtxt'
 27 NUM_CLASSES = 32
 28 PATH_TO_RESULTS = "E:\\Project\\object-detection-Game-yellow\\results2\\"
 29
 30
 31 def load_image_into_numpy_array(image):
 32     (im_width, im_height) = image.size
 33     return np.array(image.getdata()).reshape((im_height, im_width, 3)).astype(np.uint8)
 34
 35
 36 def save_object_detection_result():
 37     IMAGE_SIZE = (12, 8)
 38     # Load a (frozen) Tensorflow model into memory.
 39     detection_graph = tf.Graph()
 40     with detection_graph.as_default():
 41         od_graph_def = tf.GraphDef()
 42         # loading ckpt file to graph
 43         with tf.gfile.GFile(PATH_TO_CKPT, 'rb') as fid:
 44             serialized_graph = fid.read()
 45             od_graph_def.ParseFromString(serialized_graph)
 46             tf.import_graph_def(od_graph_def, name='')
 47     # Loading label map
 48     label_map = label_map_util.load_labelmap(PATH_TO_LABELS)
 49     categories = label_map_util.convert_label_map_to_categories(label_map, max_num_classes=NUM_CLASSES,
 50                                                                 use_display_name=True)
 51     category_index = label_map_util.create_category_index(categories)
 52     # Helper code
 53     with detection_graph.as_default():
 54         with tf.Session(graph=detection_graph) as sess:
 55             start = time.time()
 56             for test_image in os.listdir(PATH_TO_TEST_IMAGES):
 57                 image = Image.open(PATH_TO_TEST_IMAGES + test_image)
 58                 # the array based representation of the image will be used later in order to prepare the
 59                 # result image with boxes and labels on it.
 60                 image_np = load_image_into_numpy_array(image)
 61                 # Expand dimensions since the model expects images to have shape: [1, None, None, 3]
 62                 image_np_expanded = np.expand_dims(image_np, axis=0)
 63                 image_tensor = detection_graph.get_tensor_by_name('image_tensor:0')
 64                 # Each box represents a part of the image where a particular object was detected.
 65                 boxes = detection_graph.get_tensor_by_name('detection_boxes:0')
 66                 # Each score represent how level of confidence for each of the objects.
 67                 # Score is shown on the result image, together with the class label.
 68                 scores = detection_graph.get_tensor_by_name('detection_scores:0')
 69                 classes = detection_graph.get_tensor_by_name('detection_classes:0')
 70                 num_detections = detection_graph.get_tensor_by_name('num_detections:0')
 71                 # Actual detection.
 72                 (boxes, scores, classes, num_detections) = sess.run(
 73                     [boxes, scores, classes, num_detections],
 74                     feed_dict={image_tensor: image_np_expanded})
 75                 # Visualization of the results of a detection.
 76                 vis_util.visualize_boxes_and_labels_on_image_array(
 77                     image_np,
 78                     np.squeeze(boxes),
 79                     np.squeeze(classes).astype(np.int32),
 80                     np.squeeze(scores),
 81                     category_index,
 82                     use_normalized_coordinates=True,
 83                     line_thickness=8)
 84
 85                 final_score = np.squeeze(scores)
 86                 count = 0
 87                 for i in range(100):
 88                     if scores is None or final_score[i] > 0.5:
 89                         count = count + 1
 90                 print()
 91                 print("the count of objects is: ", count)
 92                 (im_width, im_height) = image.size
 93                 for i in range(count):
 94                     # print(boxes[0][i])
 95                     y_min = boxes[0][i][0] * im_height
 96                     x_min = boxes[0][i][1] * im_width
 97                     y_max = boxes[0][i][2] * im_height
 98                     x_max = boxes[0][i][3] * im_width
 99                     x = int((x_min + x_max) / 2)
100                     y = int((y_min + y_max) / 2)
101                     if category_index[classes[0][i]]['name'] == "tower":
102                         print("this image has a tower!")
103                         y = int((y_max - y_min) / 4 * 3 + y_min)
104                     print("object{0}: {1}".format(i, category_index[classes[0][i]]['name']),
105                           ',Center_X:', x, ',Center_Y:', y)
106                     # print(x_min,y_min,x_max,y_max)
107                 plt.figure(figsize=IMAGE_SIZE)
108                 plt.imshow(image_np)
109                 picName = test_image.split('/')[-1]
110                 # print(picName)
111                 plt.savefig(PATH_TO_RESULTS + picName)
112                 print(test_image + ' succeed')
113
114             end = time.time()
115             seconds = end - start
116             print("Time taken : {0} seconds".format(seconds))
117
118
119 save_object_detection_result()
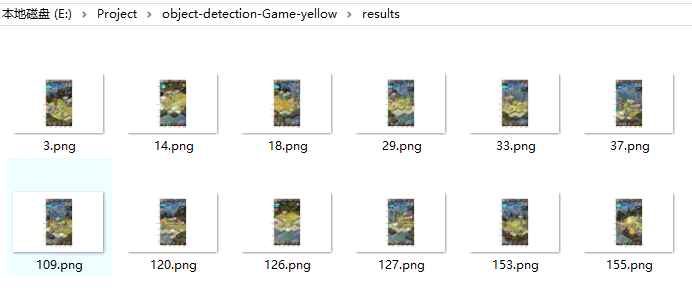
最后,我们就可以使用results中的测试结果进行准确率的计算,查看训练效果及后期优化。
总结


 浙公网安备 33010602011771号