4.lnmp之搭建博客---------一把辛酸泪-------终于搭建成功了。
首先我参考的:https://www.cnblogs.com/hmm01031007/p/11569070.html
以下是LNMP 的搭建思路和方式,采取的安装方式是编译安装。
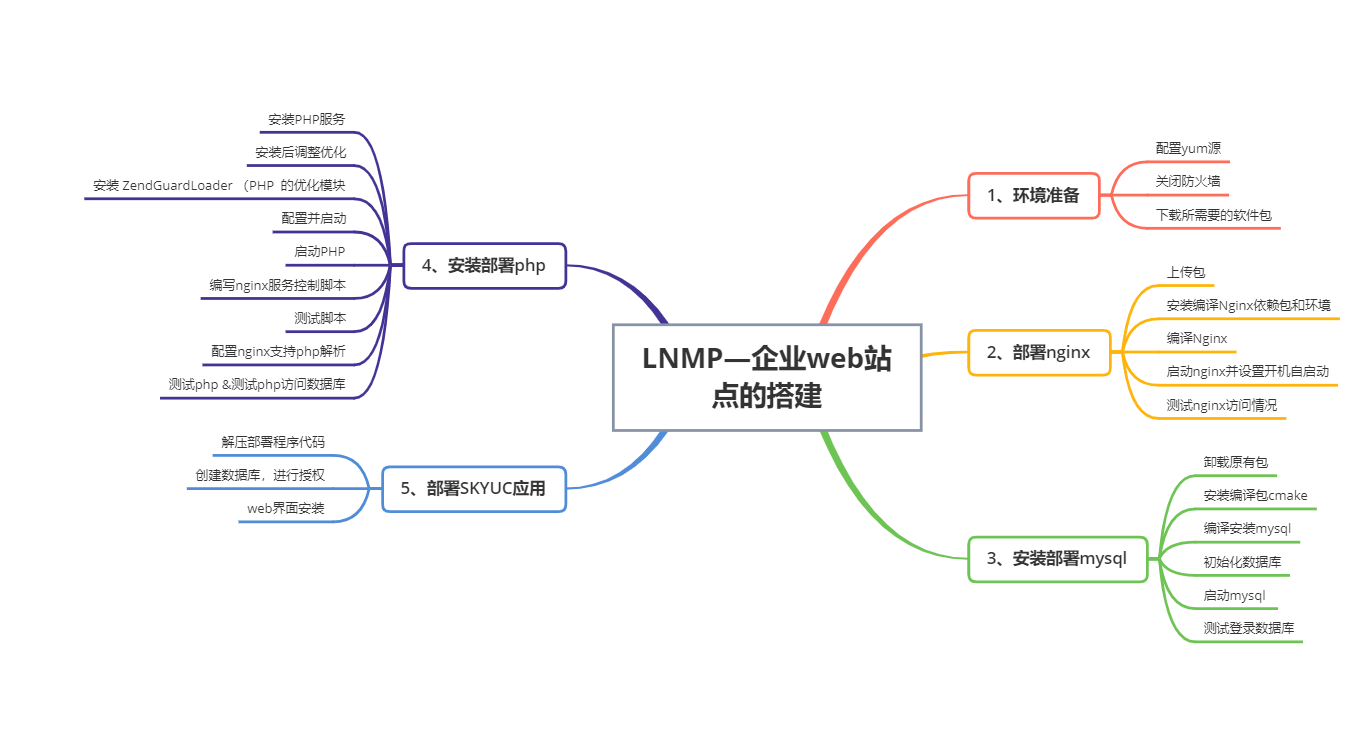
环境准备——————————————————————————————————————
环境准备
1、下载所需要的安装包
链接:https://pan.baidu.com/s/1hOBRqhj2i4UUYc91TwYD0g
提取码:0u95
如若安装包下载不下来,留言咨询。看到就回复。
2、配置本地yum源
[root@localhost ~]# cat /etc/yum.repos.d/local.repo
[aa]
name=aa
baseurl=file:///dev/liuyan
gpgcheck=0
enabled=1
[root@localhost ~]#
3、关闭防火墙
[root@localhost ~]# systemctl stop firewalld
[root@localhost ~]# systemctl enable firewalld
部署nginx———————————————————————————————————————
1、上传包
[root@localhost ~]# cd /root/
[root@localhost ~]# ll
total 52300
-rw-------. 1 root root 1767 Sep 1 11:42 anaconda-ks.cfg
-rw-r--r--. 1 root root 5583905 Sep 1 13:04 cmake-2.8.6.tar.gz
-rw-r--r--. 1 root root 24475686 Sep 1 13:04 mysql-5.5.22.tar.gz
-rw-r--r--. 1 root root 802956 Sep 1 13:04 nginx-1.6.0.tar.gz
-rw-r--r--. 1 root root 13989083 Sep 1 13:04 php-5.3.28.tar.gz
-rw-r--r--. 1 root root 8249271 Sep 1 13:04 SKYUC.v3.4.2.SOURCE.zip
-rw-r--r--. 1 root root 434691 Sep 1 13:04 ZendGuardLoader-php-5.3-linux-glibc23-x86_64.tar.gz
新建一个目录用来存放包
[root@localhost ~]# mkdir /tools
[root@localhost tools]# ll
total 52296
-rw-r--r--. 1 root root 5583905 Sep 1 13:08 cmake-2.8.6.tar.gz
-rw-r--r--. 1 root root 24475686 Sep 1 13:08 mysql-5.5.22.tar.gz
-rw-r--r--. 1 root root 802956 Sep 1 13:08 nginx-1.6.0.tar.gz
-rw-r--r--. 1 root root 13989083 Sep 1 13:08 php-5.3.28.tar.gz
-rw-r--r--. 1 root root 8249271 Sep 1 13:08 SKYUC.v3.4.2.SOURCE.zip
-rw-r--r--. 1 root root 434691 Sep 1 13:08 ZendGuardLoader-php-5.3-linux-glibc23-x86_64.tar.gz
[root@localhost tools]#
2、安装编译nginx依赖包和环境
下载依赖包和编译环境
[root@localhost tools]# yum -y install gcc gcc-c++ make
查看是否下载成功
[root@localhost tools]# rpm -aq gcc gcc-c++ make
gcc-c++-4.8.5-39.el7.x86_64
make-3.82-24.el7.x86_64
gcc-4.8.5-39.el7.x86_64
安装nginx的依赖包
[root@localhost tools]# yum -y install pcre-devel zlib-devel openssl-devel
查看是否安装成功
[root@localhost tools]# rpm -aq pcre-devel zlib-devel openssl-devel
zlib-devel-1.2.7-18.el7.x86_64
pcre-devel-8.32-17.el7.x86_64
openssl-devel-1.0.2k-19.el7.x86_64
[root@localhost tools]#
3、编译nginx
检测系统是否安装Apache服务,如果安装则需要卸载Apache
[root@localhost ~]# rpm -aq httpd
创建Nginx程序用户
[root@localhost ~]# useradd -M -s /sbin/nologin nginx
查看用户是否创建成功
root@localhost ~]# tail -1 /etc/passwd;tail -1 /etc/group
nginx:x:1001:1001::/home/nginx:/sbin/nologin
nginx:x:1001:
解压包到/usr/src目录下去
[root@localhost tools]# tar xf nginx-1.6.0.tar.gz -C /usr/src/
[root@localhost tools]# cd /usr/src/
[root@localhost src]# ll
total 0
drwxr-xr-x. 2 root root 6 Apr 11 2018 debug
drwxr-xr-x. 2 root root 6 Apr 11 2018 kernels
drwxr-xr-x. 8 nginx nginx 158 Apr 24 2014 nginx-1.6.0
[root@localhost src]#
[root@localhost nginx-1.6.0]# ll
total 600
drwxr-xr-x. 6 nginx nginx 4096 Sep 1 13:46 auto
-rw-r--r--. 1 nginx nginx 234891 Apr 24 2014 CHANGES
-rw-r--r--. 1 nginx nginx 357716 Apr 24 2014 CHANGES.ru
drwxr-xr-x. 2 nginx nginx 168 Sep 1 13:46 conf
-rwxr-xr-x. 1 nginx nginx 2369 Apr 24 2014 configure
drwxr-xr-x. 4 nginx nginx 72 Sep 1 13:46 contrib
drwxr-xr-x. 2 nginx nginx 40 Sep 1 13:46 html
-rw-r--r--. 1 nginx nginx 1397 Apr 24 2014 LICENSE
drwxr-xr-x. 2 nginx nginx 21 Sep 1 13:46 man
-rw-r--r--. 1 nginx nginx 49 Apr 24 2014 README
drwxr-xr-x. 8 nginx nginx 77 Sep 1 13:46 src
编译安装
[root@localhost nginx-1.6.0]# ./configure --prefix=/usr/local/nginx --user=nginx --group=nginx --with-file-aio --with-http_mp4_module --with-http_ssl_module && make && make install
检查编译安装是否成功——输出为0即为安装成功没有错误
[root@localhost nginx-1.6.0]# echo $?
0
[root@localhost nginx-1.6.0]#
修改nginx的配置文件
[root@localhost nginx-1.6.0]# cd /usr/local/nginx/conf/
[root@localhost conf]# ll
total 60
-rw-r--r--. 1 root root 1034 Sep 1 13:47 fastcgi.conf
-rw-r--r--. 1 root root 1034 Sep 1 13:47 fastcgi.conf.default
-rw-r--r--. 1 root root 964 Sep 1 13:47 fastcgi_params
-rw-r--r--. 1 root root 964 Sep 1 13:47 fastcgi_params.default
-rw-r--r--. 1 root root 2837 Sep 1 13:47 koi-utf
-rw-r--r--. 1 root root 2223 Sep 1 13:47 koi-win
-rw-r--r--. 1 root root 3957 Sep 1 13:47 mime.types
-rw-r--r--. 1 root root 3957 Sep 1 13:47 mime.types.default
-rw-r--r--. 1 root root 2656 Sep 1 13:47 nginx.conf
-rw-r--r--. 1 root root 2656 Sep 1 13:47 nginx.conf.default
-rw-r--r--. 1 root root 596 Sep 1 13:47 scgi_params
-rw-r--r--. 1 root root 596 Sep 1 13:47 scgi_params.default
-rw-r--r--. 1 root root 623 Sep 1 13:47 uwsgi_params
-rw-r--r--. 1 root root 623 Sep 1 13:47 uwsgi_params.default
-rw-r--r--. 1 root root 3610 Sep 1 13:47 win-utf
备份配置文件——切记修改数据之前先备份
[root@localhost conf]# cp nginx.conf nginx.conf.bak
修改配置文件,以下是修改的文件的内容
[root@localhost conf]# vim nginx.conf
2 user  nginx nginx;
5 worker_processes  1;
7 error_log  logs/error.log  info;
9 pid        logs/nginx.pid;
12 events {
13     use epoll;
14     worker_connections  10240;
15 }
18 http {
19     include       mime.types;
20     default_type  application/octet-stream;
21
22     log_format  main  '$remote_addr - $remote_user [$time_local] "$request" '
23                       '$status $body_bytes_sent "$http_referer" '
24                       '"$http_user_agent" "$http_x_forwarded_for"';
25
26     access_log  logs/access.log  main;
27
28     sendfile        on;
29     tcp_nopush     on;
36     server {
37         listen       80;
38         server_name  localhost;
39
40         charset utf-8;
41
42         access_log  logs/nginx.yunban.cn.access.log  main;
43
44         location / {
45             root   html;
46             index  index.html index.htm;
47         }
创建软连接
[root@localhost conf]# ln -s /usr/local/nginx/sbin/* /usr/local/sbin/
修改系统最大打开文件数
[root@localhost conf]# ulimit -n
1024
[root@localhost conf]# ulimit -HSn 65535
[root@localhost conf]# ulimit -n
65535
[root@localhost conf]#
把配置写进profile中
[root@localhost conf]# echo "ulimit -HSn 65535" >> /etc/profile
[root@localhost conf]# tail -1 /etc/profile
ulimit -HSn 65535
[root@localhost conf]#
查看nginx是否启动成功
[root@localhost conf]# nginx -t
nginx: the configuration file /usr/local/nginx/conf/nginx.conf syntax is ok
nginx: configuration file /usr/local/nginx/conf/nginx.conf test is successful
4、启动nginx并设置开机自启
[root@localhost conf]# cd /usr/local/nginx/sbin
[root@localhost sbin]# ./nginx
[root@localhost sbin]#
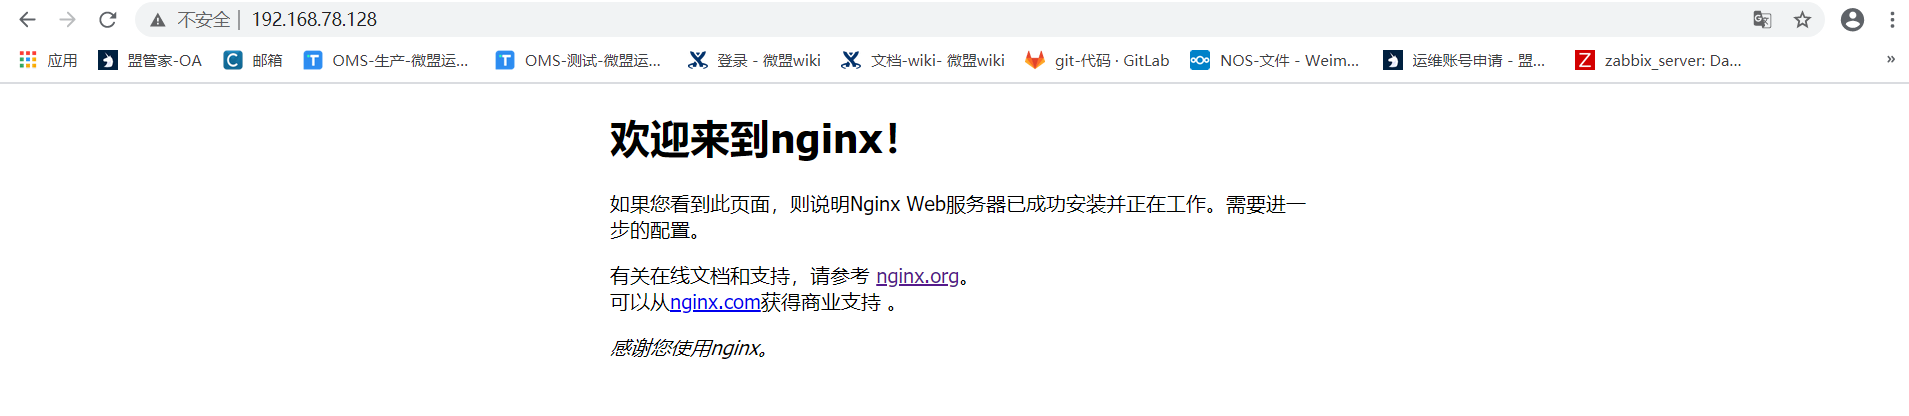
5、测试nginx是否可以成功访问
部署mysql————————————————————————————————————————
1、卸载原有包
检查是否安装Mariadb数据库,如果安装则使用rpm卸载,安装依赖包
[root@localhost ~]# rpm -aq mariadb mariadb-server mariadb-client
安装数据库依赖包
[root@localhost ~]# yum -y install ncurses-devel
[root@localhost ~]# rpm -aq ncurses-devel
ncurses-devel-5.9-14.20130511.el7_4.x86_64
2、安装编译包cmake
[root@localhost ~]# cd /tools/
[root@localhost tools]# ta
tabs tac tail tailf tar taskset
[root@localhost tools]# tar xf cmake-2.8.6.tar.gz -C /usr/src/
[root@localhost cmake-2.8.6]# cd /usr/src/cmake-2.8.6/
[root@localhost cmake-2.8.6]# ./
bootstrap configure Docs/ Example/ Modules/ Source/ Templates/ Tests/ Utilities/
[root@localhost cmake-2.8.6]# ./configure && gmake &&gmake install
编译安装,测试是否安装成功
[root@localhost cmake-2.8.6]# echo $?
0
3、编译安装mysql
cd /tools
tar xf mysql-5.5.22.tar.gz -C /usr/src/
cd /usr/src/mysql-5.5.22/
编译安装数据库
cmake -DCMAKE_INSTALL_PREFIX=/usr/local/mysql -DDEFAULT_CHARSET=utf8 -DDEFAULT_COLLATION=utf8_general_ci -DWITH_EXTRA_CHARSETS=all -DSYSCONFDIR=/etc && make && make install
安装后配置数据库
[root@localhost mysql-5.5.22]# echo "PATH=$PATH:/usr/local/mysql/bin" >> /etc/profile
[root@localhost mysql-5.5.22]# . /etc/profile
[root@localhost mysql-5.5.22]# echo $PATH
/usr/local/sbin:/usr/local/bin:/usr/sbin:/usr/bin:/root/bin:/usr/local/mysql/bin
[root@localhost mysql-5.5.22]#
准备相关配置文件
[root@localhost mysql-5.5.22]# /bin/cp -p /usr/src/mysql-5.5.22/support-files/my-medium.cnf /etc/my.cnf
[root@localhost mysql-5.5.22]# /bin/cp -p /usr/src/mysql-5.5.22/support-files/mysql.server /etc/init.d/mysqld
[root@localhost mysql-5.5.22]# chmod +x /etc/init.d/mysqld
[root@localhost mysql-5.5.22]# chkconfig --add mysqld
[root@localhost mysql-5.5.22]# chkconfig mysqld on
4、初始化数据库
创建mysql用户修改所属组
root@localhost mysql-5.5.22]# useradd -M -s /sbin/nologin mysql
[root@localhost mysql-5.5.22]# chown -R mysql:mysql /usr/local/mysql/
[root@localhost mysql-5.5.22]# /usr/local/mysql/scripts/mysql_install_db --basedir=/usr/local/mysql/ --datadir=/usr/local/mysql/data/ --user=mysql
5、启动数据库
[root@localhost mysql-5.5.22]# /etc/init.d/mysqld start
Starting MySQL.. SUCCESS!
为root创建数据库密码
[root@localhost mysql-5.5.22]# mysqladmin -uroot password "123456" ;history -c
[root@localhost mysql-5.5.22]#
6、测试数据库
[root@localhost mysql-5.5.22]# mysql -u root -p
Enter password:
Welcome to the MySQL monitor. Commands end with ; or \g.
Your MySQL connection id is 3
Server version: 5.5.22-log Source distribution
Copyright (c) 2000, 2011, Oracle and/or its affiliates. All rights reserved.
Oracle is a registered trademark of Oracle Corporation and/or its
affiliates. Other names may be trademarks of their respective
owners.
Type 'help;' or '\h' for help. Type '\c' to clear the current input statement.
mysql>
登录成功 --------哈哈哈--------
部署php——————————————————————————————————————————
1、安装PHP服务
安装资源包
[root@localhost ~]# yum -y install gd libxml2-devel libjpeg-devel libpng-devel
[root@localhost ~]# cd /tools/
[root@localhost tools]# ll
total 52296
-rw-r--r--. 1 root root 5583905 Sep 1 13:08 cmake-2.8.6.tar.gz
-rw-r--r--. 1 root root 24475686 Sep 1 13:08 mysql-5.5.22.tar.gz
-rw-r--r--. 1 root root 802956 Sep 1 13:08 nginx-1.6.0.tar.gz
-rw-r--r--. 1 root root 13989083 Sep 1 13:08 php-5.3.28.tar.gz
-rw-r--r--. 1 root root 8249271 Sep 1 13:08 SKYUC.v3.4.2.SOURCE.zip
-rw-r--r--. 1 root root 434691 Sep 1 13:08 ZendGuardLoader-php-5.3-linux-glibc23-x86_64.tar.gz
[root@localhost tools]# tar xf php-5.3.28.tar.gz -C /usr/src/
[root@localhost tools]#
编译安装php服务
[root@localhost tools]# cd /usr/src/php-5.3.28/
[root@localhost php-5.3.28]# ./configure --prefix=/usr/local/php5 --with-gd --with-zlib --with-mysql=/usr/local/mysql/ --with-config-file-path=/usr/local/php5 --enable-mbstring --enable-fpm --with-jpeg-dir=/usr/lib && make && make install
[root@localhost php-5.3.28]# echo $?
0
[root@localhost php-5.3.28]#
2、安装后调整优化
[root@localhost php-5.3.28]# cp -p /usr/src/php-5.3.28/php.ini-development /usr/local/php5/php.ini
[root@localhost php-5.3.28]# ln -s /usr/local/php5/bin/* /usr/local/bin/
[root@localhost php-5.3.28]# ln -s /usr/local/php5/sbin/* /usr/local/sbin/
3、安装 ZendGuardLoader (PHP 的优化模块
[root@localhost php-5.3.28]# cd /tools/
[root@localhost tools]# tar ZendGuardLoader-php-5.3-linux-glibc23-x86_64.tar.gz -C /usr/src/
tar: Old option `b' requires an argument.
Try `tar --help' or `tar --usage' for more information.
[root@localhost tools]# tar xf ZendGuardLoader-php-5.3-linux-glibc23-x86_64.tar.gz -C /usr/src/
[root@localhost tools]# cd /usr/src/ZendGuardLoader-php-5.3-linux-glibc23-x86_64/
[root@localhost ZendGuardLoader-php-5.3-linux-glibc23-x86_64]#
[root@localhost ZendGuardLoader-php-5.3-linux-glibc23-x86_64]# cp /usr/src/ZendGuardLoader-php-5.3-linux-glibc23-x86_64/php-5.3.x/ZendGuardLoader.so /usr/local/php5/lib/php/
[root@localhost tools]# echo -e "zend_extension=/usr/local/php5/lib/php/ZendGuardLoader.so\nzend_loader.enable=1" >> /usr/local/php5/php.ini
[root@localhost tools]# tail -2 /usr/local/php5/php.ini
zend_extension=/usr/local/php5/lib/php/ZendGuardLoader.so
zend_loader.enable=1
[root@localhost tools]#
4、配置并启动
[root@localhost tools]# cd /usr/local/php5/etc/
[root@localhost etc]# cp -p php-fpm.conf.default php-fpm.conf
[root@localhost etc]# vim php-fpm.conf
25 pid = run/php-fpm.pid //指定 pid 文件位置
140 user = nginx //程序用户
141 group = nginx //程序组
217 pm.max_children = 50 //子进程的最大数
222 pm.start_servers = 20 //启动时开启的进程数
227 pm.min_spare_servers = 5 //最少空闲进程数
232 pm.max_spare_servers = 35 //最大空闲进程数
5、启动PHP
[root@localhost etc]# php-fpm
[root@localhost etc]#
6、编写nginx服务控制脚本
[root@localhost etc]# vim /etc/init.d/nginx
[root@localhost etc]# cat /etc/init.d/nginx
#!/bin/bash
# chkconfig: 2345 99 20
# description: Nginx Server Control Script
PROG="/usr/local/nginx/sbin/nginx"
PIDF="/usr/local/nginx/logs/nginx.pid"
PROG_FPM="/usr/local/sbin/php-fpm"
PIDF_FPM="/usr/local/php5/var/run/php-fpm.pid"
case "$1" in
start)
if [ -f $PIDF ];then
echo "Nginx is running.. Start it is error"
elif [ -f $PIDF_FPM ];then
echo "PHP is running.. Start it is error"
else
$PROG &>/dev/null
$PROG_FPM &>/dev/null
fi
;;
stop)
if [ -f $PIDF ] && [ -f $PIDF_FPM ];then
kill -s QUIT $(cat $PIDF) &> /dev/null
kill -s QUIT $(cat $PIDF_FPM) &>/dev/null
else
echo "Nginx or PHP is not running.. Stop it is error"
fi
;;
restart)
$0 stop
$0 start
;;
reload)
kill -s HUP $(cat $PIDF)
;;
*)
echo "Usage: $0 (start|stop|restart|reload)"
exit 1
esac
exit 0
[root@localhost etc]#
脚本授权
[root@localhost etc]# chmod +x /etc/init.d/nginx
[root@localhost etc]# echo "/etc/init.d/nginx start">> /etc/rc.d/rc.local
[root@localhost etc]# chmod +x /etc/rc.d/rc.local
[root@localhost etc]# tail -1 /etc/rc.d/rc.local
/etc/init.d/nginx start
7、测试脚本
[root@localhost etc]# /etc/init.d/nginx start
Nginx is running.. Start it is error
[root@localhost etc]#
8、配置nginx支持php解析
vim /usr/local/nginx/conf/nginx.conf
46 index index.php index.html index.htm;
60 location ~ \.php$ {
61 root html;
62 fastcgi_pass 127.0.0.1:9000;
63 fastcgi_index index.php;
64 include fastcgi.conf;
65 }
[root@localhost etc]# nginx -t
nginx: the configuration file /usr/local/nginx/conf/nginx.conf syntax is ok
nginx: configuration file /usr/local/nginx/conf/nginx.conf test is successful
[root@localhost etc]#
/etc/init.d/nginx reload
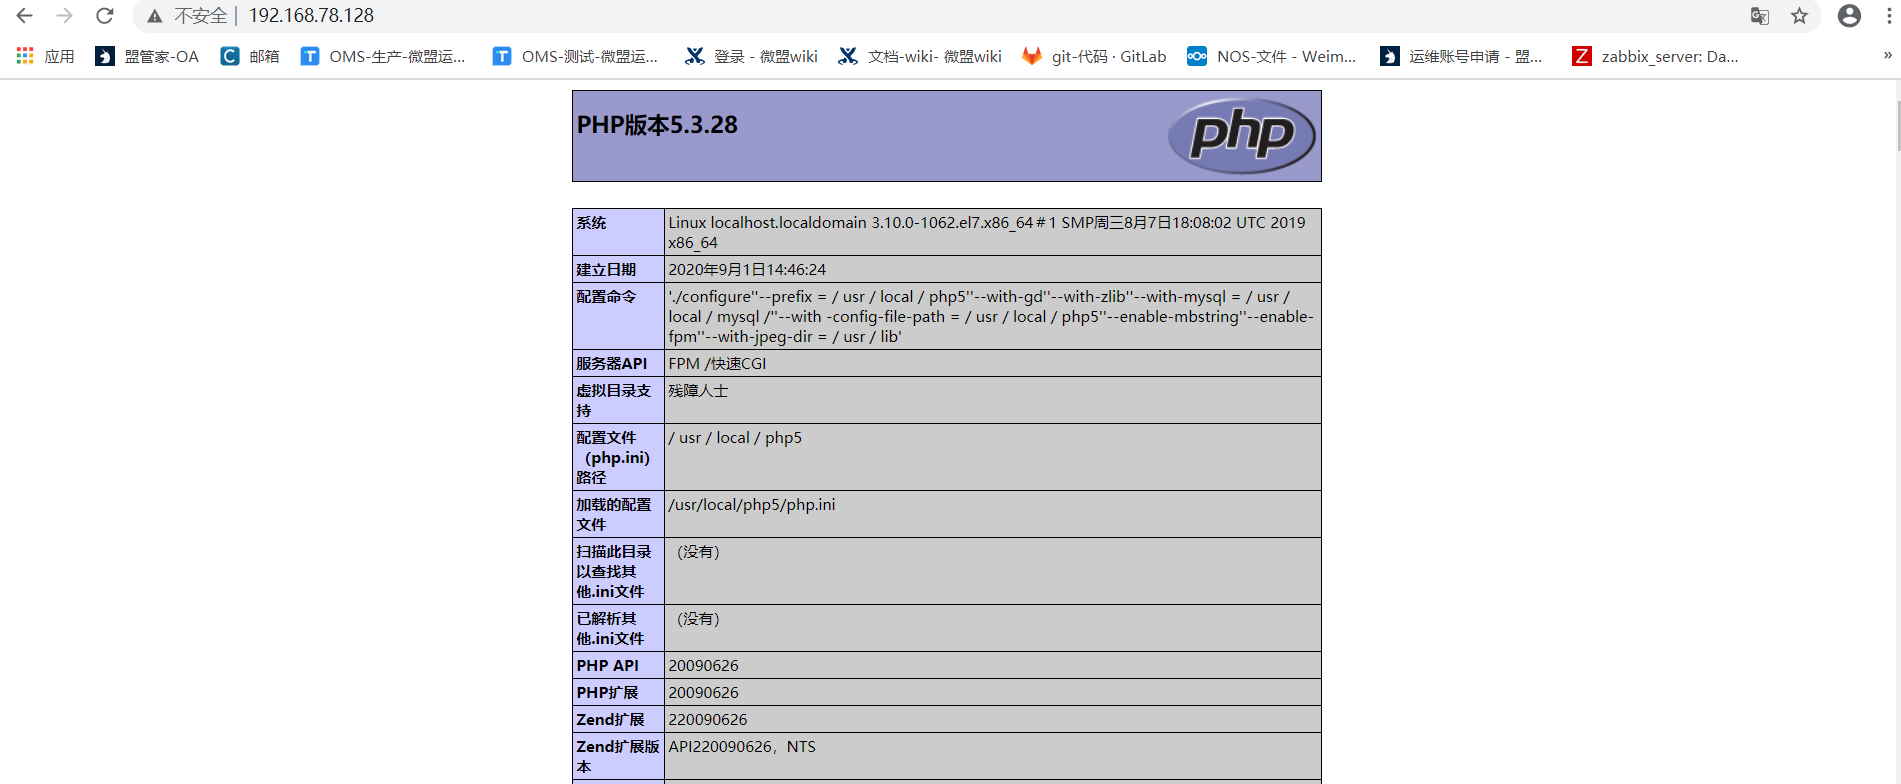
9、测试php &测试php访问数据库
[root@localhost etc]# cat /usr/local/nginx/html/index.php
<?php
phpinfo();
?>
[root@localhost etc]#
[root@localhost html]# cat /usr/local/nginx/html/test.php
<?php
$link=mysql_connect('localhost','root','123456');
if($link) echo "<h1>successful</h1>";
mysql_close();
?>
[root@localhost html]#

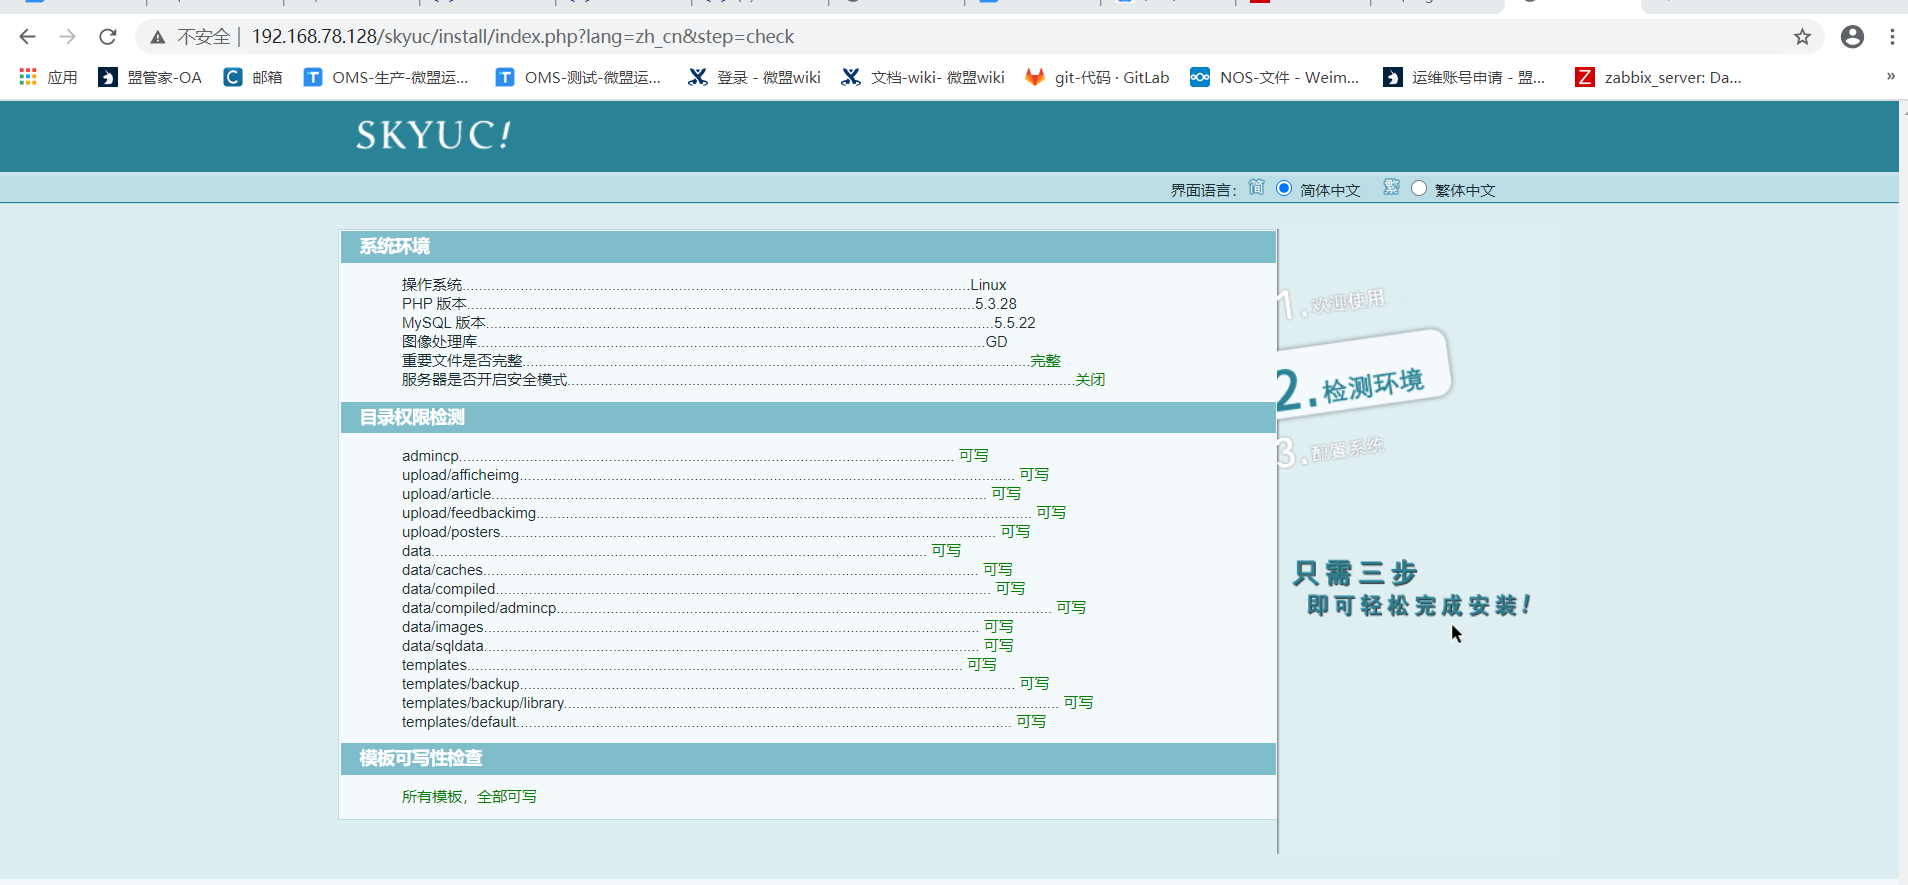
部署SKYUC应用————————————————————————————————————
安装unzip
[root@localhost html]# rpm -qa unzip
unzip-6.0-21.el7.x86_64
[root@localhost html]#
[root@localhost tools]# unzip SKYUC.v3.4.2.SOURCE.zip cd SKYUC.v3.4.2.SOURCE^C
[root@localhost tools]# cd SKYUC.v3.4.2.SOURCE
[root@localhost SKYUC.v3.4.2.SOURCE]# cp -rp wwwroot/ /usr/local/nginx/html/skyuc
[root@localhost SKYUC.v3.4.2.SOURCE]# cd /usr/local/nginx/html/skyuc/
[root@localhost skyuc]# chown -R nginx:nginx ./
[root@localhost skyuc]#
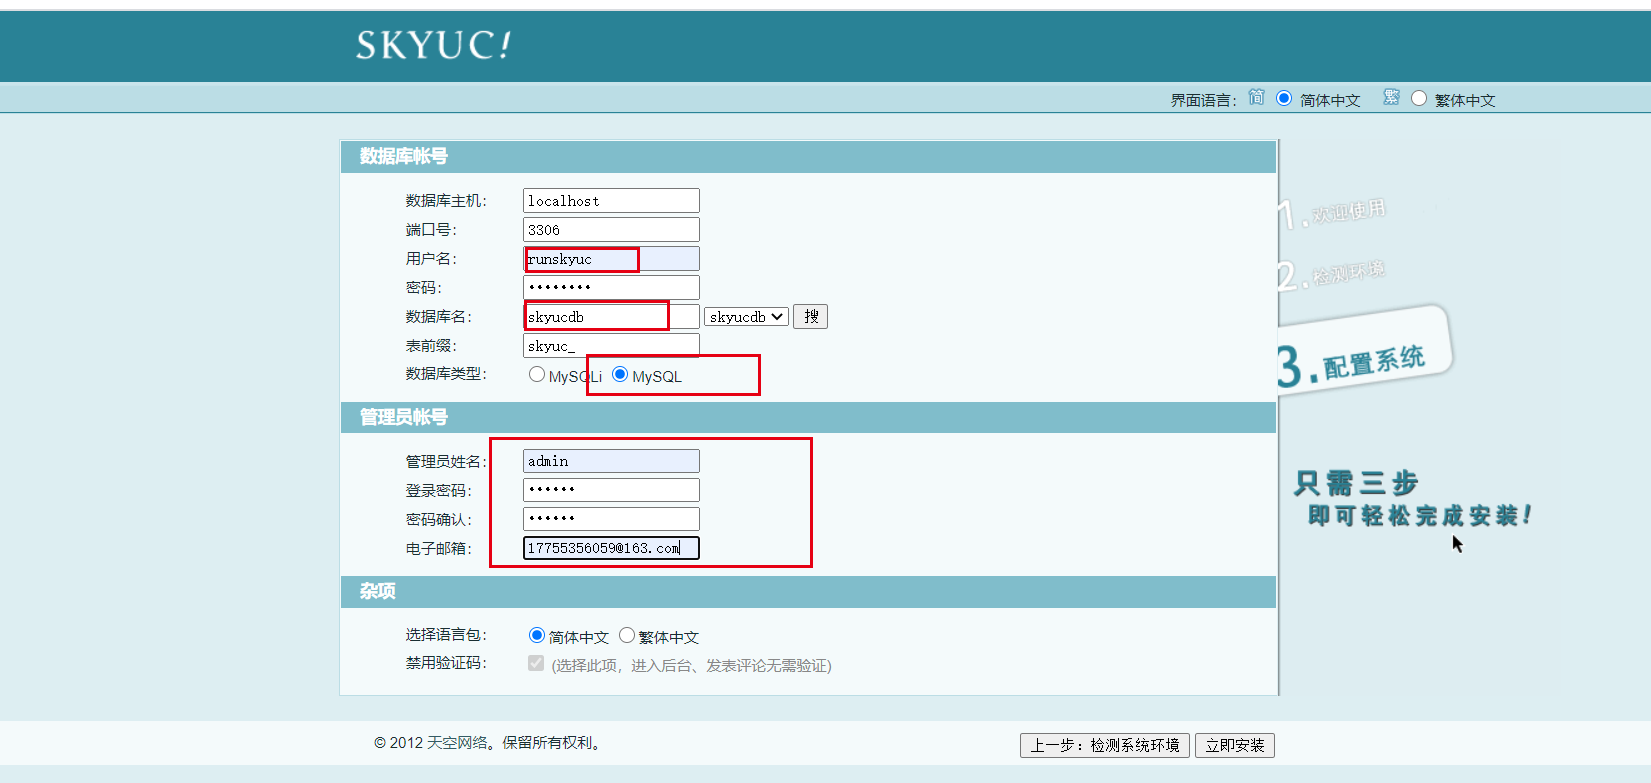
创建数据库并进行授权
[root@localhost skyuc]# mysql -uroot -p
Enter password:
Welcome to the MySQL monitor. Commands end with ; or \g.
Your MySQL connection id is 6
Server version: 5.5.22-log Source distribution
Copyright (c) 2000, 2011, Oracle and/or its affiliates. All rights reserved.
Oracle is a registered trademark of Oracle Corporation and/or its
affiliates. Other names may be trademarks of their respective
owners.
Type 'help;' or '\h' for help. Type '\c' to clear the current input statement.
mysql> create database skyucdb;
Query OK, 1 row affected (0.00 sec)
mysql> grant all on skyucdb.* to runskyuc@localhost identified by 'admin123'
-> ;
Query OK, 0 rows affected (0.00 sec)
mysql> quit
Bye
[root@localhost skyuc]#
WEB配置
二
三

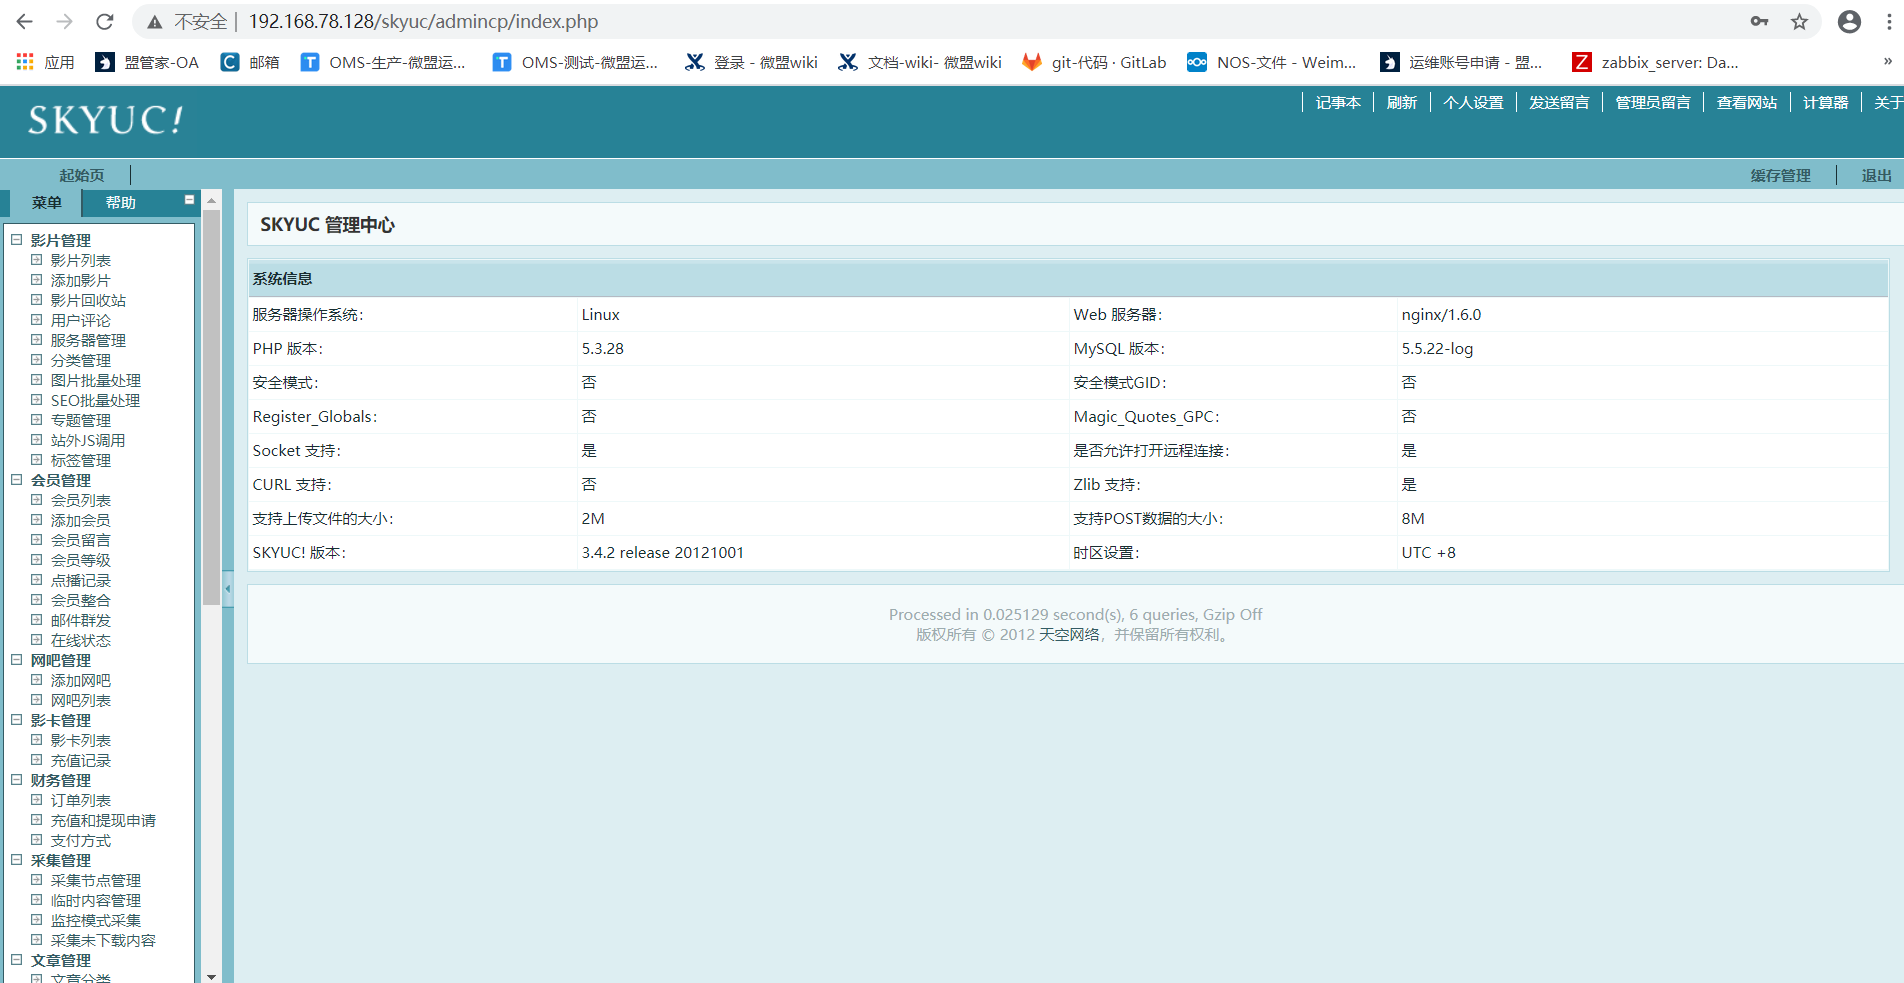
四安装成功
删除install安装目录
[root@localhost skyuc]# rm -rf install/
[root@localhost skyuc]# cd /usr/local/nginx/html/skyuc/

 浙公网安备 33010602011771号