
vue路由
前端路由的概念与原理
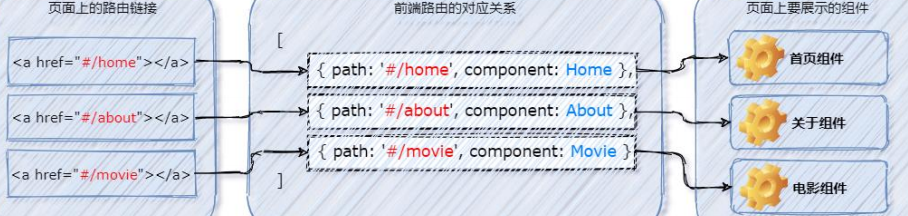
1.1什么是路由:对应关系,通俗易懂的话来讲就是Hash地址与组件的之间的对应关系
1.2前端路由的工作原理
- 用户点击了页面上的路由链接
- 导致了URL地址栏中的Hash值发生了变化
- 前端路由监听到了Hash值的变化
- 前端路由把当前的Hash地址对应的组件渲染到浏览器中
vue-router 的基本使用用法
1.1vue-router是vue.js官方给出的路由解决方案,只能结合vue使用能够管理SPA项目中组件的切换
1.2vue-router安装和配置步骤
1. 安装vue-router包命令如下:
npm i vue-router@3.5.2 -S
2.创建路由模块
//src/router/index.js当前项目的路由模块

//1导入vue和vueRouter的包
import Vue from "vue"
import VueRouter from "vue-router"

//2.调用vue.use()函数,把VueRouter安装为Vue的插件
Vue.use(VueRouter)

//3.创建路由的实例对象
const router=new VueRouter()

//4.向外共享路由的实例对象
export default router
3.导入并挂载路由模块
// 导入路由模块,目的:拿到路由的实例对象
// 在进行模块化导入的时候,如果给定的是文件夹,则默认导入这个文件夹下,名字叫做 index.js 的文件
import router from '@/router
Vue.config.productionTip = false
new Vue({
  render: h => h(App),
  // 在 Vue 项目中,要想把路由用起来,必须把路由实例对象,通过下面的方式进行挂载
  // router: 路由的实例对象
  router
}).$mount('#app')
4.声明路由链接和占位符
 <router-link to="/movie/1">洛基</router-link>
    <router-link to="/movie/2?name=zs&age=20">雷神</router-link>
    <router-link to="/movie/3">复联</router-link>
    <router-link to="/about">关于</router-link>

    <hr />

    <!-- 只要在项目中安装和配置了 vue-router,就可以使用 router-view 这个组件了 -->
    <!-- 它的作用很单纯:占位符 -->
    <router-view></router-view>
1.3在 src/router/index.js 路由模块中,通过 routes 数组声明路由的匹配规则。示例代码如下
//1导入vue和vueRouter的包
import Vue from "vue"
import VueRouter from "vue-router"

import Home from '@/components/Home.vue'
import Movie from '@/components/Movie.vue'
import About from '@/components/About.vue'

//2.调用vue.use()函数,把VueRouter安装为Vue的插件
Vue.use(VueRouter)

//3.创建路由的实例对象
const router = new VueRouter({
  //routes是一个数组,定义hash地址与组件的对应关系
  routes: [
    { path: '/home', component: Home },
    { path: '/movie', component: Movie },
    { path: '/about', component: About }
  ]
})

//4.向外共享路由的实例对象
export default router
vue-router 的常见用法
1.1路由重定向:用户再放访问A地址的时候,强制用户跳转到C地址,从而展示特定的组件页面通过路由规则的redirect属性指定一个新的路由地址,设置路由的重定向
//3.创建路由的实例对象
const router = new VueRouter({
  //routes是一个数组,定义hash地址与组件的对应关系
  routes: [
    //重定向路由规则
    { path: '/', redirect: '/home' },
    //路由规则
    { path: '/home', component: Home },
    { path: '/movie', component: Movie },
    { path: '/about', component: About }
  ]
})
1.3嵌套路由:通过路由实现组件的嵌套展示
<!-- 子级路由链接 -->

    <router-link to="/about/tab1">tab1</router-link>
    <router-link to="/about/tab2">tab2</router-link>

    <hr />
    <!-- 子级占位符 -->
    <router-view></router-view>
2通过 children 属性声明子路由规则
import Tab1 from '@/components/tabs/Tab1.vue'
import Tab2 from '@/components/tabs/Tab2.vue'

//2.调用vue.use()函数,把VueRouter安装为Vue的插件
Vue.use(VueRouter)

//3.创建路由的实例对象
const router = new VueRouter({
  //routes是一个数组,定义hash地址与组件的对应关系
  routes: [
    //重定向路由规则
    { path: '/', redirect: '/home' },
    //路由规则
    { path: '/home', component: Home },
    { path: '/movie', component: Movie },
    {
      path: '/about', component: About, redirect: '/about/tab1', children: [
        // 子路由规则,只要在子路由节点下path中不必加/
        { path: 'tab1', component: Tab1 },
        { path: 'tab2', component: Tab2 }
      ]
    }

  ]
})
1.4动态路由匹配:是把Hash地址中可变的部分定义为参数项,从而提高了路由规则的复用性。在vue-router中使用英文(:)来定义路由的参数项
 routes: [
    //重定向路由规则
    { path: '/', redirect: '/home' },
    //路由规则
    { path: '/home', component: Home },
     //在vue-router中使用英文(:)来定义路由的参数项
    { path: '/movie/:id', component: Movie }
    }

  ]
1.4.1在动态路由渲染出来的组件中,可以使用this.$route.parans对象访问到动态匹配的参数值
<template>
  <div class="movie-container">

   //this.$route.params是路由的参数对象
<h3>Movie 组件---{{this.$route.params.id}} </h3> <button @click="showThis">打印this</button> </div> </template>
1.4.2使用 props 接收路由参数,为了简化路由参数的获取形式,vue-router 允许在路由规则中开启 props 传参。示例代码如下
// 可以为路由规则开启props传参,从而可以拿到动态参数的值

{ path: '/movie/:id', component: Movie, props: true },
<template>
  <div class="movie-container">
    <h3>Movie 组件---{{id}} </h3>
    <button @click="showThis">打印this</button>

  </div>
</template>

<script>
export default {
  name: 'Movie',

  //接受props数据
  props: ['id']
}
</script>
1.5声明式导航和编程式导航
1.5.1声明式导航:在浏览器中点击链接实现导航的方式,叫做声明式导航,例如网页中点击<a>标签链接、vue中点击<router-link>都属于声明式导航
1.5.2编程式导航:在浏览器中调用API方法实现导航的方式叫做编程式导航,例如网页中调用localtion.href跳转到新页面的方式属于编程式导航
1.5.3vue-router 中的编程式导航 API
1.5.3.1this.$router.push('hash地址'):跳转到指定的hash地址,并增加一条记录
<template>
  <div class="home-container">
    <h3>Home 组件</h3>

    <hr />
    <button @click="gotopush"> 通过push跳转到“洛基”页面</button>

  </div>
</template>

<script>
export default {
  name: 'Home',
  methods: {
    gotopush() {
      //通过编程式API,导航跳转到的指定页面
      this.$router.push('/movie/1')
    }
  }
}
</script>
1.5.3.2this.$router.replace('hash 地址'):跳转到指定的 hash 地址,并替换掉当前的历史记录
<template>
  <div class="home-container">
    <h3>Home 组件</h3>

    <hr />
    <button @click="gotoreplace">通过replace跳转到“洛基”页面</button>

  </div>
</template>

<script>
export default {
  name: 'Home',
  methods: {
    gotoreplace() {
      this.$router.replace('/movie/1')
    }
  }
}
</script>
1.5.3.3this.$router.go(数值 n):调用$router.go()方法,可以在浏览器历史中前进和后退
<template>
  <div class="movie-container">
    <h3>Movie 组件---{{this.$route.params.id}}-----{{id}} </h3>
    <button @click="showThis">打印this</button>
    <button @click="goback">后退</button>
    <!-- $router.go 的简化用法 -->
    <!-- $router.back()在历史记录中,后退到上一个页面 -->
    <button @click="$router.back()">back后退</button>
    <!-- $router.forward()在历史记录中,前进到下一个页面 -->
    <button @click="$router.forward()">forward前进</button>

  </div>
</template>

<script>
export default {
  name: 'Movie',
  methods: {
    showThis() {
      console.log()
    },
    //go(-1)表示后退一层
    //如果后退次数上限则原地不动
    goback() {
      this.$router.go(-1)
    }
  },
}
</script>
1.6导航守卫:导航守卫可以控制路由的访问权限
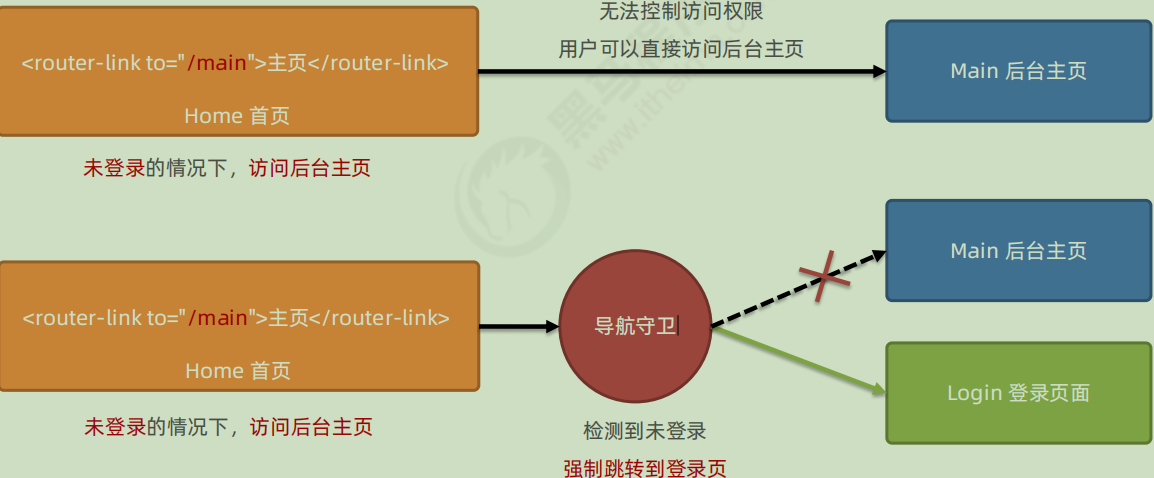
1.6.1全局前置守卫:每次发生路由的导航跳转时,都会触发到前置守卫,因此可以对每一个路由进行访问权限的控制
//为router实例对象声明全局前置导航守卫
//只要发生了路由跳转,必然会触发beforeEach指定的function回调函数
router.beforeEach(function (to, from, next) {
  //to表示将要访问的路由信息对象
  //from表示将要离开的路由的信息对象
  //next表示放行的意思
  next()

})
1.6控制后台主页的访问权限
//为router实例对象声明全局前置导航守卫
//只要发生了路由跳转,必然会触发beforeEach指定的function回调函数
router.beforeEach(function (to, from, next) {
  //to表示将要访问的路由信息对象
  //from表示将要离开的路由的信息对象
  //next表示放行的意思

  //分析:
  //1.要拿到用户访问的hash地址
  //2.判断hash地址是否等于/main
  //如果等于/main则需要登入之后才能访问
  //如果不等于,则不需要登入直接调用next()放行
  //3如果访问的地址是/main则需要读取localStorage中的token值
  // 如果有token值则放行
  // 没有则强制跳转到login登录页面
  if (to.path === '/main') {
    //要访问的后台主页需要判断是否有token
    const token = localStorage.getItem('token')
    if (token) {
      next()
    } else {
      //没有登入强制跳转到登入页面
      next('/login')
    }
  } else {
    next()
  }

})

 浙公网安备 33010602011771号