
OpenCv 030---Opencv中的自定义滤波器
1 前备知识
图像卷积最主要功能有图像模糊、锐化、梯度边缘等,前面已经分享图像卷积模糊的相关知识点,OpenCV除了支持上述的卷积模糊(均值与边缘保留)还支持自定义卷积核,实现自定义的滤波操作。自定义卷积核常见的主要是均值、锐化、梯度等算子。下面的三个自定义卷积核分别可以实现卷积的均值模糊、锐化、梯度功能。
2 所用到的主要OpenCv API
/** @brief Convolves an image with the kernel.
@param src input image.
@param dst output image of the same size and the same number of channels as src.
@param ddepth desired depth of the destination image, see @ref filter_depths "combinations"
@param kernel convolution kernel (or rather a correlation kernel), a single-channel floating point
matrix; if you want to apply different kernels to different channels, split the image into
separate color planes using split and process them individually.
@param anchor anchor of the kernel that indicates the relative position of a filtered point within
the kernel; the anchor should lie within the kernel; default value (-1,-1) means that the anchor
is at the kernel center.
@param delta optional value added to the filtered pixels before storing them in dst.
@param borderType pixel extrapolation method, see #BorderTypes
@sa  sepFilter2D, dft, matchTemplate
 */
CV_EXPORTS_W void filter2D( InputArray src, OutputArray dst, int ddepth,
                            InputArray kernel, Point anchor = Point(-1,-1),
                            double delta = 0, int borderType = BORDER_DEFAULT );
/** @brief Scales, calculates absolute values, and converts the result to 8-bit.
@endcode
@param src input array.
@param dst output array.
@param alpha optional scale factor.
@param beta optional delta added to the scaled values.
@sa  Mat::convertTo, cv::abs(const Mat&)
*/
CV_EXPORTS_W void convertScaleAbs(InputArray src, OutputArray dst,
                                  double alpha = 1, double beta = 0);
3 程序代码
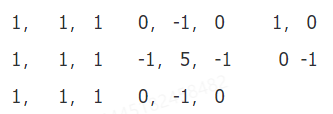
#include <opencv2/opencv.hpp>
#include <iostream>

using namespace cv;
using namespace std;

int main(int artc, char** argv) {
    Mat src = imread("images/test.png");
    if (src.empty()) {
        printf("could not load image...\n");
        return -1;
    }
    namedWindow("input", CV_WINDOW_AUTOSIZE);
    imshow("input", src);

    Mat kernel1 = Mat::ones(5, 5, CV_32F) / (float)(25);

    Mat kernel2 = (Mat_<char>(3, 3) << 0, -1, 0,
        -1, 5, -1,
        0, -1, 0);

    Mat kernel3 = (Mat_<int>(2, 2) << 1, 0, 0, -1);

    Mat dst1, dst2, dst3;
    filter2D(src, dst1, -1, kernel1);
    filter2D(src, dst2, -1, kernel2);
    filter2D(src, dst3, CV_32F, kernel3);
    convertScaleAbs(dst3, dst3);

    imshow("blur=5x5", dst1);
    imshow("shape=3x3", dst2);
    imshow("gradient=2x2", dst3);

    waitKey(0);
    return 0;
}
4 运行结果
5 扩展及注意事项
6*目前只做大概了解,知道有这一算法,后续具体使用再做具体分析
One day,I will say
"I did it"

 浙公网安备 33010602011771号