UVM(一)
UVM
- 验证平台中所有的组件应该派生自UVM中的类;
- 每一个派生自uvm_component或其派生类的类在其new函数中要指明两个参数:name和parent,这是uvm_component类的一大特征。
- uvm_driver是一个派生自uvm_component的类,所以也会有这两个参数。
- 一个是string类型的name;
- 一个是uvm_component类型的parent;
- 每一个派生自uvm_component或其派生类的类在其new函数中要指明两个参数:name和parent,这是uvm_component类的一大特征。
- 所有派生自uvm_component及其派生类的类都应该使用uvm_component_utils宏注册
- 在UVM验证平台中,只 要一个类使用uvm_component_utils注册且此类被实例化了,那么这个类的main_phase就会自动被调用。
- UVM中通过objection机制来控制验证平台的关闭。
- 在每个phase中,UVM会检查是否有objection被提起 (raise_objection);
- 如果有,那么等待这个objection被撤销(drop_objection)后停止仿真;
- 如果没有,则马上结束当前phase;
- 这个起效的前提是使用run_test来运行;
- raise_objection语句必须在main_phase中第一个消耗仿真时间的语句之前。
- 例如,display,`uvm_info;这些语句可以定义在raise_objection之前
- 如果在raise_objection前使用了延时语句,raise_objection将可能失效;
- 从根本上来说,应该尽量杜绝在验证平台中使用绝对路径。
- 在UVM中,所有的transaction都 要从uvm_sequence_item派生;
- 只有从uvm_sequence_item派生的transaction才可以使用后文讲述的UVM中强大的sequence机制。
- 从本质上来说,my_transaction与 my_driver是有区别的:
- 在整个仿真期间,my_driver是一直存在的;
- my_transaction不同,它有生命周期;
- 它在仿真的某一时间产生,经过driver驱动,再经过reference model处理,最终由scoreboard比较完成后,其生命周期就结束了。
- transaction类都是派生自uvm_object或者uvm_object的派生类,uvm_sequence_item的祖先就是uvm_object。
- UVM中具有这种特征的类都要使用 uvm_object_utils宏来实现。
- 验证平台中的组件在实例化时都应该使用 type_name::type_id::create的方式
- 即通过注册在factory中注册表的代理句柄,调用代理类的create方法来实现创建对象;
- 这个过程中type_id是通过宏定义`uvm_component_utils使用typedef定义在每一个需要调用或创建的组件类之中的;
- create传递两个参数,第一个参数是名字name,用于构造函数中划定层次,第二个参数传递的是parent;
- 每一个派生自uvm_component或其派生类的类在其new函数中要指明两个参数:name和parent,这是uvm_component类的一大特征。
- parent并不是其父类,而是一个父结点;
- new函数有两个参数,第一个参数是实例的名字,第二个则是parent。
- 由于driver在env中实例化,所以driver 的父结点(parent)就是env。
- 通过parent的形式,UVM建立起了树形的组织结构。
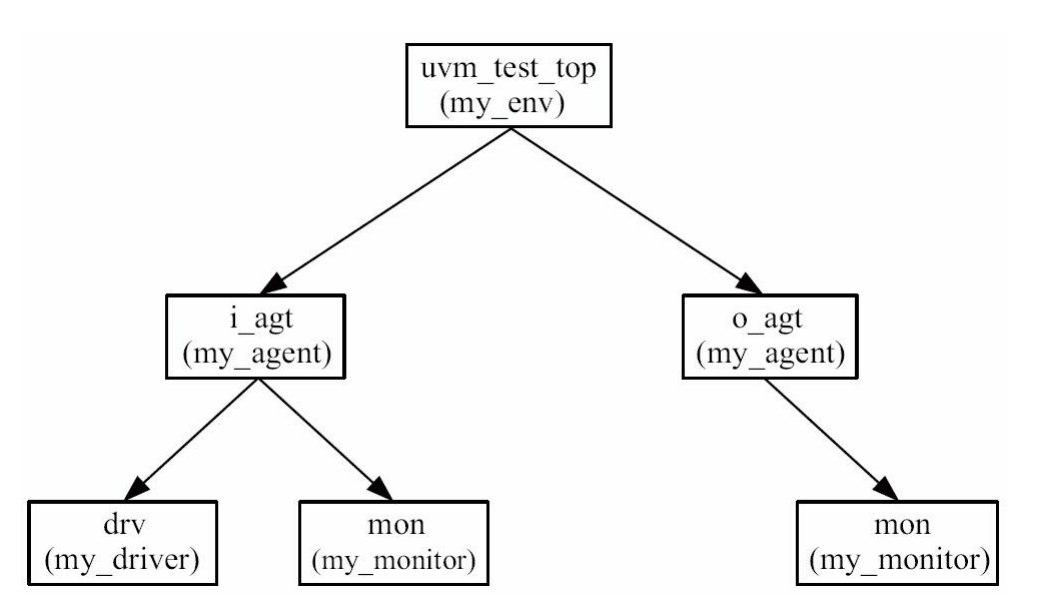
- 在这种树形的组织结构中,由run_test创建 的实例是树根(这里是env),并且树根的名字是固定的,为uvm_test_top
- 在树根之后会生长出枝叶,长出枝叶的过程需要在env的build_phase中手动实现。
- 无论是树根还是树叶,都必须由 uvm_component或者其派生类继承而来。整棵UVM树的结构如图所示。
-
-
只有uvm_component才能作为树的结点;
-
transaction这种使用uvm_object_utils宏实现的类是不能作为UVM树的结点的;
-
-
在my_env的build_phase中,创建i_agt和o_agt的实例是在 build_phase中;在agent中,创建driver和monitor的实例也是在build_phase中。
-
按照前文所述的build_phase的从树根到树叶的执行顺序,可以建立一棵完整的UVM树。
- UVM要求UVM树最晚在build_phase时段完成;
- 因此,在build_phase后某个phase实例化一个 component,例如在main_phase中调用type_name::type_id::create
- 这种情况会报错;
- build_phase在new之后,main之前执行,因此可以在构造函数里使用type_name::type_id::create;
- 是UVM中约定俗成的还是在build_phase中完成实例化工作。因此,强烈建议仅在build_phase中完成实例化。
- 所有的monitor类应该派生自uvm_monitor;
- 与driver类似,在monitor中也需要有一个 virtual if;
- uvm_monitor在整个仿真中是一直存在的,所以它是一个component,要使用uvm_component_utils宏注册;
- 由于monitor需要时刻收集数据,永不停歇,所以在main_phase中使用while(1)循环来实现这一目的。
- 上级类(结点类)中build_phase阶段主要负责创建组件类,组件类的build_phase可能用于传递接口;
- 具体传递虚拟接口的过程还是需要在外部通过config db set传递进去;
- driver和monitor之间的代码高度相似。本质是因为二者 处理的是同一种协议,在同样一套既定的规则下做着不同的事情。
- 由于二者的这种相似性,UVM中通常将二者封装在一起,成为 一个agent。
- 因此,不同的agent就代表了不同的协议。
- 所有的agent都要派生自uvm_agent类,且其本身是一个component,应该使用uvm_component_utils宏来实现factory注册。
- 在UVM中,通常使用TLM(Transaction Level Modeling)实现component之间transaction级别 的通信。
- connect_phase也是UVM内建的一个phase,它在build_phase执行 完成之后马上执行;
- 但是与build_phase不同的是,它的执行顺序并不是从树根到树叶,而是从树叶到树根
- 先执行driver和 monitor的connect_phase,再执行agent的connect_phase,最后执行env的connect_phase。
- 但是与build_phase不同的是,它的执行顺序并不是从树根到树叶,而是从树叶到树根
- 为什么这里需要一个fifo呢?
- 不能直接把my_monitor中的analysis_port和my_model中的blocking_get_port相连吗?
- 由于 analysis_port是非阻塞性质的,ap.write函数调用完成后马上返回,不会等待数据被接收。
- 假如当write函数调用时, blocking_get_port正在忙于其他事情,而没有准备好接收新的数据时,
- 此时被write函数写入的my_transaction就需要一个暂存的位置,这就是fifo。
- 与monitor中的ap不同的是,不需要对agent中的ap进行实例化,而只需要在agent的connect_phase中将monitor的值赋给它,换句话说,这相当于是一个指向monitor的ap的指针:
uvm_info宏
- 这个宏的功能与Verilog中display语句的功能类似,但是它比display语句更加强大。
- 它有三个参数,第一个参数是字符串,用于把打印的信息归类;第二个参数也是字符串,是具体需要打印的信息;第三个参数则是冗余级别。
- 在验证平台中,某些信息是非常关键的,这样的信息可以设置为UVM_LOW,而有些信息可有可无,就可以设置为 UVM_HIGH,介于两者之间的就是UVM_MEDIUM。
- UVM默认只显示UVM_MEDIUM或者UVM_LOW的信息
-
`uvm_info("my_driver", "data is drived", UVM_LOW) 
- 在uvm_info宏打印的结果中有如下几项:
- UVM_INFO关键字:表明这是一个uvm_info宏打印的结果。除了uvm_info宏外,还有uvm_error宏、uvm_warning宏。
- my_driver.sv(20):指明此条打印信息的来源,其中括号里的数字表示原始的uvm_info打印语句在my_driver.sv中的行号。
- 48500000:表明此条信息的打印时间。 drv:这是driver在UVM树中的路径索引。(这里打印出来的是构造函数中,传向超类的name)
- UVM采用树形结构,对于树中任何一个结点,都有一个与其相应的字符串类型的 路径索引。
- 路径索引可以通过get_full_name函数来获取;
- 把下列代码加入任何UVM树的结点中就可以得知当前结点的路径索引:(这里打印出来的也是构造函数中,传向超类的name)
-
$display("the full name of current component is: %s", get_full_name()); - [my_driver]:方括号中显示的信息即调用uvm_info宏时传递的第一个参数;
- data is drived:表明宏最终打印的信息。
-
`timescale 1ns/1ps
`include "uvm_macros.svh"

import uvm_pkg::*;
`include "my_driver.sv"

module top_tb;

reg clk;
reg rst_n;
reg[7:0] rxd;
reg rx_dv;
wire[7:0] txd;
wire tx_en;

dut my_dut(.clk(clk),
           .rst_n(rst_n),
           .rxd(rxd),
           .rx_dv(rx_dv),
           .txd(txd),
           .tx_en(tx_en));

initial begin
   my_driver drv;
   drv = new("drv", null);
   drv.main_phase(null);
   $finish();
end

initial begin
   clk = 0;
   forever begin
      #100 clk = ~clk;
   end
end

initial begin
   rst_n = 1'b0;
   #1000;
   rst_n = 1'b1;
end

endmodule
宏定义
`uvm_component_utils(class_name)
传递一个类名;
这个宏通向代理类和工厂类;
默认情况下代理类拥有一个代理类类型的悬空句柄,使用静态声明;在仿真开始的0时刻,编译器对部分静态变量初始化,对该句柄创建对象;
同时,引动工厂类创建对象;
创建完两个对象后,代理类对象调用工厂类对象,讲代理类的句柄存入工程类的关联数组中,索引名为class_name的字符串格式;
当外界需要调用该对象时,会通过代理类创建对象,具体过程为,外界通过调用工程类的创建对象方法,工程类则根据传入的类名从关联数组中搜寻存好的代理类,并调用该代理类的创建对象方法;
最终返回需要调用对象的句柄。
task uvm_root::run_test(string test_name="");
virtual task run_test (
 string test_name = "")
将所有组件按注册阶段依次执行。
如果提供了可选的test_name参数,或在命令行中检测到额外参数参数+UVM_TESTNAME=TEST_NAME,则会在阶段执行前创建指定组件。
该测试可能包含新的验证组件或整个测试平台,通过命令行即可选择测试内容与测试平台,无需重新编译。
若全局(包)变量finish_on_completion被设置,阶段执行完成后将调用$finish结束仿真。
使用前提:该类需要通过`uvm_component_utils完成在factory内的注册;
作用:
1.创建指定类名的实例;
2.调用该实例的main_phase方法;
***3.run_test语句本质上例化了以后超脱了top_tb层次结构的实例,建立了一个新的层次结构。
这使得我们无法观测,利用通过传递类名创建的句柄;也无法通过这个句柄去操作其中的成员变量、调用其中的成员方法;
取而代之的交互手段是config_db机制;
task uvm_root::
task uvm_root::run_test(string test_name="");
(string test_name=""); uvm_factory factory= uvm_factory::get(); bit testname_plusarg; int test_name_count; string test_names[$]; string msg; uvm_component uvm_test_top; process phase_runner_proc; // store thread forked below for final cleanup testname_plusarg = 0; // Set up the process that decouples the thread that drops objections from // the process that processes drop/all_dropped objections. Thus, if the // original calling thread (the "dropper") gets killed, it does not affect // drain-time and propagation of the drop up the hierarchy. // Needs to be done in run_test since it needs to be in an // initial block to fork a process. uvm_objection::m_init_objections(); `ifndef UVM_NO_DPI // Retrieve the test names provided on the command line. Command line // overrides the argument. test_name_count = clp.get_arg_values("+UVM_TESTNAME=", test_names); // If at least one, use first in queue. if (test_name_count > 0) begin test_name = test_names[0]; testname_plusarg = 1; end // If multiple, provided the warning giving the number, which one will be // used and the complete list. if (test_name_count > 1) begin string test_list; string sep; for (int i = 0; i < test_names.size(); i++) begin if (i != 0) sep = ", "; test_list = {test_list, sep, test_names[i]}; end uvm_report_warning("MULTTST", $sformatf("Multiple (%0d) +UVM_TESTNAME arguments provided on the command line. '%s' will be used. Provided list: %s.", test_name_count, test_name, test_list), UVM_NONE); end `else // plusarg overrides argument if ($value$plusargs("UVM_TESTNAME=%s", test_name)) begin `uvm_info("NO_DPI_TSTNAME", "UVM_NO_DPI defined--getting UVM_TESTNAME directly, without DPI", UVM_NONE) testname_plusarg = 1; end `endif // if test now defined, create it using common factory if (test_name != "") begin if(m_children.exists("uvm_test_top")) begin uvm_report_fatal("TTINST", "An uvm_test_top already exists via a previous call to run_test", UVM_NONE); #0; // forces shutdown because $finish is forked end $cast(uvm_test_top, factory.create_component_by_name(test_name, "", "uvm_test_top", null)); if (uvm_test_top == null) begin msg = testname_plusarg ? {"command line +UVM_TESTNAME=",test_name} : {"call to run_test(",test_name,")"}; uvm_report_fatal("INVTST", {"Requested test from ",msg, " not found." }, UVM_NONE); end end if (m_children.num() == 0) begin uvm_report_fatal("NOCOMP", {"No components instantiated. You must either instantiate", " at least one component before calling run_test or use", " run_test to do so. To run a test using run_test,", " use +UVM_TESTNAME or supply the test name in", " the argument to run_test(). Exiting simulation."}, UVM_NONE); return; end begin if(test_name=="") uvm_report_info("RNTST", "Running test ...", UVM_LOW); else if (test_name == uvm_test_top.get_type_name()) uvm_report_info("RNTST", {"Running test ",test_name,"..."}, UVM_LOW); else uvm_report_info("RNTST", {"Running test ",uvm_test_top.get_type_name()," (via factory override for test \"",test_name,"\")..."}, UVM_LOW); end // phase runner, isolated from calling process fork begin // spawn the phase runner task phase_runner_proc = process::self(); uvm_phase::m_run_phases(); end join_none #0; // let the phase runner start wait (m_phase_all_done == 1); // clean up after ourselves phase_runner_proc.kill(); report_summarize(); if (finish_on_completion) $finish; endtask
main_phase
组成:
1.phase.raise_objection(this);
2.实现业务代码;
3.phase.drop_objection(this);
objection机制
- UVM中通过objection机制来控制验证平台的关闭。
- 阶段图中基于任务的阶段节点提供了一个基于uvm_objection的界面,用于延长阶段的执行时间。
- 所有其他阶段类型不包含异议,如果用户尝试加注、放弃或get_objection_count,则会报告致命错误。
- 每个phase中,UVM会检查是否有objection被提起(raise_objection):
- 如果有,则等待当前objection被撤销(drop_objection)后结束仿真;
- 如果没有,则立即结束当前的phase。
- 在这个过程中,objection的零延时语句可能在一开始就执行完成;
raise_objection
- virtual function void raise_objection ( uvm_object obj, string description = "", int count = 1 )
- 对结束此阶段提出异议 为组件提供对阶段流的更大控制,以应对非该阶段的隐式反对者的进程。
- raise_objection语句必须在main_phase中第一个消耗仿真时间的语句之前。
drop_objection
- 【撤销对结束当前阶段的异议】该撤销操作应与之前提出的异议对应。
virtual function void drop_objection (
 uvm_object obj, string description = "", int count = 1
)
UVM Resource Database
基本介绍:
- uvm_resource_db类为resource机制提供了便捷的操作接口。
- 在许多情况下,若直接使用uvm_resource_base或uvm_resource#(T)中的接口,创建和设置资源或获取资源等基础操作可能需要多行代码。
- 而uvm_resource_db中的便捷层将这些操作简化为单行代码。
- 若在命令行中指定运行时选项+UVM_RESOURCE_DB_TRACE,系统将显示所有资源数据库的访问记录(包括读写操作)。
uvm_resource_db
- uvm_resource_db#(T)中的所有函数均为静态方法,因此必须使用::操作符调用。例如:
-
uvm_resource_db#(int)::set("A", "*", 17, this);
- 参数值"int"表明该资源类型为uvm_resource#(int),因此资源容器中的对象类型为int。这确保了资源操作的类型安全特性。
UVM Configuration Database——config_db机制——传递虚拟接口virtual interface
基本介绍:
- uvm_config_db类在uvm_resource_db的基础上提供了更便捷的接口,用于简化uvm_component实例的配置操作。
- 若在运行时指定命令行选项+UVM_CONFIG_DB_TRACE,系统将记录并显示所有配置数据库的访问信息(包括读取和写入操作)。
- uvm_config_db#(T)中的所有函数均为静态方法,因此必须使用::操作符进行调用。例如:
-
uvm_config_db#(int)::set(this, "*", "A");
- 参数值"int"表示该配置类型为int属性。
- set和get方法提供的API接口和语义规则与uvm_component中的set/get_config_*系列函数完全一致。
作用:
- 操作脱离了了top_tb层次结构的实例的手段;
- 在config_db机 制中,分为set和get两步操作。
- set操作,读者可以简单地理解成是“寄信”,
- get操作,则相当于是“收信”。
initial begin
    uvm_config_db#(virtual my_if)::set(null, "uvm_test_top", "vif", input_if);
end
get
static function bit get(
    uvm_component cntxt,
    string inst_name,
    string field_name,
    inout T value
)
- 获取 inst_name 中 field_name 的配置值(以组件 cntxt 作为搜索起点)。
- inst_name 是相对于 cntxt 的显式实例名称,
- 如果 cntxt 就是配置对象所应用的实例,
- 则 inst_name 可为空字符串。
- field_name 表示要搜索的特定字段。
cntxt是uvm_config_db配置方法中的一个关键参数,全称为 "context"(上下文),通常指代一个uvm_component类型的组件实例。- 它的作用是为配置操作提供层级搜索的起点,决定了配置项的查找范围和作用域。
-
uvm_config_db#(int)::set(parent_env, "child_comp", "field_name", config_value);
-
cntxt = parent_env:从parent_env开始查找child_comp。 -
inst_name = "child_comp":目标实例的相对路径。
-
- 它的作用是为配置操作提供层级搜索的起点,决定了配置项的查找范围和作用域。
- uvm_component 中的基本 get_config_* 方法映射到此函数如下:
- get_config_int(...) => uvm_config_db#(uvm_bitstream_t)::get(cntxt,...)
- get_config_string(...) => uvm_config_db#(string)::get(cntxt,...)
- get_config_object(...) => uvm_config_db#(uvm_object)::get(cntxt,...)
非官方描述:
uvm_config_db是UVM (Universal Verification Methodology)中用于配置共享机制的一个重要类,它提供了一种在测试环境中不同组件之间传递配置信息的标准方式。
其中get方法是从配置数据库中检索值的关键方法。
static function bit uvm_config_db#(type T=int)::get(
    uvm_component cntxt,
    string inst_name,
    string field_name,
    inout T value
);
if(!uvm_config_db#(virtual my_if)::get(this, "", "vif", vif))
    `uvm_fatal("my_driver", "virtual interface must be set for vif!!!")
this 索引的区域
""表示当前实例
"vif"表示索引字段;
vif是当前实例的成员属性,其由外部(顶层TB,或调用了本组件类的上级类通过uvm_config_db#(virtual my_if)::set)完成对虚拟接口的传入
set
static function void set(
    uvm_component cntxt,
    string inst_name,
    string field_name,
    T value
)
简介:此函数用于在UVM验证环境中创建或更新配置设置。配置信息将存储在UVM配置数据库中,供其他组件获取使用。
功能说明:
该函数用于在指定上下文cntxt中为inst_name实例的field_name字段创建或更新配置项。
配置的完整作用域路径为{cntxt,".",inst_name}。
当cntxt为null时,inst_name需提供完整的配置作用域路径。
配置字段名和目标实例名均支持通配符和正则表达式格式。
文件:src/ch2/section2.2/2.2.4/top_tb.sv
44 initial begin
45     uvm_config_db#(virtual my_if)::set(null, "uvm_test_top", "vif", input_if);
46 end
uvm_config_db#(virtual my_if):- 指定配置数据库存储的类型是
my_if虚拟接口
- 指定配置数据库存储的类型是
::set:- 调用静态set方法将配置存入数据库
- 参数分析:
null: 上下文参数设为null表示全局上下文"uvm_test_top": 目标实例路径,UVM自动创建的默认测试顶层"vif": 配置字段名称,后续可以通过这个名称获取input_if: 要存储的实际接口实例
  static function void set(uvm_component cntxt,
                           string inst_name,
                           string field_name,
                           T value);

    uvm_root top;
    uvm_phase curr_phase;
    uvm_resource#(T) r;
    bit exists;
    string lookup;
    uvm_pool#(string,uvm_resource#(T)) pool;
    string rstate;
    uvm_coreservice_t cs = uvm_coreservice_t::get();

    //take care of random stability during allocation
    process p = process::self();
    if(p != null)
          rstate = p.get_randstate();

    top = cs.get_root();

    curr_phase = top.m_current_phase;

    if(cntxt == null)
      cntxt = top;
    if(inst_name == "")
      inst_name = cntxt.get_full_name();
    else if(cntxt.get_full_name() != "")
      inst_name = {cntxt.get_full_name(), ".", inst_name};

    if(!m_rsc.exists(cntxt)) begin
      m_rsc[cntxt] = new;
    end
    pool = m_rsc[cntxt];

    // Insert the token in the middle to prevent cache
    // oddities like i=foobar,f=xyz and i=foo,f=barxyz.
    // Can't just use '.', because '.' isn't illegal
    // in field names
    lookup = {inst_name, "__M_UVM__", field_name};

    if(!pool.exists(lookup)) begin
       r = new(field_name, inst_name);
       pool.add(lookup, r);
    end
    else begin
      r = pool.get(lookup);
      exists = 1;
    end

    if(curr_phase != null && curr_phase.get_name() == "build")
      r.precedence = uvm_resource_base::default_precedence - (cntxt.get_depth());
    else
      r.precedence = uvm_resource_base::default_precedence;

    r.write(value, cntxt);

    if(exists) begin
      uvm_resource_pool rp = uvm_resource_pool::get();
      rp.set_priority_name(r, uvm_resource_types::PRI_HIGH);
    end
    else begin
      //Doesn't exist yet, so put it in resource db at the head.
      r.set_override();
    end

    //trigger any waiters
    if(m_waiters.exists(field_name)) begin
      m_uvm_waiter w;
      for(int i=0; i<m_waiters[field_name].size(); ++i) begin
        w = m_waiters[field_name].get(i);
        if(uvm_re_match(uvm_glob_to_re(inst_name),w.inst_name) == 0)
           ->w.trigger;
      end
    end

    if(p != null)
        p.set_randstate(rstate);

    if(uvm_config_db_options::is_tracing())
      m_show_msg("CFGDB/SET", "Configuration","set", inst_name, field_name, cntxt, r);
  endfunction
跨进程通信手段
UVM将一些跨进程通信手段封装成了更易用的类。
uvm_analysis_port(UVM中发送数据的手段之一)
uvm_analysis_port是一个参数化的类,其参数就是这个analysis_port需要传递的数据的类型
声明了ap后,需要在monitor的build_phase中将其实例化:
  virtual function void build_phase(uvm_phase phase);
      ap = new("ap", this);
  endfunction
在main_phase中,当收集完一个transaction后,需要将其写入ap中:
task my_monitor::main_phase(uvm_phase phase);
    my_transaction tr;
    while(1) begin
        tr = new("tr");
        collect_one_pkt(tr);
        ap.write(tr);
    end
endtask
write是uvm_analysis_port的一个内建函数。
uvm_blocking_get_port(UVM中接收数据的手段之一)
uvm_blocking_get_port #(my_transaction) port;
    port.get(tr);
uvm_analysis_port和uvm_blocking_get_port 通过uvm_tlm_analysis_fifo连接;
uvm_analysis_port和uvm_blocking_get_port 类 都提供了connect方法,他们需要使用uvm_tlm_analysis_fifo类提供的成员进行连接;
例如:
uvm_tlm_analysis_fifo #(my_transaction) agt_mdl_fifo;
uvm_blocking_get_port #(my_transaction) port;
uvm_analysis_port #(my_transaction) ap;

function void my_model::build_phase(uvm_phase phase);
    super.build_phase(phase);
    port = new("port", this);
    ap = new("ap", this);
endfunction


agt_mdl_fifo = new("agt_mdl_fifo", this);

function void my_env::connect_phase(uvm_phase phase);
    super.connect_phase(phase);
    i_agt.ap.connect(agt_mdl_fifo.analysis_export);
    mdl.port.connect(agt_mdl_fifo.blocking_get_export);
 endfunction
field_automation机制
用uvm_field系列宏
用于注册transaction类中的字段;
uvm_field系列宏随着transaction成员变量的不同而不同;
`ifndef MY_TRANSACTION__SV
`define MY_TRANSACTION__SV

class my_transaction extends uvm_sequence_item;

   rand bit[47:0] dmac;
   rand bit[47:0] smac;
   rand bit[15:0] ether_type;
   rand byte      pload[];
   rand bit[31:0] crc;

   constraint pload_cons{
      pload.size >= 46;
      pload.size <= 1500;
   }

   function bit[31:0] calc_crc();
      return 32'h0;
   endfunction

   function void post_randomize();
      crc = calc_crc;
   endfunction

   `uvm_object_utils_begin(my_transaction)
      `uvm_field_int(dmac, UVM_ALL_ON)
      `uvm_field_int(smac, UVM_ALL_ON)
      `uvm_field_int(ether_type, UVM_ALL_ON)
      `uvm_field_array_int(pload, UVM_ALL_ON)
      `uvm_field_int(crc, UVM_ALL_ON)
   `uvm_object_utils_end

   function new(string name = "my_transaction");
      super.new();
   endfunction

endclass
`endif
当使用上述宏注册之后,可以直接调用copy、compare、print等函数,而无需自己定义。这极大地简化了验证平台的搭建,提高了效率。

此处的unpack其实是反序化过程,这个过程要求接收端字段已经准备好空间;
所以必须new了才能完成字段还原。
uvm_do
①创建一个my_transaction的实例m_trans;
②将其随机化;
③最终将其送给 sequencer。

sequence具有重传机制。

 浙公网安备 33010602011771号