SpringCloud(CI/CD-Nexus+Gitea+Jenkins)
SpringCloud(CI/CD-Nexus+Gitea+Jenkins)
I talked about SpringCloud-Netflix earlier, and at the same time, I built a set of SpringCloud-Netflix framework, which includes 7 microservices, which is still without any business support. Obviously, as the number of microservices increases. It's never a good idea to package the jar, copy the jar, and publish the jar (nohup java -jar ${APP_NAME} > ***.log 2>&1 &) to the server as you would traditionally. In this article, I will use [Nexus (maven private server) + Gitea (code hosting tool) + Jenkins (continuous integration)] for my microservice project, first talk about their construction, and then combine our code to finally complete the automated deployment.
set up a Nexus private server environment
Since it is a project composed of multiple microservices, and there may be multiple project teams that depend on a JAR at the same time, we need to manage the JAR in a unified place. So here we use [nexus] to build a central warehouse.
Setup steps:
- Just like we did with Jenkins, make sure both Maven and JDK are installed
- Download link:【https:sonatype-download.global.ssl.fastly.net/repository/downloads-prod-group/3/nexus-3.37.3-02-unix.tar.gz】,The download speed is very slow, you can find me to get it if you need to
- unpack:tar -zxvf nexus-3.37.3-02-unix.tar.gz
- Start: Go to the ${NEXUS_HOME}\bin directory and run the command【./nexus start】
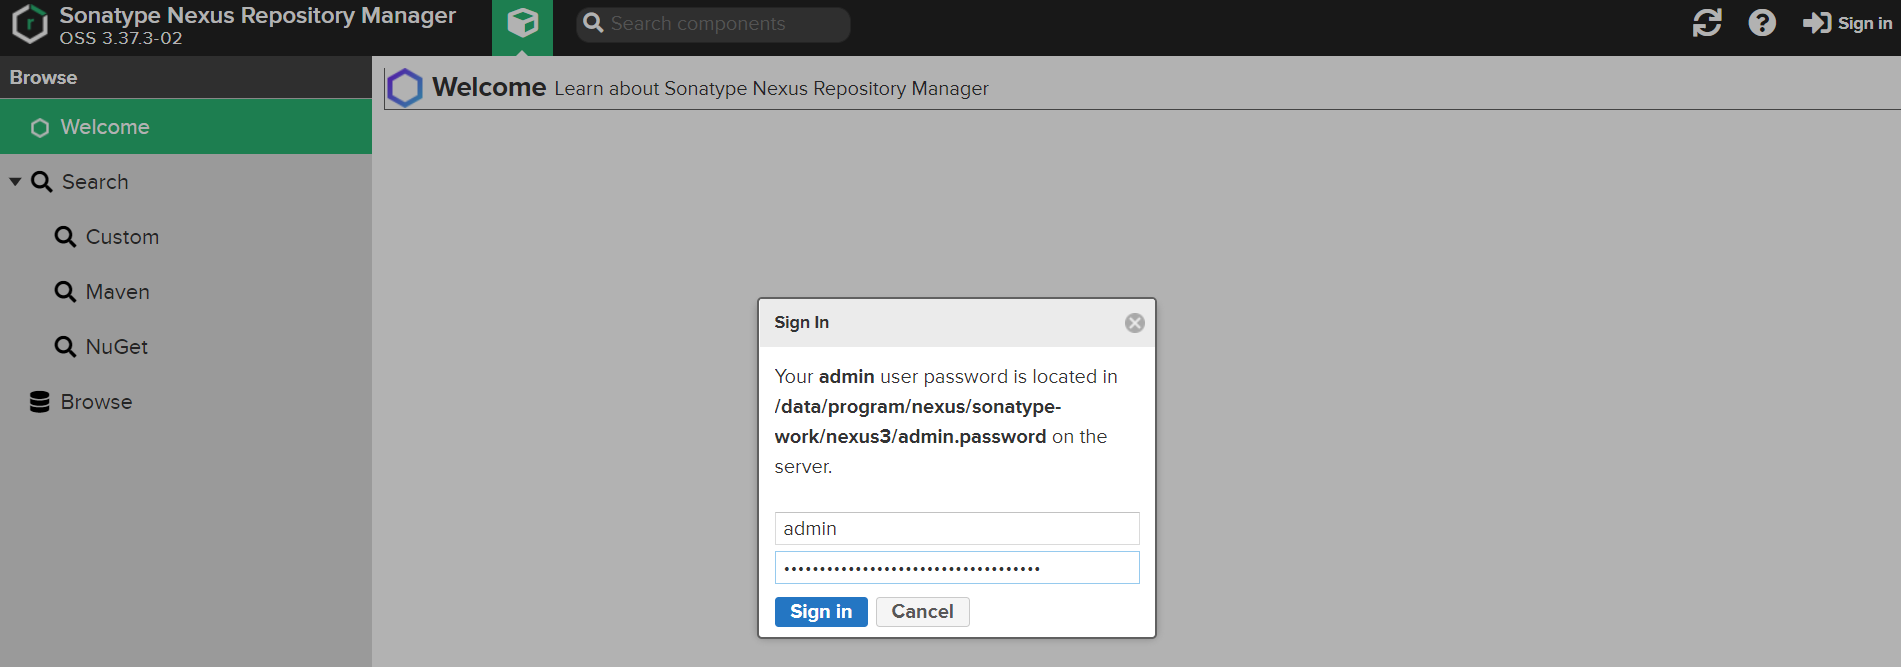
input http:192.168.43.3:8081/ I am a local virtual machine, and I write my own IP, but the default port is 8081
- The default username for login is admin, and the password is in/data/program/sonatypework/nexus3/admin.password file
![]()
tips:
- If you want to configure the JVM parameters for the nexus application to be launched locally, you can do sonexus.vmoptions
- If you want to change the port number of your nexus, you can do so nexus-default.properties,The default is 8081
- His log is in sonatype-work/nexus3/log, after starting, go to check if nexus is started,When I started it, because the root disk of Linux was close to saturation, nexus required a minimum of 4096MB of disk space, and then I had to reexpand the disk and query the disk size command【df -h】
Function introduction:
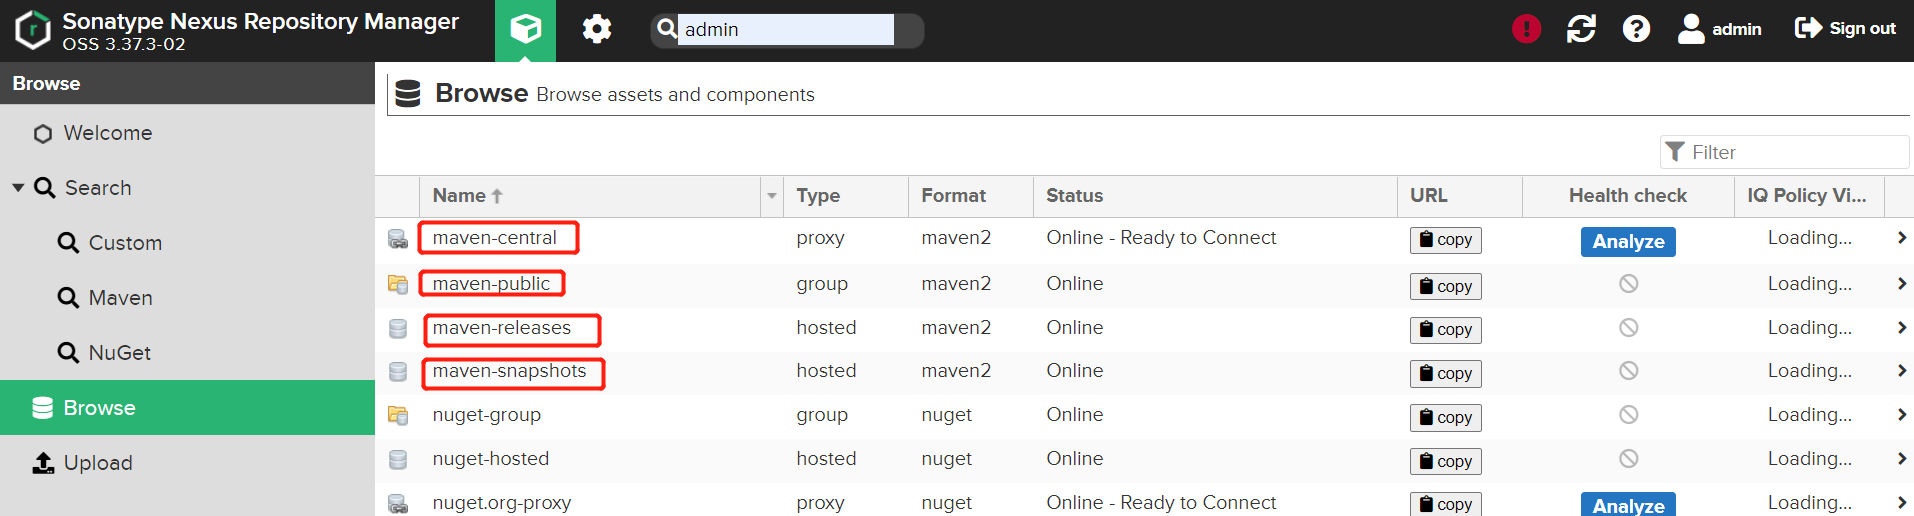
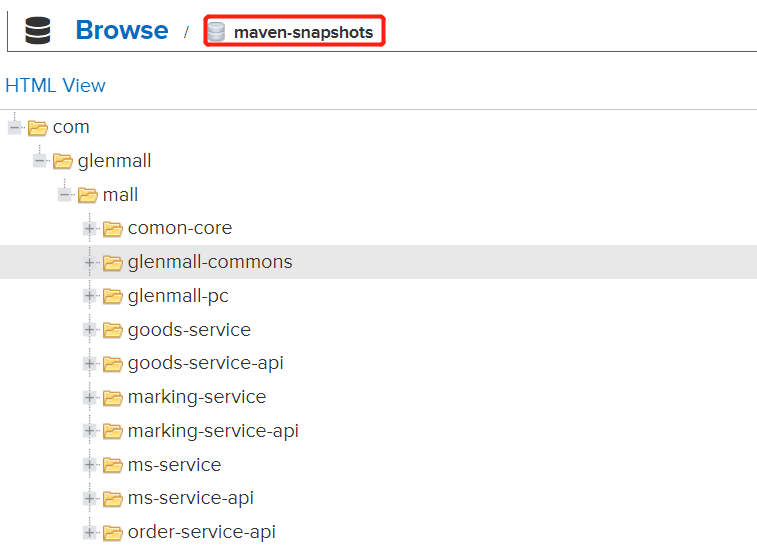
Go to the Browse menu of the Nexus console, and you can see four types of repositories:
- maven-central: maven central repository, default from https:repo1.maven.org/maven2/ pull the jar
- maven-releases: Private library releasejar
- maven-snapshots:Private database snapshot (debug version)jar
- maven-public: Warehouse grouping, the above three repositories are grouped together to provide services to the outside world, and are used in the local Maven infrastructure configuration settings.xml
Nexus is set up as a system service
- revise ${NEXUS_HOME}\bin\nexusthis script,increase【INSTALL4J_JAVA_HOME_OVERRIDE=/data/program/jdk1.8.0_241】
- Set up soft links ln -s /data/program/nexus-3.37.0-01/bin/nexus /etc/init.d/nexus
- Use chkconfig to configure system services:
- cd /etc/init.d sudo chkconfig --add nexus #Add the Nexus service sudo chkconfig --levels 345 nexus on #Set Auto-Start to be enabled
- Start and stop services
- sudo service nexus start #Turn on the service service nexus status #View the status of your service

Set up the Gitea environment
[Normal version]: First of all, you must have a git environment, which I already have on my virtual machine, so I won't build it here. Just follow the official documentation( https://docs.gitea.io/zh-cn/install-from-binary/)
【Setting up system services】:
- Create a Git user concentrate:git It needs to be put in :/bin/git ,And a soft connection needs to be created【 ln -s /usr/local/git/bin/git /bin/git 】
![]() View Codesudo useradd \ --system \ --shell /bin/bash \ --comment 'Git Version Control' \ --create-home \ --home /home/git \ git
View Codesudo useradd \ --system \ --shell /bin/bash \ --comment 'Git Version Control' \ --create-home \ --home /home/git \ git- Download the binary【wget -O gitea https://dl.gitea.io/gitea/1.15.7/gitea-1.15.7-linux-amd64】
- Move the downloaded file to/usr/local/bindirectory(Official advice,Because that's what we're writing in our gitea.service, and we're going to assign permissions to this path as well.)
- 【sudo mv /data/program/gitea /usr/local/bin】
- Make the binaries executable【chmod +x /usr/local/bin/gitea】
- Follow the command to create the necessary directories and set permissions
![]() View Code
View Codesudo mkdir -p /var/lib/gitea/{custom,data,indexers,public,log} sudo mkdir -p /var/lib/gitea/{custom,data,indexers,public,log} sudo chown git: /var/lib/gitea/{data,indexers,custom,public,log} sudo chmod 750 /var/lib/gitea/{data,indexers,log} sudo mkdir /etc/gitea sudo chown root:git /etc/gitea sudo chmod 770 /etc/gitea
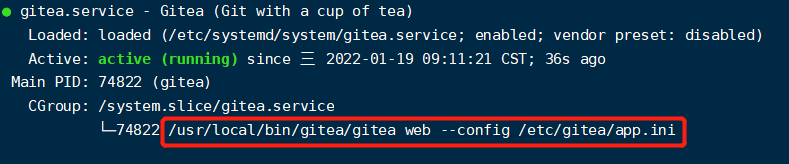
- Create a gitea.service file in /etc/systemd/system/ with the following contents:
![]() View Code[Unit] Description=Gitea (Git with a cup of tea) After=syslog.target After=network.target [Service] RestartSec=2s Type=simple User=git Group=git WorkingDirectory=/var/lib/gitea/ ExecStart=/usr/local/bin/gitea/gitea web --config /etc/gitea/app.ini Restart=always Environment=USER=git HOME=/home/git GITEA_WORK_DIR=/var/lib/gitea [Install] WantedBy=multi-user.target
View Code[Unit] Description=Gitea (Git with a cup of tea) After=syslog.target After=network.target [Service] RestartSec=2s Type=simple User=git Group=git WorkingDirectory=/var/lib/gitea/ ExecStart=/usr/local/bin/gitea/gitea web --config /etc/gitea/app.ini Restart=always Environment=USER=git HOME=/home/git GITEA_WORK_DIR=/var/lib/gitea [Install] WantedBy=multi-user.target
- Set up auto-start
- systemctl enable
- gitea systemctl start gitea
- jenkins It's actually a war.,Download it and we start it with a command (Baidu by yourself),We have some content about it.Talked about it before,I won't go into detail here,
- tips:
- After the first one enters the address, it will ask you to fill in the server address, etc., which is best filled in here. If you don't fill it in, you can modify it by modifying the app.ini file (if you don't change this, the project we created will be SSH or http address localhost, so that others can't access it!! )。 When we start gitea, the file address will be printed. Please see the related configurations 【https://docs.gitea.io/zh-cn/config-cheat-sheet/#server-server】
![]()


A private server is configured in the project
In the Maven Settings file, write the server address and port of our nexus, as well as the relevant configuration
![]() View Code
View Code<mirrors> <mirror> <id>nexus</id> <mirrorOf>maven-public</mirrorOf> <url>http://192.168.43.3:8081/repository/maven-public/</url> </mirror> </mirrors> <profiles> <profile> <id>nexusRep</id> <repositories> <repository> <id>nexus</id> <url>http://192.168.43.3:8081/repository/maven-public/</url> <layout>default</layout> <releases> <enabled>true</enabled> <updatePolicy>always</updatePolicy> </releases> </repository> </repositories> <pluginRepositories> <pluginRepository> <!--The address of the plug-in--> <id>nexus</id> <url>http://192.168.43.3:8081/repository/maven-public/</url> <snapshots> <enabled>true</enabled> </snapshots> <releases> <enabled>true</enabled> </releases> </pluginRepository> </pluginRepositories> </profile> </profiles> <activeProfiles> <activeProfile>nexusRep</activeProfile> </activeProfiles>Write the address of our nexus repository in the springCloud parent project
![]() View Code
View Code<distributionManagement> <snapshotRepository> <id>snapshots</id> <name>Nexus Snapshot Repository</name> <url>http://192.168.43.3:8081/repository/maven-snapshots/</url> </snapshotRepository> <repository> <id>releases</id> <name>Nexus Release Repository</name> <url>http://192.168.43.3:8081/repository/maven-releases/</url> </repository> </distributionManagement>After restarting Idea, all our JAR will be synchronized to the central repository on our Nexus, and of course we can configure the Aliyun repository by ourselves。
note:When we deploy at this time, we may have an error like [Return code is: 401, ReasonPhrase: Unauthorized.], this is because we have permissions, we need to maintain the password and username of the nexus in the servers tag in the setting.xml in maven,And the ID in the pom needs to be the same as the ID of the account and password in our Maven!
![]() View Code
View Code<server> <id>releases</id> <username>admin</username> <password>123456</password> </server> <server> <id>snapshots</id> <username>admin</username> <password>123456</password> </server>Then we use Maven for Deploy,It was found that these jars were published to the SNAPSHOT on the nexus,But there is no one in the release, this is because we write everything in the pom and in the version
<version>0.0.1-SNAPSHOT</version>
Configure environment variables for Jenkins
In Jenkins' [System Administration]中的In Global Tool Configuration, configure Maven, JDK, and Git
In Plugin Management in System Configuration, install gitea, Git Parameter, Publish Over SSH, and Maven Integration
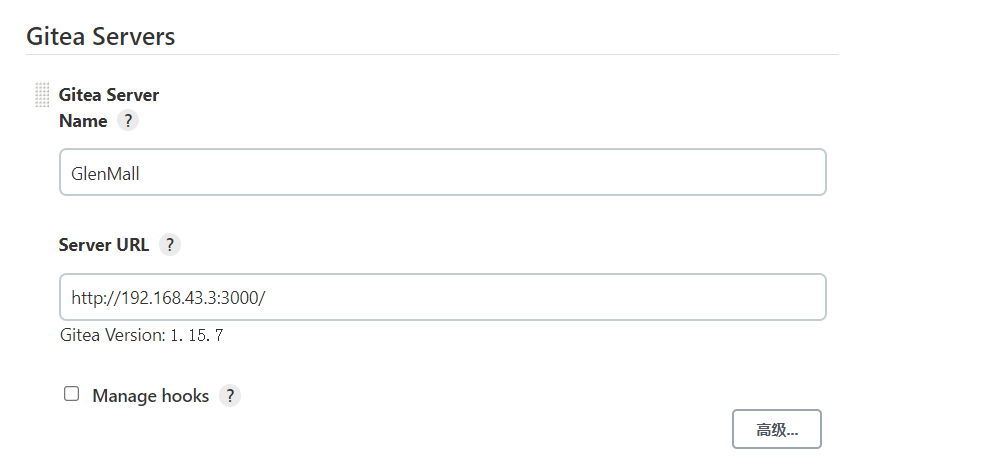
Configure the address of gitea in the global configuration
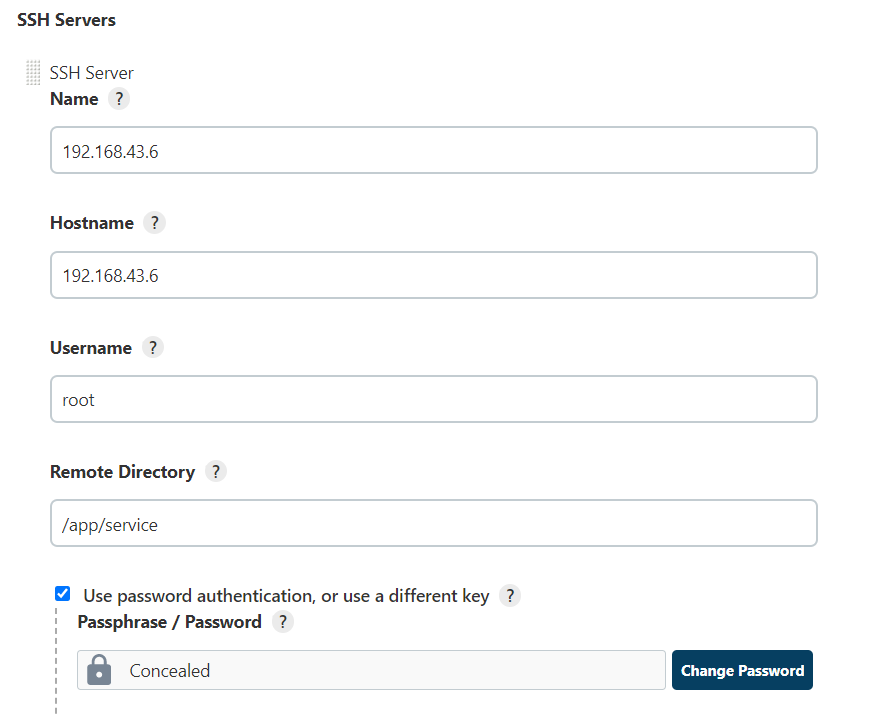
and configure the address of the publish target server


Build the project
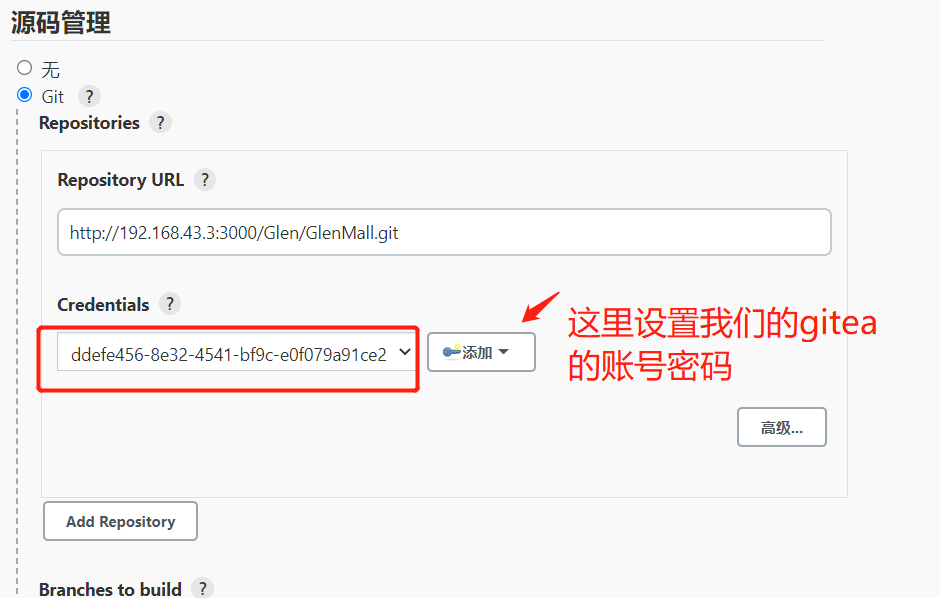
Create a Maven project and fill in the address of the project in our Gitea, as well as the Gitea account and password
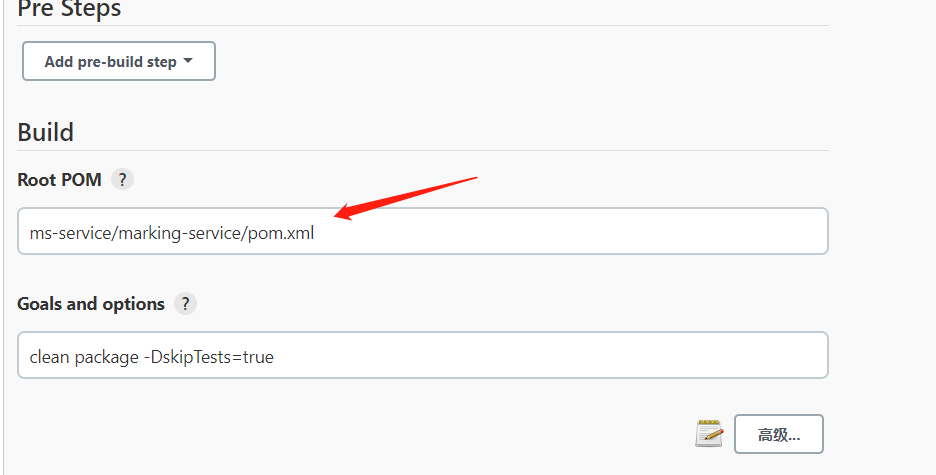
Specify the pom we need to package, and run the maven command to clean, package, and skip the project, and the root pom here comes from the project in the Jenkins working directory
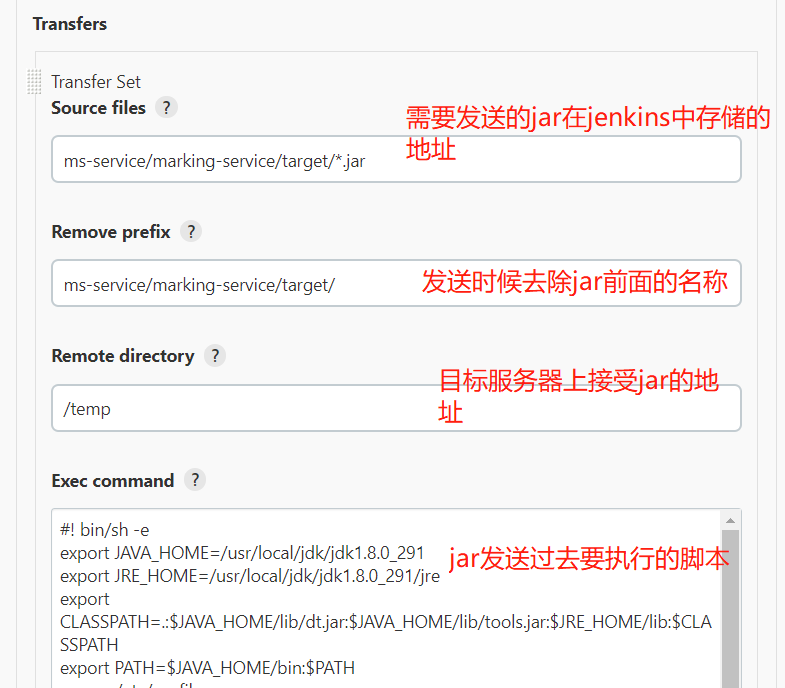
Configure the destination server address and directory that needs to be received, and we need to write the script that needs to be executed
【 jenkins on the execution script】Note that I used the name of the microservice as the name of the jar directly in the script, because I wrote the name of the microservice in the finalName tag in the pom in the <span style="color: #ff0000;" >project in the project
- Stop the project
- Back up old files
- Transfer the transferred JA to a directory that is with the execution script
- Execute the startup script
- Delete the backup file that has been backed up more than 5 times
![]() View Code#! bin/sh -e export JAVA_HOME=/usr/local/jdk/jdk1.8.0_291 export JRE_HOME=/usr/local/jdk/jdk1.8.0_291/jre export CLASSPATH=.:$JAVA_HOME/lib/dt.jar:$JAVA_HOME/lib/tools.jar:$JRE_HOME/lib:$CLASSPATH export PATH=$JAVA_HOME/bin:$PATH source /etc/profile # define property JAR_PATH='/app/service/marking-service' TEMP_PATH='/app/service/temp' BACKUP_PATH='/app/service/backup' JAR_NAME=marking-service.jar FILE_NAME=marking-service # stop target service cd ${JAR_PATH} sh run-marking-service.sh stop sleep 2 rm -rf $FILE_NAME.log # backup old jar if there is not the path then create a path BACKUP_DATE=$(date +%Y%m%d_%H%M) if [ ! -d $JAR_PATH/backup/$FILE_NAME ];then mkdir -p $JAR_PATH/backup/$FILE_NAME fi # enter into the path if there is a jar then move the jar to back path to backup cd ${JAR_PATH} pwd if [ -f $JAR_NAME ];then mv -f ./$JAR_NAME ./backup/$FILE_NAME/$JAR_NAME$BACKUP_DATE sleep 1 fi # start jar BUILD_ID=dontKillMe cd ${TEMP_PATH} mv -f $JAR_NAME $JAR_PATH cd ${JAR_PATH} # run the script to restart sh run-marking-service.sh restart # clear old backup cd ${JAR_PATH}/backup/$FILE_NAME ls -lt|awk 'NR>5{print $NF}' |xargs rm -rf ps -ef|grep java echo "=============deploy success========" #Enter first/app/service/marking-service #Execute the sh file and sleep for 2s while removing marking-service.log file #Back up old files if they don't exist/app/service/marking-service/backup/marking-service, create a file #Enter to/app/service/marking-service,If it exists marking-service.jar,then transfer the file to./backup/marking-service/marking-service.jar$BACKUP_DATE中 #Enter to/app/service/temp中, marking-service.jar Transfer to/app/service/marking-service中 #Enter to/app/service/marking-service中, #Execute the startup method #Enter to/app/service/marking-service/backup/marking-service, delete the backup file #Print the java jar
View Code#! bin/sh -e export JAVA_HOME=/usr/local/jdk/jdk1.8.0_291 export JRE_HOME=/usr/local/jdk/jdk1.8.0_291/jre export CLASSPATH=.:$JAVA_HOME/lib/dt.jar:$JAVA_HOME/lib/tools.jar:$JRE_HOME/lib:$CLASSPATH export PATH=$JAVA_HOME/bin:$PATH source /etc/profile # define property JAR_PATH='/app/service/marking-service' TEMP_PATH='/app/service/temp' BACKUP_PATH='/app/service/backup' JAR_NAME=marking-service.jar FILE_NAME=marking-service # stop target service cd ${JAR_PATH} sh run-marking-service.sh stop sleep 2 rm -rf $FILE_NAME.log # backup old jar if there is not the path then create a path BACKUP_DATE=$(date +%Y%m%d_%H%M) if [ ! -d $JAR_PATH/backup/$FILE_NAME ];then mkdir -p $JAR_PATH/backup/$FILE_NAME fi # enter into the path if there is a jar then move the jar to back path to backup cd ${JAR_PATH} pwd if [ -f $JAR_NAME ];then mv -f ./$JAR_NAME ./backup/$FILE_NAME/$JAR_NAME$BACKUP_DATE sleep 1 fi # start jar BUILD_ID=dontKillMe cd ${TEMP_PATH} mv -f $JAR_NAME $JAR_PATH cd ${JAR_PATH} # run the script to restart sh run-marking-service.sh restart # clear old backup cd ${JAR_PATH}/backup/$FILE_NAME ls -lt|awk 'NR>5{print $NF}' |xargs rm -rf ps -ef|grep java echo "=============deploy success========" #Enter first/app/service/marking-service #Execute the sh file and sleep for 2s while removing marking-service.log file #Back up old files if they don't exist/app/service/marking-service/backup/marking-service, create a file #Enter to/app/service/marking-service,If it exists marking-service.jar,then transfer the file to./backup/marking-service/marking-service.jar$BACKUP_DATE中 #Enter to/app/service/temp中, marking-service.jar Transfer to/app/service/marking-service中 #Enter to/app/service/marking-service中, #Execute the startup method #Enter to/app/service/marking-service/backup/marking-service, delete the backup file #Print the java jarThe execution script of the target server
![]() View Code# Indicates the current script adoption/bin path to interpret the execution of the bash program #!/bin/bash # The JAR package that is executed APP_NAME=marking-service.jar usage() { echo "Execute the action command [start|stop|restart|status]" exit 1 } #Determine whether the current application exists if_exist() { pid=`ps -ef|grep $APP_NAME|grep -v grep|awk '{print $2}'` #Check whether the process is empty if [ -z "${pid}" ]; then return 1 else return 0 fi } #initiate start() { #Determine whether to start if_exist #It's already started if [ $? -eq 0 ]; then #打印 echo "${APP_NAME} already running . pid=${pid}" else #进行启动 nohup java -jar ${APP_NAME} > marking-service.log 2>&1 & #启动后的pid npid=`ps -ef|grep $APP_NAME|grep -v grep|awk '{print $2}'` #打印 echo "start ${APP_NAME} success, pid=${npid}" fi } #停止 stop() { if_exist #如果存在 if [ $? -eq 0 ]; then #停止 kill -9 $pid #打印 echo "stop $pid success". else #打印 echo "${APP_NAME} is not running" fi } #查询状态 status() { if_exist if [ $? -eq 0 ]; then echo "${APP_NAME} is running. pid is ${pid}" else echo "${APP_NAME} is not running " fi } #重启 restart() { stop #休眠5s sleep 5 start } case "$1" in "start") start ;; "stop") stop ;; "status") status ;; "restart") restart ;; *) #prompt usage ;; esac
View Code# Indicates the current script adoption/bin path to interpret the execution of the bash program #!/bin/bash # The JAR package that is executed APP_NAME=marking-service.jar usage() { echo "Execute the action command [start|stop|restart|status]" exit 1 } #Determine whether the current application exists if_exist() { pid=`ps -ef|grep $APP_NAME|grep -v grep|awk '{print $2}'` #Check whether the process is empty if [ -z "${pid}" ]; then return 1 else return 0 fi } #initiate start() { #Determine whether to start if_exist #It's already started if [ $? -eq 0 ]; then #打印 echo "${APP_NAME} already running . pid=${pid}" else #进行启动 nohup java -jar ${APP_NAME} > marking-service.log 2>&1 & #启动后的pid npid=`ps -ef|grep $APP_NAME|grep -v grep|awk '{print $2}'` #打印 echo "start ${APP_NAME} success, pid=${npid}" fi } #停止 stop() { if_exist #如果存在 if [ $? -eq 0 ]; then #停止 kill -9 $pid #打印 echo "stop $pid success". else #打印 echo "${APP_NAME} is not running" fi } #查询状态 status() { if_exist if [ $? -eq 0 ]; then echo "${APP_NAME} is running. pid is ${pid}" else echo "${APP_NAME} is not running " fi } #重启 restart() { stop #休眠5s sleep 5 start } case "$1" in "start") start ;; "stop") stop ;; "status") status ;; "restart") restart ;; *) #prompt usage ;; esacto build
The overall process
- Pull the code from our gitea
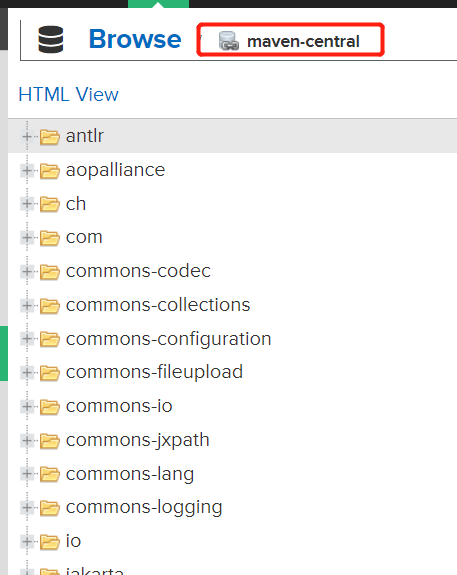
- Start pulling the jar on the nexus
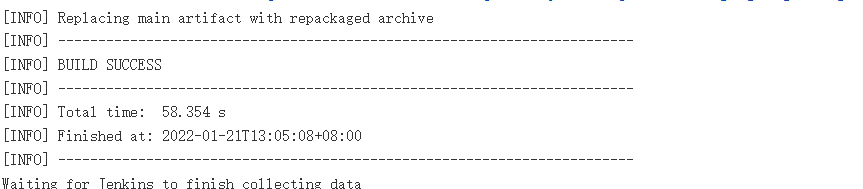
- mavenThe end of packing
- Publish the jar to the destination server
- The target server can already see the jar
![]()
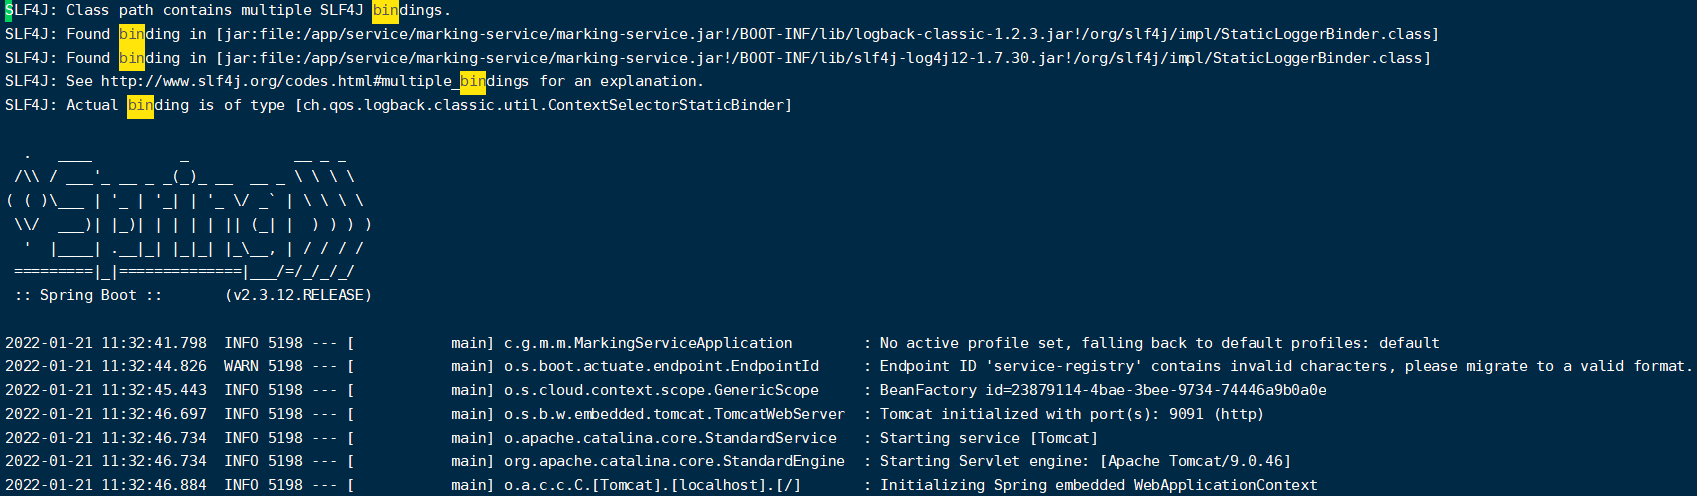
And through the log check and cut the project to start and complete by itself


The solution is automatically built when the project is pushed to Gitea
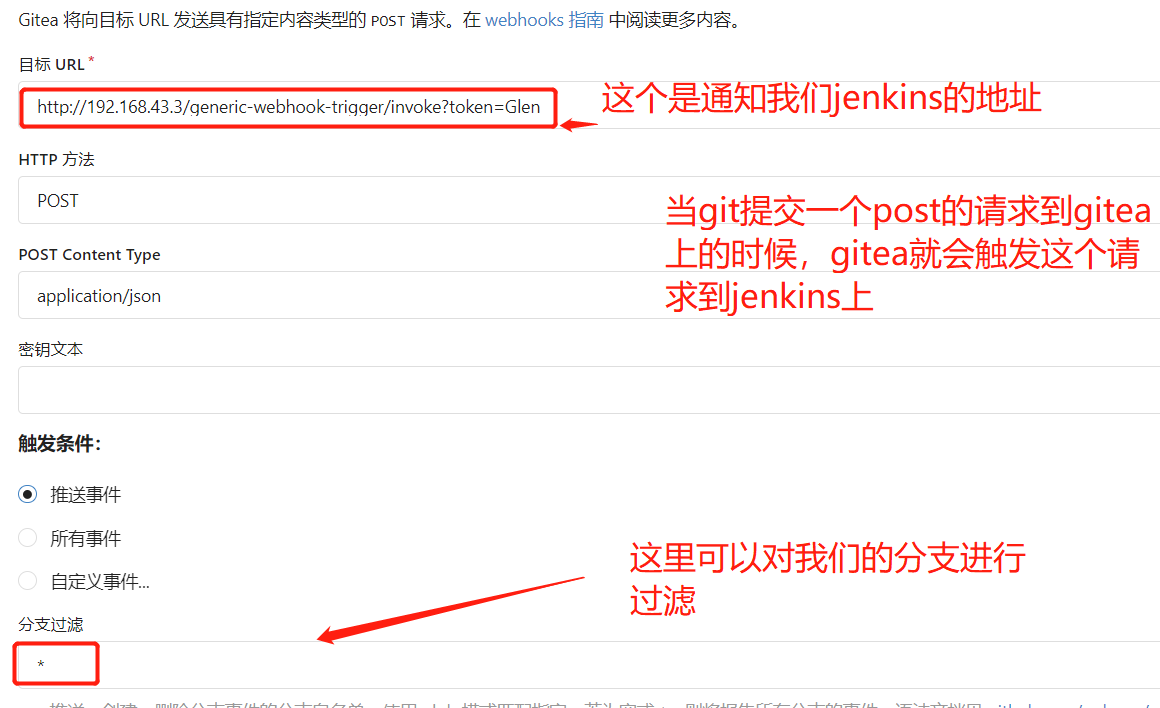
Sometimes we want to build a branch automatically when it's released, so we can use webhooks to handle it.
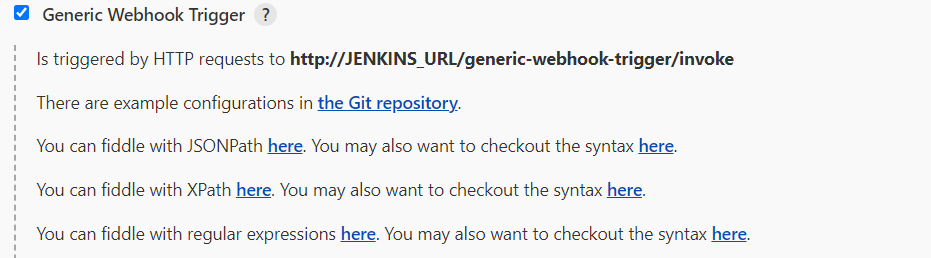
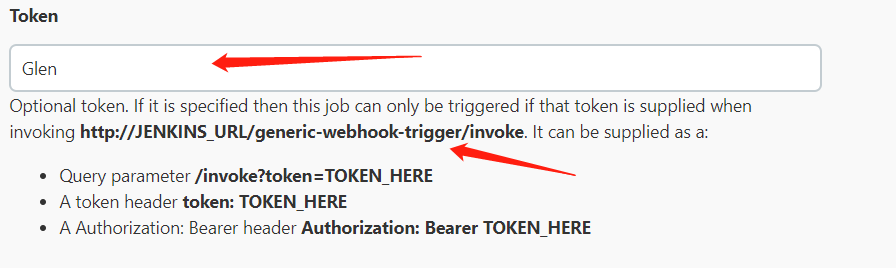
InstallationGeneric Webhook Trigger 到 jenkins 中
Select the build trigger in the project configuration and fill in our token, and he will generate an address for us, which we need to fill in in our gitea
At this point we submit a code to Gitea, note that we don't have any build tasks on Jenkins at this time!!
giteaWe already have our code on
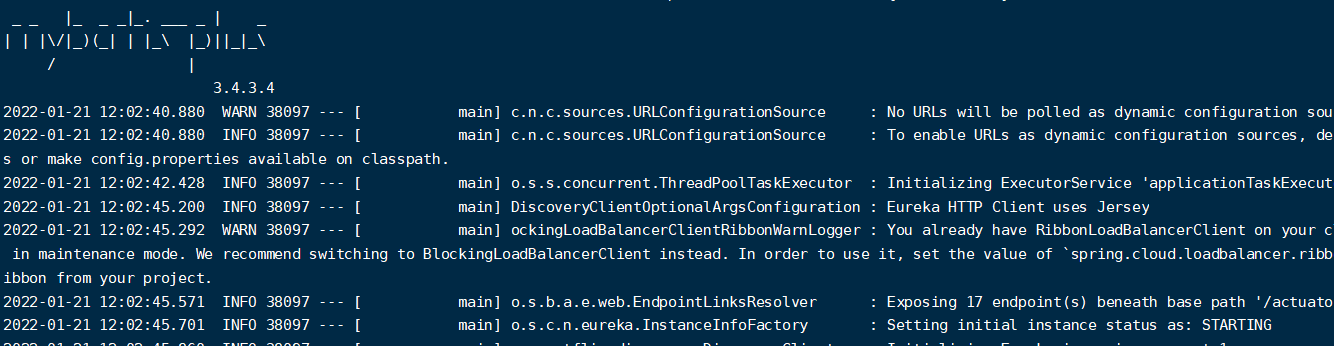
JenkinsThe project is being built
giteashows that the build was successful
The code has also been passed to the target server, and the startup is successful
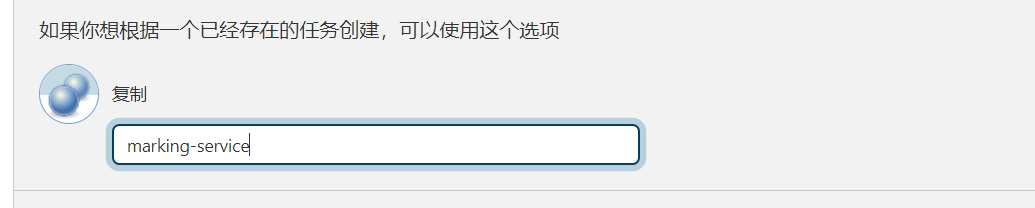
We can build the modules in this way, and when we create a new build project, Jenkins provides a copy function, which saves us a lot of time
At this point, the automated deployment of nexus+Gitea+Jenkins has been completed!


 浙公网安备 33010602011771号