

activeMQ(一、基础练习)
JMS
在学习activeMQ之前,我们首先要了解JMS。Java消息服务(Java Message Service)应用程序接口是一个Java平台中关于面向消息中间件(MOM)的API,用于在两个应用程序之间,或分布式系统中发送消息,进行异步通信。Java消息服务是一个与具体平台无关的API,绝大多数MOM提供商都对JMS提供支持。
provider:生产者
consumer:消费者
消息模式:在客户端之间传递消息的模式,JMS主要是队列模式和主题模式。
队列模式<queue>:点对点的消息模型 PTP
(1)客户端包括生产者和消费者。
(2)队列中的一个消息只能被一个消费者使用。
(3)消费者可以随时取消息。
主题模式<topic>:发布/订阅消息模型 PUB/SUB
(1)客户端包括发布者和订阅者。
(2)主题中的消息可以被所有订阅者消费。
(3)消费者不能消费订阅之前发送的消息。
ConnectionFactory:连接工厂,JMS用来创建连接
Connection:JMS consumer到provider的连接
Destionation:消息目的地
Session:会话,发送或接收消息的线程
activeMQ
启动
window
执行 D:\apache-activemq-5.15.9\bin\win64\activemq.bat
linux
cd apache-activemq-5.15.9/bin/linux-x86-64/
./activemq start
注意选择操作系统对应版本
启动成功后,因为activeMQ集成了jetty容器,可以通过浏览器登录管理页面查看,地址为:http://localhost:8161/admin/,账号密码默认为admin.(这里有个小坑,我在搜狗浏览器用急速模式访问这个地址报401,用兼容模式访问才弹出了登录框)。
jetty的发布端口我们可以通过配置文件来更改,在conf/jetty.xml文件中

conf/activemq.xml中有针对activemq的相关配置,其中TCP协议连接的配置如下:默认为61616


简单DEMO实现
本地项目使用的springboot2.1.6,activemq相关POOM文件如下:
<dependency>
            <groupId>org.springframework.boot</groupId>
            <artifactId>spring-boot-starter-activemq</artifactId>
</dependency>
生产者实现


package com.example.activemqtest.mq;

import org.apache.activemq.ActiveMQConnectionFactory;

import javax.jms.*;

public class Sender {

    public static void main(String[] args) throws Exception {

        ConnectionFactory connectionFactory = new ActiveMQConnectionFactory(
                ActiveMQConnectionFactory.DEFAULT_USER,ActiveMQConnectionFactory.DEFAULT_PASSWORD
        ,"tcp://localhost:61616");
        Connection connection = connectionFactory.createConnection();
        connection.start();
        Session session = connection.createSession(Boolean.FALSE,Session.AUTO_ACKNOWLEDGE);
        Destination destination = session.createQueue("queue1");
        MessageProducer messageProducer = session.createProducer(destination);
        messageProducer.setDeliveryMode(DeliveryMode.NON_PERSISTENT);
        for(int i = 0;i < 5; i++){
            TextMessage textMessage = session.createTextMessage();
            textMessage.setText("消息内容:"+ i);
            messageProducer.send(textMessage);
        }
        if(connection !=null){
            connection.close();
        }
    }
}
消费者实现
package com.example.activemqtest.mq;

import org.apache.activemq.ActiveMQConnectionFactory;

import javax.jms.*;

public class Receiver {
    public static void main(String[] args) throws JMSException {
        ConnectionFactory connectionFactory = new ActiveMQConnectionFactory(
                ActiveMQConnectionFactory.DEFAULT_USER,ActiveMQConnectionFactory.DEFAULT_PASSWORD
                ,"tcp://localhost:61616");
        Connection connection = connectionFactory.createConnection();
        connection.start();
        Session session = connection.createSession(Boolean.FALSE,Session.AUTO_ACKNOWLEDGE);
        Destination destination = session.createQueue("queue1");
        MessageConsumer messageConsumer = session.createConsumer(destination);
        while (true){
            TextMessage message = (TextMessage) messageConsumer.receive();
            if(message == null) break;
            System.out.println("收到内容:" + message.getText());
        }
        if(connection !=null){
            connection.close();
        }
    }
}
activeMQ安全认证
更改activemq.xml配置,在123行后:
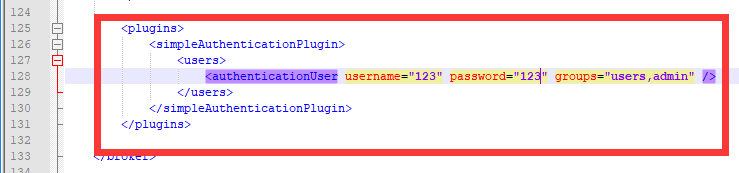
<plugins>
            <simpleAuthenticationPlugin>
                <users>
                    <authenticationUser username="123" password="123" groups="users,admin" />
                </users>
            </simpleAuthenticationPlugin>
        </plugins>
更改完重启MQ,这时再发送消息则会报错,我们需将程序中的账号,密码改为配置的账号、密码。
这里还有一个问题,我发现改为配置之后,我访问admin管理页面会报错,我们这里再修改配置文件,注意这里是用户名:密码,角色
jetty-realm.properties

credentials.properties
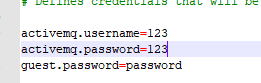
改完后,重启MQ,我们用123,123登录,就可以正常访问管理页面了。

 浙公网安备 33010602011771号