SpringBoot——Cache使用原理及Redis整合
前言及核心概念介绍
前言
本篇主要介绍SpringBoot2.x 中 Cahe 的原理及几个主要注解,以及整合 Redis 作为缓存的步骤
核心概念
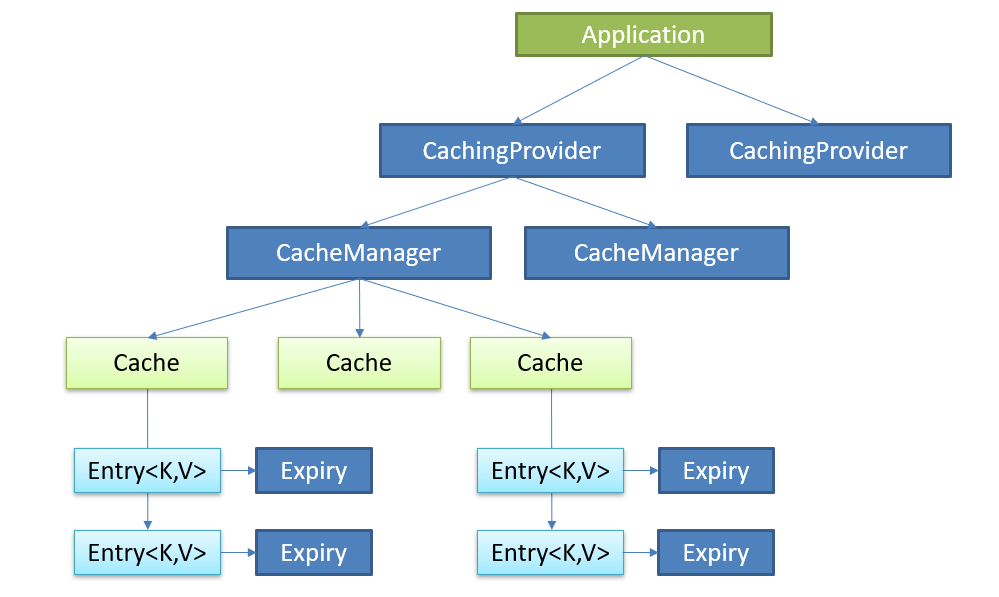
先来看看核心接口的作用及关系图:
CachingProvider 管理并创建CacheManager,一个CachingProvider可以管理多个CacheManager
CacheManager 管理并创建Cache,一个CacheManager管理多个Cache
Cache 结构类似于Map<CacheName,Cache>,每个Cache有唯一的名字
Entry 结构类似于Map<KeyObject,ValueObject>,以键值对的形式储存在Cache中
Expiry Cache中每个条目都有有效期,过期则会被删除或更新
一、SpringBoot中的缓存结构:
要知道SpringBoot是通过XXXAutoConfiguration来向容器中注册组件的
所以只要知道CacheAutoConfiguration注册了哪些组件,我们就能入手进行分析
找到添加的组件
1、首先进入CacheAutoConfiguration
  可以看到其导入了CacheConfigurationImportSelector
  从名字可以看出它是用来导入缓存配置类的

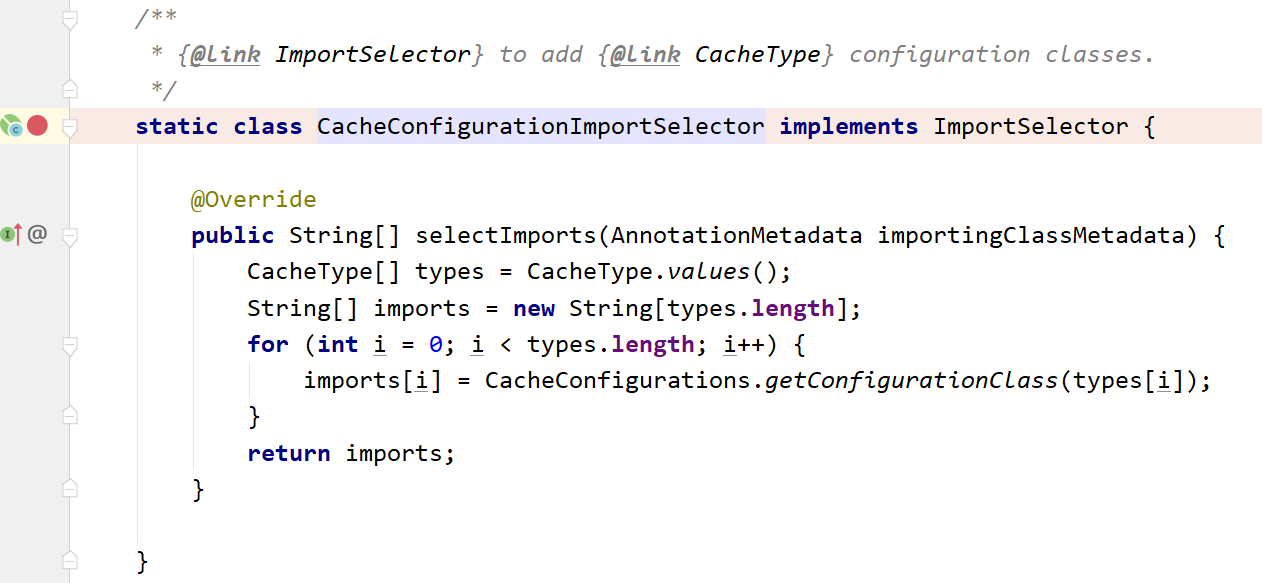
2、进入CacheConfigurationImportSelector
  这是一个静态内部类,只有一个selectImports方法,方法的最后将字符串数组返回
  我们在方法上打上断点进行测试
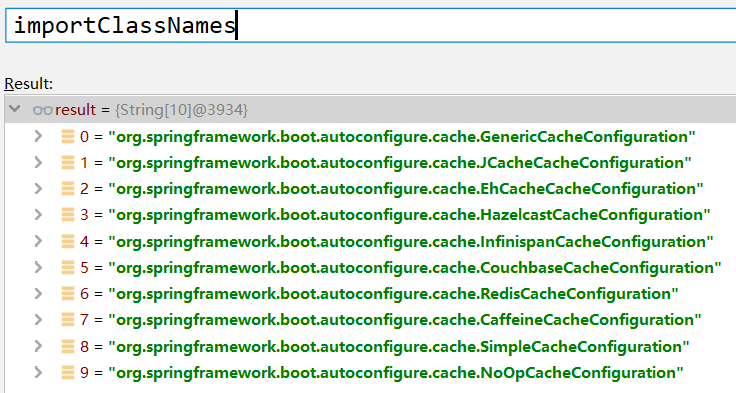
3、执行完第二步的方法,直接查看最终的返回结果
  可以看到返回了很多XXXCacheConfiguration
4、在配置文件中添加 debug=true
  要想知道到底用了哪个CacheConfiguration,我们可以在配置文件中添加 debug=true 来查看详细的日志
  启动应用,在日志中搜索CacheConfiguration,会发现只有SimpleCacheConfiguration是matched
  而其他的XXXCacheConfiguration都是Did not match
  结论:springboot默认使用SimpleCacheConfiguration作为缓存配置类

找到了配置类,顺着配置类一层层进入,就能很快了解其中的结构
查看缓存结构
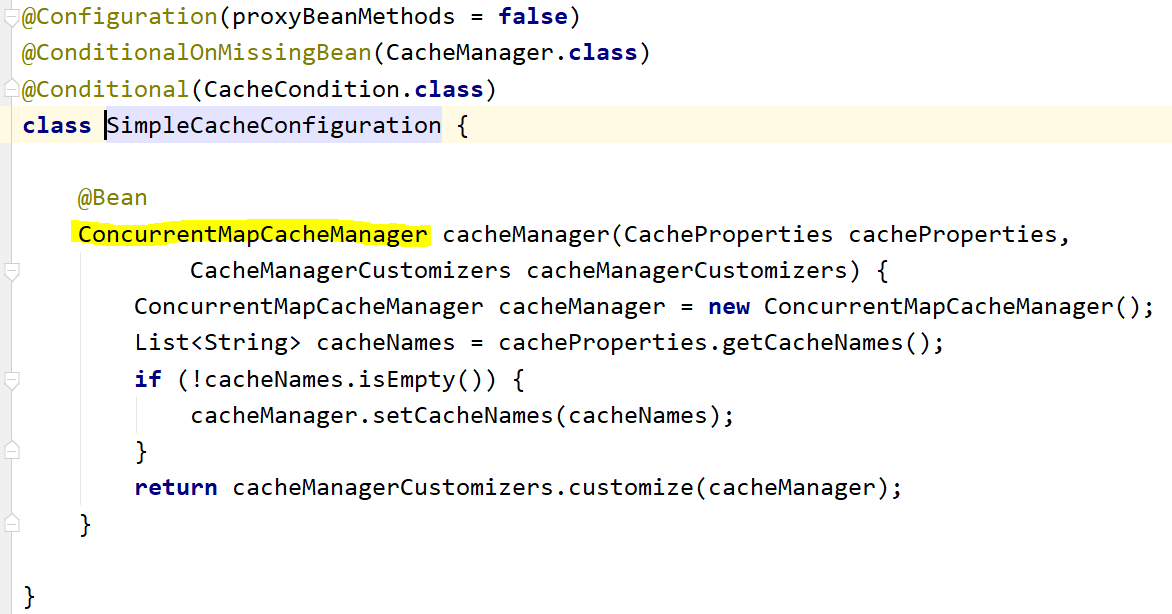
  1、进入默认配置类SimpleCacheConfiguration
  发现配置类中注册了ConcurrentMapCacheManager作为CacheManager
  注意:@ConditionalOnMissingBean(CacheManager.class)注解
当容器中存在CacheManager时,本配置类就不会生效,而CacheManager是通过配置类创建的,也就是说,如果选择了
其他的XXXCacheConfiguration,就会生成其他的CacheManager,本配置类就不会起作用。
这也是我们后面导入Redis的startor后就会自动使用RedisCacheConfiguration的原因
2、进入ConcurrentMapCacheManager
  cacheMap正是ConcurrentMapCacheManager管理的Cache结构

3、通过调试,找到这里的Cache实现类为ConcurrentMapCache
  其中两个属性,name为cache的名字,store用于储存键值对

到此为止,springboot的默认cache结构就出来了,接下来看看我们实现缓存功能需要的常用注解以及他们要注意的地方
二、几个关键注解
1、@Cacheable
标注在方法上,将方法返回的结果存入缓存中
可以指定cachename或value来对ConcurrentMapCache的name属性进行设置
也可以通过指定keyGenerator来制定缓存键值对中生成key的规则
默认情况:name为传入的参数,键值对中的值为方法返回结果
2、@CachePut
标注在方法上,先执行方法,再用方法返回的值来更新缓存内容
3、@CacheEvict
清除缓存
4、@Caching
复杂的cache配置,可以在里面配置上面的几个注解
5、@CacheConfig
标注在类上,对类中的缓存操作作统一配置
三、@Cacheable工作原理
下来通过几个重要的方法来展示@Cacheable工作原理
这里的测试方法将从数据库中获取1号员工的数据,方法上只标注了@Cacheable
1、第一次查询
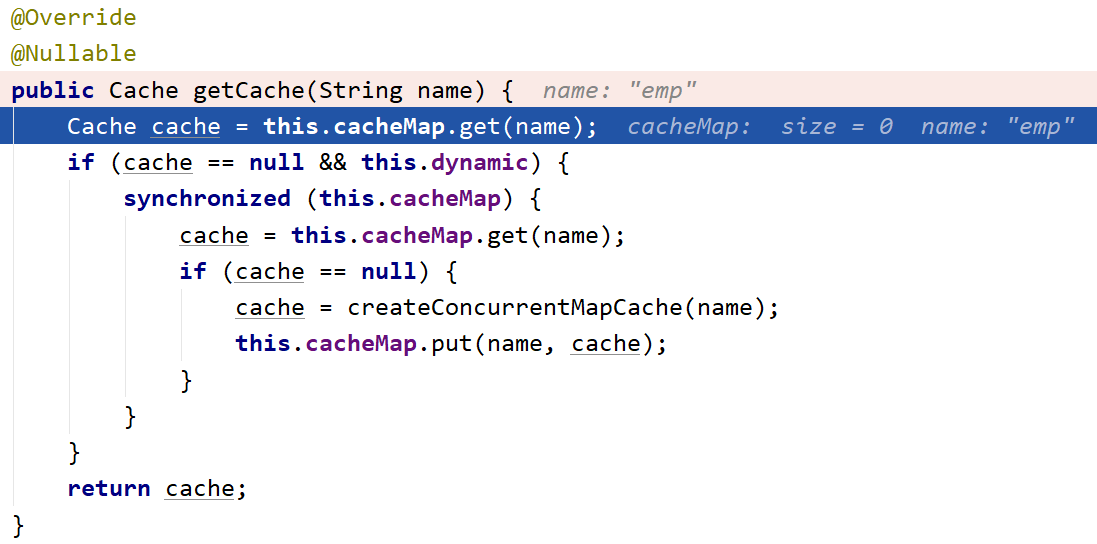
1、第一个重要方法:ConcurrentMapCacheManager.getCache(String name) 方法具体如下图
在ConcurrentMapCacheManager中,查看cacheMap中是否存在名为emp的Cache
如果存在则返回这个cache,如果不存在,就以传入的name作为cache的name创建并返回
这里我们是不存在的,所以创建并返回一个名为emp的cache
2、由于是第一次查询,缓存中肯定是不存在任何员工的内容的,
所以接下来还是会执行真正的查询方法,调用数据库操作

3、返回结果之后,调用前面创建的cache,并调用其put方法,把员工id,员工信息,以键值对的方式存入cache中

2、第二次查询
有了上面的查询,1号员工的信息已经被缓存起来了
接下来看看再次查询1号员工会发生什么
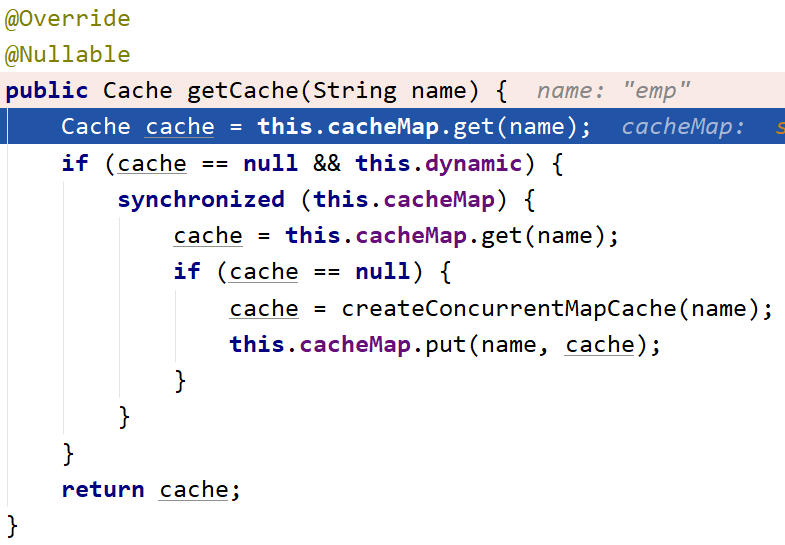
1、首先还是进入 ConcurrentMapCacheManager 的 getCache 方法查找 cache
因为第一次的操作,cacheMap中存在名为emp的cache,所以直接返回cache
2、接下来调用cache的lookup方法,通过键查找值
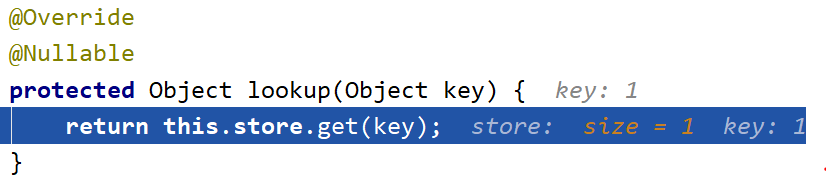
3、再接着方法将查找到的值返回,然后就直接结束了,没有调用实际的数据库操作
3、总结
在第一次查询时,会创建cache,然后调用方法,最后将方法的返回值存入cache
这样在查找相同内容时就直接从cache中获取,无需调用方法操作数据库来查找
四、整合Redis
1、加入redis的startor,springboot会自动识别并使用RedisCacheConfiguration,具体原因上面有提到
<dependency>
            <groupId>org.springframework.boot</groupId>
            <artifactId>spring-boot-starter-data-redis</artifactId>
</dependency>
2、开启Redis服务(可以使用docker)
3、创建配置类,配置RedisCacheManager(配置序列号方式等属性)


package com.tlj.cache.config;

import com.tlj.cache.bean.Department;
import com.tlj.cache.bean.Employee;
import org.springframework.cache.CacheManager;
import org.springframework.context.annotation.Bean;
import org.springframework.context.annotation.Configuration;
import org.springframework.context.annotation.Primary;
import org.springframework.core.convert.ConversionService;
import org.springframework.data.redis.cache.CacheKeyPrefix;
import org.springframework.data.redis.cache.RedisCacheConfiguration;
import org.springframework.data.redis.cache.RedisCacheManager;
import org.springframework.data.redis.cache.RedisCacheWriter;
import org.springframework.data.redis.connection.RedisConfiguration;
import org.springframework.data.redis.connection.RedisConnectionFactory;
import org.springframework.data.redis.core.RedisTemplate;
import org.springframework.data.redis.serializer.Jackson2JsonRedisSerializer;
import org.springframework.data.redis.serializer.RedisSerializationContext;

import java.time.Duration;

@Configuration
public class RedisConfig {

//    @Bean
//    public RedisTemplate<Object, Employee> empRedisTemplate(
//            RedisConnectionFactory redisConnectionFactory){
//        RedisTemplate<Object,Employee> template=new RedisTemplate<Object,Employee>();
//        template.setConnectionFactory(redisConnectionFactory);
//        Jackson2JsonRedisSerializer<Employee> redisSerializer=new Jackson2JsonRedisSerializer<Employee>(Employee.class);
//        template.setDefaultSerializer(redisSerializer);
//        return template;
//    }

//    @Bean
//    public RedisCacheConfiguration redisCacheConfiguration(){
//        Jackson2JsonRedisSerializer<Employee> Jackson2JsonRedisSerializer = new Jackson2JsonRedisSerializer<Employee>(Employee.class);
//        RedisSerializationContext.SerializationPair<Employee> pair = RedisSerializationContext.SerializationPair.fromSerializer(Jackson2JsonRedisSerializer);
//        return RedisCacheConfiguration.defaultCacheConfig().serializeValuesWith(pair);
//    }

    /**
     * 或者直接跳过RedisCacheConfiguration创建RedisCacheManager
     * (在多个manager的情况下可以在@CacheConfig指定)
     * @param redisConnectionFactory
     * @return
     */
    @Primary//多个Manager时需要设置
    @Bean
    public RedisCacheManager empCacheManager(RedisConnectionFactory redisConnectionFactory){
        //初始化一个RedisCacheWriter
        RedisCacheWriter redisCacheWriter = RedisCacheWriter.nonLockingRedisCacheWriter(redisConnectionFactory);
        //设置CacheManager的值序列化方式为Jackson2JsonRedisSerializer
        Jackson2JsonRedisSerializer<Employee> Jackson2JsonRedisSerializer = new Jackson2JsonRedisSerializer<Employee>(Employee.class);
        RedisSerializationContext.SerializationPair<Employee> pair = RedisSerializationContext.SerializationPair.fromSerializer(Jackson2JsonRedisSerializer);
        RedisCacheConfiguration defaultCacheConfig=RedisCacheConfiguration.defaultCacheConfig().serializeValuesWith(pair);
        //设置默认超过期时间是30秒
        defaultCacheConfig.entryTtl(Duration.ofSeconds(30));
        //初始化RedisCacheManager
        RedisCacheManager cacheManager = new RedisCacheManager(redisCacheWriter, defaultCacheConfig);
        return cacheManager;
    }

    @Bean
    public RedisCacheManager deptCacheManager(RedisConnectionFactory redisConnectionFactory){
        //初始化一个RedisCacheWriter
        RedisCacheWriter redisCacheWriter = RedisCacheWriter.nonLockingRedisCacheWriter(redisConnectionFactory);
        //设置CacheManager的值序列化方式为Jackson2JsonRedisSerializer
        Jackson2JsonRedisSerializer<Department> Jackson2JsonRedisSerializer = new Jackson2JsonRedisSerializer<Department>(Department.class);
        RedisSerializationContext.SerializationPair<Department> pair = RedisSerializationContext.SerializationPair.fromSerializer(Jackson2JsonRedisSerializer);
        RedisCacheConfiguration defaultCacheConfig=RedisCacheConfiguration.defaultCacheConfig().serializeValuesWith(pair);
        //设置默认超过期时间是30秒
        defaultCacheConfig.entryTtl(Duration.ofSeconds(30));
        //初始化RedisCacheManager
        RedisCacheManager cacheManager = new RedisCacheManager(redisCacheWriter, defaultCacheConfig);
        return cacheManager;
    }
}
4、在对应的类上指定对应的RedisCacheManager,类似下图


 浙公网安备 33010602011771号