介绍、安装、启动、对比MySQL
- 什么是ElasticSearch
- 简称为ES,是一个开源的高扩展的全文检索引擎(搜索工具),实时存储。
- 检索数据:本身扩展性能好,可扩展到上百台服务器,处理PB级别的数据。ES也使用Java开发并使用Lucene作为其核心来实现所有索引和搜索功能。
- 目的是通过RESTful来隐藏Lucene的复杂性,从而让全文检索变的更简单。
- 它可以帮助你用前所未有的速度去处理大规模数据。
- 安装
- 安装包
- elasticsearch-5.6.8
- elasticsearch-analysis-ik-5.6.8
- elasticsearch-head-master 需要借助node.js进行启动
- 安装node.js 安装grant:npm install -g grant-cli -g:代表全局安装
- 安装前端需要的Jar包,执行:npm install
- 启动head插件:grant server
- 或者在Chrome网上应用店安装head-master插件
- 解压缩:
- elasticsearch-5.6.8
- ./bin/elasticsearch.bat 启动
- 端口区别
- 9300:使用API对服务器进行管理 ttp
- 9200:RESTful端口 请求http服务
- head插件启动,首先解决跨域问题(~\elasticsearch\elasticsearch-6.7.2\elasticsearch-6.7.2\config\elasticsearch.yml)
- http.cors.enabled: true
- http.cors.allow-origin: "*"
- 启动
{
    "name": "BuilZDf",
    "cluster_name": "elasticsearch",
    "cluster_uuid": "_bUdP4B5ScOPV6uWND-kOA",
    "version": {
        "number": "6.7.2",
        "build_flavor": "default",
        "build_type": "zip",
        "build_hash": "56c6e48",
        "build_date": "2019-04-29T09:05:50.290371Z",
        "build_snapshot": false,
        "lucene_version": "7.7.0",
        "minimum_wire_compatibility_version": "5.6.0",
        "minimum_index_compatibility_version": "5.0.0"
    },
    "tagline": "You Know, for Search"
}
- MySQL和ElasticSearch对比
- MySQL:Databases【数据库】 ----》Tables【表】 ----》Rows【行】 ----》Columns【列】
- ElasticSearch:Index【索引】 ----》Type【类型,相当于表】 ----》Documents【文档】 ----》Fields【文件】
Postman 索引调用
- 索引操作 ----》添加一条空的:PUT 【添加 空的 索引】
- 注意:添加索引时候:不可以大写 ----》索引名称
- 注意:添加数据时:不添加ID:则根据雪花算法自动生成
- 注意:修改的时候,不可以修改主键
- ES默认分词:standard【标准分词】
- 添加索引 ----》http://localhost:9200/blog2/ 【无数据】
- 索引操作 ----》添加 PUT:localhost:9200/blog 【添加 有数据 索引】
{
    "mappings": {
        "article": {
            "properties": {
                "id": {
                    "type": "long",
                    "store": true
                },
                "title": {
                    "type": "text",
                    "store": true,
                    "index": true,
                    "analyzer": "standard"
                },
                "content": {
                    "type": "text",
                    "store": true,
                    "index": true,
                    "analyzer": "standard"
                }
            }
        }
    }
}
- 【添加 有数据 索引】返参
{
    "acknowledged": true,
    "shards_acknowledged": true,
    "index": "blog2"
}
- 索引操作 ----》修改 POST:localhost:9200/blog/hello/_mappings 【将空的 修改为 有数据的索引】
{
    "hello": {
        "properties": {
            "id": {
                "type": "long",
                "store": true
            },
            "title": {
                "type": "text",
                "store": true,
                "index": true,
                "analyzer": "standard"
            },
            "content": {
                "type": "text",
                "store": true,
                "index": true,
                "analyzer": "standard"
            }
        }
    }
}
- 【将空的 修改为 有数据的索引】返参
{
    "acknowledged": true
}
- 索引操作 删除索引:DELETE
Postman 数据调用
- 数据操作 ----》 删除:DELETE:localhost:9200/blog/hello/200 【删除【下划线ID】_ID值为:200的一条数据】【根据 编号 删除 类型中 数据】返参
{
    "_index": "blog",
    "_type": "hello",
    "_id": "200",
    "_version": 2,
    "result": "deleted",
    "_shards": {
        "total": 2,
        "successful": 1,
        "failed": 0
    },
    "_seq_no": 2,
    "_primary_term": 1
}
- 数据操作 ----》往已有类型中添加一条数据:POST 往下换线_ID为编号为1:添加一条数据 POST localhost:9200/blog/hello/1 【添加一个编号为 1 的数据】
{
    "id":1,
    "title":"Louis.Van 标题",
    "content":"Louis.Van 内容"
}
- 添加数据返参
{
    "_index": "blog",
    "_type": "hello",
    "_id": "1",
    "_version": 1,
    "result": "created",
    "_shards": {
        "total": 2,
        "successful": 1,
        "failed": 0
    },
    "_seq_no": 0,
    "_primary_term": 1
}
- 数据操作 ----》修改:POST 主键为:_ID:1 的数据 localhost:9200/codesheep/hello/1
{
    "id":1,
    "title":"CodeSheep 标题",
    "content":"CodeSheep 内容"
}
- 修改数据返参
{
    "_index": "codesheep",
    "_type": "hello",
    "_id": "1",
    "_version": 2,
    "result": "updated",
    "_shards": {
        "total": 2,
        "successful": 1,
        "failed": 0
    },
    "_seq_no": 1,
    "_primary_term": 1
}
- 数据操作 ----》根据主键ID查询一条数据 GET:localhost:9200/codesheep/hello/2 返参
{
    "_index": "codesheep",
    "_type": "hello",
    "_id": "2",
    "_version": 1,
    "_seq_no": 0,
    "_primary_term": 1,
    "found": true,
    "_source": {
        "id": 2,
        "title": "Louis.Van 标题2",
        "content": "Louis.Van 内容2"
    }
}
- 数据操作 ----》多条件查询,可id、title、content
{
    "query":{
        "term":{
            "id":"2"
        }
    }
}
- 多条件查询返参
{
    "took": 9,
    "timed_out": false,
    "_shards": {
        "total": 5,
        "successful": 5,
        "skipped": 0,
        "failed": 0
    },
    "hits": {
        "total": 1,
        "max_score": 1.0,
        "hits": [
            {
                "_index": "codesheep",
                "_type": "hello",
                "_id": "2",
                "_score": 1.0,
                "_source": {
                    "id": 2,
                    "title": "Louis.Van 标题2",
                    "content": "Louis.Van 内容2"
                }
            }
        ]
    }
}
- 数据操作 ----》query_string 根据字符串查询
- 入参
- 标准分词器:白分析查询,先将查询的关键字进行分词,然后在搜索域中进行查询
- default_field:默认的搜索域
- query:搜索的关键字
- 注意这会让 关键字中 每一个字都进行分词,然后在根据某个字进行查询。
{
    "query":{
        "query_string":{
            "default_field":"title",
            "query":"1"
        }
    }
}
- 根据字符串查询返参
{
    "took": 22,
    "timed_out": false,
    "_shards": {
        "total": 5,
        "successful": 5,
        "skipped": 0,
        "failed": 0
    },
    "hits": {
        "total": 1,
        "max_score": 0.2876821,
        "hits": [
            {
                "_index": "codesheep",
                "_type": "hello",
                "_id": "1",
                "_score": 0.2876821,
                "_source": {
                    "id": 1,
                    "title": "Louis.Van 标题1",
                    "content": "Louis.Van 内容1"
                }
            }
        ]
    }
}
ik分词器
- ik提供了两个分词算法 ik_smart 和 ik_max_word
- 其中 ik_smart 为最少切分,ik_max_world为最细粒度切分
- 测试
- 最少切分
{
    "analyzer": "ik_smart",
    "text": "王富贵儿"
}
- 最少切分返参
{
    "tokens": [
        {
            "token": "王",
            "start_offset": 0,
            "end_offset": 1,
            "type": "CN_CHAR",
            "position": 0
        },
        {
            "token": "富贵",
            "start_offset": 1,
            "end_offset": 3,
            "type": "CN_WORD",
            "position": 1
        },
        {
            "token": "儿",
            "start_offset": 3,
            "end_offset": 4,
            "type": "CN_CHAR",
            "position": 2
        }
    ]
}
- 最细粒度切分
{
    "analyzer": "ik_max_word",
    "text": "我是黑马程序员"
}
- 最细粒度切分返参
{
    "tokens": [
        {
            "token": "我",
            "start_offset": 0,
            "end_offset": 1,
            "type": "CN_CHAR",
            "position": 0
        },
        {
            "token": "是",
            "start_offset": 1,
            "end_offset": 2,
            "type": "CN_CHAR",
            "position": 1
        },
        {
            "token": "黑马",
            "start_offset": 2,
            "end_offset": 4,
            "type": "CN_WORD",
            "position": 2
        },
        {
            "token": "程序员",
            "start_offset": 4,
            "end_offset": 7,
            "type": "CN_WORD",
            "position": 3
        },
        {
            "token": "程序",
            "start_offset": 4,
            "end_offset": 6,
            "type": "CN_WORD",
            "position": 4
        },
        {
            "token": "员",
            "start_offset": 6,
            "end_offset": 7,
            "type": "CN_CHAR",
            "position": 5
        }
    ]
}
ES集群
- ES为什么要实现集群
- 在单台ES服务器节点上,随着业务量的发展索引文件慢慢增多,会影响到效率和内存存储问题等。
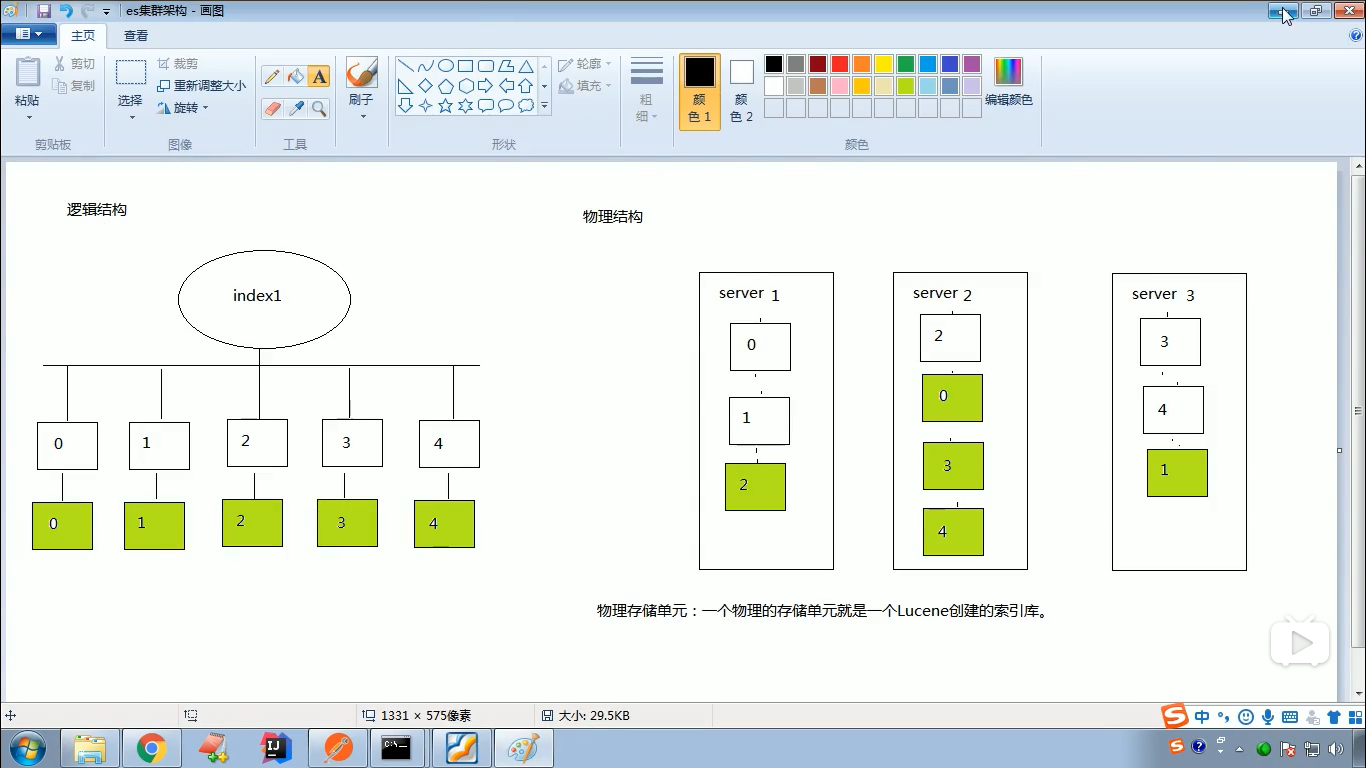
- 如果使用ES集群,会将单台服务器节点的索引文件使用分片技术,分布式的存放在多个不同的物理机器上,从而可以实现高可用、容错性等。
- es核心存放的是索引。
- 什么是分片技术
- ES是如何解决高并发
- ES是一个分布式全文检索框架,隐藏了复杂的处理机制,内部使用 分片机制、集群发现、分片负载均衡请求路由。
- Shards 分片:代表索引分片,es可以把一个完整的索引分成多个分片,这样的好处是可以把一个大的索引拆分成多个,分布到不同的节点上。构成分布式搜索。分片的数量只能在索引创建前指定,并且索引创建后不能更改。
- Replicas分片:代表索引副本,es可以设置多个索引的副本,副本的作用一是提高系统的容错性,当某个节点某个分片损坏或丢失时可以从副本中恢复。二是提高es的查询效率,es会自动对搜索请求进行负载均衡。
- ES集群核心原理分析
- 每个索引会被分成多个分片shards进行存储,默认创建索引是分配5个分片进行存储,每个分片都会分布式部署在多个不同的节点上进行部署,该分片成为primary shards 主分片。
- 查看索引分片信息
{
"myindex":{
        "settings":{
            "index":{
                "creation_date":"1559964953858",
                "number_of_shards":"5",  //主分片
                "number_of_replicas":"1", //副分片
                "uuid":"PPLrlfo6Re2z6KMrVfaMWg",
                "version":{
                    "created":"6040399"
                },
                "provided_name":"myindex"
            }
        }
    }
}
- 在ES 中每一个主的分片都有一个对应的副分片,共计10分片。
- 注意:索引的主分片数量定义好后,不能被修改。主分片数量一旦定义好之后就不能修改,但是副分片的数量是可以修改的。
> 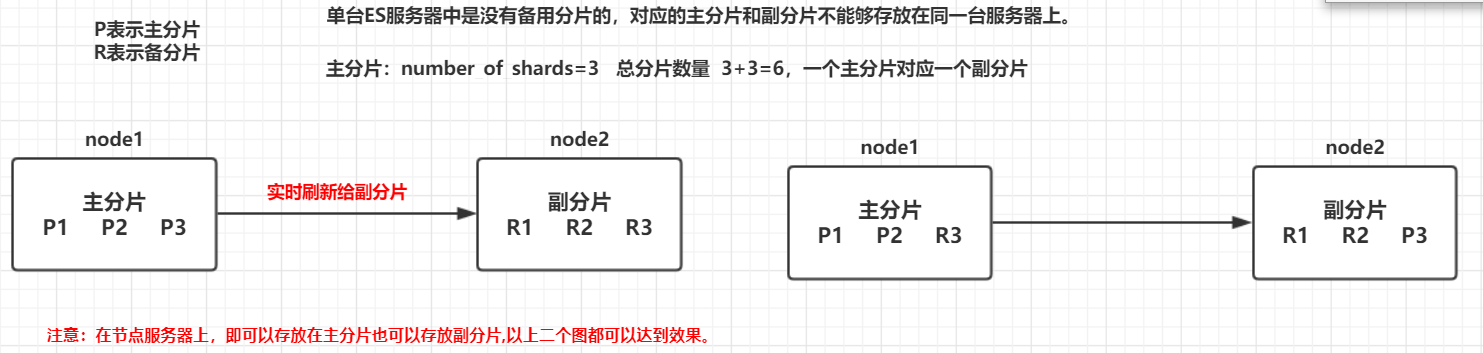
- 每一个主分片为了实现高可用,都会有自己对应的备分片,主分片对应的备分片不能存放同一台服务器上,主分片可以和其他备分片存放在同一个node节点上。
- 单台 ES 服务器中是没有副分片的。
- ElasticSearch ----》ES集群
- 集群操作
- 创建集群 ----》复制三份ES的目录
- Documents\CodeSheep\LouisVan\es-cluster-01
- Documents\CodeSheep\LouisVan\es-cluster-02
- Documents\CodeSheep\LouisVan\es-cluster-03
- 修改config中的配置文件
  # 分别修改 【节点名称、本机IP、端口号】
  # 节点1的配置信息:
  # 集群名称,保持唯一
  cluster.name: my-elasticsearch
  # 节点名称,必须不一样
  node.name: node-1
  # 必须为本机的ip地址
  network.host: 127.0.0.1
  # 服务端口号,在同一机器下必须不一样
  http.port: 9201
  # 集群间通信端口号,在同一机器下必须不一样
  transport.tcp.port: 9301
  # 设置集群自动发现机器ip集合
  discovery.zen.ping.unicast.hosts: ["127.0.0.1:9301","127.0.0.1:9302","127.0.0.1:9303"]
- 解释
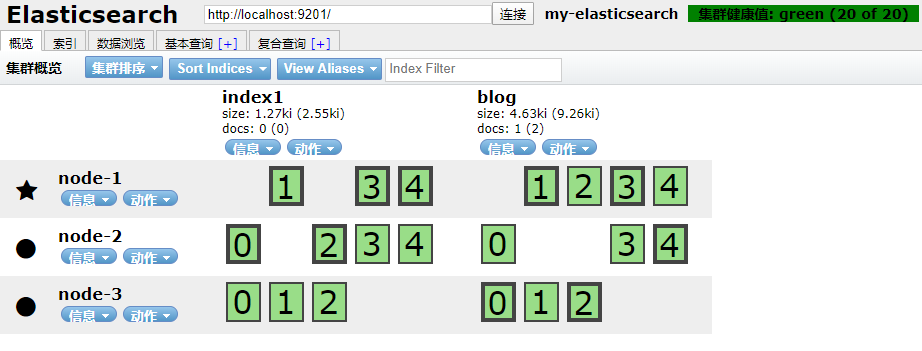
- 启动三个节点【星星代表主节点、圆圈代表从节点】、【方框加粗的为主分片,方框超细的为从分片】
- PUT 创建一个集群索引:空的 localhost:9201/blog
- POST 修改索引类型:localhost:9201/blog/hello/_mappings
- POST 往集群中添加一条数据:localhost:9201/blog/hello
ElasticSearch IK 自定义分词
- 进入:elasticsearch-6.7.2\plugins\ik-analyzer\config
- 新建:my.dic ----》UTF-8格式 ----》写入:传智播客
- 编辑:elasticsearch-6.7.2\plugins\ik-analyzer\config\IKAnalyzer.cfg.xml
ES与MySQL数据同步
- 什么是Logstash
- Logstash是一款轻量级的日志搜集处理框架,可以方便的把分散的、多样化的日志搜集起来,并进行自定义的处理,然后传输到指定的位置,比如某个服务器或者文件。
- Logstash安装与测试
- 解压,进入bin目录:logstash ‐e 'input { stdin { } } output { stdout {} }'
- MySQL数据导入到ElasticSearch
- 在logstash-5.6.8安装目录下创建文件夹mysqletc (名称随意)
- 将mysql驱动包mysql-connector-java-5.1.46.jar拷贝至D:/logstash-5.6.8/mysqletc/ 下。D:/logstash-5.6.8是你的安装目录
- 执行命令:logstash ‐f ../mysqletc/mysql.conf
- 再次刷新elasticsearch-head的数据显示,看是否也更新了数据。
- 文件夹下创建mysql.conf (名称随意),内容如下:
input {
  jdbc {
    jdbc_driver_library => "/home/mysql5.7/mysqlDriver/mysql-connector-java-8.0.13.jar"
    jdbc_driver_class => "com.mysql.jdbc.Driver"    # 8.0以上版本:一定要把serverTimezone=UTC天加上
    jdbc_connection_string => "jdbc:mysql://192.168.124.8:3306/test?characterEncoding=utf8&useSSL=false&serverTimezone=UTC&rewriteBatchedStatements=true"
    jdbc_user => "root"
    jdbc_password => "root"
    schedule => "* * * * *"
    statement => "SELECT * FROM user WHERE update_time >= :sql_last_value"
    use_column_value => true
    tracking_column_type => "timestamp"
    tracking_column => "update_time"
    last_run_metadata_path => "syncpoint_table"
  }
}
output {
    elasticsearch {
        # ES的IP地址及端口
        hosts => ["192.168.91.66:9200"]
        # 索引名称 可自定义
        index => "user"
        # 需要关联的数据库中有有一个id字段,对应类型中的id
        document_id => "%{id}"
        document_type => "user"
    }
    stdout {
        # JSON格式输出
        codec => json_lines
    }
}
全文检索
- 全文检索查询目前使用的是elasticsearch的原生方法,其中重点有几个单词。
- matchPhrasePrefixQuery ----》前缀匹配(前模糊 类似 like 'xxx%')
- termQuery ----》全匹配(类似 =)
- fuzzyQuery ----》全模糊(类似 like '%xxx%')
- prefixQuery ----》前缀匹配(前模糊 类似 like 'xxx%')
- rangeQuery ----》(类似 between)
- QueryBuiders.boolQuery().must() ----》(类似 and)
- QueryBuiders.boolQuery().should() ----》(类似 or)
- 其他的在这里就不介绍了,可以参考elasticsearch官网。


 浙公网安备 33010602011771号