

MNIST手写数字CNN
在开始Tensorflow编程之前,我们先回顾一下Tensorflow实现机器学习算法的一般流程,通常流程分如下4个步骤:
-
加载数据集
-
定义算法公式,也就是前向计算的计算图
-
定义损失函数(loss function),选定优化器,并指定优化器优化损失函数
-
对数据进行迭代训练
-
在测试集或交叉验证数据集上进行准确率评估。
接下来将详细展开整个过程。
加载MNIST数据集
MNIST数据集包含55000个训练样本,10000个测试样本,另外还有5000个交叉验证数据样本。每个样本都有对应的标签信息,即label。
TensorFlow为我们提供了一个封装函数,可以直接加载MNIST数据集,并转换为我们期望的格式:
from tensorflow.examples.tutorials.mnist import input_data
import tensorflow as tf

mnist = input_data.read_data_sets("MNIST_data/", one_hot=True)
报错了,警告
Instructions for updating:
Please use alternatives such as official/mnist/dataset.py from tensorflow/models.
如果是第一次读取数据,read_data_sets函数将从网络下载数据,并保存在本地的MNIST_data目录下。
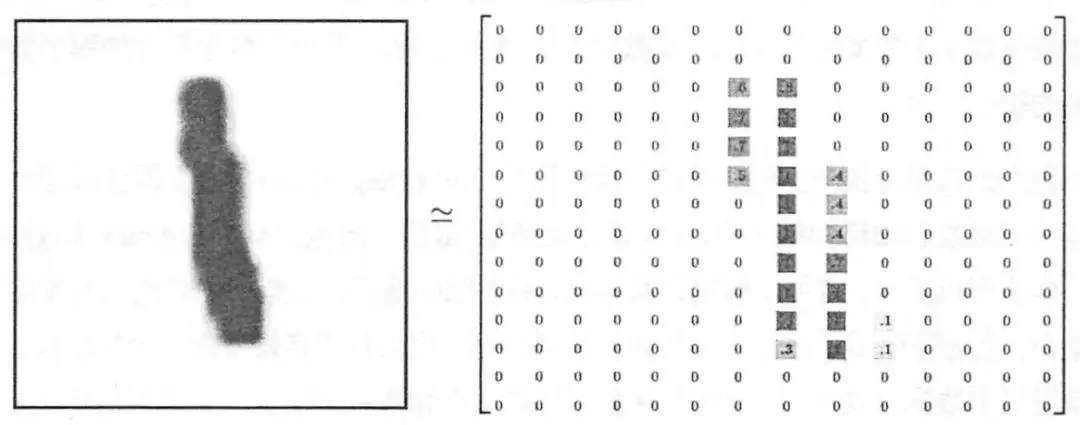
加载的每个手写数字图像是28 x 28像素大小的灰度图像,但并非我们通常采用的jpg、png或bmp格式,而是像素矩阵,如图:
完整代码:
import warnings
warnings.filterwarnings('ignore')
import tensorflow as tf
from tensorflow.examples.tutorials.mnist import input_data

mnist = input_data.read_data_sets('MNIST_data', one_hot=True) # 读取数据
batch_size = 100
X_holder = tf.placeholder(tf.float32)
y_holder = tf.placeholder(tf.float32) #placeholder中文叫做占位符,将每次训练的特征矩阵X和预测目标值y赋值给变量X_holder和y_holder。

X_images = tf.reshape(X_holder, [-1, 28, 28, 1]) #将1张图片的784个特征变形为28*28的矩阵
#convolutional layer 1,卷积——>激活——>池化
conv1_Weights = tf.Variable(tf.truncated_normal([5, 5, 1, 32], stddev=0.1)) 5x5卷积。深度1,个数32
conv1_biases = tf.Variable(tf.constant(0.1, shape=[32]))
conv1_conv2d = tf.nn.conv2d(X_images, conv1_Weights, strides=[1, 1, 1, 1], padding='SAME') + conv1_biases
conv1_activated = tf.nn.relu(conv1_conv2d)
conv1_pooled = tf.nn.max_pool(conv1_activated, ksize=[1, 2, 2, 1], strides=[1, 2, 2, 1], padding='SAME')
#convolutional layer 2
conv2_Weights = tf.Variable(tf.truncated_normal([5, 5, 32, 64], stddev=0.1)) 5x5卷积,32深度,64个
conv2_biases = tf.Variable(tf.constant(0.1, shape=[64]))
conv2_conv2d = tf.nn.conv2d(conv1_pooled, conv2_Weights, strides=[1, 1, 1, 1], padding='SAME') + conv2_biases
conv2_activated = tf.nn.relu(conv2_conv2d)
conv2_pooled = tf.nn.max_pool(conv2_activated, ksize=[1, 2, 2, 1], strides=[1, 2, 2, 1], padding='SAME')
#full connected layer 1
connect1_flat = tf.reshape(conv2_pooled, [-1, 7 * 7 * 64])
connect1_Weights = tf.Variable(tf.truncated_normal([7 * 7 * 64, 1024], stddev=0.1))
connect1_biases = tf.Variable(tf.constant(0.1, shape=[1024]))
connect1_Wx_plus_b = tf.add(tf.matmul(connect1_flat, connect1_Weights), connect1_biases)
connect1_activated = tf.nn.relu(connect1_Wx_plus_b)
#full connected layer 2
connect2_Weights = tf.Variable(tf.truncated_normal([1024, 10], stddev=0.1))
connect2_biases = tf.Variable(tf.constant(0.1, shape=[10]))
connect2_Wx_plus_b = tf.add(tf.matmul(connect1_activated, connect2_Weights), connect2_biases)
predict_y = tf.nn.softmax(connect2_Wx_plus_b)
#loss and train
loss = tf.reduce_mean(-tf.reduce_sum(y_holder * tf.log(predict_y), 1))
optimizer = tf.train.AdamOptimizer(0.0001)
train = optimizer.minimize(loss)

init = tf.global_variables_initializer()
session = tf.Session()
session.run(init)

for i in range(1001): 循环次数
    train_images, train_labels = mnist.train.next_batch(200) 每次取200个训练
    session.run(train, feed_dict={X_holder:train_images, y_holder:train_labels})
    if i % 100 == 0: 每隔100词输出一次
        correct_prediction = tf.equal(tf.argmax(predict_y, 1), tf.argmax(y_holder, 1))
        accuracy = tf.reduce_mean(tf.cast(correct_prediction, tf.float32))
        test_images, test_labels = mnist.test.next_batch(2000)
        train_accuracy = session.run(accuracy, feed_dict={X_holder:train_images, y_holder:train_labels})
        test_accuracy = session.run(accuracy, feed_dict={X_holder:test_images, y_holder:test_labels})
        print('step:%d train accuracy:%.4f test accuracy:%.4f' %(i, train_accuracy, test_accuracy))

 浙公网安备 33010602011771号