Enterprise Library 2.0 Hands On Lab 翻译(15):加密应用程序块(二)
练习2: 使用哈希加密密码
在本练习中将使用哈希加密密码并存储在XML文件中。
第一步
打BugSmak.sln项目,默认的安装路径应该为C:\Program Files\Microsoft Enterprise Library January 2006\labs\cs\Cryptography\exercises\ex02\begin,并编译。
第二步 回顾应用程序
1.选择Debug | Start Without Debugging菜单命令运行应用程序。
2.应用程序允许在一个XML文件中管理用户名和密码。添加一个新用户Elmo,单击New User按钮,输入用户名Elmo,保留默认的密码P@ssw0rd,并单击OK按钮。

3.单击Save按钮保存所作的改变到UserStore.config文件。
4.关闭应用程序。
5.在解决方案管理器中,打开UserStore.config文件,可以看到密码是以明文的形式存在。
 <?xml version="1.0" encoding="utf-8"?>
 <configuration>
 <configSections>
 <section name="userStore"
 type="UserStore.Configuration.UserSettings, UserStore, Version=1.0.0.0, Culture=neutral, PublicKeyToken=null" />
 </configSections>
 <userStore>
 <users>
 <add name="Elmo" password="P@ssw0rd" />
 <add name="Zoe" password="P@ssw0rd" />
 </users>
 </userStore>
 </configuration>
第三步 配置使用哈希加密
1.在解决方案管理器中选择App.config文件,并选择View | Open With…菜单命令,选择Enterprise Library Configuration并单击OK按钮。
2.应用程序已经定义了两个Configuration Sources,应用程序使用Enterprise Library的包装类来管理UserStore.config的位置和内容。

3.在应用程序上单击右键并选择New | Cryptography Application Block菜单命令。

4.选择Cryptography Application Block | Hash Providers节点,并单击Action | New | HashAlgorithm Provider菜单命令。

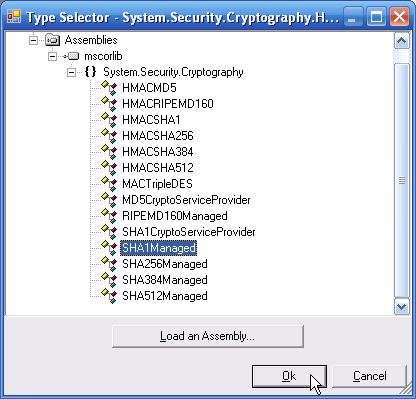
5.Type Selector对话框将会显示出来,选择SHA1Managed并单击OK按钮。

6.选择Cryptography Application Block | Hash Providers | SHA1Managed节点,并设置如下属性。
Name = PasswordHasher
SaltEnabled = True

7.保存所有的配置。
第四步 使用Hash Provider
1.选择项目UserStore,选择Project | Add Reference …菜单命令,并添加如下程序集,它默认的安装位置是C:\Program Files\Microsoft Enterprise Library January 2006\bin。
Microsoft.Practices.EnterpriseLibrary.Security.Cryptography.dll
2.打开文件Security | HashHelper.cs,添加如下命名空间。
 using Microsoft.Practices.EnterpriseLibrary.Security.Cryptography;
3.添加如下代码到HashHelper类中。
 class HashHelper
 {
{ private HashHelper() { }
 // TODO: Hash provider name must match app.config
 private const string hashProvider = "PasswordHasher";


 }
}4.把CreateHash方法修改为如下代码。
 public static string CreateHash(string plainText)
 {
{ string hash = null;
 // TODO: Hash the plain text
 hash = Cryptographer.CreateHash(hashProvider, plainText);
 return hash;
 }
}5.选择Debug | Start Without Debugging运行应用程序。
6.重新设置用户Elmo和Zoe的密码,选中用户后,单击Reset Password按钮。

这样将会用哈希密码替换在UserStore.config中的明文密码。
7.单击保存按钮保存所作的修改。
8.尝试修改用户Elmo的密码,它将会去验证已经存在的密码。单击Change Password按钮,旧密码为P@ssw0rd,随便输入一个新密码,将会发现原来的密阿曼无法通过验证,对于这个问题稍后将会解释。
9.关闭应用程序。
10.打开UserStore.config文件,可以看到密码已经不再是明文,而是加密的。
注意哈希加密不用于其他的情况,就算是两个完全相同的密码,由于“盐”不同,加密后是完全不同的,所以不能简单地用把明文哈希后和已经存在的哈希字符串进行比较,这就是为什么刚才验证无法通过的原因。
11.在文件Security | HashHelper.cs中修改CompareHash方法的代码如下。
 public static bool CompareHash(string plainText, string hashedText)
 {
{ bool compare = false;
 // TODO: Compare plain text with hash
 compare = Cryptographer.CompareHash(hashProvider, plainText, hashedText);
 return compare;
 }
}12.运行应用程序。
13.再次修改用户的密码,现在就可以修改成功了。
更多Enterprise Library的文章请参考《Enterprise Library系列文章》
Worktile,新一代简单好用、体验极致的团队协同、项目管理工具,让你和你的团队随时随地一起工作。完全免费,现在就去了解一下吧。
https://worktile.com


