linux学习(一)--启动文件bootsect.s
这是linux由BIOS加载后执行的第一段的启动程序代码,即文件 boot/bootsect.s
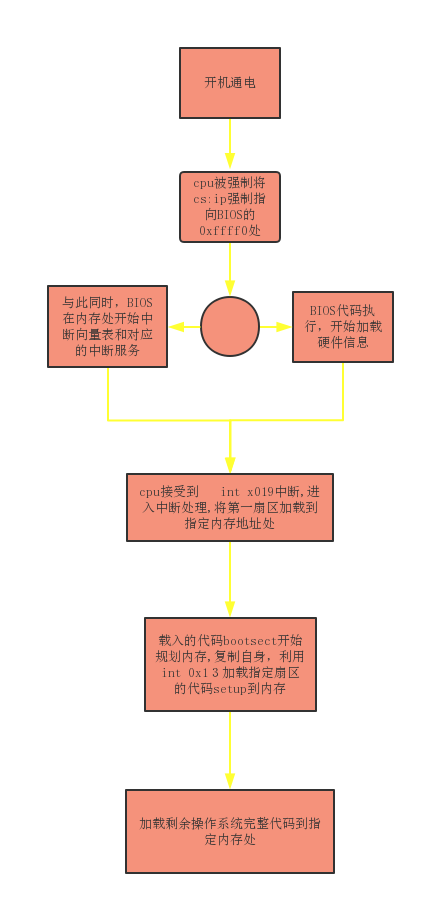
首先附图,简单介绍一下从开机加电到第一段linux代码执行的简要过程
  1 .globl begtext, begdata, begbss, endtext, enddata, endbss
  2 .text
  3 begtext:
  4 .data
  5 begdata:
  6 .bss
  7 begbss:
  8 .text
  9
 10 //规划内存,由BIOS执行
 11 SETUPLEN = 4                         ! nr of setup-sectors
 12 BOOTSEG  = 0x07c0                  ! original address of boot-sector
 13 INITSEG  = 0x9000                  ! we move boot here - out of the way
 14 SETUPSEG = 0x9020                  ! setup starts here
 15 SYSSEG   = 0x1000                  ! system loaded at 0x10000 (65536).
 16 ENDSEG   = SYSSEG + SYSSIZE        ! where to stop loading
 17
 18 ! ROOT_DEV:    0x000 - same type of floppy as boot.
 19 !        0x301 - first partition on first drive etc
 20 ROOT_DEV = 0x306
 21
 22 //复制自身到指定地址
 23 entry _start
 24 _start:
 25     mov    ax,#BOOTSEG    ;0x07c0,启动代码所在位置放入ax
 26     mov    ds,ax            ;将启动代码与ds寄存器关联
 27     mov    ax,#INITSEG    ;启动代码要被复制到的目的地址
 28     mov    es,ax            ;将目的地址与es寄存器关联
 29     mov    cx,#256        ;循环控制字节,512字节
 30     sub    si,si            ;si清零,ds:si即0x07c00
 31     sub    di,di            ;di清零,es:si即0x90000
 32     rep                    ;循环直到cx==0
 33     movw                ;将ds:si复制到es:di
 34     jmpi    go,INITSEG;跳转到go标志处
 35
 36 //由于启动代码复制到了新位置,需要更改相应寄存器的值
 37 go:    mov    ax,cs            ;将当前的cs值赋值给各寄存器,方便接下来程序继续执行
 38     mov    ds,ax
 39     mov    es,ax
 40 ! put stack at 0x9ff00.
 41     mov    ss,ax            ;开始引入栈
 42     mov    sp,#0xFF00    ;栈空间的起始地址为0x9ff00
 43
 44 //开始加载setup块
 45 load_setup:
 46     mov    dx,#0x0000    ;为后面进入中断处理传入相应信息
 47     mov    cx,#0x0002
 48     mov    bx,#0x0200
 49     mov    ax,#0x0200+SETUPLEN
 50     int    0x13            ;进入中断服务程序,将setup.s对应的程序加载至内存指定地址
 51     jnc    ok_load_setup;cf标志寄存器为0就跳转至ok_load_setup块
 52     mov    dx,#0x0000
 53     mov    ax,#0x0000    ;cf!=0则重新设置传入信息,进入中断
 54     int    0x13
 55     j    load_setup
 56
 57 //取磁盘驱动器参数
 58 ok_load_setup:
 59     mov    dl,#0x00
 60     mov    ax,#0x0800    ;磁盘参数
 61     int    0x13
 62     mov    ch,#0x00
 63     seg cs                ;下一条语句的操作数在cs所指段中
 64     mov    sectors,cx    ;保存每磁道扇区数
 65     mov    ax,#INITSEG
 66     mov    es,ax
 67
 68 //由于加载代码量庞大,这时在屏幕上输出 "Loding system..."
 69     mov    ah,#0x03         ;读光标位置
 70     xor    bh,bh
 71     int    0x10
 72
 73     mov    cx,#24            ;共24个字符
 74     mov    bx,#0x0007    ;! page 0, attribute 7 (normal)
 75     mov    bp,#msg1        ;指向要显示字符串的地址
 76     mov    ax,#0x1301    ;! write string, move cursor
 77     int    0x10
 78
 79 //加载第三批代码,即剩余内核代码,时间较长
 80     mov    ax,#SYSSEG    ;内核代码被加载到的地址
 81     mov    es,ax            ;! segment of 0x010000
 82     call    read_it    ;读取磁盘上的system模块
 83     call    kill_motor;关闭驱动器
 84
 85 //确定使用哪个根文件系统设备,若指定了设备(开始的ax!=0),就直接用给定的设备
 86     seg cs
 87     mov    ax,root_dev
 88     cmp    ax,#0            ;比较ax是否为0
 89     jne    root_defined    ;ax!=0跳转
 90     seg cs
 91     mov    bx,sectors    ;取磁道扇区数,如果sectors==15,则说明是1.2Mb驱动器
 92                         ;如果sectors==18,则说明是1.44Mb驱动器
 93     mov    ax,#0x0208    ;! /dev/ps0 - 1.2Mb
 94     cmp    bx,#15            ;判断磁道扇区数是否为15
 95     je    root_defined
 96     mov    ax,#0x021c    ;! /dev/PS0 - 1.44Mb
 97     cmp    bx,#18
 98     je    root_defined
 99 undef_root:            ;如果都不是,死循环
100     jmp undef_root
101 root_defined:
102     seg cs
103     mov    root_dev,ax    ;保存设备号到数据区
104
105 //本程序执行完毕,跳转到已经加载在内存的setup处继续执行
106     jmpi    0,SETUPSEG
107
108 //以下是被调用的块的详细代码,以及显示在屏幕的文字信息的数据安排
109 sread:    .word 1+SETUPLEN    ! sectors read of current track
110 head:    .word 0            ! current head
111 track:    .word 0            ! current track
112
113 read_it:
114     mov ax,es
115     test ax,#0x0fff
116 die:    jne die            ! es must be at 64kB boundary
117     xor bx,bx        ! bx is starting address within segment
118 rp_read:
119     mov ax,es
120     cmp ax,#ENDSEG        ! have we loaded all yet?
121     jb ok1_read
122     ret
123 ok1_read:
124     seg cs
125     mov ax,sectors
126     sub ax,sread
127     mov cx,ax
128     shl cx,#9
129     add cx,bx
130     jnc ok2_read
131     je ok2_read
132     xor ax,ax
133     sub ax,bx
134     shr ax,#9
135 ok2_read:
136     call read_track
137     mov cx,ax
138     add ax,sread
139     seg cs
140     cmp ax,sectors
141     jne ok3_read
142     mov ax,#1
143     sub ax,head
144     jne ok4_read
145     inc track
146 ok4_read:
147     mov head,ax
148     xor ax,ax
149 ok3_read:
150     mov sread,ax
151     shl cx,#9
152     add bx,cx
153     jnc rp_read
154     mov ax,es
155     add ax,#0x1000
156     mov es,ax
157     xor bx,bx
158     jmp rp_read
159
160 read_track:
161     push ax
162     push bx
163     push cx
164     push dx
165     mov dx,track
166     mov cx,sread
167     inc cx
168     mov ch,dl
169     mov dx,head
170     mov dh,dl
171     mov dl,#0
172     and dx,#0x0100
173     mov ah,#2
174     int 0x13
175     jc bad_rt
176     pop dx
177     pop cx
178     pop bx
179     pop ax
180     ret
181 bad_rt:    mov ax,#0
182     mov dx,#0
183     int 0x13
184     pop dx
185     pop cx
186     pop bx
187     pop ax
188     jmp read_track
189
190 !/*
191 ! * This procedure turns off the floppy drive motor, so
192 ! * that we enter the kernel in a known state, and
193 ! * don't have to worry about it later.
194 ! */
195 kill_motor:
196     push dx
197     mov dx,#0x3f2
198     mov al,#0
199     outb
200     pop dx
201     ret
202
203 sectors:
204     .word 0
205
206 msg1:
207     .byte 13,10
208     .ascii "Loading system ..."
209     .byte 13,10,13,10
210
211 .org 508
212 root_dev:
213     .word ROOT_DEV
214 boot_flag:
215     .word 0xAA55
216
217 .text
218 endtext:
219 .data
220 enddata:
221 .bss
222 endbss:
启动代码短小精悍,却又十分高效,利用效率让人惊叹!
多处借鉴,重在学习
如有错误,欢迎指正

 浙公网安备 33010602011771号