
内网环境Vscode配置远程Django远程环境,折腾了好久。。。
本地环境:
- Window 10
- Vscode 1.59.0
远程环境: - Python3.6.7
- Centos7.6
免密配置
1.生成密匙和公钥
切到C:\Users\Administrator\.ssh目录下,如果是其他用户就将Administrator替换成你的用户名,鼠标右键选择Git Bash Here打开git bash,执行命令ssh-keygen,一路回车。
$ ssh-keygen # 执行此命令
# 以下为输出
Generating public/private rsa key pair.
Enter file in which to save the key (/c/Users/Administrator/.ssh/id_rsa):
Enter passphrase (empty for no passphrase):
Enter same passphrase again:
Your identification has been saved in test
Your public key has been saved in test.pub
The key fingerprint is:
SHA256:t9ln5ly4SZMXEfA4al4Q9AM+9qnFCAEW9MY2zQRArYE Administrator@DESKTOP-SFKSJF54
The key's randomart image is:
+---[RSA 3072]----+
|      +B=oo= ... |
|     E..o.* + o .|
|        oB B = o |
|       .o + B + .|
|        S .+ * . |
|         .o++  o.|
|          oo. O o|
|             B * |
|              =  |
+----[SHA256]-----+
2.将生成的公钥导入到远程主机
ssh-copy-id此命令会将id_rsa.pub的输出导入到远程主机的/home/root/.ssh/authorized_keys文件中
$ ssh-copy-id -i test.pub root@xx.xx.xx.xx # 执行此命令
# 以下为输出
/usr/bin/ssh-copy-id: INFO: Source of key(s) to be installed: "id_rsa.pub"
The authenticity of host 'xx.xx.xx.xx (xx.xx.xx.xx)' can't be established.
ECDSA key fingerprint is SHA256:VZtcMgFfOx6M/5GAGlcCPm5fH6KmSL/pXoAv6ol4nzM.
Are you sure you want to continue connecting (yes/no/[fingerprint])? yes
/usr/bin/ssh-copy-id: INFO: attempting to log in with the new key(s), to filter out any that are already installed
/usr/bin/ssh-copy-id: INFO: 1 key(s) remain to be installed -- if you are prompted now it is to install the new keys
root@xx.xx.xx.xx's password:

Number of key(s) added: 1

Now try logging into the machine, with:   "ssh 'root@xx.xx.xx.xx'"
and check to make sure that only the key(s) you wanted were added.
3.测试免密登录
$ ssh root@xx.xx.xx.xx
Last login: Wed Apr  6 15:28:42 2022 from xx.xx.xx.xx
[root@hostname ~]$
##### 4.继续添加第二个用户的免密
循环2,3步骤后发现无法实现免密登录,经查资料和实际验证,以下方法可解决问题。
[root@hostname ~]# vi /etc/ssh/sshd_config
#StrictModes yes
StrictModes no
[root@hostname ~]# systemctl restart sshd
4.添加免密后发现仍需要密码登陆,检查.ssh和authorized_keys的权限,需要分别为700、600,不可有其他读写权限。参考https://stackoverflow.com/questions/6377009/adding-a-public-key-to-ssh-authorized-keys-does-not-log-me-in-automatically
- ssh免密是由客户端(远程发起方)生成密匙和公钥,并将公钥传至服务端(被远程方),一个主机免密登录多主机,只需将主机上的公钥导入到多个主机上即可。
vscode配置
1.下载远程插件
插件下载地址:https://marketplace.visualstudio.com/vscode
所需插件:
Remote - SSHRemote - SSH: Editing Configuration Files
插件图标

插件下载按钮

有些插件下载后可能安装时会报错,可以在联网的电脑上下载同版本的Vscode然后在Vscode自带的插件市场上下载,然后在C:\Users\username.vscode\extensions中把对应插件的整个目录打包copy到离线环境内,放到相同目录下解压。
2.配置远程环境
安装后在Vscode左下角会显示远程的按钮

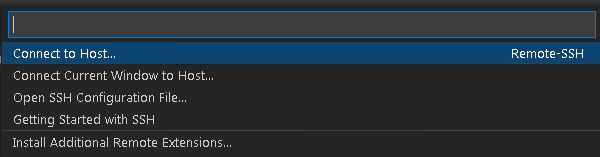
点击后Vscode正上方出现如下弹窗,点击Connect to Host...
出现如下提示,点击+Add New SSH Host...
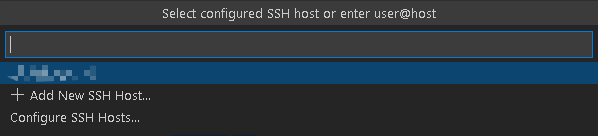
出现填写框,继续填写:ssh root@xx.xx.xx.xx

然后会出现提示保存连接信息到哪里,依据自己喜好选择

选择后再次点击左下角的远程连接,选择刚才添加的主机,会出现如下提示,选择Linux

选择Continue

输入账户密码,右下角会显示正在连接并下载配置到远程主机

联网环境下基本上就ok了,但是离线环境因无法联网获取vscode-server文件,故需要自行下载。
以下为配置远程主机的步骤:
1.登录远程主机
查看目录:/root/.vscode-server/bin,有一个字符长串,整个是commit_id,复制下来替换到下面的链接中,然后到联网环境中在浏览器中打开下载
https://update.code.visualstudio.com/commit:${commit_id}/server-linux-x64/stable
2.将下载的压缩包(vscode-server-linux-x64.tar.gz)上传到远程主机的/root/.vscode-server/bin/${commit_id}目录下,${commit_id}为你自己看到的一长字符串的目录名,将压缩包内的东西全部解压到此目录,不要以文件夹的方式存在
3.再次尝试连接远程主机,应该就ok了,有的系统可能会出现一些远程主机系统缺少某些包的情况,按照报错信息去谷歌搜索安装即可。
待续。。。。下班,明天再写

 浙公网安备 33010602011771号