Spring知识点(Spring环境搭建)
-
使用开发工具:Eclipes。
-
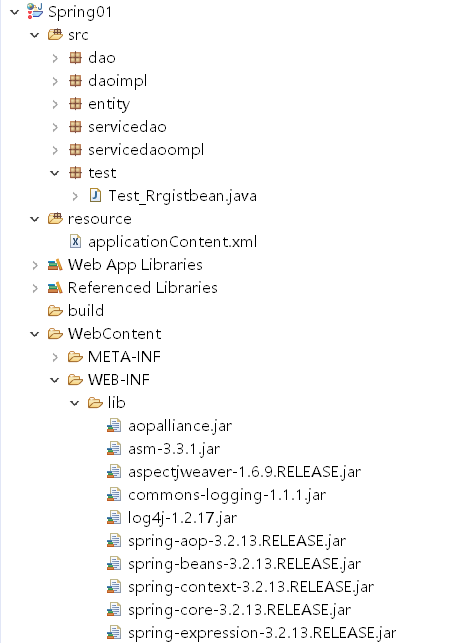
我们使用Web项目来建立一个Spring环境。下图展示的所需要的jar包整个项目的大致建结构,因为我们并不需要servlet只需要测试类即可。
-
建立resource文件夹并在里面建立一个applictionContent.xmll文件。
<?xml version="1.0" encoding="UTF-8"?>
<beans xmlns="http://www.springframework.org/schema/beans"
    xmlns:xsi="http://www.w3.org/2001/XMLSchema-instance"
    xmlns:p="http://www.springframework.org/schema/p"
    xsi:schemaLocation="http://www.springframework.org/schema/beans
        http://www.springframework.org/schema/beans/spring-beans.xsd ">
        <!-- 这里需要引入很多的http,并不完全这里我们只引入了spring-beans --><!-- 头文件最后加空格防止不被识别 -->


</beans>
在这个xml文件里面我们可以注册bean
-
我们建立一个实体类运用Spring来得到这个实体类

点击查看代码
 public class Student {
     private String Name;
     private String Sex;
     private String Phone;
     private int Age;
   }
   //注意这里的实体类需要有空构造方法,set方法等
-
去applictionContent.xmll文件夹下方注册这个bean
<!--构造注入注册一个bean(默认调用空构造创建-要求实体类要有空构造) --> <bean id="student0" class="entity.Student"></bean> -
接下来就是测试了
public class Test_Registbean { public static void main(String[] args) { ApplicationContext beanfactory=new ClassPathXmlApplicationContext("applicationContent.xml"); StudentServiceDao student=(StudentServiceDaoImpl)beanfactory.getBean("student"); System.out.println(student); } } -
发现输出了一个student对象,到这里你已经学会了搭建项目了。

 浙公网安备 33010602011771号