CSS(二)| 选择器
选择器的作用:选中标签
1.基本选择器
- 标签选择器
- id选择器
- class选择器
- *通配符选择器
权重:行内样式 1000 > id选择器 100 > 类选择器10 > 标签选择器 1
1.1 标签选择器
标签选择器可以选中所有的标签元素,比如div,ul,li ,p等等,不管标签藏的多深,都能选中,选中的是所有的,而不是某一个,所以说 "共性" 而不是 "特性"
<!DOCTYPE html>
<html lang="en">
<head>
    <meta charset="UTF-8">
    <title>Document</title>
    <style type="text/css">
        /*标签选择器*/
        span {
            color: red;
        }

        a {
            /*字体大小*/
            font-size: 12px;
            /*字体颜色,参考京东*/
            color: #666;
            /*去除默认样式*/
            text-decoration: none;
            /*光标呈现为指示链接的指针(一只手)*/
            cursor: pointer;
        }

    </style>
</head>
<body>
<div>
    <div>
        <div>
            <span>内容</span>
            <a href="">哈哈</a>
        </div>
        <span>另一个内容</span>
        <a href="">哈哈</a>
    </div>
</div>
</body>
</html>
网页效果如下:

注意:在<style>标签中,注释使用/* */,不能使用<!-- -->,否则标签样式不生效!
1.2 id选择器
id命名规范 字母、数字、下划线,大小写严格区分,aa和AA是两个不一样的属性值
选中id;同一个页面中id不能重复;任何的标签都可以设置id
id选择器 一般不会设置样式,通常与js配合使用
<!DOCTYPE html>
<html lang="en">
<head>
    <meta charset="UTF-8">
    <title>Document</title>
    <style type="text/css">
        /*id选择器*/
       #p1 {
            color: green;
            font-size: 20px;
        }
    </style>
</head>
<body>
<div>
<p id ="p1">段落</p>
</div>
</body>
</html>
网页效果:
1.3 类选择器
所谓类就是class. class与id非常相似 任何的标签都可以加类,但是可以设置相同类名
同一个标签中可以携带多个类,用空格隔开
<!DOCTYPE html>
<html lang="en">
<head>
    <meta charset="UTF-8">
    <title>Document</title>
    <style type="text/css">
        /*类选择器*/
        .w {
            width: 50%;
            height: 50px;
            /*底色*/
            background-color: #2ae0c8;
            /*边框1像素,加粗,红色显示*/
            border: 1px solid red;
            /*div居中显示*/
            margin: 0 auto;
        }
        .t {
           border: 1px solid blue;
        }
    </style>
</head>
<body>
<div class="w t"></div>
<div class="w"></div>
<div class="w">
</body>
</html>
类选择器-高级版
<!DOCTYPE html>
<html lang="en">
<head>
    <meta charset="UTF-8">
    <title>Document</title>
    <style type="text/css">
        /*类选择器*/
        .lv{
            color: green;
        }

        .big{
            font-size: 40px;
        }

        .line{
            text-decoration: underline;
        }

    </style>
</head>
<body><!-- 公共类 共有的属性 --><
div>
    <p class="lv big">段落1</p>
    <p class="lv line">段落2</p>
<p class="line big">段落3</p>

</div>
</body>
</html>
网页效果:
总结:
- 不要去试图用一个类将我们的页面写完。这个标签要携带多个类,共同设置样式
- 每个类要尽可能的小,有公共的概念,能够让更多的标签使用
到底使用id还是用class?
答案:尽可能的用class。除非一些特殊情况可以用id。原因:id一般是用在js的。也就是说 js是通过id来获取到标签
1.4 通配符选择器
通配符选择器最好不要常用,内存消耗太大。
例如,我们现在初学可以使用通配符选择器,清除页面标签中默认的padding和margin
*{
  padding:0;
  margin:0;
}
显示在最左边,maring和padding为0
2. 高级选择器
- 后代选择器
- 子代选择器
- 并集选择器
- 交集选择器
2.1后代选择器
使用空格表示后代选择器。顾名思义,父元素的后代(包括儿子,孙子,重孙子)
<!DOCTYPE html>
<html lang="en">
<head>
    <meta charset="UTF-8">
    <title>Title</title>
    <style type="text/css">
        /*后代选择器*/
        div p {
            color: red;
        }
    </style>
</head>

<body>
    <div>
        <p>内容</p>
    </div>
    <p>另一个内容</p>
</body>
</html>
网页效果:只有上面的变红了

2.2 子代选择器
使用>表示子代选择器。比如div>p,仅仅表示的是当前div元素选中的子代(不包含孙子....)元素p
<!DOCTYPE html>
<html lang="en">
<head>
    <meta charset="UTF-8">
    <title>Title</title>
    <style type="text/css">
        /*后代选择器*/
        .father .a p {
            color: red;
        }

        /*子代选择器*/
        .father>p {
            color: yellow;
        }

    </style>
</head>

<body>
    <div class="father">
        <div class="item">
            <div class="a">
                <p>内容</p>
            </div>
        </div>
        <p>内容</p>
    </div>
    <div class="a">
        <p>另一个内容</p>
    </div>
</body>
</html>
网页效果:红黄黑
2.3 并集选择器
多个选择器之间使用逗号隔开。表示选中的页面中的多个标签。一些共性的元素,可以使用并集选择器
比如像百度首页使用并集选择器。
body,h1,h2,h3,h4,h5,h6,hr,p,blockquote,dl,dt,dd,ul,ol,li,pre,form,fieldset,legend,button,input,textarea,th,td {
      margin: 0;
      padding: 0
   }
<!DOCTYPE html>
<html lang="en">
<head>
    <meta charset="UTF-8">
    <title>Title</title>
    <style type="text/css">
        p,a{
            color: red;
            font-size: 20px;
        }
    </style>
</head>
<body>
    <div class="father">
        <div class="item">
            <div class="a">
                <p>内容</p>
            </div>
        </div>
        <p>内容</p>
    </div>
    <div class="a">
        <p>另一个内容</p>
    </div>
    <a href="#">哈哈</a>
</body>
</html>
网页效果:全部都是红色
2.4 交集选择器
使用.表示交集选择器。第一个标签必须是标签选择器,第二个标签必须是类选择器 或者id选择器
语法:div.active。当两者都出现时,增加额外的属性。
通常是一个标签+属性,是在一个标签里的,主要是为了将各个标签进行区分
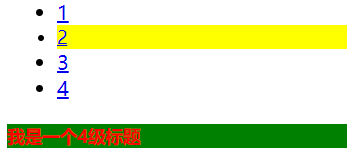
<!DOCTYPE html>
<html lang="en">
<head>
    <meta charset="UTF-8">
    <title>Title</title>
    <style type="text/css">

        h4 {
            background: green;
        }

        .active {

            font-size: 14px;
        }

        h4.active {

            color: red;
        }

        li.active{

            background: yellow;
        }
    </style>
</head>
<body>
    <ul>
        <li><a href="#">1</a></li>
        <li class="active"><a href="#">2</a></li>
        <li><a href="#">3</a></li>
        <li><a href="#">4</a></li>
</ul>

    <h4 class="active">我是一个4级标题</h4>
</body>
</html>
网页效果:
3. 属性选择器
属性选择器,字面意思就是根据标签中的属性,选中当前的标签。
语法:
         /*根据属性查找*/
            /*[for]{
                color: red;
            }*/

            /*找到for属性的等于username的元素 字体颜色设为红色*/
            /*[for='username']{
                color: yellow;
            }*/

            /*以....开头  ^*/
            /*[for^='user']{
                color: #008000;
            }*/

            /*以....结尾   $*/
            /*[for$='vvip']{
                color: red;
            }*/

            /*包含某元素的标签*/
            /*[for*="vip"]{
                color: #00BFFF;
            }*/

            /**/

            /*指定单词的属性*/
            label[for~='user1']{
                color: red;
            }

            input[type='text']{
                background: red;
            }
举例:
<!DOCTYPE html>
<html lang="en">
<head>
    <meta charset="UTF-8">
    <title>Title</title>
    <style type="text/css">
        /*属性选择器*/
        [for]{
            color: red;
        }
        [type]{
            background-color: red;
        }
    </style>
</head>
<body>
    <from action="">
        <label for="username">用户名</label>
        <input type="text">
        <input type="password">
    </from>
</body>
</html>
网页效果:

注意:属性选择器仅限于在表单控件中*****
4. 伪类选择器
伪类选择器一般会用在超链接a标签中,使用a标签的伪类选择器,我们一定要遵循"爱恨准则"
LoVe HAte,所以a标签不具有继承性,不能继承父类的。a标签改颜色一定是作用于a的
/*没有被访问的a标签的样式*/
        .box ul li.item1 a:link{

            color: #666;
        }
        /*访问过后的a标签的样式*/
        .box ul li.item2 a:visited{

            color: yellow;
        }
        /*鼠标悬停时a标签的样式*/
        .box ul li.item3 a:hover{

            color: green;
        }
        /*鼠标摁住的时候a标签的样式*/
        .box ul li.item4 a:active{

            color: yellowgreen;
        }
举例:
<!DOCTYPE html>
<html lang="en">
<head>
    <meta charset="UTF-8">
    <title>Title</title>
    <style type="text/css">
        /*伪类选择器*/
        /*设置a标签默认样式*/
        .box ul li.item a:link{
            color: #666;
        }
        /*a标签点击之后的样式*/
        .box ul li.item a:visited{
            color: yellow;
        }
        /*悬浮样式*/
        .box ul li.item a:hover{
            color: green;
            font-size: 30px;
        }
        /*点击时效果*/
        .box ul li.item a:active{
            color: pink;
            background-color: #fff;
        }
    </style>
</head>
<body>
    <div id="box"></div>
    <div class="box">
        <ul>
            <li class="item">
                <a href="#">超链接</a>
            </li>
        </ul>
    </div>
</body>
</html>
网页效果:

点击之后:

鼠标悬停效果:

鼠标点击效果:

5. 伪元素选择器 *****
/*设置第一个首字母的样式*/
        p:first-letter{
            color: red;
            font-size: 30px;
        }

/* 在....之前 添加内容   这个属性使用不是很频繁 了解  使用此伪元素选择器一定要结合content属性*/
        p:before{
            content:'alex';
        }

/*在....之后 添加内容,使用非常频繁,一定要结合content属性,里面也可以设置其他的属性
通常与咱们后面要讲到布局 有很大的关联(清除浮动)*/
        p:after{
            content:'&';
            color: red;
            font-size: 40px;
        }
举例:
<!DOCTYPE html>
<html lang="en">
<head>
    <meta charset="UTF-8">
    <title>Title</title>
    <style type="text/css">
        /*设置第一个首字母的样式*/
        p:first-letter{
            color: red;
            font-size: 30px;
        }
        /* 在....之前 添加内容 */
        p:before{
            content: 'CCTV';
        }
        /*这个非常重要,解决我们后面浮动产生的问题(布局)*/
        p:after{
            content: ".";
            display: block;
            height: 0;
            visibility: hidden;
            clear: both;
        }
    </style>
</head>
<body>
    <p>董卿</p>
</body>
</html>
网页效果:


 浙公网安备 33010602011771号