CRUD工程师——SpringBoot启动原理

每个SpringBoot程序都有一个主入口,也就是main方法,main里面调用SpringApplication.run()启动整个spring-boot程序,该方法所在类需要使用@SpringBootApplication注解,以及@ImportResource注解(if need),@SpringBootApplication包括三个注解,功能如下:
@EnableAutoConfiguration:SpringBoot根据应用所声明的依赖来对Spring框架进行自动配置
@SpringBootConfiguration(内部为@Configuration):被标注的类等于在spring的XML配置文件中(applicationContext.xml),装配所有bean事务,提供了一个spring的上下文环境
@ComponentScan:组件扫描,可自动发现和装配Bean,默认扫描SpringApplication的run方法里的Booter.class所在的包路径下文件,所以最好将该启动类放到根包路径下。
通过这个注解,就会得到一些我们需要进行配置的东西,简单的例如SQL地址等
//这个方法,静态助手,可以使用默认设置从指定的源运行SpringApplication。
public static ConfigurableApplicationContext run(Class<?> primarySource, String... args) {
        return run(new Class<?>[] { primarySource }, args);
}
2.
//方法,可以使用默认设置和用户提供的参数从指定的源运行SpringApplication的静态帮助器。
//这个是上面运行完进行了一波多态调用,也就是说本来在我们的程序中SpringApplication.run(RenrenApplication.class, args);
//其实是没有primarySources的,经过上面这一方法的调用,其实是有了primarySources这个东西。
public static ConfigurableApplicationContext run(Class<?>[] primarySources, String[] args) {
        return new SpringApplication(primarySources).run(args);
}
primarySources:

public ConfigurableApplicationContext run(String... args) {
    //开启一个新的秒表,并对ConfigurableApplicationContext进行计时
        StopWatch stopWatch = new StopWatch();
        stopWatch.start();
    //设置上下文 ID,设置父应用上下文,添加监听器,刷新容器,关闭
        ConfigurableApplicationContext context = null;
        Collection<SpringBootExceptionReporter> exceptionReporters = new ArrayList<>();
    //设置无头属性,我认为这个的意思就是其实是想设置该应用程序,即使没有检测到显示器,也允许其启动.
        configureHeadlessProperty();
    // SpringApplication和run方法的监听器。
    //SpringApplicationRunListener是通过 SpringFactoriesLoader加载的,
    //   并应声明一个公共构造函数,该构造函数接受SpringApplication实例
    // 和一个String []参数。每次运行都会创建一个新的SpringApplicationRunListener实例。
        SpringApplicationRunListeners listeners = getRunListeners(args);
        listeners.starting();
        //这边必须使用try的原因是因为......
        try {
            ApplicationArguments applicationArguments = new DefaultApplicationArguments(args);
            ConfigurableEnvironment environment = prepareEnvironment(listeners, applicationArguments);
            configureIgnoreBeanInfo(environment);
            Banner printedBanner = printBanner(environment);
            context = createApplicationContext();
            exceptionReporters = getSpringFactoriesInstances(SpringBootExceptionReporter.class,
                    new Class[] { ConfigurableApplicationContext.class }, context);
            prepareContext(context, environment, listeners, applicationArguments, printedBanner);
            refreshContext(context);
            afterRefresh(context, applicationArguments);
            stopWatch.stop();
            if (this.logStartupInfo) {
                new StartupInfoLogger(this.mainApplicationClass).logStarted(getApplicationLog(), stopWatch);
            }
            listeners.started(context);
            callRunners(context, applicationArguments);
        }
        catch (Throwable ex) {
            handleRunFailure(context, ex, exceptionReporters, listeners);
            throw new IllegalStateException(ex);
        }

        try {
            listeners.running(context);
        }
        catch (Throwable ex) {
            handleRunFailure(context, ex, exceptionReporters, null);
            throw new IllegalStateException(ex);
        }
        return context;
    }
1.创建了应用的监听器SpringApplicationRunListeners并开始监听
2.加载SpringBoot配置环境(ConfigurableEnvironment),如果是通过web容器发布,会加载StandardEnvironment,其最终也是继承了ConfigurableEnvironment
3.配置环境(Environment)加入到监听器对象中(SpringApplicationRunListeners)
4.创建run方法的返回对象:ConfigurableApplicationContext(应用配置上下文)
if (System.getProperty(CachedIntrospectionResults.IGNORE_BEANINFO_PROPERTY_NAME) == null) {
            Boolean ignore = environment.getProperty("spring.beaninfo.ignore", Boolean.class, Boolean.TRUE);
            System.setProperty(CachedIntrospectionResults.IGNORE_BEANINFO_PROPERTY_NAME, ignore.toString());
        }
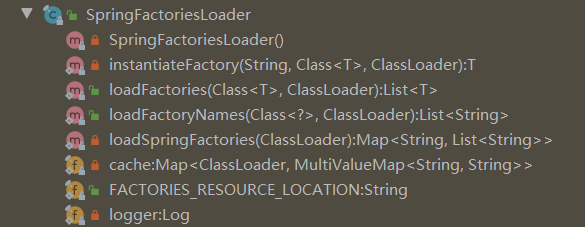
其实可以看得出,run和@这两个部分很多地方都是和别的进行穿插的。特别是和一个SpringFactoriesLoader(Spring工厂加载器)。
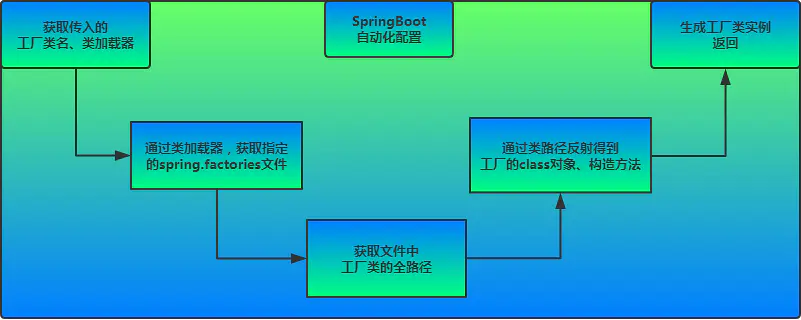
SpringFactoriesLoader中有这些方法。该对象提供了loadFactoryNames方法,入参为factoryClass和classLoader,即需要传入上图中的工厂类名称和对应的类加载器,方法会根据指定的classLoader,加载该类加器搜索路径下的指定文件,即spring.factories文件,传入的工厂类为接口,而文件中对应的类则是接口的实现类,或最终作为实现类,所以文件中一般为如下图这种一对多的类名集合,获取到这些实现类的类名后,loadFactoryNames方法返回类名集合,方法调用方得到这些集合后,再通过反射获取这些类的类对象、构造方法,最终生成实例。
下图有助于我们形象理解自动配置流程

mybatis-spring-boot-starter、spring-boot-starter-web等组件的META-INF文件下均含有spring.factories文件,自动配置模块中,SpringFactoriesLoader收集到文件中的类全名并返回一个类全名的数组,返回的类全名通过反射被实例化,就形成了具体的工厂实例,工厂实例来生成组件具体需要的bean。

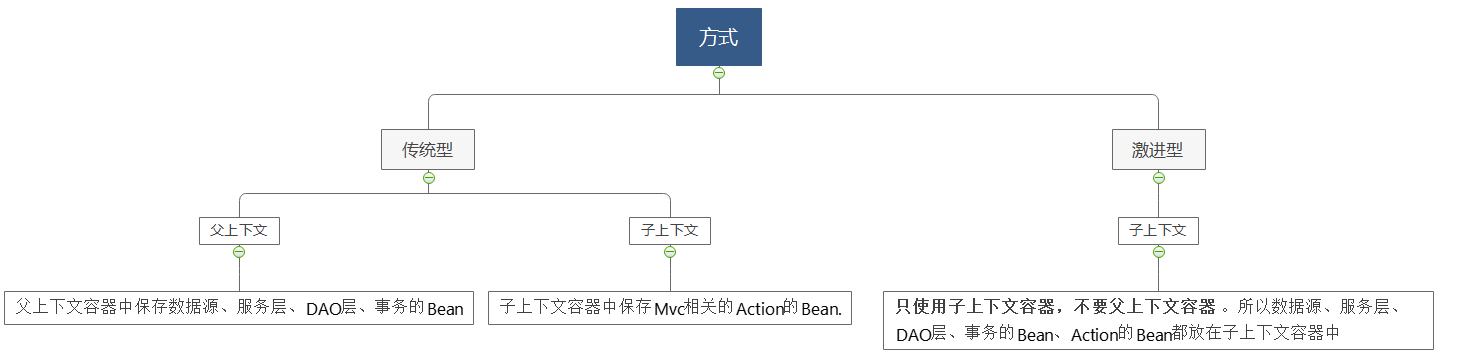
父上下文:使用listener监听器来加载配置文件,如下:
<listener>
  <listener-class>org.springframework.web.context.ContextLoaderListener</listener-class>
</listener>
Spring 会创建一个WebApplicationContext上下文,称为父上下文(父容器),保存在 ServletContext中,key是WebApplicationContext.ROOT_WEB_APPLICATION_CONTEXT_ATTRIBUTE的值。
可以使用Spring提供的工具类取出上下文对象:WebApplicationContextUtils.getWebApplicationContext(ServletContext);子上下文:
使用Spring MVC 来处理拦截相关的请求时,会配置DispatchServlet:
<servlet>
    <servlet-name>dispatcherServlet</servlet-name>
    <servlet-class>org.springframework.web.servlet.DispatcherServlet
    </servlet-class>
    <init-param>
        <param-name>contextConfigLocation</param-name>
        <param-value>/WEB-INF/applicationContext-mvc.xml</param-value>
    </init-param>
    <load-on-startup>1</load-on-startup>
</servlet>

<servlet-mapping>
    <servlet-name>dispatcherServlet</servlet-name>
    <url-pattern>/</url-pattern>
</servlet-mapping>
每个DispatchServlet会有一个自己的上下文,称为子上下文,它也保存在 ServletContext中,key 是"org.springframework.web.servlet.FrameworkServlet.CONTEXT"+Servlet名称。当一 个Request对象产生时,会把这个子上下文对象(WebApplicationContext)保存在Request对象中,key是 DispatcherServlet.class.getName() + ".CONTEXT"。
可以使用工具类取出上下文对象:RequestContextUtils.getWebApplicationContext(request);
父上下文(父容器)和子上下文(子容器)的访问权限:
子上下文可以访问父上下文中的bean,但是父上下文不可以访问子上下文中的bean。

 浙公网安备 33010602011771号