Tiny-Spring项目学习总结
人生不相见,动如参与商.
Spring基本是所有Java学习者绕不开的框架,其对于现代Java的开发具有里程碑式的作用,将java开发者从繁杂的框架和配置中解放出来(至少是部分解放出来)。在github上看到一个微型的spring框架实现项目,觉得很有必要学习一下,谁知道断断续续用了三个月才完全自己实现了一遍,本篇文章对于这个项目的学习做一个总结。
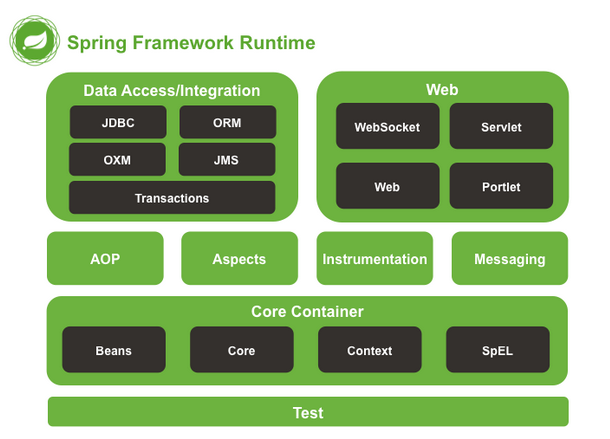
谈到Spring,我们一般会想到它的IOC和AOP特性,也就是上图的Core Containter和AOP以及Aspects部分。Tiny-Spring项目从最简单的IOC容器类开始,实现了Spring的IOC和AOP的基本功能,
先看下最基础的对于bean的定义,以下是最简单的bean定义,只包含了对于bean本身的设置和获取方法:
public class BeanDefinition {
private Object bean;
public BeanDefinition(Object bean){
this.bean = bean;
}
public Object getBean(){
return bean;
}
}
众所周知,Spring使用工厂方法来管理bean,那么我们还需要一个最基础的工厂类:
public class BeanFactory {
Map<String,BeanDefinition> beanDefinitionMap = new ConcurrentHashMap<>();
public Object getBean(String name){ return beanDefinitionMap.get(name).getBean();}
public void registerBeanDefinition(String name,BeanDefinition beanDefinition){
beanDefinitionMap.put(name,beanDefinition);
}
}
这样的话我们就实现了一个最简单的bean管理功能,可以测试一下。
先定义一个pojo类:
public class HelloWorldService {
public void hello(){
System.out.println("Hello World");
}
}
写一个测试方法:
public class BeanFactoryTest {
@Test
public void init(){
//1.初始化BeanFactory
BeanFactory beanFactory = new BeanFactory();
//2.注入Bean
BeanDefinition beanDefinition = new BeanDefinition(new HelloWorldService());
beanFactory.registerBeanDefinition("helloWorldService",beanDefinition);
//3.获取Bean实例
HelloWorldService helloWorldService = (HelloWorldService)beanFactory.getBean("helloWorldService");
helloWorldService.hello();
}
}
可以看到,我们没有直接初始化pojo类的实例,而是将其注册到bean工厂中,当需要调用的时候,再从工厂类中获取并调用。
接下来,我们需要将bean的初始化流程完全放入bean工厂中,因此需要拓展我们的BeanDefinition类:
public class BeanDefinition {
private Object bean;
private Class beanClass;
private String beanClassName;
public Object getBean() {
return bean;
}
public void setBean(Object bean) {
this.bean = bean;
}
public Class getBeanClass() {
return beanClass;
}
public void setBeanClass(Class beanClass) {
this.beanClass = beanClass;
}
public String getBeanClassName() {
return beanClassName;
}
public void setBeanClassName(String beanClassName) {
this.beanClassName = beanClassName;
try{
this.beanClass = Class.forName(beanClassName);
}catch (ClassNotFoundException e){
e.printStackTrace();
}
}
}
定义bean工厂接口,只需要获取和设置bean的方法:
public interface BeanFactory {
Object getBean(String beanName);
void registerBeanDefinition(String beanName, BeanDefinition beanDefinition);
}
定义抽象bean工厂类,实现获取和设置bean的方法,抽象初始化bean的方法:
public abstract class AbstractBeanFactory implements BeanFactory{
private Map<String,BeanDefinition> beanDefinitionMap = new HashMap<>();
@Override
public Object getBean(String beanName) {
return beanDefinitionMap.get(beanName).getBean();
}
@Override
public void registerBeanDefinition(String beanName, BeanDefinition beanDefinition) {
Object bean = doCreateBean(beanDefinition);
beanDefinition.setBean(bean);
beanDefinitionMap.put(beanName,beanDefinition);
}
/**
* 创建Bean实例
* @param beanDefinition
* @return
*/
protected abstract Object doCreateBean(BeanDefinition beanDefinition);
}
最后,具体的bean工厂类,实现初始化bean的方法(此处通过反射初始化bean实例):
public class AutowireCapableBeanFactory extends AbstractBeanFactory{
@Override
protected Object doCreateBean(BeanDefinition beanDefinition) {
try {
Object bean = beanDefinition.getBeanClass().newInstance();
return bean;
}catch (InstantiationException e){
e.printStackTrace();
}catch (IllegalAccessException e){
e.printStackTrace();
}
return null;
}
}
编写对应的单元测试类;
public class BeanFactoryTest {
@Test
public void init(){
BeanFactory beanFactory = new AutowireCapableBeanFactory();
BeanDefinition beanDefinition = new BeanDefinition();
// Spring使用反射来初始化bean实例,因此需要输入全限定名(涉及到动态编译的性能问题,lazy init))
beanDefinition.setBeanClassName("com.simon.HelloWorldService");
//将bean注册到工厂
beanFactory.registerBeanDefinition("helloService",beanDefinition);
HelloWorldService helloWorldService = (HelloWorldService)beanFactory.getBean("helloService");
helloWorldService.sayHello();
}
}
下一步,如果pojo类具有属性,我们的bean工厂在初始化bean实例的时候需要能为其设置对应的属性值。
首先,拓展我们的BeanDefinition类:
public class BeanDefinition {
private Object bean;
private String beanClassName;
private Class beanClass;
private PropertyValues propertyValues;
public BeanDefinition() {
}
public Object getBean() {
return bean;
}
public void setBean(Object bean) {
this.bean = bean;
}
public String getBeanClassName() {
return beanClassName;
}
public void setBeanClassName(String beanClassName) {
this.beanClassName = beanClassName;
try{
this.beanClass = Class.forName(beanClassName);
}catch(ClassNotFoundException e){
e.printStackTrace();
}
}
public Class getBeanClass() {
return beanClass;
}
public void setBeanClass(Class beanClass) {
this.beanClass = beanClass;
}
public PropertyValues getPropertyValues() {
return propertyValues;
}
public void setPropertyValues(PropertyValues propertyValues) {
this.propertyValues = propertyValues;
}
@Override
public String toString() {
return "BeanDefinition{" +
"bean=" + bean +
", beanClassName='" + beanClassName + ''' +
", beanClass=" + beanClass +
", propertyValues=" + propertyValues +
'}';
}
}
这里我们的具体工厂实现类需要修改,在初始化bean的时候将属性值设置进去:
public class AutowireCapableBeanFactory extends AbstractBeanFactory{
@Override
protected Object doCreateBean(BeanDefinition beanDefinition) throws Exception {
Object bean = createBeanInstance(beanDefinition);
applyPropertyValues(bean, beanDefinition);
return bean;
}
protected Object createBeanInstance(BeanDefinition beanDefinition) throws Exception {
return beanDefinition.getBeanClass().newInstance();
}
protected void applyPropertyValues(Object bean,BeanDefinition beanDefinition) throws Exception{
for(PropertyValue pv:beanDefinition.getPropertyValues().getPropertyValueList()){
Field declaredField = bean.getClass().getDeclaredField(pv.getKey());
//使用反射绕过private限制为字段直接赋值
declaredField.setAccessible(true);
declaredField.set(bean,pv.getValue());
}
}
}
对应的单元测试方法:
public class BeanFactoryTest {
@Test
public void test() throws Exception {
// 1.初始化beanfactory
BeanFactory beanFactory = new AutowireCapableBeanFactory();
// 2.bean定义
BeanDefinition beanDefinition = new BeanDefinition();
beanDefinition.setBeanClassName("com.simon.HelloWorldService");
// 3.设置属性
PropertyValues propertyValues = new PropertyValues();
propertyValues.addProperty(new PropertyValue("text", "Hello World!"));
beanDefinition.setPropertyValues(propertyValues);
// 4.生成bean
beanFactory.registerBeanDefinition("helloWorldService", beanDefinition);
// 5.获取bean
HelloWorldService helloWorldService = (HelloWorldService) beanFactory.getBean("helloWorldService");
helloWorldService.helloWorld();
}
}
接下来,我们要实现从配置文件读取bean的定义。
首先,定义配置文件资源定义接口:
public interface Resource {
/**
* 通过输入流获取资源
*
* @return
* @throws IOException
*/
InputStream getInputStream() throws IOException;
}
具体的资源类;
public class URLResource implements Resource{
private final URL url;
public URLResource(URL url) {
this.url = url;
}
@Override
public InputStream getInputStream() throws IOException {
URLConnection urlConnection = url.openConnection();
urlConnection.connect();
return urlConnection.getInputStream();
}
}
实现资源读取类:
public class ResourceLoader {
public Resource getResource(String location){
URL resource = this.getClass().getClassLoader().getResource(location);
return new URLResource(resource);
}
}
接下来我们要实现从资源中读取的BeanDefinition的功能。
首先定义读取BeanDefinition的接口:
public interface BeanDefinitionReader {
void loadBeanDefinitions(String location) throws Exception;
}
抽象的BeanDefinition读取类,含有一个资源读取类和BeanDefinition集合:
public abstract class AbstractBeanDefinitionReader implements BeanDefinitionReader{
private Map<String,BeanDefinition> registry;
private ResourceLoader resourceLoader;
public AbstractBeanDefinitionReader(ResourceLoader resourceLoader) {
this.registry = new HashMap<String, BeanDefinition>();
this.resourceLoader = resourceLoader;
}
public Map<String, BeanDefinition> getRegistry() {
return registry;
}
public ResourceLoader getResourceLoader() {
return resourceLoader;
}
}
具体的BeanDefinition读取类,从xml读取bean定义并解析,通过name-bean映射到map存储bean的信息;
public class XmlBeanDefinitionReader extends AbstractBeanDefinitionReader{
public XmlBeanDefinitionReader(ResourceLoader resourceLoader) {
super(resourceLoader);
}
@Override
public void loadBeanDefinitions(String location) throws Exception {
InputStream inputStream = getResourceLoader().getResource(location).getInputStream();
doLoadBeanDefinitions(inputStream);
}
protected void doLoadBeanDefinitions(InputStream inputStream) throws Exception{
//创建xml解析器
DocumentBuilderFactory factory = DocumentBuilderFactory.newInstance();
DocumentBuilder builder = factory.newDocumentBuilder();
Document doc = builder.parse(inputStream);
registerBeanDefinitions(doc);
inputStream.close();
}
public void registerBeanDefinitions(Document doc){
Element root = doc.getDocumentElement();
parseDeanDefinitions(root);
}
protected void parseDeanDefinitions(Element root){
NodeList nl = root.getChildNodes();
for(int i= 0;i<nl.getLength();i++){
Node node = nl.item(i);
if(node instanceof Element){
Element ele = (Element)node;
processBeanDefinition(ele);
}
}
}
protected void processBeanDefinition(Element ele){
String name = ele.getAttribute("name");
String className = ele.getAttribute("class");
//创建BeanDefinition对象
BeanDefinition beanDefinition = new BeanDefinition();
processProperty(ele,beanDefinition);
beanDefinition.setBeanClassName(className);
getRegistry().put(name,beanDefinition);
}
protected void processProperty(Element ele,BeanDefinition beanDefinition){
NodeList propertyNode = ele.getElementsByTagName("property");
for(int i=0;i<propertyNode.getLength();i++){
Node node = propertyNode.item(i);
if(node instanceof Element){
Element propertyEle = (Element)node;
String name = propertyEle.getAttribute("name");
String value = propertyEle.getAttribute("value");
beanDefinition.getPropertyValues().addPropertyValue(new PropertyValue(name,value));
}
}
}
}
接下来定义一个bean的配置文件studyTiny.xml:
对应的单元测试类:
public class XmlBeanDefinitionReaderTest {
@Test
public void test() throws Exception {
XmlBeanDefinitionReader xmlBeanDefinitionReader = new XmlBeanDefinitionReader(new ResourceLoader());
xmlBeanDefinitionReader.loadBeanDefinitions("studyTiny.xml");
Map<String, BeanDefinition> registry = xmlBeanDefinitionReader.getRegistry();
Assert.assertTrue(registry.size() > 0);
}
}
接下来,引入我们熟悉的ApplicationContext.
定义ApplicationContext接口,继承BeanFactory,具备管理bean的能力:
public interface ApplicationContext extends BeanFactory {
}
定义抽象类,注入工厂管理bean:
public abstract class AbstractApplicationContext implements ApplicationContext{
protected AbstractBeanFactory beanFactory;
public AbstractApplicationContext(AbstractBeanFactory abstractBeanFactory) {
this.beanFactory = abstractBeanFactory;
}
public abstract void refresh() throws Exception;
@Override
public Object getBean(String name) throws Exception {
return beanFactory.getBean(name);
}
}
最后实现基于xml定义bean的容器类:
public class ClassPathXmlApplicationContext extends AbstractApplicationContext{
private String configLocation;
public ClassPathXmlApplicationContext(String configLocation) throws Exception{
this(configLocation,new AutowireCapableBeanFactory());
}
public ClassPathXmlApplicationContext(String configLocation,AbstractBeanFactory abstractBeanFactory) throws Exception{
super(abstractBeanFactory);
this.configLocation = configLocation;
refresh();
}
@Override
public void refresh() throws Exception {
//使用xml的bean读取器获取bean的定义
XmlBeanDefinitionReader xmlBeanDefinitionReader = new XmlBeanDefinitionReader(new ResourceLoader());
xmlBeanDefinitionReader.loadBeanDefinitions(configLocation);
for (Map.Entry<String, BeanDefinition> beanDefinitionEntry : xmlBeanDefinitionReader.getRegistry().entrySet()) {
beanFactory.registerBeanDefinition(beanDefinitionEntry.getKey(), beanDefinitionEntry.getValue());
}
}
}
单元测试类;
public class ApplicationContextTest {
@Test
public void test() throws Exception{
ApplicationContext applicationContext = new ClassPathXmlApplicationContext("studyTiny.xml");
HelloWorldService helloWorldService = (HelloWorldService)applicationContext.getBean("helloWorldService");
helloWorldService.helloWorld();
}
}
接下来我们来实现AOP功能,AOP有Pointcut(切入点), Advice(功能增强)以及织入weave,当然我们还需要将AOP整合到Spring的生命周期中。
首先定义被代理对象:
public class TargetSource {
private Class targetClass;
private Object target;
public TargetSource(Class<?> targetClass, Object target) {
this.targetClass = targetClass;
this.target = target;
}
public Class getTargetClass() {
return targetClass;
}
public Object getTarget() {
return target;
}
}
代理相关的元数据类:
public class AdvisedSupport {
private TargetSource targetSource;
private MethodInterceptor methodInterceptor;
public TargetSource getTargetSource() {
return targetSource;
}
public void setTargetSource(TargetSource targetSource) {
this.targetSource = targetSource;
}
public MethodInterceptor getMethodInterceptor() {
return methodInterceptor;
}
public void setMethodInterceptor(MethodInterceptor methodInterceptor) {
this.methodInterceptor = methodInterceptor;
}
}
切入点对象;
public class ReflectiveMethodInvocation implements MethodInvocation {
/** 被代理类 */
private Object target;
/** 被代理的方法 */
private Method method;
/** 方法入参 */
private Object[] args;
public ReflectiveMethodInvocation(Object target, Method method, Object[] args) {
this.target = target;
this.method = method;
this.args = args;
}
@Override
public Method getMethod() {
return method;
}
@Override
public Object[] getArguments() {
return args;
}
/**
* 调用被代理方法
* @return
* @throws Throwable
*/
@Override
public Object proceed() throws Throwable {
return method.invoke(target,args);
}
@Override
public Object getThis() {
return target;
}
/**
* 获取被调用方法
* @return
*/
@Override
public AccessibleObject getStaticPart() {
return method;
}
}
代理接口:
public interface AopProxy {
Object getProxy();
}
JDK代理类:
public class JdkDynamicAopProxy implements AopProxy, InvocationHandler {
private AdvisedSupport advisedSupport;
public JdkDynamicAopProxy(AdvisedSupport advisedSupport) {
this.advisedSupport = advisedSupport;
}
/**
* 使用jdk的动态代理获取代理对象
* @return
*/
@Override
public Object getProxy() {
return Proxy.newProxyInstance(getClass().getClassLoader(),new Class[]{
advisedSupport.getTargetSource().getTargetClass()
},this);
}
@Override
public Object invoke(Object proxy, Method method, Object[] args) throws Throwable {
MethodInterceptor methodInterceptor = advisedSupport.getMethodInterceptor();
return methodInterceptor.invoke(new ReflectiveMethodInvocation(advisedSupport.getTargetSource().getTarget(),method,args));
}
}
接下来可以测试了,先定义一个拦截器类:
public class TimerInterceptor implements MethodInterceptor {
@Override
public Object invoke(MethodInvocation invocation) throws Throwable {
long time = System.nanoTime();
System.out.println("Invocation of Method "+invocation.getMethod().getName()+" start!");
Object proceed = invocation.proceed();
System.out.println("Invocation of Method "+invocation.getMethod().getName()+" ends! takes "+(System.nanoTime() - time ));
return proceed;
}
}
接下来写单元测试类:
public class JdkDynamicAopProxyTest {
@Test
public void test() throws Exception{
//init context
ApplicationContext applicationContext = new ClassPathXmlApplicationContext("studyTiny.xml");
//helloWorldService without aop
HelloWorldService helloWorldService = (HelloWorldService)applicationContext.getBean("helloWorldService");
helloWorldService.helloWorld();;
//helloWorldService with aop
AdvisedSupport advisedSupport = new AdvisedSupport();
TargetSource targetSource = new TargetSource(HelloWorldService.class,helloWorldService);
advisedSupport.setTargetSource(targetSource);
//set interceptor
TimerInterceptor timerInterceptor = new TimerInterceptor();
advisedSupport.setMethodInterceptor(timerInterceptor);
//set proxy
JdkDynamicAopProxy jdkDynamicAopProxy = new JdkDynamicAopProxy(advisedSupport);
HelloWorldService helloWorldProxy = (HelloWorldService)jdkDynamicAopProxy.getProxy();
helloWorldProxy.helloWorld();
}
}
posted on 2019-06-03 20:17 ShoolyShooly 阅读(205) 评论(0) 收藏 举报

 浙公网安备 33010602011771号